
Owner Manual
Page 5
... country to country). *How to country.) 1 2 3 Speaker Cable Speaker cable labels 5 Supplied Accessories Make sure you have the following accessories: Remote controller & two batteries (AA/R6) Speaker setup microphone Indoor FM antenna (TX-SR706 only) * Power-plug adapter Only supplied in certain countries. Use this adapter if your AC outlet does not match with... the plug on the AV receiver/AV amplifier's power cord (adapter varies from country to mount the AC plug: AM loop antenna (TX-SR706 only) * In catalogs and on packaging, the letter at the end of color.
... country to country). *How to country.) 1 2 3 Speaker Cable Speaker cable labels 5 Supplied Accessories Make sure you have the following accessories: Remote controller & two batteries (AA/R6) Speaker setup microphone Indoor FM antenna (TX-SR706 only) * Power-plug adapter Only supplied in certain countries. Use this adapter if your AC outlet does not match with... the plug on the AV receiver/AV amplifier's power cord (adapter varies from country to mount the AC plug: AM loop antenna (TX-SR706 only) * In catalogs and on packaging, the letter at the end of color.

Owner Manual
Page 7
...the Sleep Timer 56 Using Headphones 56 Listening to the Radio (TX-SR706 only 57 Using the Tuner 57 Presetting AM/FM Stations 58 ...Remote Control Codes 102 Remote Control Codes for Onkyo Components Connected via V 103 Resetting REMOTE MODE Buttons 103 Resetting the Remote Controller 103 Controlling a TV 104 Controlling a DVD Player, or DVD Recorder ..... 105 Controlling a VCR or PVR 106 Controlling a Satellite Receiver or Cable Receiver 107 Controlling a CD Player, CD Recorder, or MD Player 108 Controlling an RI Dock 109 Controlling a Cassette Recorder 110 Controlling a Tuner (TX...
...the Sleep Timer 56 Using Headphones 56 Listening to the Radio (TX-SR706 only 57 Using the Tuner 57 Presetting AM/FM Stations 58 ...Remote Control Codes 102 Remote Control Codes for Onkyo Components Connected via V 103 Resetting REMOTE MODE Buttons 103 Resetting the Remote Controller 103 Controlling a TV 104 Controlling a DVD Player, or DVD Recorder ..... 105 Controlling a VCR or PVR 106 Controlling a Satellite Receiver or Cable Receiver 107 Controlling a CD Player, CD Recorder, or MD Player 108 Controlling an RI Dock 109 Controlling a Cassette Recorder 110 Controlling a Tuner (TX...

Owner Manual
Page 9
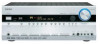
.../AV amplifier is in parentheses show where you can be displayed as arrow buttons and are used to select radio presets (see page 58) (TX-SR706 only). G Display See "Display" on page 59. X TUNING MODE or LATE NIGHT button (57, 83) This button is used to ...input selection setup. On the TX-SA706, this button again selects the previous listening mode. C STANDBY indicator (40) This indicator lights up when Zone 2 is used to -∞ dB, -81.5 dB through +18.0 dB (relative display). F Remote control sensor (14) This sensor receives control signals from the following input ...
.../AV amplifier is in parentheses show where you can be displayed as arrow buttons and are used to select radio presets (see page 58) (TX-SR706 only). G Display See "Display" on page 59. X TUNING MODE or LATE NIGHT button (57, 83) This button is used to ...input selection setup. On the TX-SA706, this button again selects the previous listening mode. C STANDBY indicator (40) This indicator lights up when Zone 2 is used to -∞ dB, -81.5 dB through +18.0 dB (relative display). F Remote control sensor (14) This sensor receives control signals from the following input ...

Owner Manual
Page 12
... IN 1-4 and OUT HDMI (High Definition Multimedia Interface) connections carry digital audio and digital video. I FM ANTENNA (TX-SR706 only) This jack is for connecting components with coaxial digital audio outputs, such as a DVD player, DVD recorder, or... S CD IN This analog audio input is for connecting an FM antenna. Front & Rear Panels-Continued B V REMOTE CONTROL This V (Remote Interactive) jack can be connected to a suitable wall outlet. The other AV component, even if they are connected ... suit your setup. See "Digital Input Setup" on another Onkyo AV component.
... IN 1-4 and OUT HDMI (High Definition Multimedia Interface) connections carry digital audio and digital video. I FM ANTENNA (TX-SR706 only) This jack is for connecting components with coaxial digital audio outputs, such as a DVD player, DVD recorder, or... S CD IN This analog audio input is for connecting an FM antenna. Front & Rear Panels-Continued B V REMOTE CONTROL This V (Remote Interactive) jack can be connected to a suitable wall outlet. The other AV component, even if they are connected ... suit your setup. See "Digital Input Setup" on another Onkyo AV component.

Owner Manual
Page 15
... RETURN button Returns to select the listening modes. C REMOTE MODE/INPUT SELECTOR buttons (54, 104-110) Selects the remote controller modes and the input sources. H LISTENING MODE buttons ... ■ Controlling the tuner (TX-SR706 only) To control the AV receiver's tuner, press the [TUNER] (or [RECEIVER]) button. Remote Controller-Continued Controlling the AV Receiver/AV Amplifier To control the AV...54) Adjusts the volume of the AV receiver/AV amplifier regardless of the currently selected remote controller mode. D MULTI CH button (55) Selects the multichannel DVD input. J DISPLAY ...
... RETURN button Returns to select the listening modes. C REMOTE MODE/INPUT SELECTOR buttons (54, 104-110) Selects the remote controller modes and the input sources. H LISTENING MODE buttons ... ■ Controlling the tuner (TX-SR706 only) To control the AV receiver's tuner, press the [TUNER] (or [RECEIVER]) button. Remote Controller-Continued Controlling the AV Receiver/AV Amplifier To control the AV...54) Adjusts the volume of the AV receiver/AV amplifier regardless of the currently selected remote controller mode. D MULTI CH button (55) Selects the multichannel DVD input. J DISPLAY ...

Owner Manual
Page 57
... so that the AUTO indicator disappears from a stereo FM station is found. 2 When tuned into AM and FM stations directly by entering the appropriate frequency. 1 Remote controller Press the [TUNER] button repeatedly to select AM or FM, followed by Frequency You can store your favorite stations as shown. (Actual display depends on... input source changes between AM and FM. When tuned into Radio Stations ■ Auto Tuning Mode 1 Press the [TUNING MODE] but - Listening to the Radio (TX-SR706 only) Using the Tuner With the built-in mono.
... so that the AUTO indicator disappears from a stereo FM station is found. 2 When tuned into AM and FM stations directly by entering the appropriate frequency. 1 Remote controller Press the [TUNER] button repeatedly to select AM or FM, followed by Frequency You can store your favorite stations as shown. (Actual display depends on... input source changes between AM and FM. When tuned into Radio Stations ■ Auto Tuning Mode 1 Press the [TUNING MODE] but - Listening to the Radio (TX-SR706 only) Using the Tuner With the built-in mono.

Owner Manual
Page 58
...want to delete. The preset number flashes. 3 While the preset number is stored and the preset number stops flashing. Remote controller You can also use the remote controller's number buttons to select a preset directly. 4 Press the [MEMORY] button again to select a preset from the... Radio (TX-SR706 only)-Continued Presetting AM/FM Stations Selecting Presets 2,4 3 PRESET You can store a combination of up to 40 of your favorite AM/FM radio stations as a preset. 2 Press the [MEMORY] button. ing (about 8 seconds), use the PRESET [F]/[S] buttons, or the remote controller's CH ...
...want to delete. The preset number flashes. 3 While the preset number is stored and the preset number stops flashing. Remote controller You can also use the remote controller's number buttons to select a preset directly. 4 Press the [MEMORY] button again to select a preset from the... Radio (TX-SR706 only)-Continued Presetting AM/FM Stations Selecting Presets 2,4 3 PRESET You can store a combination of up to 40 of your favorite AM/FM radio stations as a preset. 2 Press the [MEMORY] button. ing (about 8 seconds), use the PRESET [F]/[S] buttons, or the remote controller's CH ...

Owner Manual
Page 72
...94 7. Hardware Setup 1. Speaker Configuration 3. Speaker Distance 4. Source Setup DVD 1. IntelliVolume 2. GAME/TV 5. CD 9. Input Assign 2. Remote Control 2. Zone2 3. Digital Audio Input pages 73-79 2. Speaker Setup 1. Equalizer Settings 6. Multiplex / Mono 2. DSD 6. TUNER 8. Settings ... 95 8. Component Video Input 3. Speaker Settings 2. PHONO 72 Miscellaneous 1. Volume Setup 2. Lock Setup Lock page 98 page 47 (TX-SR706 only) Unlocked page 42-44 1. Audio Adjust 1. Theater-Dimentional 5. VCR/DVR 3. Hardware Setup 8. A/V Sync 3. Name Edit...
...94 7. Hardware Setup 1. Speaker Configuration 3. Speaker Distance 4. Source Setup DVD 1. IntelliVolume 2. GAME/TV 5. CD 9. Input Assign 2. Remote Control 2. Zone2 3. Digital Audio Input pages 73-79 2. Speaker Setup 1. Equalizer Settings 6. Multiplex / Mono 2. DSD 6. TUNER 8. Settings ... 95 8. Component Video Input 3. Speaker Settings 2. PHONO 72 Miscellaneous 1. Volume Setup 2. Lock Setup Lock page 98 page 47 (TX-SR706 only) Unlocked page 42-44 1. Audio Adjust 1. Theater-Dimentional 5. VCR/DVR 3. Hardware Setup 8. A/V Sync 3. Name Edit...

Owner Manual
Page 85
... input selector only "Analog" will be resumed once the AV receiver/AV amplifier has been set the default listening mode to Standby. 1 Remote controller Press the [RECEIVER] button followed by the [SETUP] button. DVD 2. AUX 6. The Last Valid option means that will be used ...ENTER]. The "Listening Mode Preset" menu appears. 5. Listening Mode Preset 1. VCR/DVR 3. CBL/SAT 4. CD 9. Mono Last Valid On the TX-SR706, for DSD multichannel sources, such as DVD-Audio. Dolby Digital: With this setting, you can specify the listening mode to be used when a ...
... input selector only "Analog" will be resumed once the AV receiver/AV amplifier has been set the default listening mode to Standby. 1 Remote controller Press the [RECEIVER] button followed by the [SETUP] button. DVD 2. AUX 6. The Last Valid option means that will be used ...ENTER]. The "Listening Mode Preset" menu appears. 5. Listening Mode Preset 1. VCR/DVR 3. CBL/SAT 4. CD 9. Mono Last Valid On the TX-SR706, for DSD multichannel sources, such as DVD-Audio. Dolby Digital: With this setting, you can specify the listening mode to be used when a ...

Owner Manual
Page 91
...receiver/AV amplifier's remote ID, be sure to change the remote controller to change its [SETUP] button, arrow buttons, and [ENTER] button. See the separate Satellite Radio Guide for that item appears. The [RECEIVER] button flashes twice. Tuner (TX-SR706 only) ■... (about 3 seconds). tons to select an item, and then ID 1, 2, or 3. Remote Control 2. HDMI Note: This procedure can change it with the remote controller. Remote Control ■ Remote ID When several Onkyo components are explained below ), otherwise, you can also be able to obtain a SIRIUS ID...
...receiver/AV amplifier's remote ID, be sure to change the remote controller to change its [SETUP] button, arrow buttons, and [ENTER] button. See the separate Satellite Radio Guide for that item appears. The [RECEIVER] button flashes twice. Tuner (TX-SR706 only) ■... (about 3 seconds). tons to select an item, and then ID 1, 2, or 3. Remote Control 2. HDMI Note: This procedure can change it with the remote controller. Remote Control ■ Remote ID When several Onkyo components are explained below ), otherwise, you can also be able to obtain a SIRIUS ID...

Owner Manual
Page 99
...up , and the 12V TRIGGER OUT ZONE 2 goes high (+12 V). To select AM or FM press the [TUNER] input selector button repeatedly (TX-SR706 only). To select the same source as Dolby Digital EX, DTS-ES, and THX Select2 Cinema, are unavailable. 99 Note: You cannot select different... for Zone 2, and how to turn on Zone 2 and select an input source, press the [ZONE 2] button repeatedly. Controlling Zone 2 from the AV receiver/AV amplifier Controlling Zone 2 with the Remote Controller ON/ STANDBY INPUT SELECTOR ZONE2 12 1 1 To turn Zone 2 on and off Zone 2, press the [ZONE 2] button...
...up , and the 12V TRIGGER OUT ZONE 2 goes high (+12 V). To select AM or FM press the [TUNER] input selector button repeatedly (TX-SR706 only). To select the same source as Dolby Digital EX, DTS-ES, and THX Select2 Cinema, are unavailable. 99 Note: You cannot select different... for Zone 2, and how to turn on Zone 2 and select an input source, press the [ZONE 2] button repeatedly. Controlling Zone 2 from the AV receiver/AV amplifier Controlling Zone 2 with the Remote Controller ON/ STANDBY INPUT SELECTOR ZONE2 12 1 1 To turn Zone 2 on and off Zone 2, press the [ZONE 2] button...

Owner Manual
Page 116
... Dock to the TAPE IN/OUT jacks, or an RI Dock to the GAME/TV IN jacks, for the remote controller to work as expected. • Make sure you cannot operate it 's an Onkyo component, make sure that the V cable and analog audio cable are not supported (page 34). • When the "Output... is output to a device connected to MD, CDR, or DOCK (page 48). If you 've entered the correct remote control code. • Make sure to set the display to the HDMI OUT. 116 Tuner (TX-SR706 only) Reception is noisy, FM stereo reception is noisy, or the FM STEREO indicator doesn't appear • Relocate...
... Dock to the TAPE IN/OUT jacks, or an RI Dock to the GAME/TV IN jacks, for the remote controller to work as expected. • Make sure you cannot operate it 's an Onkyo component, make sure that the V cable and analog audio cable are not supported (page 34). • When the "Output... is output to a device connected to MD, CDR, or DOCK (page 48). If you 've entered the correct remote control code. • Make sure to set the display to the HDMI OUT. 116 Tuner (TX-SR706 only) Reception is noisy, FM stereo reception is noisy, or the FM STEREO indicator doesn't appear • Relocate...


