
User's Manual
Page 1
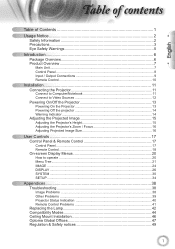
... Precautions...3 Eye Safety Warnings 5 Introduction 6 Package Overview 6 Product Overview 7 Main Unit...7 Control Panel ...8 Input / Output Connections 9 Remote Control...10 Installation 11 Connecting the Projector 11 Connect to Computer/Notebook 11 Connect to Video Sources 12 Powering On/Off the Projector 13 ...34 Appendices 38 Troubleshooting 38 Image Problems 38 Other Problems 39 Projector Status Indication 40 Remote Control Problems 41 Replacing the Lamp 42 Compatibility Modes 44 Ceiling Mount Installation 46 Optoma Global Offices 47 Regulation & Safety notices 49 1
... Precautions...3 Eye Safety Warnings 5 Introduction 6 Package Overview 6 Product Overview 7 Main Unit...7 Control Panel ...8 Input / Output Connections 9 Remote Control...10 Installation 11 Connecting the Projector 11 Connect to Computer/Notebook 11 Connect to Video Sources 12 Powering On/Off the Projector 13 ...34 Appendices 38 Troubleshooting 38 Image Problems 38 Other Problems 39 Projector Status Indication 40 Remote Control Problems 41 Replacing the Lamp 42 Compatibility Modes 44 Ceiling Mount Installation 46 Optoma Global Offices 47 Regulation & Safety notices 49 1

User's Manual
Page 6
POWER SOURCE Noottee Due to ensure all parts listed below are in each country, some regions may have different accessories. 6 Projector with lens cap Power Cord 1.8m Lamp 2 × AAA Batteries IR Remote Control Documentation : User's Manual Warranty Card Quick Start Card WEEE Card (for EMEA only) If something is missing, please contact your nearest customer service center. ntroduction Package Overview Unpack and inspect the box contents to different applications in the box.
POWER SOURCE Noottee Due to ensure all parts listed below are in each country, some regions may have different accessories. 6 Projector with lens cap Power Cord 1.8m Lamp 2 × AAA Batteries IR Remote Control Documentation : User's Manual Warranty Card Quick Start Card WEEE Card (for EMEA only) If something is missing, please contact your nearest customer service center. ntroduction Package Overview Unpack and inspect the box contents to different applications in the box.

User's Manual
Page 10
Power Off Lamp 2 3. 16:9 4. Overscan 19 4 7. YPbPr Source 16 7 13. Lamp Mode 12 10 22. HDMI 1 Source 14. Mode 23. Contrast 6. Enter 8. Re-Sync 18 5 9. Source 16. Source Lock 23 17. Native 20 3 5. Menu 15 8 15. EdgeMask 14 18. LBX 13 9 20. 4:3 21. Four Directional Select Keys 11 10 ntroduction Remote Control 1 21 22 1. Power On 2. D-Sub Source 10. Video Source 17 6 11. HDMI 2 Source 12. Brightness 19.
Power Off Lamp 2 3. 16:9 4. Overscan 19 4 7. YPbPr Source 16 7 13. Lamp Mode 12 10 22. HDMI 1 Source 14. Mode 23. Contrast 6. Enter 8. Re-Sync 18 5 9. Source 16. Source Lock 23 17. Native 20 3 5. Menu 15 8 15. EdgeMask 14 18. LBX 13 9 20. 4:3 21. Four Directional Select Keys 11 10 ntroduction Remote Control 1 21 22 1. Power On 2. D-Sub Source 10. Video Source 17 6 11. HDMI 2 Source 12. Brightness 19.

User's Manual
Page 13
... Green. The startup screen will display in approximately 10 seconds. SOURCE 2 Power POWER POWER SOURCE Noottee Turn on the remote. Securely connect the power cord and signal cable. If not, push menu button and go to switch between inputs. Make sure that you..., notebook, video player, etc). Remove the lens cap. 2. The ON/STANDBY LED will detect the source automatically. Turn on the remote control to "SETUP". English nstallation Powering On/Off the Projector Powering On the Projector 1. Turn on the lamp by pressing " " button either on...
... Green. The startup screen will display in approximately 10 seconds. SOURCE 2 Power POWER POWER SOURCE Noottee Turn on the remote. Securely connect the power cord and signal cable. If not, push menu button and go to switch between inputs. Make sure that you..., notebook, video player, etc). Remove the lens cap. 2. The ON/STANDBY LED will detect the source automatically. Turn on the remote control to "SETUP". English nstallation Powering On/Off the Projector Powering On the Projector 1. Turn on the lamp by pressing " " button either on...
User's Manual
Page 14
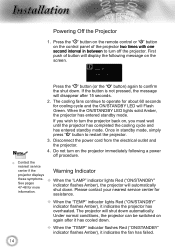
... button is not pressed, the message will shut down . Disconnect the power cord from the electrical outlet and the projector. 4. Press the " " button on the remote control or " " button on , you wish to restart the projector. 3. First push of the projector two times with one second interval in standby mode, simply...
... button is not pressed, the message will shut down . Disconnect the power cord from the electrical outlet and the projector. 4. Press the " " button on the remote control or " " button on , you wish to restart the projector. 3. First push of the projector two times with one second interval in standby mode, simply...

User's Manual
Page 17
... Power Refer to select an input signal. Indicate the projector's lamp status. Menu Press "Menu" to control the functions: Control Panel and Remote Control. ser ontrols Control Panel & Remote Control There are two ways for you to launch the on pages 13-14. RE-SYNC Automatically synchronize the projector to your item...
... Power Refer to select an input signal. Indicate the projector's lamp status. Menu Press "Menu" to control the functions: Control Panel and Remote Control. ser ontrols Control Panel & Remote Control There are two ways for you to launch the on pages 13-14. RE-SYNC Automatically synchronize the projector to your item...
User's Manual
Page 18
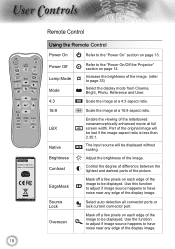
... the degree of difference between the lightest and darkest parts of the image. Mask off a few pixels on page 14. ser ontrols Lamp 18 Remote Control Using the Remote Control Power On Refer to page 33) Select the display mode from Cinema, Bright, Photo, Reference and User. Power Off Lamp Mode Mode...
... the degree of difference between the lightest and darkest parts of the image. Mask off a few pixels on page 14. ser ontrols Lamp 18 Remote Control Using the Remote Control Power On Refer to page 33) Select the display mode from Cinema, Bright, Photo, Reference and User. Power Off Lamp Mode Mode...
User's Manual
Page 19
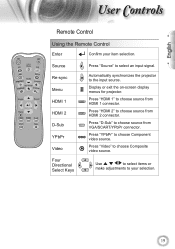
... input source. Press "HDMI 2" to choose source from HDMI 2 connector. Press "D-Sub" to choose source from VGA/SCART/YPbPr connector. English ser ontrols Remote Control Using the Remote Control Enter Confirm your selection. 19 Display or exit the on-screen display menus for projector. Four Directional Select Keys Use to...
... input source. Press "HDMI 2" to choose source from HDMI 2 connector. Press "D-Sub" to choose source from VGA/SCART/YPbPr connector. English ser ontrols Remote Control Using the Remote Control Enter Confirm your selection. 19 Display or exit the on-screen display menus for projector. Four Directional Select Keys Use to...
User's Manual
Page 20
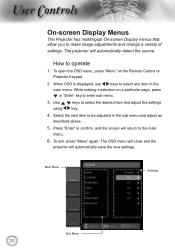
To open the OSD menu, press "Menu" on a particular page, press or "Enter" key to enter sub menu. 3. While making a selection on the Remote Control or Projector Keypad. 2 When OSD is displayed, use keys to be adjusted in the main menu. Use using keys to operate 1. Select the next ...
To open the OSD menu, press "Menu" on a particular page, press or "Enter" key to enter sub menu. 3. While making a selection on the Remote Control or Projector Keypad. 2 When OSD is displayed, use keys to be adjusted in the main menu. Use using keys to operate 1. Select the next ...
User's Manual
Page 39
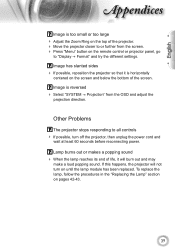
... the Zoom Ring on the top of life, it is reversed Select "SYSTEM Projection" from the screen. Press "Menu" button on the remote control or projector panel, go to all controls If possible, turn on until the lamp module has been replaced. Other Problems The projector stops...
... the Zoom Ring on the top of life, it is reversed Select "SYSTEM Projection" from the screen. Press "Menu" button on the remote control or projector panel, go to all controls If possible, turn on until the lamp module has been replaced. Other Problems The projector stops...
User's Manual
Page 41
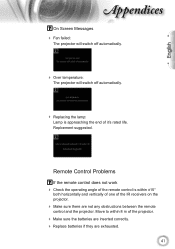
... one of the IR receivers on the projector. Make sure there are exhausted. 41 Replcement suggested. Remote Control Problems If the remote control does not work Check the operating angle of the remote control is approaching the end of it's rated life. English ppendices On Screen Messages Fan failed: The...: Lamp is within 8 m of the projector. Make sure the batteries are inserted correctly. Replace batteries if they are not any obstructions between the remote control and the projector.
... one of the IR receivers on the projector. Make sure there are exhausted. 41 Replcement suggested. Remote Control Problems If the remote control does not work Check the operating angle of the remote control is approaching the end of it's rated life. English ppendices On Screen Messages Fan failed: The...: Lamp is within 8 m of the projector. Make sure the batteries are inserted correctly. Replace batteries if they are not any obstructions between the remote control and the projector.

Datasheet
Page 1
... and portable-friendly 6.4 lbs weight, the Optoma HD200X is perfect for connecting to any home entertainment device with the HD200X! HD200X - Kick your entertainment up a notch with HDMI, component, composite video and VGA Backlit IR remote control Features Texas Instruments 1080p DLP...26.8mm, 1.2x Manual Zoom and Focus User Controls Complete On-Screen Menu Adjustments in home theater/multi-media experience. The Optoma HD200X breaks new ground in 21 Languages I/O Connectors Two HDMI, VGA-In, Component Video, Composite Video and +12V Trigger Security Kensington...
... and portable-friendly 6.4 lbs weight, the Optoma HD200X is perfect for connecting to any home entertainment device with the HD200X! HD200X - Kick your entertainment up a notch with HDMI, component, composite video and VGA Backlit IR remote control Features Texas Instruments 1080p DLP...26.8mm, 1.2x Manual Zoom and Focus User Controls Complete On-Screen Menu Adjustments in home theater/multi-media experience. The Optoma HD200X breaks new ground in 21 Languages I/O Connectors Two HDMI, VGA-In, Component Video, Composite Video and +12V Trigger Security Kensington...

Brochure
Page 1
... Multi-Directional Selector Re-Sync D-sub Video Power +12V Trigger Kensington Lock The Optoma HD200X brings a new level of flexibility to your favorite game console. With true 1080p resolution, the HD200X delivers excellent color saturation and subtle details for taking your video gaming to the ...next level by connecting the HD200X to any home entertainment device with HDMI, component, composite video and VGA Backlit IR remote control Features Texas Instruments 1080p DLP® chipset and BrilliantColor™ technology www.OptomaUSA...
... Multi-Directional Selector Re-Sync D-sub Video Power +12V Trigger Kensington Lock The Optoma HD200X brings a new level of flexibility to your favorite game console. With true 1080p resolution, the HD200X delivers excellent color saturation and subtle details for taking your video gaming to the ...next level by connecting the HD200X to any home entertainment device with HDMI, component, composite video and VGA Backlit IR remote control Features Texas Instruments 1080p DLP® chipset and BrilliantColor™ technology www.OptomaUSA...
Brochure
Page 2
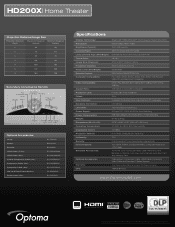
HD200X| Home Theater Projection Distance/Image Size Projection Distance (Feet) Maximum Diagonal (Inches) Minimum Diagonal (Inches) 6 55 46 8 73 61 10 92 76 12 110 92 14 129 107 16 147 122 18 165 138 Secondary Convenience Remote Four Directional Keys Source....6" to 301.1" (0.95 to 7.64 m) Projection Distance: 4.92' to 32.8' (1.5 to 10 m) Noise Level (STD/Bright): 32dB/34dB Remote Control: Fully Featured Backlit IR Remote Computer Compatibility: HD, UXGA, WXGA, SXGA+, SXGA, XGA, SVGA, VGA Resized, VESA, PC and Macintosh Compatible Video Compatibility: NTSC, PAL...
HD200X| Home Theater Projection Distance/Image Size Projection Distance (Feet) Maximum Diagonal (Inches) Minimum Diagonal (Inches) 6 55 46 8 73 61 10 92 76 12 110 92 14 129 107 16 147 122 18 165 138 Secondary Convenience Remote Four Directional Keys Source....6" to 301.1" (0.95 to 7.64 m) Projection Distance: 4.92' to 32.8' (1.5 to 10 m) Noise Level (STD/Bright): 32dB/34dB Remote Control: Fully Featured Backlit IR Remote Computer Compatibility: HD, UXGA, WXGA, SXGA+, SXGA, XGA, SVGA, VGA Resized, VESA, PC and Macintosh Compatible Video Compatibility: NTSC, PAL...


