
User's Manual
Page 1
...14 Warning Indicator 14 Adjusting the Projected Image 15 Adjusting the Projector's Height 15 Adjusting the Projector's Zoom / Focus 16 Adjusting Projected Image Size 16 User Controls 17 Control Panel & Remote Control 17 Control Panel ...17 Remote Control...18 On-screen Display Menus 20 How to operate ...20 Menu Tree...21 IMAGE ...24 DISPLAY ...26 SYSTEM ...30 SETUP ...34 Appendices 38 Troubleshooting 38 Image Problems 38 Other Problems 39 Projector Status Indication 40 Remote Control Problems 41 Replacing the Lamp 42 Compatibility Modes 44 Ceiling Mount Installation 46 Optoma...
...14 Warning Indicator 14 Adjusting the Projected Image 15 Adjusting the Projector's Height 15 Adjusting the Projector's Zoom / Focus 16 Adjusting Projected Image Size 16 User Controls 17 Control Panel & Remote Control 17 Control Panel ...17 Remote Control...18 On-screen Display Menus 20 How to operate ...20 Menu Tree...21 IMAGE ...24 DISPLAY ...26 SYSTEM ...30 SETUP ...34 Appendices 38 Troubleshooting 38 Image Problems 38 Other Problems 39 Projector Status Indication 40 Remote Control Problems 41 Replacing the Lamp 42 Compatibility Modes 44 Ceiling Mount Installation 46 Optoma...
User's Manual
Page 2
.... Only use the projector near heat sources such as radiators, heaters, stoves or any ventilation openings. Do not attempt to rain or moisture. 3. Do not block any other hazards. To reduce the risk of important operating and maintenance (servicing) instructions in fire or electric shock. 8. The unit should only be repaired by the manufacturer. 6. DO NOT OPEN THE...
.... Only use the projector near heat sources such as radiators, heaters, stoves or any ventilation openings. Do not attempt to rain or moisture. 3. Do not block any other hazards. To reduce the risk of important operating and maintenance (servicing) instructions in fire or electric shock. 8. The unit should only be repaired by the manufacturer. 6. DO NOT OPEN THE...

User's Manual
Page 3
... not use lens cap when projector is approaching the end of fire or electric shock, do not open or disassemble the projector as this user's guide. ▀■ Warning- Allow 90 seconds for the projector to change the lamp when it shows warning messages. Please contact your eyes. ▀■ Warning- Reset the "Lamp Reset" function from the on pages 42-43. ▀■ Warning- When switching the projector...
... not use lens cap when projector is approaching the end of fire or electric shock, do not open or disassemble the projector as this user's guide. ▀■ Warning- Allow 90 seconds for the projector to change the lamp when it shows warning messages. Please contact your eyes. ▀■ Warning- Reset the "Lamp Reset" function from the on pages 42-43. ▀■ Warning- When switching the projector...
User's Manual
Page 13
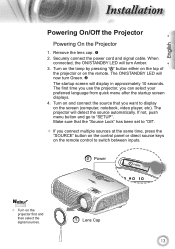
... the remote control to switch between inputs. If not, push menu button and go to "Off". If you can select your preferred language from quick menu after the startup screen displays. 4. Make sure that you want to display on and connect the source that the "Source Lock" has been set to "SETUP". Turn on the screen (computer, notebook, video player, etc). The ON/STANDBY LED will now turn Amber. 3. Remove the lens cap...
... the remote control to switch between inputs. If not, push menu button and go to "Off". If you can select your preferred language from quick menu after the startup screen displays. 4. Make sure that you want to display on and connect the source that the "Source Lock" has been set to "SETUP". Turn on the screen (computer, notebook, video player, etc). The ON/STANDBY LED will now turn Amber. 3. Remove the lens cap...
User's Manual
Page 14
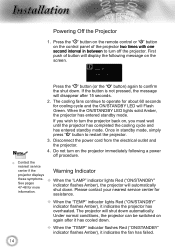
If the button is not pressed, the message will shut down . When the "TEMP" indicator flashes Red ("ON/STANDBY" indicator flashes Amber), it indicates the projector has overheated. Disconnect the power cord from the electrical outlet and the projector. 4. The projector will disappear after it has cooled down automatically. Once in between to turn off procedure. Contact the nearest service center if the projector displays Warning Indicator these...
If the button is not pressed, the message will shut down . When the "TEMP" indicator flashes Red ("ON/STANDBY" indicator flashes Amber), it indicates the projector has overheated. Disconnect the power cord from the electrical outlet and the projector. 4. The projector will disappear after it has cooled down automatically. Once in between to turn off procedure. Contact the nearest service center if the projector displays Warning Indicator these...
User's Manual
Page 17
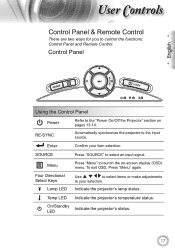
... projector's lamp status. Enter Confirm your selection. Four Directional Select Keys Lamp LED Use to select items or make adjustments to the input source. RE-SYNC Automatically synchronize the projector to your item selection. Control Panel English SOURCE POWER Using the Control Panel Power Refer to control the functions: Control Panel and Remote Control. ser ontrols Control Panel & Remote Control There are two ways for you to the "Power On/Off the Projector" section on -screen display (OSD) menu. On/Standby LED Indicate the projector's status...
... projector's lamp status. Enter Confirm your selection. Four Directional Select Keys Lamp LED Use to select items or make adjustments to the input source. RE-SYNC Automatically synchronize the projector to your item selection. Control Panel English SOURCE POWER Using the Control Panel Power Refer to control the functions: Control Panel and Remote Control. ser ontrols Control Panel & Remote Control There are two ways for you to the "Power On/Off the Projector" section on -screen display (OSD) menu. On/Standby LED Indicate the projector's status...
User's Manual
Page 18
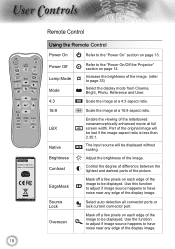
... ratio. ser ontrols Lamp 18 Remote Control Using the Remote Control Power On Refer to be displayed. Increase the brightness of the image to the "Power On" section on page 14. Power Off Lamp Mode Mode 4:3 Refer to page 33) Select the display mode from Cinema, Bright, Photo, Reference and User. Source Lock Overscan Select auto detection all connector ports or lock current connector port. Use the function to adjust if image source happens to have noise...
... ratio. ser ontrols Lamp 18 Remote Control Using the Remote Control Power On Refer to be displayed. Increase the brightness of the image to the "Power On" section on page 14. Power Off Lamp Mode Mode 4:3 Refer to page 33) Select the display mode from Cinema, Bright, Photo, Reference and User. Source Lock Overscan Select auto detection all connector ports or lock current connector port. Use the function to adjust if image source happens to have noise...
User's Manual
Page 28
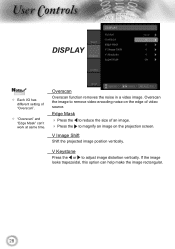
... can 't work at same time. Overscan the image to remove video encoding noise on the edge of an image. Press the to magnify an image on the projection screen. Edge Mask Press the to adjust image distortion vertically. V Keystone Press the or to reduce the size of video source. V Image Shift Shift the projected image position vertically. ser ontrols DISPLAY Noottee Each I/O has different setting of "Overscan...
... can 't work at same time. Overscan the image to remove video encoding noise on the edge of an image. Press the to magnify an image on the projection screen. Edge Mask Press the to adjust image distortion vertically. V Keystone Press the or to reduce the size of video source. V Image Shift Shift the projected image position vertically. ser ontrols DISPLAY Noottee Each I/O has different setting of "Overscan...
User's Manual
Page 30
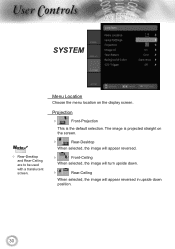
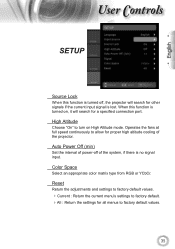
Menu Location Choose the menu location on the screen. Rear-Desktop When selected, the image will appear reversed. Front-Ceiling When selected, the image will turn upside down. Rear-Ceiling When selected, the image will appear reversed in upside down position. 30 The image is the default selection. ser ontrols SYSTEM Noottee Rear-Desktop and Rear-Ceiling are to be used with a translucent screen. Projection Front-Projection This is projected straight on the display screen.
Menu Location Choose the menu location on the screen. Rear-Desktop When selected, the image will appear reversed. Front-Ceiling When selected, the image will turn upside down. Rear-Ceiling When selected, the image will appear reversed in upside down position. 30 The image is the default selection. ser ontrols SYSTEM Noottee Rear-Desktop and Rear-Ceiling are to be used with a translucent screen. Projection Front-Projection This is projected straight on the display screen.
User's Manual
Page 33
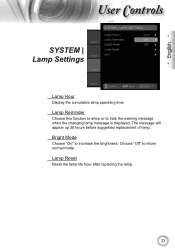
Lamp Reset Reset the lamp life hour after replacing the lamp. 33 Bright Mode Choose "On" to return normal mode. Choose "Off" to increase the brightness. The message will appear up 30 hours before suggested replacement of lamp. English ser ontrols SYSTEM | Lamp Settings Lamp Hour Display the cumulative lamp operating time. Lamp Reminder Choose this function to show or to hide the warning message when the changing lamp message is displayed.
Lamp Reset Reset the lamp life hour after replacing the lamp. 33 Bright Mode Choose "On" to return normal mode. Choose "Off" to increase the brightness. The message will appear up 30 hours before suggested replacement of lamp. English ser ontrols SYSTEM | Lamp Settings Lamp Hour Display the cumulative lamp operating time. Lamp Reminder Choose this function to show or to hide the warning message when the changing lamp message is displayed.
User's Manual
Page 35
..." to factory default. All : Return the settings for proper high altitude cooling of power-off , the projector will search for a specified connection port. Reset Return the adjustments and settings to factory default values. Current : Return the current menu's settings to turn on , it will search for other signals if the current input signal is lost. English ser ontrols SETUP Source Lock When this function is turned on High Altitude mode. Color Space...
..." to factory default. All : Return the settings for proper high altitude cooling of power-off , the projector will search for a specified connection port. Reset Return the adjustments and settings to factory default values. Current : Return the current menu's settings to turn on , it will search for other signals if the current input signal is lost. English ser ontrols SETUP Source Lock When this function is turned on High Altitude mode. Color Space...
User's Manual
Page 37
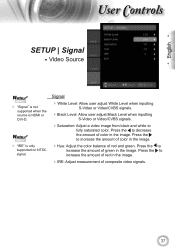
... inputting S-Video or Video/CVBS signals. Saturation: Adjust a video image from black and white to increase the amount of composite video signals. 37 Press the to fully saturated color. Press the to increase the amount of red in the image. IRE: Adjust measurement of green in the image. Press the to decrease the amount of red and green. Video Source Noottee "Signal" is not supported when the source is only supported...
... inputting S-Video or Video/CVBS signals. Saturation: Adjust a video image from black and white to increase the amount of composite video signals. 37 Press the to fully saturated color. Press the to increase the amount of red in the image. IRE: Adjust measurement of green in the image. Press the to decrease the amount of red and green. Video Source Noottee "Signal" is not supported when the source is only supported...
User's Manual
Page 38
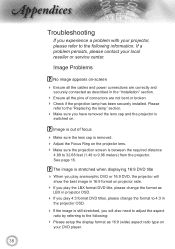
... setup the display format as LBX in the "Installation" section. Ensure all the pins of connectors are not bent or broken. Check if the projection lamp has been securely installed. Image is out of focus Make sure the lens cap is switched on your DVD player. 38 Image Problems No image appears on the projector lens. Make sure the projection screen is stretched when displaying...
... setup the display format as LBX in the "Installation" section. Ensure all the pins of connectors are not bent or broken. Check if the projection lamp has been securely installed. Image is out of focus Make sure the lens cap is switched on your DVD player. 38 Image Problems No image appears on the projector lens. Make sure the projection screen is stretched when displaying...
User's Manual
Page 40
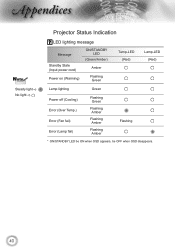
ppendices Noottee Steady light No light Projector Status Indication LED lighting message Message Standby State (Input power cord) Power on (Warming) ON/STANDBY LED (Green/Amber) Amber Flashing Green Temp-LED (Red) Lamp-LED (Red) Lamp lighting Green Power off (Cooling) Error (Over Temp.) Error (Fan fail) Error (Lamp fail) Flashing Green Flashing Amber Flashing Amber Flashing Amber Flashing * ON/STANDBY LED be ON when OSD appears, be OFF when OSD disappears. 40
ppendices Noottee Steady light No light Projector Status Indication LED lighting message Message Standby State (Input power cord) Power on (Warming) ON/STANDBY LED (Green/Amber) Amber Flashing Green Temp-LED (Red) Lamp-LED (Red) Lamp lighting Green Power off (Cooling) Error (Over Temp.) Error (Fan fail) Error (Lamp fail) Flashing Green Flashing Amber Flashing Amber Flashing Amber Flashing * ON/STANDBY LED be ON when OSD appears, be OFF when OSD disappears. 40
User's Manual
Page 41
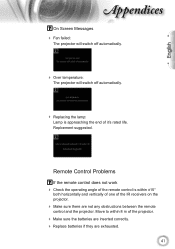
... the remote control and the projector. Move to within ±15° both horizontally and vertically of one of the IR receivers on the projector. Make sure there are exhausted. 41 English ppendices On Screen Messages Fan failed: The projector will switch off automatically. Over temperature: The projector will switch off automatically. Replacing the lamp: Lamp is within 8 m of it's rated life.
... the remote control and the projector. Move to within ±15° both horizontally and vertically of one of the IR receivers on the projector. Make sure there are exhausted. 41 English ppendices On Screen Messages Fan failed: The projector will switch off automatically. Over temperature: The projector will switch off automatically. Replacing the lamp: Lamp is within 8 m of it's rated life.
User's Manual
Page 42
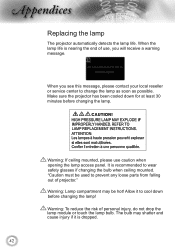
... of use caution when opening the lamp access panel. Warning: To reduce the risk of projector." The bulb may be used to change the lamp as soon as possible. "Caution must be hot! When you will receive a warning message. Allow it is dropped. 42 ppendices Replacing the lamp The projector automatically detects the lamp life. Warning: If ceiling mounted, please use , you see this message, please contact your local reseller or service center...
... of use caution when opening the lamp access panel. Warning: To reduce the risk of projector." The bulb may be used to change the lamp as soon as possible. "Caution must be hot! When you will receive a warning message. Allow it is dropped. 42 ppendices Replacing the lamp The projector automatically detects the lamp life. Warning: If ceiling mounted, please use , you see this message, please contact your local reseller or service center...

User's Manual
Page 43
... turned on if the lamp cover has not been placed back on the projector and use "Lamp Reset" after the lamp module is replaced. Unscrew the two screws on the cover. 1 5. Disconnect the power cord. 4. Switch off the power to clean the lamp module if it was accidentally touched. 2 4 3 Lamp Replacement Procedure: 1. Unscrew the two screws on the lamp module. 3 7. Lamp Reset: (i) Press "Menu" (ii) Select "SYSTEM" (iii) Select "Lamp Settings" (iv) Select "Lamp Reset...
... turned on if the lamp cover has not been placed back on the projector and use "Lamp Reset" after the lamp module is replaced. Unscrew the two screws on the cover. 1 5. Disconnect the power cord. 4. Switch off the power to clean the lamp module if it was accidentally touched. 2 4 3 Lamp Replacement Procedure: 1. Unscrew the two screws on the lamp module. 3 7. Lamp Reset: (i) Press "Menu" (ii) Select "SYSTEM" (iii) Select "Lamp Settings" (iv) Select "Lamp Reset...

Datasheet
Page 1
... (STD), Home Theater Projector Datasheet - Featuring excellent color saturation, a sleek design and portable-friendly 6.4 lbs weight, the Optoma HD200X is perfect for connecting to consumers seeking affordable Hi-Def home theater performance. HD200X - The Optoma HD200X breaks new ground in 21 Languages I/O Connectors Two HDMI, VGA-In, Component Video, Composite Video and +12V Trigger Security Kensington® Lock Port, Security Bar and Keypad Lock Projection Method Front, Rear, Ceiling Mount, Table...
... (STD), Home Theater Projector Datasheet - Featuring excellent color saturation, a sleek design and portable-friendly 6.4 lbs weight, the Optoma HD200X is perfect for connecting to consumers seeking affordable Hi-Def home theater performance. HD200X - The Optoma HD200X breaks new ground in 21 Languages I/O Connectors Two HDMI, VGA-In, Component Video, Composite Video and +12V Trigger Security Kensington® Lock Port, Security Bar and Keypad Lock Projection Method Front, Rear, Ceiling Mount, Table...

Brochure
Page 1
... Component VGA/ Video SCART/ Service YPbPr Video HDMI 1 HDMI 2 +12V Trigger Power On 4:3 Letterbox Brightness Edge Mask Display Mode Source Menu HDMI 1 YPbPr HDMI 2 Power Off Lamp Mode 16:9 Native Contrast Source Lock Overscan Multi-Directional Selector Re-Sync D-sub Video Power +12V Trigger Kensington Lock The Optoma HD200X brings a new level of 3500:1 Up to 300" screen size for large group viewing Perfect for taking your video gaming to the next level by connecting the HD200X to your high-definition home theater...
... Component VGA/ Video SCART/ Service YPbPr Video HDMI 1 HDMI 2 +12V Trigger Power On 4:3 Letterbox Brightness Edge Mask Display Mode Source Menu HDMI 1 YPbPr HDMI 2 Power Off Lamp Mode 16:9 Native Contrast Source Lock Overscan Multi-Directional Selector Re-Sync D-sub Video Power +12V Trigger Kensington Lock The Optoma HD200X brings a new level of 3500:1 Up to 300" screen size for large group viewing Perfect for taking your video gaming to the next level by connecting the HD200X to your high-definition home theater...
Brochure
Page 2
... Keys Source Menu Keystone Correction Re-Sync Power and Standby Enter Power Lamp Temp LED LED LED Optional Accessories Lamp: Mount: Remote: HDMI Cable (7.5m): HDMI Cable (5m): VGA to Component Cable (5m): Component Cable (2m): Composite Cable (2m): 120" 16:9 Fixed Frame Screen: Power Cord (11m): BL-FP230D BM-5001U BR-3042B BC-DDHMXX08 BC-HMHMXX05 BC-VGCRXX05 BC-CRCRXX02 BC-COCOXX02 DF-WW9120F BC-PUPIXY11 Specifications Display Technology: Single 0.65" 1080p DMD DLP® Technology by Texas Instruments Resolution: Native...
... Keys Source Menu Keystone Correction Re-Sync Power and Standby Enter Power Lamp Temp LED LED LED Optional Accessories Lamp: Mount: Remote: HDMI Cable (7.5m): HDMI Cable (5m): VGA to Component Cable (5m): Component Cable (2m): Composite Cable (2m): 120" 16:9 Fixed Frame Screen: Power Cord (11m): BL-FP230D BM-5001U BR-3042B BC-DDHMXX08 BC-HMHMXX05 BC-VGCRXX05 BC-CRCRXX02 BC-COCOXX02 DF-WW9120F BC-PUPIXY11 Specifications Display Technology: Single 0.65" 1080p DMD DLP® Technology by Texas Instruments Resolution: Native...


