
User Manual
Page 2
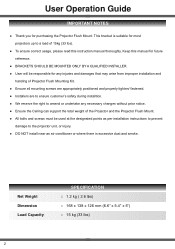
... Guide IMPORTANT NOTES ● Thank you for any injuries and damages that may arise from improper installation and handing of Projector Flush Mounting Kit. ● Ensure all mounting screws are appropriately positioned and properly tighten/ fastened. ● Installers are to ensure customer's safety during installtion. ●...9679; DO NOT install near an air conditioner or where there is suitable for most projectors up to amend or undertake any necessary changes without prior notice. ● Ensure the Ceiling can support the total weight of 15kg (33 lbs). ● To ensure correct usage...
... Guide IMPORTANT NOTES ● Thank you for any injuries and damages that may arise from improper installation and handing of Projector Flush Mounting Kit. ● Ensure all mounting screws are appropriately positioned and properly tighten/ fastened. ● Installers are to ensure customer's safety during installtion. ●...9679; DO NOT install near an air conditioner or where there is suitable for most projectors up to amend or undertake any necessary changes without prior notice. ● Ensure the Ceiling can support the total weight of 15kg (33 lbs). ● To ensure correct usage...
User Manual
Page 8
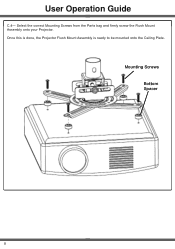
Mounting Screws Bottom Spacer 8 Once this is done, the Projector Flush Mount Assembly is ready to be mounted onto the Ceiling Plate. Select the correct Mounting Screws from the Parts bag and firmly screw the Flush Mount Assembly onto your Projector. User Operation Guide C.4-
Mounting Screws Bottom Spacer 8 Once this is done, the Projector Flush Mount Assembly is ready to be mounted onto the Ceiling Plate. Select the correct Mounting Screws from the Parts bag and firmly screw the Flush Mount Assembly onto your Projector. User Operation Guide C.4-
User Manual
Page 9
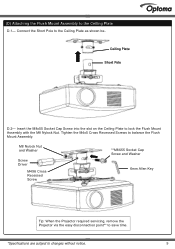
... Screw Driver M4X6 Cross Recessed Screw **M8X55 Socket Cap Screw and Washer 6mm Allen Key Tip: When the Projector required servicing, remove the Projector via the easy disconnection point** to save time. *Specifications are subject to balance the Flush Mount Assembly. (D) Attaching the Flush Mount Assembly to the Ceiling Plate D.1- Ceiling Plate Short Pole D.2-
... Screw Driver M4X6 Cross Recessed Screw **M8X55 Socket Cap Screw and Washer 6mm Allen Key Tip: When the Projector required servicing, remove the Projector via the easy disconnection point** to save time. *Specifications are subject to balance the Flush Mount Assembly. (D) Attaching the Flush Mount Assembly to the Ceiling Plate D.1- Ceiling Plate Short Pole D.2-


