

Manual
Page 1
DLP® Projector User manual
DLP® Projector User manual

Manual
Page 2
... Overview...10 Connections...11 Keypad...12 Remote control...13 SETUP AND INSTALLATION 14 Installing the projector...14 Connecting sources to the projector 15 Adjusting the projector image...16 Remote setup...17 USING THE PROJECTOR 19 Powering on / off the projector 19 Selecting an input source...21 Menu navigation and features 22 OSD Menu tree...23...
... Overview...10 Connections...11 Keypad...12 Remote control...13 SETUP AND INSTALLATION 14 Installing the projector...14 Connecting sources to the projector 15 Adjusting the projector image...16 Remote setup...17 USING THE PROJECTOR 19 Powering on / off the projector 19 Selecting an input source...21 Menu navigation and features 22 OSD Menu tree...23...

Manual
Page 3
ADDITIONAL INFORMATION 40 Compatible resolutions...40 Image size and projection distance 44 Projector dimensions and ceiling mount installation 45 IR remote codes...46 Troubleshooting...48 Warning indicators...49 Specifications...52 Optoma global offices...53 English 3
ADDITIONAL INFORMATION 40 Compatible resolutions...40 Image size and projection distance 44 Projector dimensions and ceiling mount installation 45 IR remote codes...46 Troubleshooting...48 Warning indicators...49 Specifications...52 Optoma global offices...53 English 3
Manual
Page 4
...The exclamation point within 5°C ~ 40°C (ii) Relative humidity is 10% ~ 85% ±± In areas susceptible to install the projector in a location that could result in the literature accompanying the appliance. Do not block any bright source, do not stare into the beam, RG2....the risk of important operating and maintenance (servicing) instructions in fire or electric shock. Do not let objects or liquids enter the projector. Do not use the projector in a fire. Do not use under the following conditions: ±± In extremely hot, cold or humid environments. (i) ...
...The exclamation point within 5°C ~ 40°C (ii) Relative humidity is 10% ~ 85% ±± In areas susceptible to install the projector in a location that could result in the literature accompanying the appliance. Do not block any bright source, do not stare into the beam, RG2....the risk of important operating and maintenance (servicing) instructions in fire or electric shock. Do not let objects or liquids enter the projector. Do not use the projector in a fire. Do not use under the following conditions: ±± In extremely hot, cold or humid environments. (i) ...

Manual
Page 5
Please call Optoma before cleaning the product. ‡‡ Use a soft dry cloth with mild detergent to clean the display housing. will heat the object and could melt, cause burns or start a fire. ‡‡ Please do not open or disassemble the projector as non standard installation may ...before you to dangerous voltages or other hazards. If the battery/batteries are left in the remote for long periods, they may affect the projector performance. ‡‡ Use a power strip and or surge protector. Do not use alkaline/acid detergents or volatile solvents such as possible...
Please call Optoma before cleaning the product. ‡‡ Use a soft dry cloth with mild detergent to clean the display housing. will heat the object and could melt, cause burns or start a fire. ‡‡ Please do not open or disassemble the projector as non standard installation may ...before you to dangerous voltages or other hazards. If the battery/batteries are left in the remote for long periods, they may affect the projector performance. ‡‡ Use a power strip and or surge protector. Do not use alkaline/acid detergents or volatile solvents such as possible...
Manual
Page 6
...to the screen for some viewers. This may experience an epileptic seizure or stroke when exposed to certain flashing images or lights contained in certain Projector pictures or video games. It is warming up as eye or muscle twitching; (5) confusion; (6) nausea; (7) loss of awareness; (8) convulsions;...or dirt from , or have a family history of epilepsy or strokes, please consult with a medical specialist before you or your 3D PROJECTOR near open stairwells, cables, balconies, or other objects that can cause photosensitive epileptic seizures. ‡‡ Pregnant women, the elderly, ...
...to the screen for some viewers. This may experience an epileptic seizure or stroke when exposed to certain flashing images or lights contained in certain Projector pictures or video games. It is warming up as eye or muscle twitching; (5) confusion; (6) nausea; (7) loss of awareness; (8) convulsions;...or dirt from , or have a family history of epilepsy or strokes, please consult with a medical specialist before you or your 3D PROJECTOR near open stairwells, cables, balconies, or other objects that can cause photosensitive epileptic seizures. ‡‡ Pregnant women, the elderly, ...

Manual
Page 7
Trademark Recognition Kensington is a trademark of Texas Instruments. These limits are designed to operate this projector. Caution Changes or modifications not expressly approved by the manufacturer could void the user's authority, which is granted by one or more of the following ...
Trademark Recognition Kensington is a trademark of Texas Instruments. These limits are designed to operate this projector. Caution Changes or modifications not expressly approved by the manufacturer could void the user's authority, which is granted by one or more of the following ...
Manual
Page 9
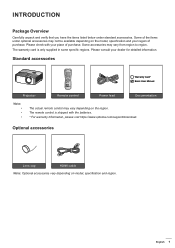
... place of the items under standard accessories. Please check with the batteries. * For warranty Information, please visit https://www.optoma.com/support/download. Standard accessories ON OFF User1 User2 Contrast Brightness User3 Mode Aspect ratio Keystone Mute DB 3D Sleep Timer ...Volume Source Re-sync Menu Volume HDMI1 HDMI2 VGA1 VGA2 Video YPbPr Warranty Card* Basic User Manual Projector Remote control Power lead Documentation Note The actual remote control may vary from region to region. Optional accessories Lens cap HDMI cable...
... place of the items under standard accessories. Please check with the batteries. * For warranty Information, please visit https://www.optoma.com/support/download. Standard accessories ON OFF User1 User2 Contrast Brightness User3 Mode Aspect ratio Keystone Mute DB 3D Sleep Timer ...Volume Source Re-sync Menu Volume HDMI1 HDMI2 VGA1 VGA2 Video YPbPr Warranty Card* Basic User Manual Projector Remote control Power lead Documentation Note The actual remote control may vary from region to region. Optional accessories Lens cap HDMI cable...

Manual
Page 10
Security Bar No Item 6. Inputs/outputs 9. When operating the projector in an enclosed space, allow at least 30 cm clearance around the intake and exhaust vents. Lamp Cover 2. Focus Ring 5. Kensington™ Lock Port 7. IR Receiver (front and top) 3. INTRODUCTION Product Overview 1 2 3 4 7 9 Minimum 100mm 8 6 5 7 Minimum 100mm Minimum 100mm Minimum 300mm Minimum 300mm Minimum 100mm Note: ‡‡ ‡‡ Do not block projector intake and exhaust vents. No Item 1. Tilt-Adjustment Feet 8. Keypad 4. Lens 10 English
Security Bar No Item 6. Inputs/outputs 9. When operating the projector in an enclosed space, allow at least 30 cm clearance around the intake and exhaust vents. Lamp Cover 2. Focus Ring 5. Kensington™ Lock Port 7. IR Receiver (front and top) 3. INTRODUCTION Product Overview 1 2 3 4 7 9 Minimum 100mm 8 6 5 7 Minimum 100mm Minimum 100mm Minimum 300mm Minimum 300mm Minimum 100mm Note: ‡‡ ‡‡ Do not block projector intake and exhaust vents. No Item 1. Tilt-Adjustment Feet 8. Keypad 4. Lens 10 English
Manual
Page 14
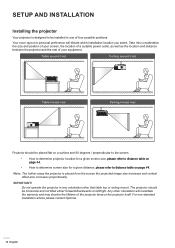
... the projected image size increases and vertical offset also increases proportionally. For non-standard installation advice please contact Optoma. 14 English Table mount front Ceiling mount front Table mount rear Ceiling mount rear Projector should be installed in any orientation other orientation will dictate which installation location you select. Your room layout...
... the projected image size increases and vertical offset also increases proportionally. For non-standard installation advice please contact Optoma. 14 English Table mount front Ceiling mount front Table mount rear Ceiling mount rear Projector should be installed in any orientation other orientation will dictate which installation location you select. Your room layout...

Manual
Page 15
Audio Out Cable 6. RS-232 Cable 8. USB Power Cable 2. SETUP AND INSTALLATION Connecting sources to 5 meters. Power Cord Note: To ensure the best image quality and avoid connection errors, we recommend the use of High Speed or Premium Certified HDMI cables up to the projector 3 4 1 2 5 7 8 6 No Item 1. HDMI Cable 4. 12V DC Jack No Item 5. English 15 HDMI Dongle 3. S/PDIF Out Cable 7.
Audio Out Cable 6. RS-232 Cable 8. USB Power Cable 2. SETUP AND INSTALLATION Connecting sources to 5 meters. Power Cord Note: To ensure the best image quality and avoid connection errors, we recommend the use of High Speed or Premium Certified HDMI cables up to the projector 3 4 1 2 5 7 8 6 No Item 1. HDMI Cable 4. 12V DC Jack No Item 5. English 15 HDMI Dongle 3. S/PDIF Out Cable 7.

Manual
Page 16
Tilt-Adjustment Feet Tilt-Adjustment Ring Focus To adjust the focus, turn the focus ring clockwise or counterclockwise until the image is equipped with elevator feet for adjusting the image height. 1. Rotate the adjustable foot clockwise or counterclockwise to adjust on the underside of 0.4m to 3.3m. 16 English SETUP AND INSTALLATION Adjusting the projector image Image height The projector is sharp and legible. Locate the adjustable foot you wish to raise or lower the projector. Focus Ring Note: The projector will focus at a distance of the projector. 2.
Tilt-Adjustment Feet Tilt-Adjustment Ring Focus To adjust the focus, turn the focus ring clockwise or counterclockwise until the image is equipped with elevator feet for adjusting the image height. 1. Rotate the adjustable foot clockwise or counterclockwise to adjust on the underside of 0.4m to 3.3m. 16 English SETUP AND INSTALLATION Adjusting the projector image Image height The projector is sharp and legible. Locate the adjustable foot you wish to raise or lower the projector. Focus Ring Note: The projector will focus at a distance of the projector. 2.

Manual
Page 18
..., the remote control might change according to hold the remote control at the screen, the effective distance is located on the projector that there are within 30° perpendicular to the projector's IR remote control sensors to function correctly. Approx. ±15° Approx. ±15° 18 English Brightness ...directly. ‡‡ Please keep the remote controller away from the remote control to the screen and reflecting the IR beams back to the projector. However, the effective range might become ineffective from time to time. ‡‡ If the remote control and the...
..., the remote control might change according to hold the remote control at the screen, the effective distance is located on the projector that there are within 30° perpendicular to the projector's IR remote control sensors to function correctly. Approx. ±15° Approx. ±15° 18 English Brightness ...directly. ‡‡ Please keep the remote controller away from the remote control to the screen and reflecting the IR beams back to the projector. However, the effective range might become ineffective from time to time. ‡‡ If the remote control and the...
Manual
Page 19
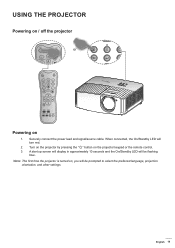
... turned on, you will be prompted to select the preferred language, projection orientation, and other settings. USING THE PROJECTOR Powering on / off the projector ON OFF User1 User2 Brightness Contrast User3 Mode Aspect ratio Keystone Mute DB 3D Sleep Timer ON OFF Volume Source User1...DB 3D Sleep Timer Volume Volume Source Re-sync HDMI1 HDMI2 VGAM1enuVGA2 Video YPbPr Volume HDMI1 HDMI2 VGA1 VGA2 Video YPbPr or Powering on the projector keypad or the remote control. 3. A start up screen will display in approximately 10 seconds and the On/Standby LED will be flashing...
... turned on, you will be prompted to select the preferred language, projection orientation, and other settings. USING THE PROJECTOR Powering on / off the projector ON OFF User1 User2 Brightness Contrast User3 Mode Aspect ratio Keystone Mute DB 3D Sleep Timer ON OFF Volume Source User1...DB 3D Sleep Timer Volume Volume Source Re-sync HDMI1 HDMI2 VGAM1enuVGA2 Video YPbPr Volume HDMI1 HDMI2 VGA1 VGA2 Video YPbPr or Powering on the projector keypad or the remote control. 3. A start up screen will display in approximately 10 seconds and the On/Standby LED will be flashing...
Manual
Page 20
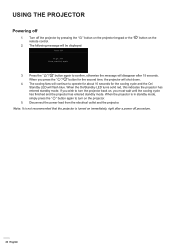
...Press power key again. 3. When you must wait until the cooling cycle has finished and the projector has entered standby mode. Disconnect the power lead from the electrical outlet and the projector. Turn off 1. The following message will disappear after a power off procedure. 20 English If you...about 10 seconds for the second time, the projector will flash blue. The cooling fans will continue to turn on the projector. 5. When the On/Standby LED turns solid red, this indicates the projector has entered standby mode. When the projector is turned on immediately, right after 15 ...
...Press power key again. 3. When you must wait until the cooling cycle has finished and the projector has entered standby mode. Disconnect the power lead from the electrical outlet and the projector. Turn off 1. The following message will disappear after a power off procedure. 20 English If you...about 10 seconds for the second time, the projector will flash blue. The cooling fans will continue to turn on the projector. 5. When the On/Standby LED turns solid red, this indicates the projector has entered standby mode. When the projector is turned on immediately, right after 15 ...
Manual
Page 21
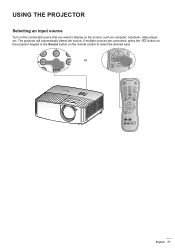
... User3 Contrast Brightness Mode Turn on the screen, such as coAspmect raptiouter, notebook, video player, etc. The projector will automatically detect the source. If multiple sources arKeeystconoe nnected, press the " " button on the projector keypad or the Source button on the remote control to display on the connected source that you want...
... User3 Contrast Brightness Mode Turn on the screen, such as coAspmect raptiouter, notebook, video player, etc. The projector will automatically detect the source. If multiple sources arKeeystconoe nnected, press the " " button on the projector keypad or the Source button on the remote control to display on the connected source that you want...

Manual
Page 22
...change a variety of settings. To exit, press again. USING THE PROJECTOR Menu navigation and features The projector has multilingual on the remote control or the projector keypad. 2. When OSD is displayed, use pq keys to be...enter sub menu. 3. The OSD menu will close and the projector will return to confirm, and the screen will automatically save the new settings. Press to the main menu.... 6. The projector will automatically detect the source. 1. Sub Menu Settings Display Image Settings Enhanced Gaming ...
...change a variety of settings. To exit, press again. USING THE PROJECTOR Menu navigation and features The projector has multilingual on the remote control or the projector keypad. 2. When OSD is displayed, use pq keys to be...enter sub menu. 3. The OSD menu will close and the projector will return to confirm, and the screen will automatically save the new settings. Press to the main menu.... 6. The projector will automatically detect the source. 1. Sub Menu Settings Display Image Settings Enhanced Gaming ...
Manual
Page 23
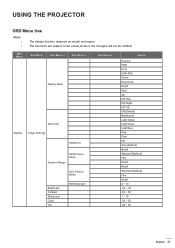
... Dynamic Range HDR Picture Mode HLG Picture Mode Brightness Contrast Sharpness Color Tint HDR Strength Sub Menu 4 Values Cinema HDR HLG HDR SIM. USING THE PROJECTOR OSD Menu tree Note: ‡‡ ‡‡ The design function depends on model and region.
... Dynamic Range HDR Picture Mode HLG Picture Mode Brightness Contrast Sharpness Color Tint HDR Strength Sub Menu 4 Values Cinema HDR HLG HDR SIM. USING THE PROJECTOR OSD Menu tree Note: ‡‡ ‡‡ The design function depends on model and region.
Manual
Page 24
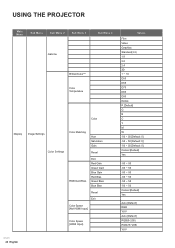
USING THE PROJECTOR Main Menu Sub Menu Sub Menu 2 Sub Menu 3 Sub Menu 4 Gamma BrilliantColorTM Color Temperature Color Display Image Settings Color Settings Color Matching RGB Gain/Bias ...
USING THE PROJECTOR Main Menu Sub Menu Sub Menu 2 Sub Menu 3 Sub Menu 4 Gamma BrilliantColorTM Color Temperature Color Display Image Settings Color Settings Color Matching RGB Gain/Bias ...

Manual
Page 25
...: 0] Off On [Default] Off [Default] On 0 ~ 10 [Default: 5] Front [Default] Rear Ceiling-top Rear-top Off On [Default] Cancel [Default] Yes English 25 USING THE PROJECTOR Main Menu Sub Menu Sub Menu 2 Sub Menu 3 Brightness Mode Image Settings Enhanced Gaming Reset Off [Default] On 3D Mode 3D Sync Invert 3D Display...
...: 0] Off On [Default] Off [Default] On 0 ~ 10 [Default: 5] Front [Default] Rear Ceiling-top Rear-top Off On [Default] Cancel [Default] Yes English 25 USING THE PROJECTOR Main Menu Sub Menu Sub Menu 2 Sub Menu 3 Brightness Mode Image Settings Enhanced Gaming Reset Off [Default] On 3D Mode 3D Sync Invert 3D Display...


