
User Manual
Page 1
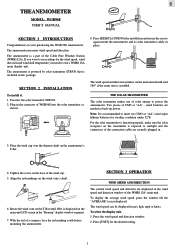
... unit LCD screen in the connector of WGR968 into the solar transmitter as back-up power. Tighten the screw on the anemometer's T-bar. 4. Rotate the wind vane on the main unit should read 180° if the main unit is a part of the wind cup. 5. To select the display unit, ...1. Press [UNIT] for weather condition under 32°F. SECTION 2 INSTALLATION To install it, 1. Unscrew the solar transmitter STR938. 2. Place the wind cup over the thinnest shaft on the base of the Cable Free Weather Station (WMR112A). Align the red markings on your purchasing the WGR 968 Anemometer....
... unit LCD screen in the connector of WGR968 into the solar transmitter as back-up power. Tighten the screw on the anemometer's T-bar. 4. Rotate the wind vane on the main unit should read 180° if the main unit is a part of the wind cup. 5. To select the display unit, ...1. Press [UNIT] for weather condition under 32°F. SECTION 2 INSTALLATION To install it, 1. Unscrew the solar transmitter STR938. 2. Place the wind cup over the thinnest shaft on the base of the Cable Free Weather Station (WMR112A). Align the red markings on your purchasing the WGR 968 Anemometer....


