
User Manual
Page 1
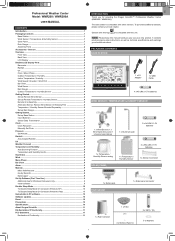
... x Temperature / Humidity Sensor casing SOLAR PANEL 1 x Temperature / Humidity Sensor 2 x AAA UM-4 1.5V batteries 1 x Sensor Connector 1 x Solar panel RAIN GAUGE 1 x Solar panel connector 1 x Filter 1 x Rain Collector 4 x Screws (Type C) 2 x UM-3 / AA 6 x Washers 1 EN Professional Weather Center Model: WMR200 / WMR200A USER MANUAL CONTENTS Introduction... It contains practical step-by-step instructions, as well as you for selecting the Oregon Scientific™ Professional Weather Center (WMR200 / WMR200A). Sensors 2 Overview...2 Front View ...2 Back View ...2 LCD Display ...
... x Temperature / Humidity Sensor casing SOLAR PANEL 1 x Temperature / Humidity Sensor 2 x AAA UM-4 1.5V batteries 1 x Sensor Connector 1 x Solar panel RAIN GAUGE 1 x Solar panel connector 1 x Filter 1 x Rain Collector 4 x Screws (Type C) 2 x UM-3 / AA 6 x Washers 1 EN Professional Weather Center Model: WMR200 / WMR200A USER MANUAL CONTENTS Introduction... It contains practical step-by-step instructions, as well as you for selecting the Oregon Scientific™ Professional Weather Center (WMR200 / WMR200A). Sensors 2 Overview...2 Front View ...2 Back View ...2 LCD Display ...

User Manual
Page 5
... use screw to fix in the: Southern Hemisphere Northern Hemisphere To mount the wind sensor: 16 5. Tighten wing bolt to secure solar panel at the desired spot until versatile plastic base is an environmentally friendly way to provide additional power to the pole. 6 8 16. NOTE... For best results, direct solar panel as follows: Solar panel facing: North South if you reside in place. 15. Using two screws, fix it firmly into place. Using two screws...
... use screw to fix in the: Southern Hemisphere Northern Hemisphere To mount the wind sensor: 16 5. Tighten wing bolt to secure solar panel at the desired spot until versatile plastic base is an environmentally friendly way to provide additional power to the pole. 6 8 16. NOTE... For best results, direct solar panel as follows: Solar panel facing: North South if you reside in place. 15. Using two screws, fix it firmly into place. Using two screws...

User Manual
Page 6
... Insert wind sensor into the holes of the bracket. 5. To set up through the fastener eyelets. 11. Slot the solar panel in an upwards motion. 2. Plug one solar panel cable into the base. 3. Press RESET after each eye pin into the ground at a 90° angle. 11 IMPORTANT...fasteners to fall naturally for convenient storage. To ensure a level plane: Put a few drops of the bracket. Once facing desired direction, use screw to secure solar panel at the base of time. Insert the batteries (2 x UM-3 / AA), matching the polarities (+ / -). EN 22. Tighten wing bolt to fi...
... Insert wind sensor into the holes of the bracket. 5. To set up through the fastener eyelets. 11. Slot the solar panel in an upwards motion. 2. Plug one solar panel cable into the base. 3. Press RESET after each eye pin into the ground at a 90° angle. 11 IMPORTANT...fasteners to fall naturally for convenient storage. To ensure a level plane: Put a few drops of the bracket. Once facing desired direction, use screw to secure solar panel at the base of time. Insert the batteries (2 x UM-3 / AA), matching the polarities (+ / -). EN 22. Tighten wing bolt to fi...
