
Handbook
Page 2
...Other product and brand names may arise through the use of Palm, Inc. assumes no responsibility for any loss or claims by deletion of data as a result of adapters: 25pin serial adapter (for your handheld fits a USB connector. assumes no responsibility for any part... adapter. PN: 406-3912A-US All rights reserved. Palm, Inc. Palm™ Desktop software is supplied on other media to the web site: www.palm.com. Copyright Copyright © 2001-2002 Palm, Inc. Graffiti, HotSync, PalmModem, and Palm OS are trademarks of the End User Software License Agreement. assumes...
...Other product and brand names may arise through the use of Palm, Inc. assumes no responsibility for any loss or claims by deletion of data as a result of adapters: 25pin serial adapter (for your handheld fits a USB connector. assumes no responsibility for any part... adapter. PN: 406-3912A-US All rights reserved. Palm, Inc. Palm™ Desktop software is supplied on other media to the web site: www.palm.com. Copyright Copyright © 2001-2002 Palm, Inc. Graffiti, HotSync, PalmModem, and Palm OS are trademarks of the End User Software License Agreement. assumes...
Handbook
Page 3
... 1: Introduction to Your Handheld 3 Getting to know your Palm™ m100 series handheld 3 What is a Palm m100 series handheld 3 System requirements 4 Handheld components 5 Upgrading from another Palm OS handheld 7 Preparing to use your handheld 8 Using the protective flip cover 8 Changing the face plate 9 Connecting the HotSync cradle/cable 10 Charging the handheld 11 Palm Desktop software 12 Using your handheld with another PIM...
... 1: Introduction to Your Handheld 3 Getting to know your Palm™ m100 series handheld 3 What is a Palm m100 series handheld 3 System requirements 4 Handheld components 5 Upgrading from another Palm OS handheld 7 Preparing to use your handheld 8 Using the protective flip cover 8 Changing the face plate 9 Connecting the HotSync cradle/cable 10 Charging the handheld 11 Palm Desktop software 12 Using your handheld with another PIM...

Handbook
Page 4
Contents Writing symbols and extended characters 33 Writing accented characters 33 Accent strokes 34 Additional non-English characters 34 Navigation strokes 34 Graffiti ShortCuts 34 Using the onscreen keyboard 35 Using Note ...Choosing preferences 43 Installing and removing applications 44 Installing add-on applications 44 Removing applications 47 Removing Palm Desktop software 48 Security 49 Assigning a password 49 Changing or deleting a password 50 Locking your handheld 51 Recovering from a forgotten password 54 Chapter 4: Using Expansion Features 55 Inserting an expansion ...
Contents Writing symbols and extended characters 33 Writing accented characters 33 Accent strokes 34 Additional non-English characters 34 Navigation strokes 34 Graffiti ShortCuts 34 Using the onscreen keyboard 35 Using Note ...Choosing preferences 43 Installing and removing applications 44 Installing add-on applications 44 Removing applications 47 Removing Palm Desktop software 48 Security 49 Assigning a password 49 Changing or deleting a password 50 Locking your handheld 51 Recovering from a forgotten password 54 Chapter 4: Using Expansion Features 55 Inserting an expansion ...

Handbook
Page 6
... 132 Returning to cradle/cable HotSync operations 133 Conducting a HotSync operation via a modem 134 Preparing your computer 134 Preparing your handheld 136 Selecting the conduits for a modem HotSync operation 138 Performing a HotSync operation via a modem 138 Using File Link 139 ...Creating a user profile 139 Chapter 7: Setting Preferences for Your Handheld 143 Viewing preferences 143 Buttons preferences 144 Pen preferences 144 HotSync buttons preferences 145 Digitizer preferences 146 Formats preferences 146 Country default...
... 132 Returning to cradle/cable HotSync operations 133 Conducting a HotSync operation via a modem 134 Preparing your computer 134 Preparing your handheld 136 Selecting the conduits for a modem HotSync operation 138 Performing a HotSync operation via a modem 138 Using File Link 139 ...Creating a user profile 139 Chapter 7: Setting Preferences for Your Handheld 143 Viewing preferences 143 Buttons preferences 144 Pen preferences 144 HotSync buttons preferences 145 Digitizer preferences 146 Formats preferences 146 Country default...

Handbook
Page 7
... service templates 156 Adding detailed information to a service template 156 Login scripts 159 Creating a login script on your handheld 160 Plug-in applications 162 Deleting a service template 162 Network preferences menu commands 162 TCP/IP troubleshooting 163 Owner preferences... 164 Creating a ShortCut 164 Editing a ShortCut 165 Deleting a ShortCut 166 Appendix A: Maintaining Your Handheld 167 Caring for your handheld 167 Battery considerations 168 Resetting your handheld 168 Performing a soft reset 168 Performing a hard reset 169 Appendix B: Frequently Asked Questions 173 ...
... service templates 156 Adding detailed information to a service template 156 Login scripts 159 Creating a login script on your handheld 160 Plug-in applications 162 Deleting a service template 162 Network preferences menu commands 162 TCP/IP troubleshooting 163 Owner preferences... 164 Creating a ShortCut 164 Editing a ShortCut 165 Deleting a ShortCut 166 Appendix A: Maintaining Your Handheld 167 Caring for your handheld 167 Battery considerations 168 Resetting your handheld 168 Performing a soft reset 168 Performing a hard reset 169 Appendix B: Frequently Asked Questions 173 ...
Handbook
Page 9
... the rest of this handbook as a reference for less common tasks, for maintaining your handheld, and also as a source of information if you need to know about how to the Palm™ m100 series handheld. This handbook is designed to help you get up and running quickly on your... handheld and the applications that come with the basic functionality of your handheld, you can use your handheld. It describes all the parts of your handheld s Viewing and entering ...
... the rest of this handbook as a reference for less common tasks, for maintaining your handheld, and also as a source of information if you need to know about how to the Palm™ m100 series handheld. This handbook is designed to help you get up and running quickly on your... handheld and the applications that come with the basic functionality of your handheld, you can use your handheld. It describes all the parts of your handheld s Viewing and entering ...

Handbook
Page 11
...yourself on schedule and remind yourself of appointments and notes s Synchronize your data with an IR (infrared) port that is a Palm m100 series handheld? Use your new handheld to do the following: s Enter your schedule in Date Book s Keep all your contact names, addresses, and phone numbers...buttons and controls on your Palm™ m100 series handheld, how to use your handheld for the first time, how to add expansion cards to your handheld, and how to use peripheral hardware devices, such as a modem s Beam information to another Palm OS® handheld with Palm Desktop software on your ...
...yourself on schedule and remind yourself of appointments and notes s Synchronize your data with an IR (infrared) port that is a Palm m100 series handheld? Use your new handheld to do the following: s Enter your schedule in Date Book s Keep all your contact names, addresses, and phone numbers...buttons and controls on your Palm™ m100 series handheld, how to use your handheld for the first time, how to add expansion cards to your handheld, and how to use peripheral hardware devices, such as a modem s Beam information to another Palm OS® handheld with Palm Desktop software on your ...
Handbook
Page 12
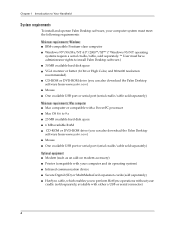
Chapter 1 Introduction to Your Handheld System requirements To install and operate Palm Desktop software, your computer system must meet the following requirements: Minimum requirements: Windows s IBM-compatible Pentium-class computer s Windows 95*/98/Me/NT 4.0*/2000**/XP...Minimum requirements: Mac computer s Mac computer or compatible with a PowerPC processor s Mac OS 8.6 to 9.x s 25 MB available hard disk space s 6 MB available RAM s CD-ROM or DVD-ROM drive (you can also download the Palm Desktop software from www.palm.com) s Mouse s One available USB port or serial port (serial cradle/cable ...
Chapter 1 Introduction to Your Handheld System requirements To install and operate Palm Desktop software, your computer system must meet the following requirements: Minimum requirements: Windows s IBM-compatible Pentium-class computer s Windows 95*/98/Me/NT 4.0*/2000**/XP...Minimum requirements: Mac computer s Mac computer or compatible with a PowerPC processor s Mac OS 8.6 to 9.x s 25 MB available hard disk space s 6 MB available RAM s CD-ROM or DVD-ROM drive (you can also download the Palm Desktop software from www.palm.com) s Mouse s One available USB port or serial port (serial cradle/cable ...
Handbook
Page 13
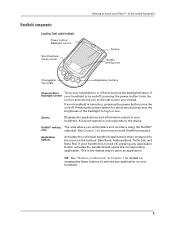
...to activate any application button activates the handheld and opens the corresponding application. Handheld components Locating front panel controls Power button/ Backlight control Scroll buttons/ Clock control Getting to know your Palm™ m100 series handheld Screen Graffiti writing area Changeable face plate... Application buttons Power button/ Turns your handheld is turned off, pressing the power button turns the unit on and...
...to activate any application button activates the handheld and opens the corresponding application. Handheld components Locating front panel controls Power button/ Backlight control Scroll buttons/ Clock control Getting to know your Palm™ m100 series handheld Screen Graffiti writing area Changeable face plate... Application buttons Power button/ Turns your handheld is turned off, pressing the power button turns the unit on and...
Handbook
Page 14
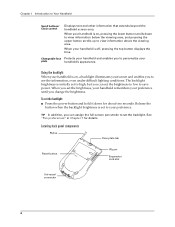
Chapter 1 Introduction to see the information, even under difficult lighting conditions. Using the backlight When your handheld is on , pressing the lower button scrolls down for details. To set the backlight: s Press the power button and hold it down ...Pen preferences" in Chapter 7 for about two seconds. Changeable face Protects your handheld and enables you to personalize your handheld is initially set the brightness to low to set the brightness, your handheld remembers your preference. When your handheld is set to your preference until you can set to high, but you ...
Chapter 1 Introduction to see the information, even under difficult lighting conditions. Using the backlight When your handheld is on , pressing the lower button scrolls down for details. To set the backlight: s Press the power button and hold it down ...Pen preferences" in Chapter 7 for about two seconds. Changeable face Protects your handheld and enables you to personalize your handheld is initially set the brightness to low to set the brightness, your handheld remembers your preference. When your handheld is set to your preference until you can set to high, but you ...
Handbook
Page 15
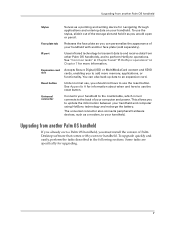
...universal connector also connects peripheral hardware devices, such as you must install the version of your handheld with your handheld. Upgrading from another Palm OS handheld If you already own a Palm OS handheld, you would a pen or pencil. Some tasks are specifically for navigating through applications and ...entering data on your new handheld. Upgrading from another Palm OS handheld Stylus Serves as a pointing and writing device for upgrading. 7 See "Common tasks" in Chapter 5 and ...
...universal connector also connects peripheral hardware devices, such as you must install the version of your handheld with your handheld. Upgrading from another Palm OS handheld If you already own a Palm OS handheld, you would a pen or pencil. Some tasks are specifically for navigating through applications and ...entering data on your new handheld. Upgrading from another Palm OS handheld Stylus Serves as a pointing and writing device for upgrading. 7 See "Common tasks" in Chapter 5 and ...
Handbook
Page 16
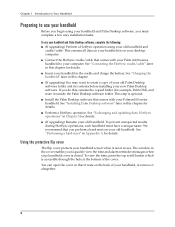
...data: HotSync operations" in this chapter for details. We recommend that comes with your Palm m100 series handheld. Chapter 1 Introduction to Your Handheld Preparing to use your handheld Before you begin using your handheld in Appendix A for details. s Connect the HotSync cradle/cable that you to ... flip cover The flip cover protects your old handheld. You can open the cover so that comes with your Palm m100 series handheld to create a copy of your old Palm Desktop software folder and its contents before installing your handheld, or remove it rests on your computer. ...
...data: HotSync operations" in this chapter for details. We recommend that comes with your Palm m100 series handheld. Chapter 1 Introduction to Your Handheld Preparing to use your handheld Before you begin using your handheld in Appendix A for details. s Connect the HotSync cradle/cable that you to ... flip cover The flip cover protects your old handheld. You can open the cover so that comes with your Palm m100 series handheld to create a copy of your old Palm Desktop software folder and its contents before installing your handheld, or remove it rests on your computer. ...

Handbook
Page 17
For information about face plate accessories, visit the web site www.palm.com. 9 Gently rock the cover from the slots on the top edge of your handheld To remove the cover: 1. To reattach the cover: s Align the hinge prongs with your thumb. 2. Changing the face plate You can personalize the ...appearance of your handheld by changing the face plate. Open the cover and grasp the hinge with the slots on the top edge of your handheld. Preparing to use your handheld, and then insert one side to the other until the hinge prongs...
For information about face plate accessories, visit the web site www.palm.com. 9 Gently rock the cover from the slots on the top edge of your handheld To remove the cover: 1. To reattach the cover: s Align the hinge prongs with your thumb. 2. Changing the face plate You can personalize the ...appearance of your handheld by changing the face plate. Open the cover and grasp the hinge with the slots on the top edge of your handheld. Preparing to use your handheld, and then insert one side to the other until the hinge prongs...

Handbook
Page 18
... tasks. Align the bottom edge of the new face plate with your handheld fits a USB connector. If your computer. 10 Gently press the top of your handheld until it from your handheld and pull the existing face plate away from www.palm.com. To connect the HotSync Cradle/cable 1. Face plate tab To... attach the face plate: 1. Plug the USB connector on the cradle/cable into position. Shut down and turn off your handheld. Lift the face plate tab slightly to separate it ...
... tasks. Align the bottom edge of the new face plate with your handheld fits a USB connector. If your computer. 10 Gently press the top of your handheld until it from your handheld and pull the existing face plate away from www.palm.com. To connect the HotSync Cradle/cable 1. Face plate tab To... attach the face plate: 1. Plug the USB connector on the cradle/cable into position. Shut down and turn off your handheld. Lift the face plate tab slightly to separate it ...

Handbook
Page 19
... cord that attaches to the back of the cradle's USB port connector to recharge the battery before you lose the data on your handheld. 11 Just place your handheld in the cradle. If this occurs, perform a HotSync operation and then recharge the battery as soon as possible. Plug the adapter... into any AC current outlet. Charging the handheld Your handheld is recharged each time you place the handheld in the cradle for at least two hours for ten to fifteen minutes each day to recharge the battery to full...
... cord that attaches to the back of the cradle's USB port connector to recharge the battery before you lose the data on your handheld. 11 Just place your handheld in the cradle. If this occurs, perform a HotSync operation and then recharge the battery as soon as possible. Plug the adapter... into any AC current outlet. Charging the handheld Your handheld is recharged each time you place the handheld in the cradle for at least two hours for ten to fifteen minutes each day to recharge the battery to full...

Handbook
Page 20
... it with HotSync technology and synchronize the data on your data. Chapter 1 Introduction to Your Handheld Palm Desktop software Palm Desktop software extends many of the functions of your handheld to your computer and serves to back up your data in HotSync technology, you can fully ...synchronize the information on your handheld with your handheld applications on your computer. With Palm Desktop software, you can view, enter, and modify any data stored on your data is optional. Synchronization ...
... it with HotSync technology and synchronize the data on your data. Chapter 1 Introduction to Your Handheld Palm Desktop software Palm Desktop software extends many of the functions of your handheld to your computer and serves to back up your data in HotSync technology, you can fully ...synchronize the information on your handheld with your handheld applications on your computer. With Palm Desktop software, you can view, enter, and modify any data stored on your data is optional. Synchronization ...

Handbook
Page 21
... Macintosh User's Guide located in the Documentation folder in the Palm Desktop folder. Installing Palm Desktop software The following before installing: s Turn off your computer and connect the HotSync cradle/cable to your computer. 2. After installation, refer to use your handheld s Print your handheld to decompress the files. Do the following instructions guide you...
... Macintosh User's Guide located in the Documentation folder in the Palm Desktop folder. Installing Palm Desktop software The following before installing: s Turn off your computer and connect the HotSync cradle/cable to your computer. 2. After installation, refer to use your handheld s Print your handheld to decompress the files. Do the following instructions guide you...

Handbook
Page 22
... software CD-ROM into your computer. however you synchronize the data between your handheld and your PIM or visit the web site www.palm.com. 14 Follow the onscreen instructions to the Palm Desktop software. Using your handheld with a HotSync cradle. The connection software, called a conduit, lets you must install it in addition to...
... software CD-ROM into your computer. however you synchronize the data between your handheld and your PIM or visit the web site www.palm.com. 14 Follow the onscreen instructions to the Palm Desktop software. Using your handheld with a HotSync cradle. The connection software, called a conduit, lets you must install it in addition to...

Handbook
Page 23
...: s Open applications s Choose menu commands s Initiate a Find operation to search through applications installed on your handheld for tapping or making strokes on the handheld screen. The first time you start your handheld, setup instructions appear on your computer, you can also drag the stylus to select text. Calibration aligns the...Just as you can drag the mouse to select text or move objects on the screen. You can also use the point of your handheld with the stylus to get things done Like using a mouse to click elements on a computer screen, using the stylus to tap elements ...
...: s Open applications s Choose menu commands s Initiate a Find operation to search through applications installed on your handheld for tapping or making strokes on the handheld screen. The first time you start your handheld, setup instructions appear on your computer, you can also drag the stylus to select text. Calibration aligns the...Just as you can drag the mouse to select text or move objects on the screen. You can also use the point of your handheld with the stylus to get things done Like using a mouse to click elements on a computer screen, using the stylus to tap elements ...

Handbook
Page 24
... keyboard. 123 With the cursor in an input field, tap the dot to change the contrast in large increments. Chapter 1 Introduction to Your Handheld Elements of the handheld interface Menu bar Icons Menu bar A set of the slider to adjust the contrast in small increments or drag the slider to activate the...
... keyboard. 123 With the cursor in an input field, tap the dot to change the contrast in large increments. Chapter 1 Introduction to Your Handheld Elements of the handheld interface Menu bar Icons Menu bar A set of the slider to adjust the contrast in small increments or drag the slider to activate the...


