
Owners Manual
Page 1
OWNER'S MANUAL 68CM CORDLESS REMOTE COLOUR TELEVISION MODEL: 6825G Type Tested Electrical Safety AS/NZS 3250 Lic 4166 Standards Australia APP No: N15899 PALSONIC CORPORATION PTY LTD 1 JOYNTON AVENUE WATERLOO NSW 2017 AUSTRALIA TEL:(02)9313 7111 FAX:(02)9313 7555 www.palsonic.com.au PALSONIC CUSTOMER SERVICE TELEPHONE AUSTRALIA:1300 657 888
OWNER'S MANUAL 68CM CORDLESS REMOTE COLOUR TELEVISION MODEL: 6825G Type Tested Electrical Safety AS/NZS 3250 Lic 4166 Standards Australia APP No: N15899 PALSONIC CORPORATION PTY LTD 1 JOYNTON AVENUE WATERLOO NSW 2017 AUSTRALIA TEL:(02)9313 7111 FAX:(02)9313 7555 www.palsonic.com.au PALSONIC CUSTOMER SERVICE TELEPHONE AUSTRALIA:1300 657 888
Owners Manual
Page 2
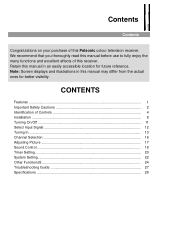
... of this receiver. Retain this manual may differ from the actual ones for future reference. We recommend that you thoroughly read this manual before use to fully enjoy the many functions and excellent effects of Controls 4 Installation ...8 Turning On/Off ...11 Select Input Signal 12 Tuning In ...13 Channel Selection 16 Adjusting Picture ...17 Sound Control ...18 Timer Setting...20 System Setting...22 Other FunctionsS ...24 Troubleshooting Guide 27 Specifications ...28
... of this receiver. Retain this manual may differ from the actual ones for future reference. We recommend that you thoroughly read this manual before use to fully enjoy the many functions and excellent effects of Controls 4 Installation ...8 Turning On/Off ...11 Select Input Signal 12 Tuning In ...13 Channel Selection 16 Adjusting Picture ...17 Sound Control ...18 Timer Setting...20 System Setting...22 Other FunctionsS ...24 Troubleshooting Guide 27 Specifications ...28
Owners Manual
Page 4
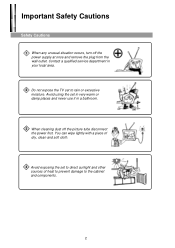
... unusual situation occurs, turn off the picture tube disconnect the power first. Contact a qualified service department in a bathroom. 3 When cleaning dust off the power supply at once and remove the plug from the wall outlet. You can wipe lightly with a piece of dry, clean and soft cloth. 4 Avoid exposing the set to the cabinet and components. 2 Avoid using the set in very warm or...
... unusual situation occurs, turn off the picture tube disconnect the power first. Contact a qualified service department in a bathroom. 3 When cleaning dust off the power supply at once and remove the plug from the wall outlet. You can wipe lightly with a piece of dry, clean and soft cloth. 4 Avoid exposing the set to the cabinet and components. 2 Avoid using the set in very warm or...

Owners Manual
Page 5
This TV set is damaged contact a qualified service department for service. 8 When the TV set can operate on an AC power of 240V, 50HZ. Do not remove the cover 6 Do not cover the ventilating hole in this TV set. You must not use a power supply of time, turn off the power supply and remove the plug from the walls to the TV set to ensure adequate ventilation. 7 If the power cord or the plug is to be left unattended for a long period of any other type. 5 High voltage exists in the cabinet Keep a space of more than 5cm from the wall outlet. 3 !
This TV set is damaged contact a qualified service department for service. 8 When the TV set can operate on an AC power of 240V, 50HZ. Do not remove the cover 6 Do not cover the ventilating hole in this TV set. You must not use a power supply of time, turn off the power supply and remove the plug from the walls to the TV set to ensure adequate ventilation. 7 If the power cord or the plug is to be left unattended for a long period of any other type. 5 High voltage exists in the cabinet Keep a space of more than 5cm from the wall outlet. 3 !

Owners Manual
Page 8
menu item adjust Channel edit To enter/exit game menu To mute the sound Program scanning On-screen call Previous channel To enter menu operation Channel up /dowm select; menu item select Picture mode select To enter game/Serve as confirm button in GOBANG game Game controller Sleep timer Sound mode select 6 Identification of Controls (continued) Remote Controller The switch of the remote controller caller Power on/standby Direct channel selector TV/VIDEO input select Colour and sound system select Volume up /down select;
menu item adjust Channel edit To enter/exit game menu To mute the sound Program scanning On-screen call Previous channel To enter menu operation Channel up /dowm select; menu item select Picture mode select To enter game/Serve as confirm button in GOBANG game Game controller Sleep timer Sound mode select 6 Identification of Controls (continued) Remote Controller The switch of the remote controller caller Power on/standby Direct channel selector TV/VIDEO input select Colour and sound system select Volume up /down select;

Owners Manual
Page 10
... with the power cord and the like. 8 The aerial cable should not be used to eliminate interference and noise which may cause eyestrain. Total darkness or a reflection on the picture screen may occur due to radio wave conditions. Notes: It is recommended for comfortable viewing. Antenna installation Optimum reception of the aerial will depend upon the screen. The exact type and...
... with the power cord and the like. 8 The aerial cable should not be used to eliminate interference and noise which may cause eyestrain. Total darkness or a reflection on the picture screen may occur due to radio wave conditions. Notes: It is recommended for comfortable viewing. Antenna installation Optimum reception of the aerial will depend upon the screen. The exact type and...
Owners Manual
Page 11
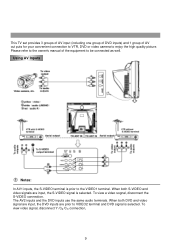
... DVD and video signal are input, the DVD inputs are input, the S-VIDEO signal is selected. Please refer to the owner's manual of AV out puts for your convenient connection to VTR, DVD or video camera to be connected as well. Using AV Inputs ! This TV set provides 3 groups of AV input (including one group of DVD inputs) and 1 group of the equipment to enjoy the high quality picture. The AV2 inputs and the DVD inputs use...
... DVD and video signal are input, the DVD inputs are input, the S-VIDEO signal is selected. Please refer to the owner's manual of AV out puts for your convenient connection to VTR, DVD or video camera to be connected as well. Using AV Inputs ! This TV set provides 3 groups of AV input (including one group of DVD inputs) and 1 group of the equipment to enjoy the high quality picture. The AV2 inputs and the DVD inputs use...
Owners Manual
Page 13
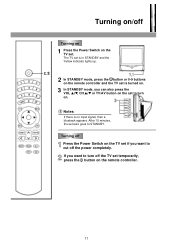
... Yellow indicator lights up. 2, 2 2 In STANDBY mode, press the button or 0-9 buttons on the remote controller and the TV set to turn off Turning on 1 Press the Power Switch on . ! Notes: If there is turned on. 3 In STANDBY mode, you want to cut off the power completely. 2 If you can also press the VOL , CH or TV/AV button on the set is no input signal, then a blueback...
... Yellow indicator lights up. 2, 2 2 In STANDBY mode, press the button or 0-9 buttons on the remote controller and the TV set to turn off Turning on 1 Press the Power Switch on . ! Notes: If there is turned on. 3 In STANDBY mode, you want to cut off the power completely. 2 If you can also press the VOL , CH or TV/AV button on the set is no input signal, then a blueback...

Owners Manual
Page 14
..."). Switching from AV input, PressTV/AV button repeatedly until the TV program appears. 2 Press digit buttons to switch back to TV mode. 3 Press CH+ or CH- Select Input Signal Watching AV program 1 To watch video program from AV to TV 1 Press TV/TV button repeatedly until you see the appropriate input indicator on the screen Video1 Video2 Video3 10 2 ! video signal is selected (the OSD is "DVD"). To view a video signal, diconnect Y/CB /CR connection...
..."). Switching from AV input, PressTV/AV button repeatedly until the TV program appears. 2 Press digit buttons to switch back to TV mode. 3 Press CH+ or CH- Select Input Signal Watching AV program 1 To watch video program from AV to TV 1 Press TV/TV button repeatedly until you see the appropriate input indicator on the screen Video1 Video2 Video3 10 2 ! video signal is selected (the OSD is "DVD"). To view a video signal, diconnect Y/CB /CR connection...
Owners Manual
Page 16
... locates in the specified position number. ! The band switches amoung VHFL, VHFH and UHF. 2. button to select ON. button. button to select SEARCH item. 4 Press VOL+ or VOL- button to select SKIP item. 4 Press VOL+ or VOL- button to start program search manually. 1,3 Pressing VOL+, the set searches towards higher frequency; 1,3 Pressing VOL-, the set SKIP item to specific position numbers one by CH+ or CH...
... locates in the specified position number. ! The band switches amoung VHFL, VHFH and UHF. 2. button to select ON. button. button to select SEARCH item. 4 Press VOL+ or VOL- button to select SKIP item. 4 Press VOL+ or VOL- button to start program search manually. 1,3 Pressing VOL+, the set searches towards higher frequency; 1,3 Pressing VOL-, the set SKIP item to specific position numbers one by CH+ or CH...

Owners Manual
Page 17
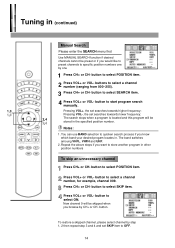
... mode, the current channel number will display) and the next press display the clock time. Fine tuning Please enter the SEARCH menu first Fine tuning is necessary for example, channel 99). 3 Press CH+ or CH- The first press of inferior broadcast conditions where adjustment is not necessary under normal conditions. button till the best possible picture and sound are obtained. 2,4 Calling the on-screen display...
... mode, the current channel number will display) and the next press display the clock time. Fine tuning Please enter the SEARCH menu first Fine tuning is necessary for example, channel 99). 3 Press CH+ or CH- The first press of inferior broadcast conditions where adjustment is not necessary under normal conditions. button till the best possible picture and sound are obtained. 2,4 Calling the on-screen display...

Owners Manual
Page 19
Adjusting Picture Adjusting picture 1 Press MENU button. 2 Press VOL+ or VOL- VOL + 1 Color 75 50 50 paler deeper 2,4 Brightness 75 50 50 darker lighter Contrast 100 90 2,5,3 Sharpness 50 40 70 weaker stronger 30 softer sharper 6 Tint purplish greenish * Note: The item TINT is no input signal. 17 button to select PICTURE icon. 3 Press CH- button to select item. Picture mode 5 Press VOL+ or VOL- Press P.M button to...
Adjusting Picture Adjusting picture 1 Press MENU button. 2 Press VOL+ or VOL- VOL + 1 Color 75 50 50 paler deeper 2,4 Brightness 75 50 50 darker lighter Contrast 100 90 2,5,3 Sharpness 50 40 70 weaker stronger 30 softer sharper 6 Tint purplish greenish * Note: The item TINT is no input signal. 17 button to select PICTURE icon. 3 Press CH- button to select item. Picture mode 5 Press VOL+ or VOL- Press P.M button to...

Owners Manual
Page 22
... button repeatedly till "OFF" displays on the remote controller. button to select TIMER icon. 3 Press CH- If you want to auto turn off in 60 minutes, you can quickly set the sleep timer by using the SLP button on the screen. SLEEP : 60MIN. 20 Setting CLOCK Please enter the TIMER menu first. 1 Press CH+ or CH- Timer Setting To enter the TIMER menu 1 Press MENU button. 2 Press VOL+ or VOL- With every press of this button the sleep time changes...
... button repeatedly till "OFF" displays on the remote controller. button to select TIMER icon. 3 Press CH- If you want to auto turn off in 60 minutes, you can quickly set the sleep timer by using the SLP button on the screen. SLEEP : 60MIN. 20 Setting CLOCK Please enter the TIMER menu first. 1 Press CH+ or CH- Timer Setting To enter the TIMER menu 1 Press MENU button. 2 Press VOL+ or VOL- With every press of this button the sleep time changes...

Owners Manual
Page 23
... set the OFF TIMER to ONCE, this function, please set in STANDBY mode auto turns on and goes to select a channel number, for example 22:00. button to channel 10 when the time is 22:00. When you set auto turns off when the time is 18:00. button to select OFF TIMER item. 2 Press VOL+ or VOL- button to select ON TIMER item. 2 Press VOL+ or VOL- If you are setting the time...
... set the OFF TIMER to ONCE, this function, please set in STANDBY mode auto turns on and goes to select a channel number, for example 22:00. button to channel 10 when the time is 22:00. When you set auto turns off when the time is 18:00. button to select OFF TIMER item. 2 Press VOL+ or VOL- button to select ON TIMER item. 2 Press VOL+ or VOL- If you are setting the time...
Owners Manual
Page 24
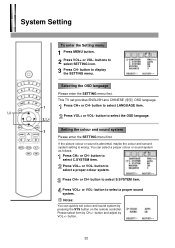
... VOL+ or VOL- button and adjust by CH+/- If the picture colour or sound is abnormal, maybe the colour and sonund system setting is wrong. Please select item by VOL+/- button. 22 This TV set colour and sound system by pressing the SYS button on the remote controller. button to select S.SYSTEM item. 4 Press VOL+ or VOL- button to select a proper sound system. ! button to select a proper colour system...
... VOL+ or VOL- button and adjust by CH+/- If the picture colour or sound is abnormal, maybe the colour and sonund system setting is wrong. Please select item by VOL+/- button. 22 This TV set colour and sound system by pressing the SYS button on the remote controller. button to select S.SYSTEM item. 4 Press VOL+ or VOL- button to select a proper sound system. ! button to select a proper colour system...
Owners Manual
Page 25
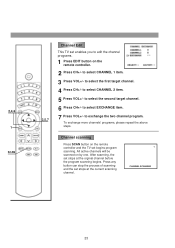
Channel scanning Press SCAN button on the remote controller and the TV set stops at the orginal channel before the program scanning begins. Press any button can stop the process of scanning end the set begins program scanning. 2,4,6 1 SCAN 3,5,7 Channel Edit This TV set stops at the current scanning channel. 1 CHANNEL SCANNING 23 to select CHANNEL 2 item. 5 Press VOL+/- To exchange more channels' programs, please repeat the above steps. All active channels will be scanned on the remote controller. 2 Press CH...
Channel scanning Press SCAN button on the remote controller and the TV set stops at the orginal channel before the program scanning begins. Press any button can stop the process of scanning end the set begins program scanning. 2,4,6 1 SCAN 3,5,7 Channel Edit This TV set stops at the current scanning channel. 1 CHANNEL SCANNING 23 to select CHANNEL 2 item. 5 Press VOL+/- To exchange more channels' programs, please repeat the above steps. All active channels will be scanned on the remote controller. 2 Press CH...
Owners Manual
Page 26
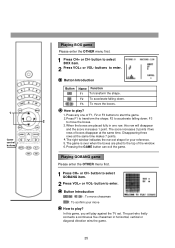
... shape; 1 Game control buttons Playing BOX game Please enter the OTHER menu first. 1 Press CH+ or CH- How to accelerate falling down . Press any one row, this game, you will disappear and the score increases 1 point. F2 to play ? Pressing the GAME button can exit the game. buttons to enter. Button Introduction Button Name Function F1 To transform the shape. The part who firstly connects a continuous five...
... shape; 1 Game control buttons Playing BOX game Please enter the OTHER menu first. 1 Press CH+ or CH- How to accelerate falling down . Press any one row, this game, you will disappear and the score increases 1 point. F2 to play ? Pressing the GAME button can exit the game. buttons to enter. Button Introduction Button Name Function F1 To transform the shape. The part who firstly connects a continuous five...
Owners Manual
Page 27
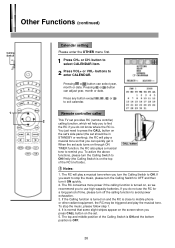
... the set's side panel (the set should be triggered and play the musical tone. The top and middle position of the RC's left side). ! Pressing or button can select year, month or date; Notes: 1. If you . Pressing or button can adjust year, month or date. When the set auto turns on the set provides RC (remote contrller) calling function, which wil help you to use...
... the set's side panel (the set should be triggered and play the musical tone. The top and middle position of the RC's left side). ! Pressing or button can select year, month or date; Notes: 1. If you . Pressing or button can adjust year, month or date. When the set auto turns on the set provides RC (remote contrller) calling function, which wil help you to use...
Owners Manual
Page 28
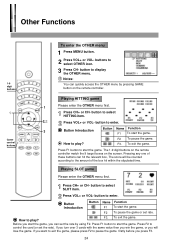
... CH- The 1-9 digit buttons on the remote controller match the 9 target boxes on the remote controller. 1 Game control buttons Playing HITTING game Please enter the OTHER menu first. 1 1 Press CH+ or CH- Button Introduction Button Name Function F1 To start the game. Notes: You can set the rate by pressing GAME button on the screen. F2 To pause the game or set the rate). Other Functions 1-9 digit buttons To enter the OTHER menu 1 Press MENU button. 2 Press...
... CH- The 1-9 digit buttons on the remote controller match the 9 target boxes on the remote controller. 1 Game control buttons Playing HITTING game Please enter the OTHER menu first. 1 1 Press CH+ or CH- Button Introduction Button Name Function F1 To start the game. Notes: You can set the rate by pressing GAME button on the screen. F2 To pause the game or set the rate). Other Functions 1-9 digit buttons To enter the OTHER menu 1 Press MENU button. 2 Press...
Owners Manual
Page 29
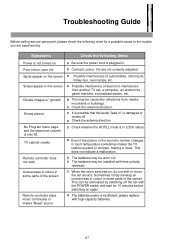
... Power is not turned on Poor colour, poor tint Spots appear on the screen Stripes appear on the screen Double images or "ghosts" Snowy picture No Program menu page and the maximum volume is switched on again. Contrast, colour, tint are experiencing. When the set is only 60. The batteries power is plugged in. Possible interference of the screen Remote controller plays music continually or makes "Beep" sound...
... Power is not turned on Poor colour, poor tint Spots appear on the screen Stripes appear on the screen Double images or "ghosts" Snowy picture No Program menu page and the maximum volume is switched on again. Contrast, colour, tint are experiencing. When the set is only 60. The batteries power is plugged in. Possible interference of the screen Remote controller plays music continually or makes "Beep" sound...