

Owners Manual
Page 1
OWNER'S MANUAL 106CM WIDE SCREEN PDP TV/MONITOR MODEL: PDP4225HD N111 PALSONIC CORPORATION PTY LTD 1 JOYNTON AVENUE WATERLOO NSW 2017 AUSTRALIA TEL:(02)9313 7111 FAX:(02)9313 7555 PALSONIC CUSTOMER SERVICE TELEPHONE AUSTRALIA:1300 657 888
OWNER'S MANUAL 106CM WIDE SCREEN PDP TV/MONITOR MODEL: PDP4225HD N111 PALSONIC CORPORATION PTY LTD 1 JOYNTON AVENUE WATERLOO NSW 2017 AUSTRALIA TEL:(02)9313 7111 FAX:(02)9313 7555 PALSONIC CUSTOMER SERVICE TELEPHONE AUSTRALIA:1300 657 888

Owners Manual
Page 4
... occurs, unplug the power cord from the apparatus. Improper adjustment of time, unplug it can result in accidents. 6. f. Replacement parts---In case the product needs replacement parts, make sure that the service person replaces parts specified by the manufacturer. But IMPROPER USE CAN RESULT IN POTENTIAL ELECTRICAL SHOCK OR FIRE HAZARD. Keep these instructions---All operating instructions must be supplied by the manufacturer. Servicing is required when...
... occurs, unplug the power cord from the apparatus. Improper adjustment of time, unplug it can result in accidents. 6. f. Replacement parts---In case the product needs replacement parts, make sure that the service person replaces parts specified by the manufacturer. But IMPROPER USE CAN RESULT IN POTENTIAL ELECTRICAL SHOCK OR FIRE HAZARD. Keep these instructions---All operating instructions must be supplied by the manufacturer. Servicing is required when...

Owners Manual
Page 5
... cleaners. Stand---Use only with dry cloth---Unplug this television equipment during lightning storms or when unused for long periods of blue, green or red. The apparatus shall not be placed on a wall, be sure to lightning and power-line surges. 18. Clean only with the cart, stand, tripod, bracket, or table specified by broken glass pieces in case the display panel breaks. 23...
... cleaners. Stand---Use only with dry cloth---Unplug this television equipment during lightning storms or when unused for long periods of blue, green or red. The apparatus shall not be placed on a wall, be sure to lightning and power-line surges. 18. Clean only with the cart, stand, tripod, bracket, or table specified by broken glass pieces in case the display panel breaks. 23...

Owners Manual
Page 6
... type of Video Games, Computers, Captions or Other Fixed Image Displays. ! B. Important Information Regarding Use of irreversible screen deterioration can be displayed for extended periods of time. Never use in a soap and water solution or a weak detergent solution. ! This is not designed to remove stubborn dirt from fixed image use of a stationary fixed image. If the surfaces are extremely dirty, use . Storage temperature: 0°C to normal. ! Turn the power off...
... type of Video Games, Computers, Captions or Other Fixed Image Displays. ! B. Important Information Regarding Use of irreversible screen deterioration can be displayed for extended periods of time. Never use in a soap and water solution or a weak detergent solution. ! This is not designed to remove stubborn dirt from fixed image use of a stationary fixed image. If the surfaces are extremely dirty, use . Storage temperature: 0°C to normal. ! Turn the power off...
Owners Manual
Page 7
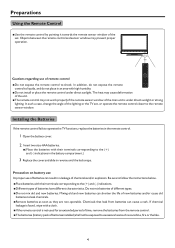
... the remote control is not used for an extended period of time, remove the batteries from batteries can cause a rash. If chemical leakage is under direct sunlight. Preparations Using the Remote Control < Use the remote control by pointing it towards the remote sensor window of the set , or operate the remote control closer to the remote sensor window. In such a case, change the angle of the lighting or...
... the remote control is not used for an extended period of time, remove the batteries from batteries can cause a rash. If chemical leakage is under direct sunlight. Preparations Using the Remote Control < Use the remote control by pointing it towards the remote sensor window of the set , or operate the remote control closer to the remote sensor window. In such a case, change the angle of the lighting or...

Owners Manual
Page 8
... an outdoor antenna must be used to eliminate interference and noise which may occur due to radio wave conditions. = The antenna cable should be bundled with the power cord. Note = This illustration is recommended for comfortable viewing. The AC plug may cause eyestrain. Connecting the male plug to the AC socket on the picture screen may be different on different models. = This product...
... an outdoor antenna must be used to eliminate interference and noise which may occur due to radio wave conditions. = The antenna cable should be bundled with the power cord. Note = This illustration is recommended for comfortable viewing. The AC plug may cause eyestrain. Connecting the male plug to the AC socket on the picture screen may be different on different models. = This product...
Owners Manual
Page 10
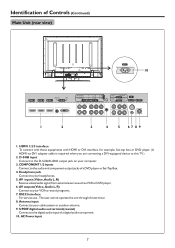
... outputs(Video, Audio L, R) Connect to record programs. 7. RS232 interface For service use . The user cannot operate the unit through this TV.) 2. HDMI 1/2/3 interface To connect with those equipments with HDMI or DVI interface, for example, Set-top box or DVD player. (A HDMI-to-DVI adapter cable is required when you are connecting a DVI-equipped device to the digital audio input of a DVD player or Set-Top Box. 4. S/PDIF digital audio out terminal(coaxial) Connect to this terminal. 8. Identification of Controls (Continued) Main Unit (rear view...
... outputs(Video, Audio L, R) Connect to record programs. 7. RS232 interface For service use . The user cannot operate the unit through this TV.) 2. HDMI 1/2/3 interface To connect with those equipments with HDMI or DVI interface, for example, Set-top box or DVD player. (A HDMI-to-DVI adapter cable is required when you are connecting a DVI-equipped device to the digital audio input of a DVD player or Set-Top Box. 4. S/PDIF digital audio out terminal(coaxial) Connect to this terminal. 8. Identification of Controls (Continued) Main Unit (rear view...

Owners Manual
Page 11
... timer. 10 19 17 RECALL: Returns to the previous channel. 11 20 18 EXIT: Exits the menu screen. 19 SOURCE: Displays input source menu. 12 21 20 LIST: Displays the channel list. 21 CH / : Changes channel up and down. 13 22 22 P.MODE: Selects picture mode. 23 Below is teletext control buttons: 24 28 23 Colored buttons (RED/GREEN/YELLOW/BLUE): Direct 25 29 access to the colored items or corresponding pages. (Teletext) 26 30 24 TTX: Used...
... timer. 10 19 17 RECALL: Returns to the previous channel. 11 20 18 EXIT: Exits the menu screen. 19 SOURCE: Displays input source menu. 12 21 20 LIST: Displays the channel list. 21 CH / : Changes channel up and down. 13 22 22 P.MODE: Selects picture mode. 23 Below is teletext control buttons: 24 28 23 Colored buttons (RED/GREEN/YELLOW/BLUE): Direct 25 29 access to the colored items or corresponding pages. (Teletext) 26 30 24 TTX: Used...
Owners Manual
Page 12
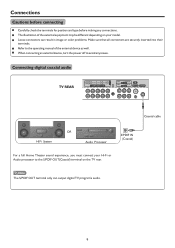
... result in image or color problems. Make sure that all connectors are securely inserted into their terminals. Loose connectors can output digital TV program's audio. 9 Connections Cautions before connecting Carefully check the terminals for position and type before making any issues. Refer to the operating manual of the external equipment may be different depending on the TV rear. Connecting digital coaxial audio TV REAR Coaxial cable HIFi...
... result in image or color problems. Make sure that all connectors are securely inserted into their terminals. Loose connectors can output digital TV program's audio. 9 Connections Cautions before connecting Carefully check the terminals for position and type before making any issues. Refer to the operating manual of the external equipment may be different depending on the TV rear. Connecting digital coaxial audio TV REAR Coaxial cable HIFi...
Owners Manual
Page 13
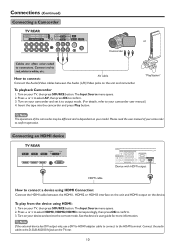
... user manual of the camcorder may be different and is dependant on your model. To play from the device using HDMI Connection: Connect the HDMI cable between the Audio (L/R)/Video jacks on the device. The Input Source menu opens. 2. Press 5 or6 to select HDMI1/HDMI2/HDMI3 correspondingly, then press OK to connectors. "PlayStation" To playback Camcorder 1. Connections (Continued) Connecting a Camcorder TV REAR or Camcorder Cables are often color-coded to confirm. 3. Turn...
... user manual of the camcorder may be different and is dependant on your model. To play from the device using HDMI Connection: Connect the HDMI cable between the Audio (L/R)/Video jacks on the device. The Input Source menu opens. 2. Press 5 or6 to select HDMI1/HDMI2/HDMI3 correspondingly, then press OK to connectors. "PlayStation" To playback Camcorder 1. Connections (Continued) Connecting a Camcorder TV REAR or Camcorder Cables are often color-coded to confirm. 3. Turn...

Owners Manual
Page 14
.... To play component video from a computer 1. Audio cable To connect a device using component video: Connect the Component Video cable between the AUDIO input jacks on the unit and AUDIO output jacks on the device. The Input Source menu opens. 2. Connections (Continued) Connecting Component Video TV REAR Component video cable Device with component video Cables are often color-coded to confirm. 3. The Input Source menu opens. 2. Turn on your TV, then press SOURCE button. Turn on your computer, and adjust the display properties as required. 11 Connect the Audio cable...
.... To play component video from a computer 1. Audio cable To connect a device using component video: Connect the Component Video cable between the AUDIO input jacks on the unit and AUDIO output jacks on the device. The Input Source menu opens. 2. Connections (Continued) Connecting Component Video TV REAR Component video cable Device with component video Cables are often color-coded to confirm. 3. The Input Source menu opens. 2. Turn on your TV, then press SOURCE button. Turn on your computer, and adjust the display properties as required. 11 Connect the Audio cable...
Owners Manual
Page 16
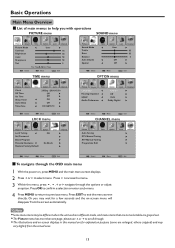
... Balance Auto Volume Spatial Time Option Lock User Off Off Channel 50 50 0 Select Move Menu Exit OPTION menu Picture Sound Clock Off Time On Time Sleep Timer Auto Sleep Time Zone Time Option Lock Channel 28/Sep /2008 15:30 Off Off Off Off VIC GMT+10 Select Move Menu Exit LOCK menu Picture Sound Time Language Hearing Impaired SPDIF Audio Preference Option Lock English Off Auto Dolby Digital Channel Select Move Menu Exit CHANNEL menu Picture Sound Time Lock Tuning Set Password Block Program Parental Guidance Restore Factory Default...
... Balance Auto Volume Spatial Time Option Lock User Off Off Channel 50 50 0 Select Move Menu Exit OPTION menu Picture Sound Clock Off Time On Time Sleep Timer Auto Sleep Time Zone Time Option Lock Channel 28/Sep /2008 15:30 Off Off Off Off VIC GMT+10 Select Move Menu Exit LOCK menu Picture Sound Time Language Hearing Impaired SPDIF Audio Preference Option Lock English Off Auto Dolby Digital Channel Select Move Menu Exit CHANNEL menu Picture Sound Time Lock Tuning Set Password Block Program Parental Guidance Restore Factory Default...

Owners Manual
Page 17
... INFO button to select the input source. In DTV mode, more information will be displayed. Next program name and start and end play times. ! Audio mode, audio track. ! Signal strength for future use its features. To cut off the unit, and put the unit in standby mode, press Power button on the unit or the remote control to power on the mode, different information is in standby mode. Watch the signal from the HDMI 2 input jack...
... INFO button to select the input source. In DTV mode, more information will be displayed. Next program name and start and end play times. ! Audio mode, audio track. ! Signal strength for future use its features. To cut off the unit, and put the unit in standby mode, press Power button on the unit or the remote control to power on the mode, different information is in standby mode. Watch the signal from the HDMI 2 input jack...
Owners Manual
Page 18
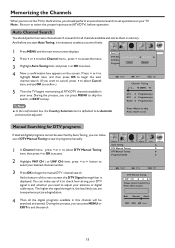
... use OK to confirm.) 5 Then the TV begins memorizing all channels available and stores them in your TV. Picture Sound Time Option Lock Auto Tuning DTV ManuaCloTuunntrinygSelection ATV Manual Tuning Programme Edit Start Australia Cancel Channel 4 Now a confirmation box appears on the screen. Memorizing the Channels When you turn on the TV for the first time, you should perform an auto channel search to search for DTV programs...
... use OK to confirm.) 5 Then the TV begins memorizing all channels available and stores them in your TV. Picture Sound Time Option Lock Auto Tuning DTV ManuaCloTuunntrinygSelection ATV Manual Tuning Programme Edit Start Australia Cancel Channel 4 Now a confirmation box appears on the screen. Memorizing the Channels When you turn on the TV for the first time, you should perform an auto channel search to search for DTV programs...
Owners Manual
Page 19
... analog TV program. Manual Fine Tuning Picture Sound Time Auto Tuning DTV Manual Tuning ATV Manual Tuning Programme Edit Option Lock Channel Select Move Menu Exit ATV Manual Tuning Storage To 1 Color System PAL Audio System BG Current CH Search Fine-Tune Frequency 1 445.25 MHz Exit SAVE Select Fine Tuning is unnecessary to set audio system. However, if abnormal sound occurs, you want to store. 3 Use 6 or5 to...
... analog TV program. Manual Fine Tuning Picture Sound Time Auto Tuning DTV Manual Tuning ATV Manual Tuning Programme Edit Option Lock Channel Select Move Menu Exit ATV Manual Tuning Storage To 1 Color System PAL Audio System BG Current CH Search Fine-Tune Frequency 1 445.25 MHz Exit SAVE Select Fine Tuning is unnecessary to set audio system. However, if abnormal sound occurs, you want to store. 3 Use 6 or5 to...

Owners Manual
Page 21
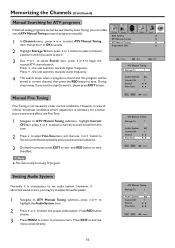
... found unless you to delete your unwanted channel, press BLUE button and a skip symbol appears alongside the selected channel in DTV mode. To delete channels This function allows you perform a channel search again. 18 Memorizing the Channels (Continued) Channel List Management After auto search, a default channel list is automatically assigned and cannot be changed by CH / CH . 1 Navigate to Channel menu and press 6 or5 to select Programme...
... found unless you to delete your unwanted channel, press BLUE button and a skip symbol appears alongside the selected channel in DTV mode. To delete channels This function allows you perform a channel search again. 18 Memorizing the Channels (Continued) Channel List Management After auto search, a default channel list is automatically assigned and cannot be changed by CH / CH . 1 Navigate to Channel menu and press 6 or5 to select Programme...

Owners Manual
Page 23
... Page Next Page Select Move Menu Exit Picture Sound Time Color Temperature Aspect Ratio Noise Reduction Screen Option Cool 16:9 Off Lock Channel Prev Page Next Page Select Move Menu Exit Option Description Picture Mode Selects a desired picture mode. Mild: Select for extended periods of dark picture such as red, or set . Note: To quickly change the picture mode, press the P.MODE button on the remote control repeatedly. User: The picture quality you may be...
... Page Next Page Select Move Menu Exit Picture Sound Time Color Temperature Aspect Ratio Noise Reduction Screen Option Cool 16:9 Off Lock Channel Prev Page Next Page Select Move Menu Exit Option Description Picture Mode Selects a desired picture mode. Mild: Select for extended periods of dark picture such as red, or set . Note: To quickly change the picture mode, press the P.MODE button on the remote control repeatedly. User: The picture quality you may be...
Owners Manual
Page 27
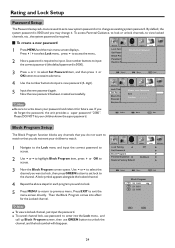
... your password and retain it . Block Program Confirm - - - - Picture Sound Time Option Lock Lock Tuning Set Password Block Program Please enter PasOsfwf ord En- Press EXIT to view locked channels, etc., the system password is required. To view a locked channel, just input the password. ! To access Parental Guidance, to lock or unlock channels, to exit the menu screen directly. Move Menu Exit 4 Use the number buttons to change it for future use. Rating and Lock Setup Password Setup The Password setup sub-menu is used to set lock to...
... your password and retain it . Block Program Confirm - - - - Picture Sound Time Option Lock Lock Tuning Set Password Block Program Please enter PasOsfwf ord En- Press EXIT to view locked channels, etc., the system password is required. To view a locked channel, just input the password. ! To access Parental Guidance, to lock or unlock channels, to exit the menu screen directly. Move Menu Exit 4 Use the number buttons to change it for future use. Rating and Lock Setup Password Setup The Password setup sub-menu is used to set lock to...

Owners Manual
Page 28
.... Use 3 or4 to toggle between YES or NO item, and Restore Factory Default press OK to exit the menu screen directly. MA(Mature Adult Audience): May contain mature themes, profane language, graphic violence, and sexual situations. Picture Sound Time Lock Tuning Set Password Block Program Parental Guidance Restore Factory Default Option Off Lock No Block Channel Select Move Menu Exit Restoring Factory Default Running this function to reset all settings to...
.... Use 3 or4 to toggle between YES or NO item, and Restore Factory Default press OK to exit the menu screen directly. MA(Mature Adult Audience): May contain mature themes, profane language, graphic violence, and sexual situations. Picture Sound Time Lock Tuning Set Password Block Program Parental Guidance Restore Factory Default Option Off Lock No Block Channel Select Move Menu Exit Restoring Factory Default Running this function to reset all settings to...
Owners Manual
Page 34
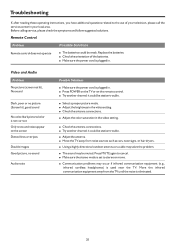
Make sure the power cord is not correct Only snow and noise appear on the remote control. ! Video and Audio Problem No picture (screen not lit), No sound Dark, poor or no sound Audio noise Possible Solutions ! Select a proper picture mode. ! Check the antenna connections. ! Adjust the antenna. ! Using a highly directional outdoor antenna or a cable may be station trouble. ! Make sure the stereo mode is eliminated. 31 Move the infrared communication equipment away from...
Make sure the power cord is not correct Only snow and noise appear on the remote control. ! Video and Audio Problem No picture (screen not lit), No sound Dark, poor or no sound Audio noise Possible Solutions ! Select a proper picture mode. ! Check the antenna connections. ! Adjust the antenna. ! Using a highly directional outdoor antenna or a cable may be station trouble. ! Make sure the stereo mode is eliminated. 31 Move the infrared communication equipment away from...
