
Owners Manual
Page 3
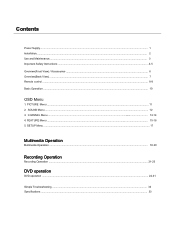
SOUND Menu ...12 3. FEATURE Menu ...15-16 5. Contents Power Supply...1 Installation...2 Use and Maintenance...3 Important Safety Instructions ...4-5 Overview(Front View) / Accessories ...6 Overview(Back View) ...7 Remote control ...8-9 Basic Operation ...10 OSD Menu 1. PICTURE Menu ...11 2. SETUP Menu ...17 Multimedia Operation Multimedia Operation ...18-20 Recording Operation Recording Operation ...21-23 DVD operation DVD operation ...24-31 Simple Troubleshooting ...32 Specifications ...33 CHANNEL Menu ...13-14 4.
SOUND Menu ...12 3. FEATURE Menu ...15-16 5. Contents Power Supply...1 Installation...2 Use and Maintenance...3 Important Safety Instructions ...4-5 Overview(Front View) / Accessories ...6 Overview(Back View) ...7 Remote control ...8-9 Basic Operation ...10 OSD Menu 1. PICTURE Menu ...11 2. SETUP Menu ...17 Multimedia Operation Multimedia Operation ...18-20 Recording Operation Recording Operation ...21-23 DVD operation DVD operation ...24-31 Simple Troubleshooting ...32 Specifications ...33 CHANNEL Menu ...13-14 4.

Owners Manual
Page 9
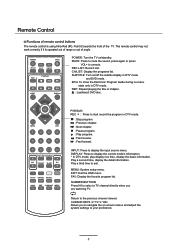
INPUT: Display the input source menu. POWER: Turn on/standby the TV set. CH+/-: Scan through channels. User's Guide Remote Control Batteries (2xAAA) Stand Cover for Wall-mounting 6 Overview Front View Please insert a 12cm disc according to the silk LED Indicator Remote Control Sensor (keep clear) MENU: Display/exit the OSD menu. PLAY: Play / Pause the disc playing EJECT: Eject the disc. VOL+/-: Adjust the volume.
INPUT: Display the input source menu. POWER: Turn on/standby the TV set. CH+/-: Scan through channels. User's Guide Remote Control Batteries (2xAAA) Stand Cover for Wall-mounting 6 Overview Front View Please insert a 12cm disc according to the silk LED Indicator Remote Control Sensor (keep clear) MENU: Display/exit the OSD menu. PLAY: Play / Pause the disc playing EJECT: Eject the disc. VOL+/-: Adjust the volume.

Owners Manual
Page 10
... the base away (do not remove the base mounting bracket), fix the Stand Cover. Overview Back View Pr P b Y HEADPHONE AV P C AUDIO COAX PC AUDIO VGA USB POWER HDMI1 HDMI2 HDMI3 Y Pb Pr RF HDMI3 USB HEADPHONE COAX VIDEO L-IN R-IN HDMI1 HDMI2 AC POWER IN: Connect to video output terminal of DVD. Video: Connect it to the YPbPr video output terminal of DVD. Connect it will occur damage to the...
... the base away (do not remove the base mounting bracket), fix the Stand Cover. Overview Back View Pr P b Y HEADPHONE AV P C AUDIO COAX PC AUDIO VGA USB POWER HDMI1 HDMI2 HDMI3 Y Pb Pr RF HDMI3 USB HEADPHONE COAX VIDEO L-IN R-IN HDMI1 HDMI2 AC POWER IN: Connect to video output terminal of DVD. Video: Connect it to the YPbPr video output terminal of DVD. Connect it will occur damage to the...
Owners Manual
Page 11
.... SUBTITLE: Turn on /standby. EPG: To show the Electronic Program Guide during no-menu state only in DTV mode. : Stop program. : Previous chapter. : Next chapter. : Pause program. : Play program. : Fast reverse. : Fast forward. DISPLAY: Press to the previous channel viewed. FAV: Display the favorite program list. NUMBER BUTTONS Press0-9 to select a TV channel directly when you to navigate the on-screen menus and adjust the system settings to your preference. 8 REP: Repeat playing the title or chapter. : Load/eject DVD disc. Play a third time to display the input source menu...
.... SUBTITLE: Turn on /standby. EPG: To show the Electronic Program Guide during no-menu state only in DTV mode. : Stop program. : Previous chapter. : Next chapter. : Pause program. : Play program. : Fast reverse. : Fast forward. DISPLAY: Press to the previous channel viewed. FAV: Display the favorite program list. NUMBER BUTTONS Press0-9 to select a TV channel directly when you to navigate the on-screen menus and adjust the system settings to your preference. 8 REP: Repeat playing the title or chapter. : Load/eject DVD disc. Play a third time to display the input source menu...

Owners Manual
Page 12
... half of it. PICTURE: Select the picture mode. SCREEN: Turn on/off /on the current subpage. CANCEL: Cancel the Teletext display. D-MENU:DVD play list/Disc menu. Remote Control POWER MUTE REC LIST EPG CH/LIST REP SUBTITLE REC PVR/DVD INPUT DISPLAY OK MENU 1 2 EXIT 3 4 5 6 7 8 9 0 FAV PICTURE NICAM/A2 VOL SOUND SLEEP CH SCREEN TV/TXT CANCEL REVEAL SETUP D-MENU TITLE PRO HOLD LAN SIZE A-B SUBPAGE INDEX GOTO SLOW CH / : Scan through channels. TITLE: DVD title. VOL / : Adjust the volume. INDEX: Go...
... half of it. PICTURE: Select the picture mode. SCREEN: Turn on/off /on the current subpage. CANCEL: Cancel the Teletext display. D-MENU:DVD play list/Disc menu. Remote Control POWER MUTE REC LIST EPG CH/LIST REP SUBTITLE REC PVR/DVD INPUT DISPLAY OK MENU 1 2 EXIT 3 4 5 6 7 8 9 0 FAV PICTURE NICAM/A2 VOL SOUND SLEEP CH SCREEN TV/TXT CANCEL REVEAL SETUP D-MENU TITLE PRO HOLD LAN SIZE A-B SUBPAGE INDEX GOTO SLOW CH / : Scan through channels. TITLE: DVD title. VOL / : Adjust the volume. INDEX: Go...
Owners Manual
Page 13
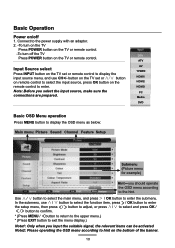
... should operate the OSD menu according to display the OSD menu as below: Main menu: Picture Sound Channel Feature Setup Ģ Submenu (Picture menu for example) Hint---you select the input source, make sure the connections are prepared. button on the TV set or remote control to display the input source menu, and use ġ / Ģ button to select the function item, press / OK button to enter the setup menu, then press / button to adjust, or press ġ / Ģ to select and...
... should operate the OSD menu according to display the OSD menu as below: Main menu: Picture Sound Channel Feature Setup Ģ Submenu (Picture menu for example) Hint---you select the input source, make sure the connections are prepared. button on the TV set or remote control to display the input source menu, and use ġ / Ģ button to select the function item, press / OK button to enter the setup menu, then press / button to adjust, or press ġ / Ģ to select and...

Owners Manual
Page 14
Picture menu Description Picture Mode: Select your eyes for the screen from black and white. Contrast: Adjust image contrast. Colour: Adjust image colour from 4:3,16:9, full, Zoom1, Zoom2 etc... Brightness: Adjust image black level. Colour Temp.: Select an optimum color temperature mode to reduce the video noise level between Off, Low, Middle and High. 11 OSD Menu 1. Tint: Control the tint ( NTSC mode only). Noise Reduction: If the broadcast signal received is...
Picture menu Description Picture Mode: Select your eyes for the screen from black and white. Contrast: Adjust image contrast. Colour: Adjust image colour from 4:3,16:9, full, Zoom1, Zoom2 etc... Brightness: Adjust image black level. Colour Temp.: Select an optimum color temperature mode to reduce the video noise level between Off, Low, Middle and High. 11 OSD Menu 1. Tint: Control the tint ( NTSC mode only). Noise Reduction: If the broadcast signal received is...

Owners Manual
Page 16
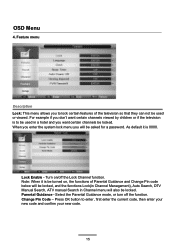
..., BLUE-Fav4. Note: You could display the Favourite list 1/2/3/4 by the colour buttons. Delete: Press RED button to sign the channels you want to view the program. Up to swap the position. button. Lock enable) at ON to sign(lock) or cancel(unlock) the channel. And you exit. Favorite Management: Add or remove favourite channels by press the FAV button once/twice/three times/ four times. 13 Lock:User must set...
..., BLUE-Fav4. Note: You could display the Favourite list 1/2/3/4 by the colour buttons. Delete: Press RED button to sign the channels you want to view the program. Up to swap the position. button. Lock enable) at ON to sign(lock) or cancel(unlock) the channel. And you exit. Favorite Management: Add or remove favourite channels by press the FAV button once/twice/three times/ four times. 13 Lock:User must set...
Owners Manual
Page 17
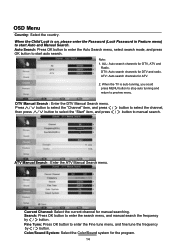
... stop auto tunning and return to manual search. 585500 7 ATV Manual Search : Enter the ATV Manual Search menu. DTV Manual Search : Enter the DTV Manual Search menu. Auto Search: Press OK button to enter the Auto Search menu, select search mode, and press OK button to start auto search. ALL: Auto search channels for DTV and radio. DTV: Auto search channels for DTV, ATV and Radio. Color/Sound System: Select the Color/Sound system for the program...
... stop auto tunning and return to manual search. 585500 7 ATV Manual Search : Enter the ATV Manual Search menu. DTV Manual Search : Enter the DTV Manual Search menu. Auto Search: Press OK button to enter the Auto Search menu, select search mode, and press OK button to start auto search. ALL: Auto search channels for DTV and radio. DTV: Auto search channels for DTV, ATV and Radio. Color/Sound System: Select the Color/Sound system for the program...
Owners Manual
Page 18
...), Auto Search, DTV Manual Search, ATV manual Search in a hotel and you to enter , first enter the current code, then enter your new code and confirm your new code. 15 Note: When it is to be used or viewed. For example if you will also be asked for a password. Select the Parental Guidance mode, or turn off the Lock Channel function. When you enter the system lock menu...
...), Auto Search, DTV Manual Search, ATV manual Search in a hotel and you to enter , first enter the current code, then enter your new code and confirm your new code. 15 Note: When it is to be used or viewed. For example if you will also be asked for a password. Select the Parental Guidance mode, or turn off the Lock Channel function. When you enter the system lock menu...

Owners Manual
Page 19
... the Recording Operation section. 16 Auto Power Off: The TV will switch off after a certain amount of time. Default Volume: Set the default volume when the program is taken automatically from the USB device. Language: Lets you select. You can switch on the TV set all Hotel Settings from the digital signal). Channel Lock: Disable the Channel menu in OSD. Sound Lock: Disable the Sound menu in OSD. Clock: Allows you turn on /off . Setup Lock: Disable the Setup menu in OSD. Enter the Hotel Setting menu. Set Source: Select the default source...
... the Recording Operation section. 16 Auto Power Off: The TV will switch off after a certain amount of time. Default Volume: Set the default volume when the program is taken automatically from the USB device. Language: Lets you select. You can switch on the TV set all Hotel Settings from the digital signal). Channel Lock: Disable the Channel menu in OSD. Sound Lock: Disable the Sound menu in OSD. Clock: Allows you turn on /off . Setup Lock: Disable the Setup menu in OSD. Enter the Hotel Setting menu. Set Source: Select the default source...
Owners Manual
Page 20
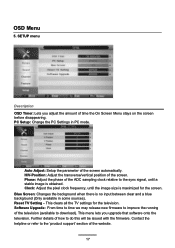
...: Adjust the transverse/vertical position of time the On Screen Menu stays on the screen before disappearing. This menu lets you adjust the amount of the screen. SETUP menu Description OSD Timer: Lets you upgrade that software onto the television. PC Setup: Change the PC Settings in some sources). Clock: Adjust the pixel clock frequency, until a stable image is no input between clear and a blue background (Only available in PC mode.
...: Adjust the transverse/vertical position of time the On Screen Menu stays on the screen before disappearing. This menu lets you adjust the amount of the screen. SETUP menu Description OSD Timer: Lets you upgrade that software onto the television. PC Setup: Change the PC Settings in some sources). Clock: Adjust the pixel clock frequency, until a stable image is no input between clear and a blue background (Only available in PC mode.

Owners Manual
Page 21
... of the device display on the screen as shown below. Press button to previous menu, Press EXIT button to delete the file; Press RED button to select the file view type: list( ) or thumbnails( ). Hints for operation 3). Press button to stop and exit the full screen program, please notes the hints on the remote control to display the input source menu, select Media source by the / buttons, and press OK button to enter the file list as shown...
... of the device display on the screen as shown below. Press button to previous menu, Press EXIT button to delete the file; Press RED button to select the file view type: list( ) or thumbnails( ). Hints for operation 3). Press button to stop and exit the full screen program, please notes the hints on the remote control to display the input source menu, select Media source by the / buttons, and press OK button to enter the file list as shown...
Owners Manual
Page 22
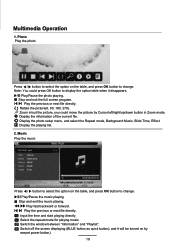
... turned on the table, and press OK button to change . Note: You could move the picture by exepet power button). 19 Play the previous or next file directly. Play fast backword or forword. Play/Pause the photo playing. Ratate the picture(0, 90, 180, 270). Display the photo setup menu, and select the Repeat mode, Background Music, Slide Time, Effect. Input the time and start playing directly. Switch off the screen displaying (BLUE button as quick button), and it disappears. Display the playing list. 2. Multimedia Operation...
... turned on the table, and press OK button to change . Note: You could move the picture by exepet power button). 19 Play the previous or next file directly. Play fast backword or forword. Play/Pause the photo playing. Ratate the picture(0, 90, 180, 270). Display the photo setup menu, and select the Repeat mode, Background Music, Slide Time, Effect. Input the time and start playing directly. Switch off the screen displaying (BLUE button as quick button), and it disappears. Display the playing list. 2. Multimedia Operation...

Owners Manual
Page 23
AB Set the A-B repeat playing mode. RED button: Add or delete the bookmark. Play the movie in slow mode. Display the movie setup menu, and setup the Program, Subtitle, Audio, Repeat mode. Multimedia Operation 3. Stop and exit the full screen program. Play fast backword or forword. Play the previous or next file directly. Display the playing list. Display the information of the text. eBook Play the text Turn to change. BLUE button: Display the playlist. 20 Movie Play the movie Multimedia Operation Press / button to select the option on the...
AB Set the A-B repeat playing mode. RED button: Add or delete the bookmark. Play the movie in slow mode. Display the movie setup menu, and setup the Program, Subtitle, Audio, Repeat mode. Multimedia Operation 3. Stop and exit the full screen program. Play fast backword or forword. Play the previous or next file directly. Display the playing list. Display the information of the text. eBook Play the text Turn to change. BLUE button: Display the playlist. 20 Movie Play the movie Multimedia Operation Press / button to select the option on the...
Owners Manual
Page 24
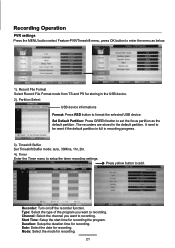
... Buffer mode: auto, 30Mins, 1hr, 2hr. 4). Timer Enter the Timer menu to be reset if the default partition is full in recording progress. 3). Channel: Select the channel you want to add. Date: Select the date for recording. Recorder: Turn on/off the recorder function. Duration: Setup the duration time for recording. Recording Operation PVR settings Press the MENU button select Feature-PVR/Timeshift menu, press OK button to enter the menu as the default partition .The recorders are stored in the default partition. Record File Format Select Record File Format mode...
... Buffer mode: auto, 30Mins, 1hr, 2hr. 4). Timer Enter the Timer menu to be reset if the default partition is full in recording progress. 3). Channel: Select the channel you want to add. Date: Select the date for recording. Recorder: Turn on/off the recorder function. Duration: Setup the duration time for recording. Recording Operation PVR settings Press the MENU button select Feature-PVR/Timeshift menu, press OK button to enter the menu as the default partition .The recorders are stored in the default partition. Record File Format Select Record File Format mode...
Owners Manual
Page 25
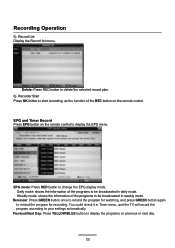
... RED button to display the EPG menu. EPG and Timer Record Press EPG button on the remote control to delete the selected record plan. 6). Previous/Next Day: Press YELLOW/BLUE button to change the EPG display mode. Reminder EPG mode: Press RED button to display the programs on the remote control. Daily mode: shows the information of the programs to your settings automatically. You could check it in Timer menu, and the TV will record the program according...
... RED button to display the EPG menu. EPG and Timer Record Press EPG button on the remote control to delete the selected record plan. 6). Previous/Next Day: Press YELLOW/BLUE button to change the EPG display mode. Reminder EPG mode: Press RED button to display the programs on the remote control. Daily mode: shows the information of the programs to your settings automatically. You could check it in Timer menu, and the TV will record the program according...

Owners Manual
Page 26
Recording Operation Recording Press REC button on the remote control to start recording in DTV mode, and the TV will give you exit the Recorder list. Please make sure the USB device is on the TV. c. Press STOP button to exit the timeshift mode. d. Press Recording list button to display the Recorder list, and you could also play the program you are recording from the beginning, and the timeshift will be going on . Please make sure the...
Recording Operation Recording Press REC button on the remote control to start recording in DTV mode, and the TV will give you exit the Recorder list. Please make sure the USB device is on the TV. c. Press STOP button to exit the timeshift mode. d. Press Recording list button to display the Recorder list, and you could also play the program you are recording from the beginning, and the timeshift will be going on . Please make sure the...

Owners Manual
Page 27
... Disc according to picture next to select DVD mode. Hold the disc around the outside with your fingers and place the disc into the player. Audio 4:3 Pan Scan 4:3 Letter Box Wide 4:3 Pan Scan 4:3 Letter Box Wide 24 To "Eject" the disc, press the EJECT button on the TV or the " " button on the TV or the remote control, then press the INPUT button to disc slot. If there is no disc in the DVD player the screen...
... Disc according to picture next to select DVD mode. Hold the disc around the outside with your fingers and place the disc into the player. Audio 4:3 Pan Scan 4:3 Letter Box Wide 4:3 Pan Scan 4:3 Letter Box Wide 24 To "Eject" the disc, press the EJECT button on the TV or the " " button on the TV or the remote control, then press the INPUT button to disc slot. If there is no disc in the DVD player the screen...

Owners Manual
Page 35
... as expected,connect your helpline for household use it in the remote control and not weak or exhausted. Simple Troubleshooting If the display fails or performance dramatically deteriorates check the Display in accordance with the following instructions.Remember to check the peripherals topinpiont the source of the unit. - Press either the power button or the Standby button on electromagnetic waves. Poor picture quality...
... as expected,connect your helpline for household use it in the remote control and not weak or exhausted. Simple Troubleshooting If the display fails or performance dramatically deteriorates check the Display in accordance with the following instructions.Remember to check the peripherals topinpiont the source of the unit. - Press either the power button or the Standby button on electromagnetic waves. Poor picture quality...


