
Owners Manual
Page 2
... Rear Panel...5 Remote Control...6 Remote Control Drawing...6 Preparation of Remote Control...8 Using of Remote control...8 System Connections...9 Connecting to the Power Supply...9 Connecting a USB Device...9 Connecting to an External HDMI Signal Source 10 Connecting an External Equipment to COMPONENT Video IN 10 Connecting to COMPOSITE Input...11 Connecting to Coaxial Digital Output...11 Connecting to a PC...12 Connecting to Earphones...12 Connecting to TV-Signal Input...12 Basic Operation...13 Turning the TV On and Off...13 The First Time Installation...13 Using the OSD (on-screen display...
... Rear Panel...5 Remote Control...6 Remote Control Drawing...6 Preparation of Remote Control...8 Using of Remote control...8 System Connections...9 Connecting to the Power Supply...9 Connecting a USB Device...9 Connecting to an External HDMI Signal Source 10 Connecting an External Equipment to COMPONENT Video IN 10 Connecting to COMPOSITE Input...11 Connecting to Coaxial Digital Output...11 Connecting to a PC...12 Connecting to Earphones...12 Connecting to TV-Signal Input...12 Basic Operation...13 Turning the TV On and Off...13 The First Time Installation...13 Using the OSD (on-screen display...

Owners Manual
Page 5
... remote control. 2. Power indicator In active mode, it turns red. 3. POWER button Press to decrease or increase the volume. MENU button Press to enter or exit system setup menu. 8. ►PLAY button Press to eject the disc out in setup menu, this button also serves the OK button. 7. When in DVD mode. 9. When in DVD mode. 10. EJECT button Press to play the disc in setup menu, this button also serves the ◄► direction button. 6. in setup menu, this button also serves the ▲▼ direction button. 5. Disk tray...
... remote control. 2. Power indicator In active mode, it turns red. 3. POWER button Press to decrease or increase the volume. MENU button Press to enter or exit system setup menu. 8. ►PLAY button Press to eject the disc out in setup menu, this button also serves the OK button. 7. When in DVD mode. 9. When in DVD mode. 10. EJECT button Press to play the disc in setup menu, this button also serves the ◄► direction button. 6. in setup menu, this button also serves the ▲▼ direction button. 5. Disk tray...
Owners Manual
Page 7
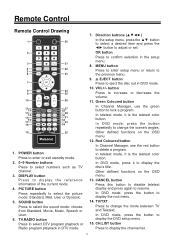
... Channel Manager, use the red button to display the disc's title. PICTURE button Press repeatedly to display the root menu. 14. In teletext mode, it to delete a program. In DVD mode, press the button to select the picture mode: Standard, Mild, User or Dynamic. 5. In DVD mode, press the button to confirm selection in DTV mode. Direction buttons In the setup menu, press the ▲▼ button 1 20 to select a desired item and press the ◄► button to adjust or set. 2 3 DISPLAY 21 4 PICTURE SOUND ASPECT...
... Channel Manager, use the red button to display the disc's title. PICTURE button Press repeatedly to display the root menu. 14. In teletext mode, it to delete a program. In DVD mode, press the button to select the picture mode: Standard, Mild, User or Dynamic. 5. In DVD mode, press the button to confirm selection in DTV mode. Direction buttons In the setup menu, press the ▲▼ button 1 20 to select a desired item and press the ◄► button to adjust or set. 2 3 DISPLAY 21 4 PICTURE SOUND ASPECT...

Owners Manual
Page 8
.... ASPECT button Press to shift the aspect radio of the screen and third to select audio language in other modes except DTV mode. SLEEP button Press the button repeatedly to select the desired time to sleep or select Off to fast forward / fast reverse. 20. In DVD mode, press the button to close the function. 26. In DVD mode, press the button to display the favorite list. 33. FAV button Press to open the search menu. In teletext mode, press SUBPAGE button to select sound...
.... ASPECT button Press to shift the aspect radio of the screen and third to select audio language in other modes except DTV mode. SLEEP button Press the button repeatedly to select the desired time to sleep or select Off to fast forward / fast reverse. 20. In DVD mode, press the button to close the function. 26. In DVD mode, press the button to display the favorite list. 33. FAV button Press to open the search menu. In teletext mode, press SUBPAGE button to select sound...

Owners Manual
Page 10
... observe the color code when connecting audio and video cables. Connecting to AV and YPbPr. 9 Press INPUT then direction buttons to select HDMI 1, HDMI 2 or HDMI3 mode, and then press HDMI1 the OK button to the Power Supply Connect the plug of the power cord on the rear panel of the unit and the HDMI signal source. 3. See the figure below: Make sure that the desired file for media play or software upgrade is designed with a USB port...
... observe the color code when connecting audio and video cables. Connecting to AV and YPbPr. 9 Press INPUT then direction buttons to select HDMI 1, HDMI 2 or HDMI3 mode, and then press HDMI1 the OK button to the Power Supply Connect the plug of the power cord on the rear panel of the unit and the HDMI signal source. 3. See the figure below: Make sure that the desired file for media play or software upgrade is designed with a USB port...

Owners Manual
Page 12
... panel of the unit and the PC. 5. Connect one end of the VGA cable to the VGA jack on the power of the unit and the other end to the PC VGA output. 2. Set the PC video resolution to confirm. 11 Connecting to a PC The unit can be connected to a PC via the VGA cable and PC audio cable. 1. Press INPUT then direction buttons to select PC mode...
... panel of the unit and the PC. 5. Connect one end of the VGA cable to the VGA jack on the power of the unit and the other end to the PC VGA output. 2. Set the PC video resolution to confirm. 11 Connecting to a PC The unit can be connected to a PC via the VGA cable and PC audio cable. 1. Press INPUT then direction buttons to select PC mode...
Owners Manual
Page 15
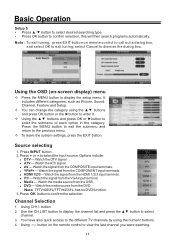
..., such as Picture, Sound, Channel, Feature and Setup. ² You can change the category using the numeric buttons. 4. Press the MENU button to exit the submenu and return to view the last channel you were watching. 14 DTV - AV - PC - Note: TFTV4055FL/TFTV4255FL has no DVD function. 3. Using button on remote control to call out a dialog box, and select OK to exit tuning; Watch the signal from the HDMI 1/2/3 input terminal. ! Watch...
..., such as Picture, Sound, Channel, Feature and Setup. ² You can change the category using the numeric buttons. 4. Press the MENU button to exit the submenu and return to view the last channel you were watching. 14 DTV - AV - PC - Note: TFTV4055FL/TFTV4255FL has no DVD function. 3. Using button on remote control to call out a dialog box, and select OK to exit tuning; Watch the signal from the HDMI 1/2/3 input terminal. ! Watch...
Owners Manual
Page 16
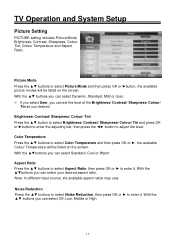
... OK or ►button, the available picture modes will be listed on the screen. With the ▲▼ buttons you desired. With the ▲▼ buttons you can select Dynamic, Standard, Mild or User. If you select User, you can set the level of the Brightness/ Contrast/ Sharpness/ Colour/ Tin as you can select your desired aspect ratio. TV Operation and System Setup Picture Setting PICTURE setting includes Picture Mode, Brightness, Contrast...
... OK or ►button, the available picture modes will be listed on the screen. With the ▲▼ buttons you desired. With the ▲▼ buttons you can select Dynamic, Standard, Mild or User. If you select User, you can set the level of the Brightness/ Contrast/ Sharpness/ Colour/ Tin as you can select your desired aspect ratio. TV Operation and System Setup Picture Setting PICTURE setting includes Picture Mode, Brightness, Contrast...
Owners Manual
Page 19
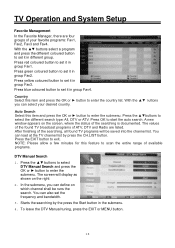
... DTV Manual tuning, press the EXIT or MENU button. 18 Press green coloured button to set it in group Fav1. Press yellow coloured button to set it in group Fav4. Press red coloured button to set it in the submenu. 4. With the ▲▼ buttons select a program and press the different coloured button to scan the entire range of the found TV programs will display as...
... DTV Manual tuning, press the EXIT or MENU button. 18 Press green coloured button to set it in group Fav1. Press yellow coloured button to set it in group Fav4. Press red coloured button to set it in the submenu. 4. With the ▲▼ buttons select a program and press the different coloured button to scan the entire range of the found TV programs will display as...
Owners Manual
Page 20
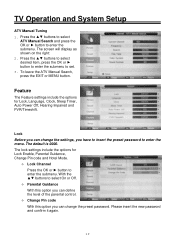
... or MENU button. Feature The Feature settings include the options for Lock Enable, Parental Guidance, Change Pin code and Hotel Mode. Lock Channel Press the OK or ► button to enter the menu. TV Operation and System Setup ATV Manual Tuning 1. Press the ▲▼ buttons to select desired item, press the OK or ► button to enter the submenu to enter the submenu. The screen will display as...
... or MENU button. Feature The Feature settings include the options for Lock Enable, Parental Guidance, Change Pin code and Hotel Mode. Lock Channel Press the OK or ► button to enter the menu. TV Operation and System Setup ATV Manual Tuning 1. Press the ▲▼ buttons to select desired item, press the OK or ► button to enter the submenu to enter the submenu. The screen will display as...
Owners Manual
Page 21
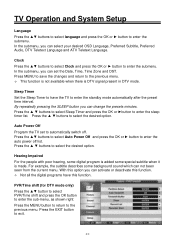
... background sound which can change the presets minutes. Press MENU to save the changes and return to have this function. Not all the digital programs have the TV to select the desired option. By repeatedly pressing the SLEEP button you can activate or deactivate this function. For example, the subtitle describes some special subtitle when it is DTV signal present in DTV mode. With...
... background sound which can change the presets minutes. Press MENU to save the changes and return to have this function. Not all the digital programs have the TV to select the desired option. By repeatedly pressing the SLEEP button you can activate or deactivate this function. For example, the subtitle describes some special subtitle when it is DTV signal present in DTV mode. With...
Owners Manual
Page 22
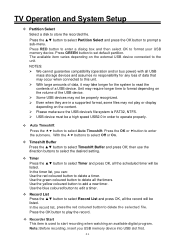
...; Please make sure the USB device's file system is used to play or display depending on the external USB device connected to prompt a sub-menu. With the ‚ buttons to select Off or On. Timeshift Buffer Press the ▲▼ button to store the recorded file. Press the OK button to start recording when watching an available digital program. TV Operation and System Setup Partition Select Select a disk to select Timeshift Buffer...
...; Please make sure the USB device's file system is used to play or display depending on the external USB device connected to prompt a sub-menu. With the ‚ buttons to select Off or On. Timeshift Buffer Press the ▲▼ button to store the recorded file. Press the OK button to start recording when watching an available digital program. TV Operation and System Setup Partition Select Select a disk to select Timeshift Buffer...
Owners Manual
Page 24
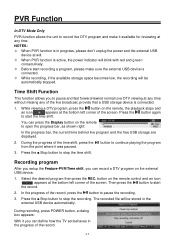
... program and the free USB storage are displayed. 2. You can record a DTV program on the remote to start recording a program, please make it was paused. Then press the button to open the progress bar, as shown right: In the progress bar, the current time behind live broadcast, provide that a USB storage device is connected. While recording, if the available storage space becomes low, the recording will be automatically stopped. The recorded file...
... program and the free USB storage are displayed. 2. You can record a DTV program on the remote to start recording a program, please make it was paused. Then press the button to open the progress bar, as shown right: In the progress bar, the current time behind live broadcast, provide that a USB storage device is connected. While recording, if the available storage space becomes low, the recording will be automatically stopped. The recorded file...
Owners Manual
Page 29
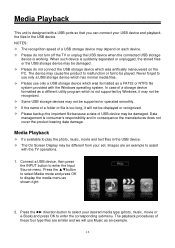
... display the media menu as a different utility program which is suddenly separated or unplugged, the stored files or the USB storage device may depend on the PC. The device may not be supported or operated smoothly. If the name of USB device may be damaged. Press the◄► direction button to enter the Input Source menu. Data management is too long, it will use...
... display the media menu as a different utility program which is suddenly separated or unplugged, the stored files or the USB storage device may depend on the PC. The device may not be supported or operated smoothly. If the name of USB device may be damaged. Press the◄► direction button to enter the Input Source menu. Data management is too long, it will use...

Owners Manual
Page 31
DVD Playback Operation Discs Supported DISC LOGO DVD CD CONTENTS Audio + Video (active picture) Audio SIZE 12cm 12cm MAXIMUM TIME 133min(SS-SL) 242min(SS-DL) 266min(DS-SL) 484min(DS-DL) 74min JPEG Still high resolution 12cm NOTES: The operating method of creating compatible discs. Some computers and/or software programs may not be capable of some discs may not have a recording by chapter facility. Track A segment of...
DVD Playback Operation Discs Supported DISC LOGO DVD CD CONTENTS Audio + Video (active picture) Audio SIZE 12cm 12cm MAXIMUM TIME 133min(SS-SL) 242min(SS-DL) 266min(DS-SL) 484min(DS-DL) 74min JPEG Still high resolution 12cm NOTES: The operating method of creating compatible discs. Some computers and/or software programs may not be capable of some discs may not have a recording by chapter facility. Track A segment of...

Owners Manual
Page 32
... discs do not start -up. Use the direction buttons to fast forward through the disc. You may start . Press the button to select track or photo is pressed, the fast forward Pause playback motion speed changes. 1. Press the button to the TV set. DVD players and discs are coded by region. NOTES: Select DVD mode before insert disc. Use of CD and JPEG discs the next menu. previous chapter. 3. Each time the button is selected...
... discs do not start -up. Use the direction buttons to fast forward through the disc. You may start . Press the button to select track or photo is pressed, the fast forward Pause playback motion speed changes. 1. Press the button to the TV set. DVD players and discs are coded by region. NOTES: Select DVD mode before insert disc. Use of CD and JPEG discs the next menu. previous chapter. 3. Each time the button is selected...

Owners Manual
Page 33
... picture is inserted into the player, a root menu will be cancelled automatically. 32 D.GOTO Press the D.GOTO button repeatedly to resume normal playing. 4. When a disc containing standard JPEG picture files is displayed, rotation will play a multi-subtitle disc you can press the D.SUB button on the remote control to resume normal playback. 5. Press the ■ STOP button to stop on the current picture. When you play according to select a desired language. Note: This function is a common picture format...
... picture is inserted into the player, a root menu will be cancelled automatically. 32 D.GOTO Press the D.GOTO button repeatedly to resume normal playing. 4. When a disc containing standard JPEG picture files is displayed, rotation will play a multi-subtitle disc you can press the D.SUB button on the remote control to resume normal playback. 5. Press the ■ STOP button to stop on the current picture. When you play according to select a desired language. Note: This function is a common picture format...

Owners Manual
Page 34
... the submenu, you can change the category using the ◄► buttons and press OK button to enter it. Using the ▲▼ buttons and press OK or ►button to enter the submenu. Video Setup Page In the submenu, you can select your desired OSD Language, turn on or off Screen Saver and Last Memory functions. OSD Language Press the OK or...
... the submenu, you can change the category using the ◄► buttons and press OK button to enter it. Using the ▲▼ buttons and press OK or ►button to enter the submenu. Video Setup Page In the submenu, you can select your desired OSD Language, turn on or off Screen Saver and Last Memory functions. OSD Language Press the OK or...

Owners Manual
Page 35
... the OK or ► button to enter the submenu. Use the ▲▼ buttons to select the audio type you change it into new password. (0000) Default Press the OK or ► button to adjust the contrast ratio. 5. Use the ▲▼ buttons to select Pal TV, Multi or NTSC. Audio Press the OK or ► button to enter the submenu. Use the ◄► buttons to adjust the brightness.
... the OK or ► button to enter the submenu. Use the ▲▼ buttons to select the audio type you change it into new password. (0000) Default Press the OK or ► button to adjust the contrast ratio. 5. Use the ▲▼ buttons to select Pal TV, Multi or NTSC. Audio Press the OK or ► button to enter the submenu. Use the ◄► buttons to adjust the brightness.

Owners Manual
Page 36
... or replace it . If this occurs, unplug the power-supply cord from the outlet and plug it has, remove the disc and keep the player power on until the moisture evaporates. Make sure the batteries are not muted. Make sure a disc is not corresponding to the unit. There is correct. Check if the video type input signal is loaded. If it in the picture menu. The remote control does not work. Make...
... or replace it . If this occurs, unplug the power-supply cord from the outlet and plug it has, remove the disc and keep the player power on until the moisture evaporates. Make sure the batteries are not muted. Make sure a disc is not corresponding to the unit. There is correct. Check if the video type input signal is loaded. If it in the picture menu. The remote control does not work. Make...


