

Owners Manual
Page 2
......8 Using of Remote control...8 System Connections...9 Connecting to the Power Supply...9 Connecting a USB Device...9 Connecting to an External HDMI Signal Source...10 Connecting an External Equipment to COMPONENT Video IN 10 Connecting to COMPOSITE Input...11 Connecting to Coaxial Digital Output...11 Connecting to a PC...12 Connecting to Earphones...12 Connecting to TV-Signal Input...13 Basic Operation...14 Turning the TV On and Off...14 Source selecting...14 Channel Selection...14 The First Time Installation...14 TV Operation and System Setup...15 Picture...15 Sound...16 Channel...17 Lock...
......8 Using of Remote control...8 System Connections...9 Connecting to the Power Supply...9 Connecting a USB Device...9 Connecting to an External HDMI Signal Source...10 Connecting an External Equipment to COMPONENT Video IN 10 Connecting to COMPOSITE Input...11 Connecting to Coaxial Digital Output...11 Connecting to a PC...12 Connecting to Earphones...12 Connecting to TV-Signal Input...13 Basic Operation...14 Turning the TV On and Off...14 Source selecting...14 Channel Selection...14 The First Time Installation...14 TV Operation and System Setup...15 Picture...15 Sound...16 Channel...17 Lock...
Owners Manual
Page 3
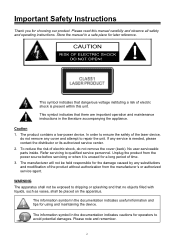
... place for operators to repair the unit. Please read this unit. If any cover and attempt to avoid potential damages. To reduce the risk of time. 3. The manufacturer will not be placed on the apparatus. Important Safety Instructions Thank you for a long period of electric shock, do not remove any service is present within this manual carefully...
... place for operators to repair the unit. Please read this unit. If any cover and attempt to avoid potential damages. To reduce the risk of time. 3. The manufacturer will not be placed on the apparatus. Important Safety Instructions Thank you for a long period of electric shock, do not remove any service is present within this manual carefully...

Owners Manual
Page 4
.... 14. Install according to qualified service personnel. Refer all instructions to a mains socket outlet with liquids, such as power-supply cord or plug is required when the apparatus has been damaged in any ventilation openings. Use only with the stand, tripod, bracket, or table specified by hand. 3 Read these instructions. 3. The apparatus shall be exposed to rain or moisture, does not operate normally...
.... 14. Install according to qualified service personnel. Refer all instructions to a mains socket outlet with liquids, such as power-supply cord or plug is required when the apparatus has been damaged in any ventilation openings. Use only with the stand, tripod, bracket, or table specified by hand. 3 Read these instructions. 3. The apparatus shall be exposed to rain or moisture, does not operate normally...
Owners Manual
Page 5
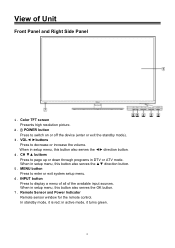
... in DTV or ATV mode. VOL◄ ►buttons Press to page up or down through programs in setup menu, this button also serves the ◄► direction button. 4. View of the available input sources. Color TFT screen Presents high resolution picture. 2. When in active mode, it is red; Remote Sensor and Power Indicator Remote sensor window for the remote control. MENU button Press to enter or exit system setup menu. 6. in setup menu, this button also serves the ▲...
... in DTV or ATV mode. VOL◄ ►buttons Press to page up or down through programs in setup menu, this button also serves the ◄► direction button. 4. View of the available input sources. Color TFT screen Presents high resolution picture. 2. When in active mode, it is red; Remote Sensor and Power Indicator Remote sensor window for the remote control. MENU button Press to enter or exit system setup menu. 6. in setup menu, this button also serves the ▲...

Owners Manual
Page 6
... switched off. 5. COMPOSITE Input Jacks Connecting for VGA audio signal input. 8. COMPONENT shares the same audio jacks with COMPOSITE. 7. VGA IN Jack Connected to receive the ATV/DTV program in ATV/DTV mode. 5 RF Input Jack Connected to external antenna to the VGA output jack on a personal computer. 9. VGA AUDIO IN Jacks Connecting for AV signal input in YPbPr mode. COMPONENT Input Jacks Connecting for HDMI signal. 4. View of Unit Rear Panel 1. USB Port Connect the USB device. 3. HDMI1/HDMI2/HDMI3 Input Jack Connecting for the COMPONENT input...
... switched off. 5. COMPOSITE Input Jacks Connecting for VGA audio signal input. 8. COMPONENT shares the same audio jacks with COMPOSITE. 7. VGA IN Jack Connected to receive the ATV/DTV program in ATV/DTV mode. 5 RF Input Jack Connected to external antenna to the VGA output jack on a personal computer. 9. VGA AUDIO IN Jacks Connecting for AV signal input in YPbPr mode. COMPONENT Input Jacks Connecting for HDMI signal. 4. View of Unit Rear Panel 1. USB Port Connect the USB device. 3. HDMI1/HDMI2/HDMI3 Input Jack Connecting for the COMPONENT input...
Owners Manual
Page 7
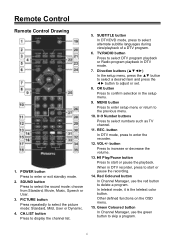
Remote Control Remote Control Drawing 1. MENU button Press to enter setup menu or return to the previous menu. 10. 0~9 Number buttons Press to increase or decrease the volume. 13. button Press to select numbers such as TV channel. 11. Red Coloured button In Channel Manager, use the green button to skip a program. 6 SOUND button Press to select alternate subtitle languages during view/playback of a DTV program. 6. SUBTITLE button In DTV/DVD mode, press to select the sound mode: choose from Standard, Movie...
Remote Control Remote Control Drawing 1. MENU button Press to enter setup menu or return to the previous menu. 10. 0~9 Number buttons Press to increase or decrease the volume. 13. button Press to select numbers such as TV channel. 11. Red Coloured button In Channel Manager, use the green button to skip a program. 6 SOUND button Press to select alternate subtitle languages during view/playback of a DTV program. 6. SUBTITLE button In DTV/DVD mode, press to select the sound mode: choose from Standard, Movie...

Owners Manual
Page 8
... the speaker output. 20. Yellow Coloured button In Channel Manager, use the blue button to double the size of teletext letters in media player. EXIT button Press to shift the aspect radio of the screen. 21. When in media player. Remote Control In teletext mode, it is the teletext color button. CANCEL button Press this button to display or remove concealed information on the OSD menu. 32. Blue Coloured button In Channel Manager, use the yellow button...
... the speaker output. 20. Yellow Coloured button In Channel Manager, use the blue button to double the size of teletext letters in media player. EXIT button Press to shift the aspect radio of the screen. 21. When in media player. Remote Control In teletext mode, it is the teletext color button. CANCEL button Press this button to display or remove concealed information on the OSD menu. 32. Blue Coloured button In Channel Manager, use the yellow button...

Owners Manual
Page 10
... can connect your USB device for media play , record or software upgrade. Connecting a USB Device This unit is stored in the USB device before connection. 9 Connecting to the Power Supply Connect the plug of the power cord on the rear panel of the unit to the AC 100~240V wall outlet. System Connections Do not connect the power cord until all other connections have been made. Ensure that you observe the color code when connecting audio and video cables.
... can connect your USB device for media play , record or software upgrade. Connecting a USB Device This unit is stored in the USB device before connection. 9 Connecting to the Power Supply Connect the plug of the power cord on the rear panel of the unit to the AC 100~240V wall outlet. System Connections Do not connect the power cord until all other connections have been made. Ensure that you observe the color code when connecting audio and video cables.

Owners Manual
Page 11
... power of the unit and the HDMI signal source. 3. After connection, turn on the rear panel of the unit. Connect the white / red audio cables for sound from the audio (L/R) output jacks on your external equipment to one of the HDMI jacks on the TV's rear panel. 2. Press INPUT then direction buttons to select HDMI 1, HDMI 2 or HDMI3 mode, and then press the OK button to AV and YPBPR. Use a component cable (not supplied) to connect an external AV signal source to an External HDMI Signal Source 1. System Connections Connecting...
... power of the unit and the HDMI signal source. 3. After connection, turn on the rear panel of the unit. Connect the white / red audio cables for sound from the audio (L/R) output jacks on your external equipment to one of the HDMI jacks on the TV's rear panel. 2. Press INPUT then direction buttons to select HDMI 1, HDMI 2 or HDMI3 mode, and then press the OK button to AV and YPBPR. Use a component cable (not supplied) to connect an external AV signal source to an External HDMI Signal Source 1. System Connections Connecting...

Owners Manual
Page 12
After connection, turn on the rear panel of the unit and the external AV signal source. This feature is designed with coaxial digital audio input connectors. 11 Press INPUT then direction buttons to select AV mode, and then press the OK button to the digital amplifier, see the figure below. System Connections Connecting to COMPOSITE Input Use the AV cables to connect the external AV signal source to the AV input jacks on the power of the...
After connection, turn on the rear panel of the unit and the external AV signal source. This feature is designed with coaxial digital audio input connectors. 11 Press INPUT then direction buttons to select AV mode, and then press the OK button to the digital amplifier, see the figure below. System Connections Connecting to COMPOSITE Input Use the AV cables to connect the external AV signal source to the AV input jacks on the power of the...
Owners Manual
Page 13
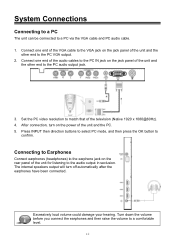
... on the power of the unit and the PC. 5. After connection, turn off automatically after the earphones have been connected. Press INPUT then direction buttons to select PC mode, and then press the OK button to a PC via the VGA cable and PC audio cable. 1. Set the PC video resolution to match that of the unit for listening to the PC audio output jack. 3. System Connections Connecting to...
... on the power of the unit and the PC. 5. After connection, turn off automatically after the earphones have been connected. Press INPUT then direction buttons to select PC mode, and then press the OK button to a PC via the VGA cable and PC audio cable. 1. Set the PC video resolution to match that of the unit for listening to the PC audio output jack. 3. System Connections Connecting to...

Owners Manual
Page 14
Connect TV signal input source from the aerial to the RF jack on the rear panel of the unit so that you can receive television programs. 1. System Connections Connecting to TV-Signal Input Connect the TV signal cable (the antenna cable, for example to the RF Jack on the back of the unit. 2. After connection, turn on the power of the unit. 3. Then press the INPUT button and the direction buttons to select DTV or ATV mode, press the OK button to confirm and conduct program selection. 13
Connect TV signal input source from the aerial to the RF jack on the rear panel of the unit so that you can receive television programs. 1. System Connections Connecting to TV-Signal Input Connect the TV signal cable (the antenna cable, for example to the RF Jack on the back of the unit. 2. After connection, turn on the power of the unit. 3. Then press the INPUT button and the direction buttons to select DTV or ATV mode, press the OK button to confirm and conduct program selection. 13
Owners Manual
Page 15
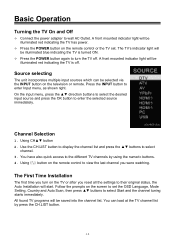
... status, the Auto Installation will be illuminated red indicating the TV has power. Press the POWER button on the remote control to set . All found TV programs will be illuminated red indicating the TV is turned ON. Press the POWER button again to the different TV channels by press the CH.LIST button. 14 Basic Operation Turning the TV On and Off Connect the power adapter to enter Input menu, as...
... status, the Auto Installation will be illuminated red indicating the TV has power. Press the POWER button on the remote control to set . All found TV programs will be illuminated red indicating the TV is turned ON. Press the POWER button again to the different TV channels by press the CH.LIST button. 14 Basic Operation Turning the TV On and Off Connect the power adapter to enter Input menu, as...
Owners Manual
Page 16
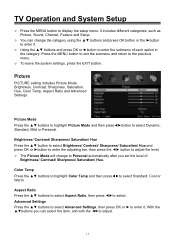
... Picture Mode will change to Personal automatically after you can change the category using the ▲▼ buttons and press OK button or the ►button to adjust. 15 Color Temp Press the ▲▼ buttons to highlight Color Temp and then press◄►to display the setup menu. With the ▲▼buttons you set the level of each option in the category. TV Operation and...
... Picture Mode will change to Personal automatically after you can change the category using the ▲▼ buttons and press OK button or the ►button to adjust. 15 Color Temp Press the ▲▼ buttons to highlight Color Temp and then press◄►to display the setup menu. With the ▲▼buttons you set the level of each option in the category. TV Operation and...

Owners Manual
Page 19
... runs the search. To leave the DTV Manual tuning, press the EXIT or MENU button. TV Operation and System Setup Auto Scan Select this feature to scan the entire range of available programs. DTV Manual Scan 1. Press the ▲▼buttons to highlight Country or Mode and press ◄► buttons to adjust, then press▲▼button to select Start and press OK or ►...
... runs the search. To leave the DTV Manual tuning, press the EXIT or MENU button. TV Operation and System Setup Auto Scan Select this feature to scan the entire range of available programs. DTV Manual Scan 1. Press the ▲▼buttons to highlight Country or Mode and press ◄► buttons to adjust, then press▲▼button to select Start and press OK or ►...
Owners Manual
Page 20
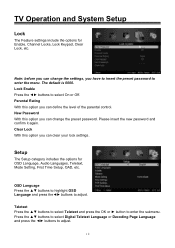
... your lock settings. Parental Rating With this option you can change the preset password. TV Operation and System Setup Lock The Feature settings include the options for OSD Language, Audio Languages, Teletext, Mode Setting, First Time Setup, OAD, etc. The default is 0000. Please insert the new password and confirm it again. New Password With this option you have to insert the preset password to enter the menu. Note...
... your lock settings. Parental Rating With this option you can change the preset password. TV Operation and System Setup Lock The Feature settings include the options for OSD Language, Audio Languages, Teletext, Mode Setting, First Time Setup, OAD, etc. The default is 0000. Please insert the new password and confirm it again. New Password With this option you have to insert the preset password to enter the menu. Note...
Owners Manual
Page 21
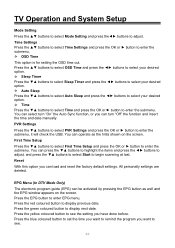
... Time and press the OK or ► button to display previous date. TV Operation and System Setup Mode Setting Press the ▲▼ buttons to select Mode Setting and press the◄► buttons to display next date. Press the green coloured button to adjust. EPG Menu (In DTV Mode Only) The electronic program guide (EPG) can be activated by pressing the EPG button as the hints shown on the screen...
... Time and press the OK or ► button to display previous date. TV Operation and System Setup Mode Setting Press the ▲▼ buttons to select Mode Setting and press the◄► buttons to display next date. Press the green coloured button to adjust. EPG Menu (In DTV Mode Only) The electronic program guide (EPG) can be activated by pressing the EPG button as the hints shown on the screen...

Owners Manual
Page 22
... data damage. The device may be different from your desired media type (photo, music, movie or Text) and press OK to select your set. Connect a USB device, then press the INPUT button to display the media menu as an example. 21 Media Playback This unit is working. NOTES: The recognition speed of USB device may depend on the PC. Press the◄...
... data damage. The device may be different from your desired media type (photo, music, movie or Text) and press OK to select your set. Connect a USB device, then press the INPUT button to display the media menu as an example. 21 Media Playback This unit is working. NOTES: The recognition speed of USB device may depend on the PC. Press the◄...
Owners Manual
Page 24
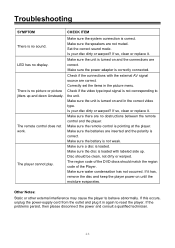
... the external AV signal source are inserted and the polarity is pointing at the player. Make sure the disc is loaded. Disc should match the region code of the Player. If it in again to reset the player. If this occurs, unplug the power-supply cord from the outlet and plug it has, remove the disc and keep the player power on and the connections are...
... the external AV signal source are inserted and the polarity is pointing at the player. Make sure the disc is loaded. Disc should match the region code of the Player. If it in again to reset the player. If this occurs, unplug the power-supply cord from the outlet and plug it has, remove the disc and keep the player power on and the connections are...

Owners Manual
Page 25
Specifications Model Screen Size Native Resolution Brightness Contrast Ratio Response time (ms) Teletext Speaker Output Power Consumption Standby Power Dimension (with stand) Dimension (without stand) Net Weight Ambient Temperature TFTV5027FL 50-inch LED 1920 × 1080 Pixels 270 cd/ m2 4000 :1 8 ms 1000 pages 8W+8W
Specifications Model Screen Size Native Resolution Brightness Contrast Ratio Response time (ms) Teletext Speaker Output Power Consumption Standby Power Dimension (with stand) Dimension (without stand) Net Weight Ambient Temperature TFTV5027FL 50-inch LED 1920 × 1080 Pixels 270 cd/ m2 4000 :1 8 ms 1000 pages 8W+8W


