

Owners Manual
Page 1
OWNER'S MANUAL 51CM CORDLESS REMOTE LCD TV/MONITOR MODEL: TFTV535WS N111 PALSONIC CORPORATION PTY LTD 1 JOYNTON AVENUE WATERLOO NSW 2017 AUSTRALIA TEL: (02) 9313 7111 FAX: (02) 9313 7555 www.palsonic.com.au PALSONIC CUSTOMER SERVICE TELEPHONE AUSTRALIA: 1300 657 888
OWNER'S MANUAL 51CM CORDLESS REMOTE LCD TV/MONITOR MODEL: TFTV535WS N111 PALSONIC CORPORATION PTY LTD 1 JOYNTON AVENUE WATERLOO NSW 2017 AUSTRALIA TEL: (02) 9313 7111 FAX: (02) 9313 7555 www.palsonic.com.au PALSONIC CUSTOMER SERVICE TELEPHONE AUSTRALIA: 1300 657 888

Owners Manual
Page 2
Table of Contents Important Information ...1 Important Safety Precautions ...2 Preparations ...5 Identification of Controls ...7 Connections ...10 Turning the Unit On and Off ...14 Memorising the Channels ...15 Basic Operations ...17 Setting Picture ...18 Adjusting Image in D-Sub mode ...19 Setting Sound ...20 Other Functions ...21 Troubleshooting ...22 Care and Maintenance ...23 Specifications ...24
Table of Contents Important Information ...1 Important Safety Precautions ...2 Preparations ...5 Identification of Controls ...7 Connections ...10 Turning the Unit On and Off ...14 Memorising the Channels ...15 Basic Operations ...17 Setting Picture ...18 Adjusting Image in D-Sub mode ...19 Setting Sound ...20 Other Functions ...21 Troubleshooting ...22 Care and Maintenance ...23 Specifications ...24
Owners Manual
Page 3
... lightning flash with the limits for proper grounding and, in a residential area is provided to call the CATV system installer's attention to Article 820-40 of the National Electrical Code that provides guidelines for a Class digital device, pursuant to the point of cable entry as close to part 15 of ,important operating and maintenance (servicing) instructions in accordance with the instruction manual...
... lightning flash with the limits for proper grounding and, in a residential area is provided to call the CATV system installer's attention to Article 820-40 of the National Electrical Code that provides guidelines for a Class digital device, pursuant to the point of cable entry as close to part 15 of ,important operating and maintenance (servicing) instructions in accordance with the instruction manual...

Owners Manual
Page 5
... adjustment of service or repair work by a qualified technician. If the product has been dropped or the cabinet has been damaged in the instructions can cause electric shock short internal parts. When the product displays an abnormal condition or exhibits a distinct change in the operating instructions. This is used, use caution when moving the cart/apparatus combination to ensure that the service person uses replacement parts...
... adjustment of service or repair work by a qualified technician. If the product has been dropped or the cabinet has been damaged in the instructions can cause electric shock short internal parts. When the product displays an abnormal condition or exhibits a distinct change in the operating instructions. This is used, use caution when moving the cart/apparatus combination to ensure that the service person uses replacement parts...
Owners Manual
Page 6
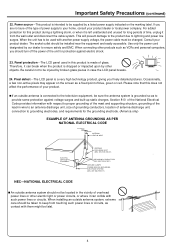
... is intended to the television equipment, be installed near the equipment and easily accessible. Panel protection---The LCD panel used with such power lines or circuits. Therefore, it from touching such power lines or circuits, as contact with them might be supplied by a listed power supply indicated on the screen as VCRs and personal computers, you should be sure the antenna system is made of...
... is intended to the television equipment, be installed near the equipment and easily accessible. Panel protection---The LCD panel used with such power lines or circuits. Therefore, it from touching such power lines or circuits, as contact with them might be supplied by a listed power supply indicated on the screen as VCRs and personal computers, you should be sure the antenna system is made of...
Owners Manual
Page 7
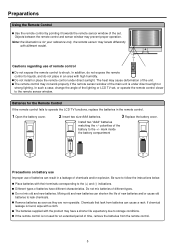
... remote control. 5 In such a case, change the angle of the lighting or LCD TV set . Be sure to the +/- Do not mix old and new batteries. If the remote control is found, wipe with different model. Mixing old and new batteries can cause a rash. Remove batteries as soon as they are non-operable. Preparations Using the Remote Control Use the remote control by pointing it towards the remote sensor...
... remote control. 5 In such a case, change the angle of the lighting or LCD TV set . Be sure to the +/- Do not mix old and new batteries. If the remote control is found, wipe with different model. Mixing old and new batteries can cause a rash. Remove batteries as soon as they are non-operable. Preparations Using the Remote Control Use the remote control by pointing it towards the remote sensor...
Owners Manual
Page 9
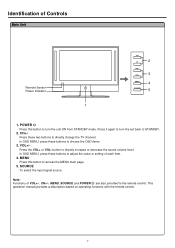
SOURCE To select the input signal source. POWER Press this button to access the MENU main page. 5. CH+/Press these buttons to adjust the value or setting of each item. 4. In OSD MENU, press these two buttons to directly change the TV channel; Identification of VOL+/-, CH+/-, MENU, SOURCE and POWER are also provided to the remote control. In OSD MENU, press these buttons to directly increase or decrease the sound volume level; Press it...
SOURCE To select the input signal source. POWER Press this button to access the MENU main page. 5. CH+/Press these buttons to adjust the value or setting of each item. 4. In OSD MENU, press these two buttons to directly change the TV channel; Identification of VOL+/-, CH+/-, MENU, SOURCE and POWER are also provided to the remote control. In OSD MENU, press these buttons to directly increase or decrease the sound volume level; Press it...

Owners Manual
Page 10
S-Video input Receive a S-Video signal from external sources such as VCR or DVD player. 5. POWER SWITCH 8 Component inputs Connect to the D-Sub/audio output jacks on your PC. 2. AV inputs Receive video/audio signals from external source such as VCR or DVD player. 6. D-Sub input /Audio Line in Connect to the audio and component output jacks of Controls (continued) 1 2 6 3 4 5 1. Main Unit Identification of a DVD player or Set-Top Box. 3. Antenna input Allows you to connect cable or outdoor antenna. 4.
S-Video input Receive a S-Video signal from external sources such as VCR or DVD player. 5. POWER SWITCH 8 Component inputs Connect to the D-Sub/audio output jacks on your PC. 2. AV inputs Receive video/audio signals from external source such as VCR or DVD player. 6. D-Sub input /Audio Line in Connect to the audio and component output jacks of Controls (continued) 1 2 6 3 4 5 1. Main Unit Identification of a DVD player or Set-Top Box. 3. Antenna input Allows you to connect cable or outdoor antenna. 4.

Owners Manual
Page 11
... set sleep timer To adjust image automatically in VGA mode Audio mode select + To display channel status or signal information To quickly jump between current channel and last selected channel. 9 Identification of Controls (continued) Remote Control To adjust backlight This button can not work To adjust menu transparency To access the MENU main page or exit menu operation To select input signal source Picture mode select [0-9] number buttons: Direct channel select Turn the unit on or off Sound mute ENTER: To confirm your operation CH+/-: To switch channels...
... set sleep timer To adjust image automatically in VGA mode Audio mode select + To display channel status or signal information To quickly jump between current channel and last selected channel. 9 Identification of Controls (continued) Remote Control To adjust backlight This button can not work To adjust menu transparency To access the MENU main page or exit menu operation To select input signal source Picture mode select [0-9] number buttons: Direct channel select Turn the unit on or off Sound mute ENTER: To confirm your operation CH+/-: To switch channels...
Owners Manual
Page 12
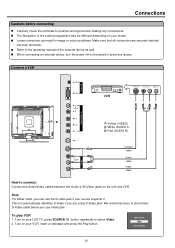
... (VIDEO) White (AUDIO L) Red (AUDIO R) S-Video cable Audio cable Video cable How to connect: Connect the Audio/Video cables between the Audio (L/R)/Video jacks on your source supports it. Refer to disconnect S-Video cable before making any issues. Note: For better video, you are securely inserted into their terminals. Turn on the unit and VCR. When connecting an external device, turn the power off on your LCD TV, press SOURCE button repeatedly to avoid any connections. We recommend you to the operating manual of the external...
... (VIDEO) White (AUDIO L) Red (AUDIO R) S-Video cable Audio cable Video cable How to connect: Connect the Audio/Video cables between the Audio (L/R)/Video jacks on your source supports it. Refer to disconnect S-Video cable before making any issues. Note: For better video, you are securely inserted into their terminals. Turn on the unit and VCR. When connecting an external device, turn the power off on your LCD TV, press SOURCE button repeatedly to avoid any connections. We recommend you to the operating manual of the external...
Owners Manual
Page 13
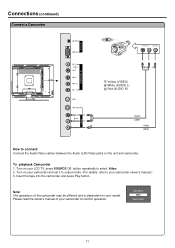
... to connect: Connect the Audio/Video cables between the Audio (L/R)/Video jacks on your camcorder and set it to output mode. (For details, refer to select Video. 2. Please read the owner's manual of the camcorder may be different and is dependent on your LCD TV, press SOURCE button repeatedly to your model. Connections (continued) Connect a Camcorder Yellow (VIDEO) White (AUDIO L) Red (AUDIO R) Audio cable Video cable How to confirm operation. Insert the tape into the camcorder and press Play button. Input Source Video Source Switch 11 Turn...
... to connect: Connect the Audio/Video cables between the Audio (L/R)/Video jacks on your camcorder and set it to output mode. (For details, refer to select Video. 2. Please read the owner's manual of the camcorder may be different and is dependent on your LCD TV, press SOURCE button repeatedly to your model. Connections (continued) Connect a Camcorder Yellow (VIDEO) White (AUDIO L) Red (AUDIO R) Audio cable Video cable How to confirm operation. Insert the tape into the camcorder and press Play button. Input Source Video Source Switch 11 Turn...

Owners Manual
Page 14
Insert a disc and press PLAY button. button repeatedly to connect a DVD Player using Component Video Connections: Connect the Video cable between the AUDIO input jack on the unit and AUDIO output jacks on your LCD TV, press SOURCE 2. Input Source YPbPr Source Switch 12 Connect a DVD Player Connections (continued) White (AUDIO L) Red (AUDIO R, Pr/Cr) Green (Y) Blue (Pb/Cb) DTV RECEIVER How to select YPbPr. To play DVD 1. Turn on the DVD player. Turn on the DVD player. Connect the Audio cable between the Y, Pb, Pr input jacks on the unit and Y, Pb, Pr (or Y, Cb...
Insert a disc and press PLAY button. button repeatedly to connect a DVD Player using Component Video Connections: Connect the Video cable between the AUDIO input jack on the unit and AUDIO output jacks on your LCD TV, press SOURCE 2. Input Source YPbPr Source Switch 12 Connect a DVD Player Connections (continued) White (AUDIO L) Red (AUDIO R, Pr/Cr) Green (Y) Blue (Pb/Cb) DTV RECEIVER How to select YPbPr. To play DVD 1. Turn on the DVD player. Turn on the DVD player. Connect the Audio cable between the Y, Pb, Pr input jacks on the unit and Y, Pb, Pr (or Y, Cb...
Owners Manual
Page 15
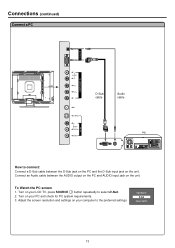
Connect an Audio cable between the D-Sub jack on the PC and the D-Sub input jack on the unit. Input Source D-Sub Source Switch 13 Turn on your LCD TV, press SOURCE button repeatedly to select D-Sub. 2. To Watch the PC screen 1. Turn on your PC and check for PC system requirements. 3. Adjust the screen resolution and settings on your computer to the preferred settings. Connections (continued) Connect a PC D-Sub cable Audio cable How to connect: Connect a D-Sub cable between the AUDIO output on the PC and AUDIO input jack on the unit.
Connect an Audio cable between the D-Sub jack on the PC and the D-Sub input jack on the unit. Input Source D-Sub Source Switch 13 Turn on your LCD TV, press SOURCE button repeatedly to select D-Sub. 2. To Watch the PC screen 1. Turn on your PC and check for PC system requirements. 3. Adjust the screen resolution and settings on your computer to the preferred settings. Connections (continued) Connect a PC D-Sub cable Audio cable How to connect: Connect a D-Sub cable between the AUDIO output on the PC and AUDIO input jack on the unit.
Owners Manual
Page 16
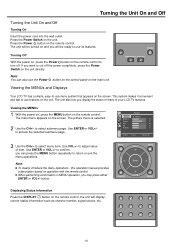
... adjust value of your LCD TV features. The main menu appears on operation with the remote control. Use ENTER or VOL+/to select submenu page. to use features on the remote control. Enter Note: To clearly introduce the menu operations , this operation manual provides a description based on the screen. Viewing the MENUs 1 With the power on, press the MENU button on the remote control to use its features. to access the selected submenu page. button. Turning...
... adjust value of your LCD TV features. The main menu appears on operation with the remote control. Use ENTER or VOL+/to select submenu page. to use features on the remote control. Enter Note: To clearly introduce the menu operations , this operation manual provides a description based on the screen. Viewing the MENUs 1 With the power on, press the MENU button on the remote control to use its features. to access the selected submenu page. button. Turning...
Owners Manual
Page 17
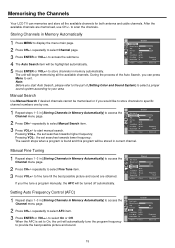
... best possible picture and sound are memorised, use CH+/- Channel Auto Search Manual Search Skip Fine Tune AFC On Sound Mode B/G Color Mode Auto Channel Edit Off Frequency 55.25 Move Select Menu to exit Channel Auto Search Manual Search Skip Fine Tune AFC On Sound Mode B/G Color Mode Auto Channel Edit Off Frequency 55.25 Move Select Menu to access the Channel menu page. 2 Press CH+/- Memorising the Channels Your LCD TV can press Menu to access the Channel menu page. Manual Search Use Manual...
... best possible picture and sound are memorised, use CH+/- Channel Auto Search Manual Search Skip Fine Tune AFC On Sound Mode B/G Color Mode Auto Channel Edit Off Frequency 55.25 Move Select Menu to exit Channel Auto Search Manual Search Skip Fine Tune AFC On Sound Mode B/G Color Mode Auto Channel Edit Off Frequency 55.25 Move Select Menu to access the Channel menu page. 2 Press CH+/- Memorising the Channels Your LCD TV can press Menu to access the Channel menu page. Manual Search Use Manual...
Owners Manual
Page 18
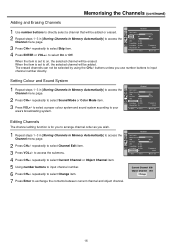
... or Off. Memorising the Channels (continued) Adding and Erasing Channels 1 Use number buttons to directly select a channel that will be erased. Channel Auto Search Manual Search Skip Fine Tune AFC On Sound Mode B/G Color Mode Auto Channel Edit Off Frequency 55.25 Move Select Menu to exit Editing Channels The channel editing function is set to input channel number directly. Channel Auto Search Manual Search Skip Fine Tune AFC On Sound Mode B/G Color Mode Auto Channel Edit Off Frequency 55.25...
... or Off. Memorising the Channels (continued) Adding and Erasing Channels 1 Use number buttons to directly select a channel that will be erased. Channel Auto Search Manual Search Skip Fine Tune AFC On Sound Mode B/G Color Mode Auto Channel Edit Off Frequency 55.25 Move Select Menu to exit Editing Channels The channel editing function is set to input channel number directly. Channel Auto Search Manual Search Skip Fine Tune AFC On Sound Mode B/G Color Mode Auto Channel Edit Off Frequency 55.25...

Owners Manual
Page 19
... the volume. In this button to the selected channel. Direct Accessing Channels Press the number buttons to go to switch between the current channel and the previous channel. to exit. repeatedly to change channels. To select a two-digit channel: press the 0-9 number buttons to input the channel number and press ENTER or wait for some seconds to go directly to the selected channel. Using the Return button Press this case, the menu language...
... the volume. In this button to the selected channel. Direct Accessing Channels Press the number buttons to go to switch between the current channel and the previous channel. to exit. repeatedly to change channels. To select a two-digit channel: press the 0-9 number buttons to input the channel number and press ENTER or wait for some seconds to go directly to the selected channel. Using the Return button Press this case, the menu language...
Owners Manual
Page 20
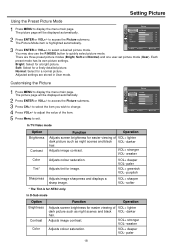
... User mode. Move Select Menu to select a desired picture mode. Adjusts image contrast. In D-Sub mode Option Brightness Contrast Color Function Operation Adjusts screen brightness for easier viewing of VOL+ lighter dark picture such as night scenes and black VOL- paler 18 Adjusted settings are three preset picture modes (Bright, Soft and Normal) and one user-set picture mode (User). The picture page will be displayed automatically. 2 Press ENTER or VOL+/- Setting Picture Using the Preset Picture Mode 1 Press MENU to access...
... User mode. Move Select Menu to select a desired picture mode. Adjusts image contrast. In D-Sub mode Option Brightness Contrast Color Function Operation Adjusts screen brightness for easier viewing of VOL+ lighter dark picture such as night scenes and black VOL- paler 18 Adjusted settings are three preset picture modes (Bright, Soft and Normal) and one user-set picture mode (User). The picture page will be displayed automatically. 2 Press ENTER or VOL+/- Setting Picture Using the Preset Picture Mode 1 Press MENU to access...
Owners Manual
Page 24
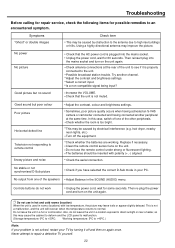
... properly connected to remote control Snowy picture and noise Adjust the contrast, colour and brightness settings. Unplug the power cord, wait for 60 seconds. Check antenna connections at the same time. Adjust the contrast and brightness settings. Select a correct input. Is a non-compatible signal being input? Good sound but no sound Increase the VOLUME. Sometimes, poor picture quality occurs when having activated an S-VHS camera or camcorder connected and having connected another channel. Check...
... properly connected to remote control Snowy picture and noise Adjust the contrast, colour and brightness settings. Unplug the power cord, wait for 60 seconds. Check antenna connections at the same time. Adjust the contrast and brightness settings. Select a correct input. Is a non-compatible signal being input? Good sound but no sound Increase the VOLUME. Sometimes, poor picture quality occurs when having activated an S-VHS camera or camcorder connected and having connected another channel. Check...

Owners Manual
Page 25
... "shadow image" on the LCD panel. Use eyeglass cleaner to a minimum viewing level. The extended use of fixed image program material can be limited by observing the following steps: A. Do not display the fixed image for extended periods of time. This product is not designed to display fixed image patterns for extended periods of Video Games, Computers, Captions or Other Fixed Image Displays. Cleaning and Maintenance To clean...
... "shadow image" on the LCD panel. Use eyeglass cleaner to a minimum viewing level. The extended use of fixed image program material can be limited by observing the following steps: A. Do not display the fixed image for extended periods of time. This product is not designed to display fixed image patterns for extended periods of Video Games, Computers, Captions or Other Fixed Image Displays. Cleaning and Maintenance To clean...


