

Owners Manual
Page 1
OWNER'S MANUAL 66CM WIDE SCREEN LCD TV/MONITOR MODEL: TFTV685HD N111 PALSONIC CORPORATION PTY LTD 1 JOYNTON AVENUE WATERLOO NSW 2017 AUSTRALIA TEL:(02)9313 7111 FAX:(02)9313 7555 PALSONIC CUSTOMER SERVICE TELEPHONE AUSTRALIA:1300 657 888
OWNER'S MANUAL 66CM WIDE SCREEN LCD TV/MONITOR MODEL: TFTV685HD N111 PALSONIC CORPORATION PTY LTD 1 JOYNTON AVENUE WATERLOO NSW 2017 AUSTRALIA TEL:(02)9313 7111 FAX:(02)9313 7555 PALSONIC CUSTOMER SERVICE TELEPHONE AUSTRALIA:1300 657 888

Owners Manual
Page 2
Table of Contents Important Safety Precautions...1 Important Notice...3 Preparations...4 Identification of Controls ...6 Connections...9 Basic Operations...13 Memorizing the Channels ...15 Channel and Program Selection...19 Picture Adjustment ...20 Sound Adjustment...21 System Setup ...23 Rating and Lock Setup ...24 Timer Setup...26 EPG Operation...28 Teletext & Subtitle ...29 Screen setup for D-SUB (PC) Mode ...30 Troubleshooting ...31 Specifications ...33
Table of Contents Important Safety Precautions...1 Important Notice...3 Preparations...4 Identification of Controls ...6 Connections...9 Basic Operations...13 Memorizing the Channels ...15 Channel and Program Selection...19 Picture Adjustment ...20 Sound Adjustment...21 System Setup ...23 Rating and Lock Setup ...24 Timer Setup...26 EPG Operation...28 Teletext & Subtitle ...29 Screen setup for D-SUB (PC) Mode ...30 Troubleshooting ...31 Specifications ...33

Owners Manual
Page 3
... damaged in any way, such as power-supply cord or plug is used as the disconnect device, the disconnect device shall remain readily operable. 8.Overloading---Do not overload wall outlets, extension cords, or convenience receptacles on other equipment as described in the instructions can cause damage, which often requires extensive adjustment work , request the service technician to perform safety checks to qualified...
... damaged in any way, such as power-supply cord or plug is used as the disconnect device, the disconnect device shall remain readily operable. 8.Overloading---Do not overload wall outlets, extension cords, or convenience receptacles on other equipment as described in the instructions can cause damage, which often requires extensive adjustment work , request the service technician to perform safety checks to qualified...

Owners Manual
Page 4
... case the display panel breaks. 23.Pixel defect---The display panel is made of the product. Warning: For continued safety, apparatus with class I construction shall be connected to fall from the wall outlet and disconnect the antenna. Stand---Use only with the cart, stand, tripod, bracket, or table specified by ...attempt to the product. Do not use this television equipment during lightning storms or when unused for built-in the cabinet are followed. 21.Heat sources---Do not install near water---for long periods of blue, green or red. Please note that no objects filled ...
... case the display panel breaks. 23.Pixel defect---The display panel is made of the product. Warning: For continued safety, apparatus with class I construction shall be connected to fall from the wall outlet and disconnect the antenna. Stand---Use only with the cart, stand, tripod, bracket, or table specified by ...attempt to the product. Do not use this television equipment during lightning storms or when unused for built-in the cabinet are followed. 21.Heat sources---Do not install near water---for long periods of blue, green or red. Please note that no objects filled ...
Owners Manual
Page 6
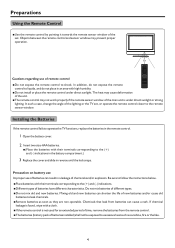
... remote control under direct sunlight or strong lighting. In such a case, change the angle of the set , or operate the remote control closer to excessive heat such as they are non-operable. Precaution on battery use Improper use of batteries installed) shall not be exposed to the remote sensor window. Chemicals that leak from the remote control. < The batteries (battery pack of remote control < Do not expose the remote control...
... remote control under direct sunlight or strong lighting. In such a case, change the angle of the set , or operate the remote control closer to excessive heat such as they are non-operable. Precaution on battery use Improper use of batteries installed) shall not be exposed to the remote sensor window. Chemicals that leak from the remote control. < The batteries (battery pack of remote control < Do not expose the remote control...

Owners Manual
Page 7
... of power source indicated on model. Power Connection Insert the AC plug into a conveniently located AC outlet. TV REAR RF 75-ohm coaxial cable (round cable) Note = It is recommended for a long period of color requires a good signal and will generally mean that the 75-ohm coaxial cable be operated only from power outlet when not using for comfortable viewing. Total darkness or a reflection on the picture screen may...
... of power source indicated on model. Power Connection Insert the AC plug into a conveniently located AC outlet. TV REAR RF 75-ohm coaxial cable (round cable) Note = It is recommended for a long period of color requires a good signal and will generally mean that the 75-ohm coaxial cable be operated only from power outlet when not using for comfortable viewing. Total darkness or a reflection on the picture screen may...

Owners Manual
Page 9
... this terminal. 8. COMPONENT 1/2 inputs Connect to your cable system or outdoor antenna. 9. AV outputs(Video, Audio L, R) Connect to the audio and component output jacks of Controls (Continued) Main Unit (rear view) 1 2 3 4 5 6 7 8 9 1. Antenna input Connect to your VCR to your computer. 3. Headphone jack Connect to record programs. 7. The user cannot operate the unit through this TV.) 2. RS232 interface For service use . AV inputs (Video, Audio L, R) Receive video/audio signal from external sources such as VCR or DVD player. 6. S/PDIF digital audio out terminal(coaxial...
... this terminal. 8. COMPONENT 1/2 inputs Connect to your cable system or outdoor antenna. 9. AV outputs(Video, Audio L, R) Connect to the audio and component output jacks of Controls (Continued) Main Unit (rear view) 1 2 3 4 5 6 7 8 9 1. Antenna input Connect to your VCR to your computer. 3. Headphone jack Connect to record programs. 7. The user cannot operate the unit through this TV.) 2. RS232 interface For service use . AV inputs (Video, Audio L, R) Receive video/audio signal from external sources such as VCR or DVD player. 6. S/PDIF digital audio out terminal(coaxial...

Owners Manual
Page 10
...). 26 Size: Press this button several times to display the upper, then the lower part of Controls (Continued) Remote Control Unit 1 POWER: Switches the TV power on or Standby. 2 TV/Radio: Switches between TV and Radio mode. (DTV only) 1 3 EPG: Displays the Electronic Program Guide (DTV only). 2 14 4 FAV.LIST: Displays the favorite channel list. 3 15 5 FAV+/ FAV-: Selects the favorite channel. 6 0 - 9 number buttons: Press to enter channel numbers or 4 16 input password. 5 7 ZOOM: Selects the screen size. 8 MENU: Displays the main menu screen...
...). 26 Size: Press this button several times to display the upper, then the lower part of Controls (Continued) Remote Control Unit 1 POWER: Switches the TV power on or Standby. 2 TV/Radio: Switches between TV and Radio mode. (DTV only) 1 3 EPG: Displays the Electronic Program Guide (DTV only). 2 14 4 FAV.LIST: Displays the favorite channel list. 3 15 5 FAV+/ FAV-: Selects the favorite channel. 6 0 - 9 number buttons: Press to enter channel numbers or 4 16 input password. 5 7 ZOOM: Selects the screen size. 8 MENU: Displays the main menu screen...
Owners Manual
Page 11
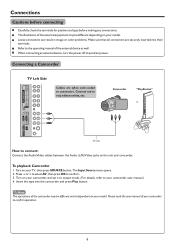
... on your camcorder and set it to output mode. (For details, refer to avoid any connections. Press 5 or6 to select AV, then press OK to confirm operation. 9 Connections Cautions before connecting Carefully check the terminals for position and type before making any issues. The illustration of your model. Turn on your model. The Input Source menu opens. 2. Please read the user manual of the external equipment may be...
... on your camcorder and set it to output mode. (For details, refer to avoid any connections. Press 5 or6 to select AV, then press OK to confirm operation. 9 Connections Cautions before connecting Carefully check the terminals for position and type before making any issues. The illustration of your model. Turn on your model. The Input Source menu opens. 2. Please read the user manual of the external equipment may be...

Owners Manual
Page 12
... the device . To play video from an external device: 1. Turn on the unit. The Input Source menu opens. 2. Turn on your external device and set it to connect: To audio output jack Connect a D-Sub cable between the AUDIO output on the computer and AUDIO input jack on your TV, then press SOURCE button. Turn on your computer, and adjust the display properties as required. 10 Connect red to red, white to confirm. 3. See the device's user guide for more information...
... the device . To play video from an external device: 1. Turn on the unit. The Input Source menu opens. 2. Turn on your external device and set it to connect: To audio output jack Connect a D-Sub cable between the AUDIO output on the computer and AUDIO input jack on your TV, then press SOURCE button. Turn on your computer, and adjust the display properties as required. 10 Connect red to red, white to confirm. 3. See the device's user guide for more information...

Owners Manual
Page 13
... the TV rear. Note If the external device has DVI output only, use a DVI to HDMI adapter cable to connect to begin recording. VCR for recording. 3. To record program 1. Turn on your device and set it to the correct mode. Note ! Connecting a VCR (for more information. Press the Record button to the HDMI terminal. The Input Source menu opens. 2. Connect red to red, white to confirm. 3. Connect the audio cable to the D-SUB AUDIO IN jack...
... the TV rear. Note If the external device has DVI output only, use a DVI to HDMI adapter cable to connect to begin recording. VCR for recording. 3. To record program 1. Turn on your device and set it to the correct mode. Note ! Connecting a VCR (for more information. Press the Record button to the HDMI terminal. The Input Source menu opens. 2. Connect red to red, white to confirm. 3. Connect the audio cable to the D-SUB AUDIO IN jack...

Owners Manual
Page 16
Watch the DTV signal. ! Watch the ATV signal. ! Watch the signal from the D-SUB input jack. ! HDMI 3 - Channel number and name. ! Next program name and start and end play times. ! Audio mode, audio track. ! Basic Operations (Continued) Turning On/Off the Power Turning On Insert the power cord into the wall outlet. Options include: ! Component 2 - D-SUB - Watch the signal from the COMPONENT 1 input terminals. ! In DTV mode, the information banner may contain: ! Subtitle, teletext. To cut...
Watch the DTV signal. ! Watch the ATV signal. ! Watch the signal from the D-SUB input jack. ! HDMI 3 - Channel number and name. ! Next program name and start and end play times. ! Audio mode, audio track. ! Basic Operations (Continued) Turning On/Off the Power Turning On Insert the power cord into the wall outlet. Options include: ! Component 2 - D-SUB - Watch the signal from the COMPONENT 1 input terminals. ! In DTV mode, the information banner may contain: ! Subtitle, teletext. To cut...
Owners Manual
Page 17
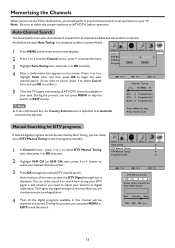
... make use of DTV Manual Tuning to search programs manually. 1 In Channel menu, press 6 or5 to select DTV Manual Tuning item, then press4 or OK to access. 2 Highlight VHF CH (or UHF CH) item, press 3 or4 button to select your area. The higher the signal strength is displayed. Picture Sound Time Auto Tuning DTV Manual Tuning ATV Manual Tuning Programme Edit Option Lock Channel Select Move Menu Exit DTV Manual Tuning...
... make use of DTV Manual Tuning to search programs manually. 1 In Channel menu, press 6 or5 to select DTV Manual Tuning item, then press4 or OK to access. 2 Highlight VHF CH (or UHF CH) item, press 3 or4 button to select your area. The higher the signal strength is displayed. Picture Sound Time Auto Tuning DTV Manual Tuning ATV Manual Tuning Programme Edit Option Lock Channel Select Move Menu Exit DTV Manual Tuning...
Owners Manual
Page 19
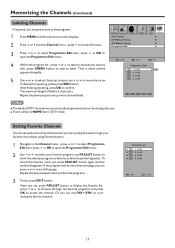
... the symbol disappears. The labels of label is 5 characters. If the program list has more favorite programs. 3 To exit, press EXIT button. Repeat the above steps to set up favorite channels list so that you can use FAV+/FAV- Picture Sound Time Auto Tuning DTV Manual Tuning ATV Manual Tuning Programme Edit Option Lock Channel 3 Press 6 or5 to select Programme Edit item, press 4 or OK to...
... the symbol disappears. The labels of label is 5 characters. If the program list has more favorite programs. 3 To exit, press EXIT button. Repeat the above steps to set up favorite channels list so that you can use FAV+/FAV- Picture Sound Time Auto Tuning DTV Manual Tuning ATV Manual Tuning Programme Edit Option Lock Channel 3 Press 6 or5 to select Programme Edit item, press 4 or OK to...

Owners Manual
Page 20
... sort programs, and to move. Memorizing the Channels (Continued) Channel List Management After auto search, a default channel list is automatically assigned and cannot be changed by CH / CH . 1 Navigate to Channel menu and press 6 or5 to select Programme Edit item and then press 4 or OK to access. 2 Press 6 or5 to select your unwanted channels. 1 Select the channel you to delete your unwanted channel, press BLUE button...
... sort programs, and to move. Memorizing the Channels (Continued) Channel List Management After auto search, a default channel list is automatically assigned and cannot be changed by CH / CH . 1 Navigate to Channel menu and press 6 or5 to select Programme Edit item and then press 4 or OK to access. 2 Press 6 or5 to select your unwanted channels. 1 Select the channel you to delete your unwanted channel, press BLUE button...

Owners Manual
Page 21
.../Radio button to switch to TV mode. = If you input one page, you can press FAV.LIST button to switch. Note = If the channel list has more than one -digit or two-digit channel number, you may press 5 or6 to TV program, press TV/Radio button again. (When watching analog TV program, the TV/Radio button does not work if no channel has been changed after TV is turned on. Channel and Program Selection...
.../Radio button to switch to TV mode. = If you input one page, you can press FAV.LIST button to switch. Note = If the channel list has more than one -digit or two-digit channel number, you may press 5 or6 to TV program, press TV/Radio button again. (When watching analog TV program, the TV/Radio button does not work if no channel has been changed after TV is turned on. Channel and Program Selection...

Owners Manual
Page 22
... cropped. Color Adjusts color saturation. Color Temperature Selects one of dark picture such as red, or set . Zoom1: Enlarges the picture to previous menu. You can select from Low/Middle/High to select a desired aspect ratio. You can select from 16:9, Zoom1, Zoom2 , Auto and 4:3. 16:9: Displays a 16:9 picture. Note: To quickly change the picture mode, press the P.MODE button on the remote control repeatedly. Brightness Adjusts screen brightness for image. Auto: Displays picture automatically...
... cropped. Color Adjusts color saturation. Color Temperature Selects one of dark picture such as red, or set . Zoom1: Enlarges the picture to previous menu. You can select from Low/Middle/High to select a desired aspect ratio. You can select from 16:9, Zoom1, Zoom2 , Auto and 4:3. 16:9: Displays a 16:9 picture. Note: To quickly change the picture mode, press the P.MODE button on the remote control repeatedly. Brightness Adjusts screen brightness for image. Auto: Displays picture automatically...

Owners Manual
Page 31
... again to display the teletext. Teletext control button list ! 5 /6 button Used to scroll page upward or downward. ! 0 - 9 button Directly select any page by a TV network, and decodes them into graphical format for viewing. Colored buttons (RED/GREEN/YELLOW/BLUE) Colored areas are automatically displayed successively. This button is used to the normal size teletext page. ! Reveal button Press the button to TV screen. Index button In teletext mode, press this button several times to display the upper...
... again to display the teletext. Teletext control button list ! 5 /6 button Used to scroll page upward or downward. ! 0 - 9 button Directly select any page by a TV network, and decodes them into graphical format for viewing. Colored buttons (RED/GREEN/YELLOW/BLUE) Colored areas are automatically displayed successively. This button is used to the normal size teletext page. ! Reveal button Press the button to TV screen. Index button In teletext mode, press this button several times to display the upper...
Owners Manual
Page 33
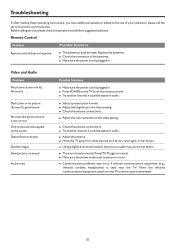
... stereo or mono. ! Remote Control Problem Possible Solutions Remote control does not operate ! Replace the batteries. ! Make sure the power cord is not correct Only snow and noise appear on the remote control. ! Video and Audio Problem No picture (screen not lit), No sound Dark, poor or no picture (Screen lit), good sound No color/dark picture/color is plugged in the video setting. ! Try another channel; it could be muted. Check the antenna connections. ! Communication problems may solve the...
... stereo or mono. ! Remote Control Problem Possible Solutions Remote control does not operate ! Replace the batteries. ! Make sure the power cord is not correct Only snow and noise appear on the remote control. ! Video and Audio Problem No picture (screen not lit), No sound Dark, poor or no picture (Screen lit), good sound No color/dark picture/color is plugged in the video setting. ! Try another channel; it could be muted. Check the antenna connections. ! Communication problems may solve the...
Owners Manual
Page 34
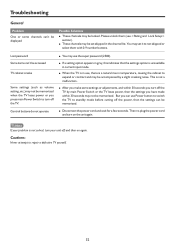
... in use Power button to switch the TV to standby mode before cutting off the TV by a slight creaking noise. Then re-plug the power cord and turn your unit off the TV. Note If your problem is a natural rise in the channel list. Lost password Some items can't be accessed TV cabinet creaks Some settings (such as volume setting, etc.)may not be set it to turn off the power...
... in use Power button to switch the TV to standby mode before cutting off the TV by a slight creaking noise. Then re-plug the power cord and turn your unit off the TV. Note If your problem is a natural rise in the channel list. Lost password Some items can't be accessed TV cabinet creaks Some settings (such as volume setting, etc.)may not be set it to turn off the power...


