

Owners Manual
Page 2
... ...4 Rear Panel...5 Remote Control...6 Remote Control Drawing...6 Preparation of Remote Control ...8 Using of Remote control...8 System Connections ...9 Connecting to the Power Supply ...9 Connecting a USB Device for Upgrade...9 Connecting to an External AV Signal Source(HDMI 10 Connecting an External AV Signal Source (YPBPR 10 Connecting to an External AV Signal Source...11 Connecting to Coaxial Digital Output ...11 Connecting to a PC ...12 Connecting to Earphones ...12 Connecting to TV-Signal Input ...13 Basic Operation ...14 Turning the TV On and Off ...14 Source selecting...14 Channel...
... ...4 Rear Panel...5 Remote Control...6 Remote Control Drawing...6 Preparation of Remote Control ...8 Using of Remote control...8 System Connections ...9 Connecting to the Power Supply ...9 Connecting a USB Device for Upgrade...9 Connecting to an External AV Signal Source(HDMI 10 Connecting an External AV Signal Source (YPBPR 10 Connecting to an External AV Signal Source...11 Connecting to Coaxial Digital Output ...11 Connecting to a PC ...12 Connecting to Earphones ...12 Connecting to TV-Signal Input ...13 Basic Operation ...14 Turning the TV On and Off ...14 Source selecting...14 Channel...

Owners Manual
Page 4
... not touch the color LED screen directly by the manufacturer, or sold with the apparatus. 15. Important Safety Instructions NOTES: 1. Read these instructions. 3. Follow all warnings. 4. Do not block any way, such as radiators, heat registers, stoves or other apparatus (including amplifiers) that blocks ventilation. Do not install near any heat sources such as power-supply cord or plug is required...
... not touch the color LED screen directly by the manufacturer, or sold with the apparatus. 15. Important Safety Instructions NOTES: 1. Read these instructions. 3. Follow all warnings. 4. Do not block any way, such as radiators, heat registers, stoves or other apparatus (including amplifiers) that blocks ventilation. Do not install near any heat sources such as power-supply cord or plug is required...

Owners Manual
Page 5
... turns red. View of the available input sources. CH ▲▼ buttons Press to enter or exit system setup menu. 3. Remote Sensor Remote sensor window for the remote control. 3. Right Side Panel 1. MENU button Press to page up or down through programs in DTV or ATV mode. When in setup menu, this button also serves the ▲▼ direction button. 4. When in setup menu, this button also serves the OK button. 2. POWER button Press to decrease or increase the volume. INPUT button...
... turns red. View of the available input sources. CH ▲▼ buttons Press to enter or exit system setup menu. 3. Remote Sensor Remote sensor window for the remote control. 3. Right Side Panel 1. MENU button Press to page up or down through programs in DTV or ATV mode. When in setup menu, this button also serves the ▲▼ direction button. 4. When in setup menu, this button also serves the OK button. 2. POWER button Press to decrease or increase the volume. INPUT button...

Owners Manual
Page 6
... USB device. 5 View of Unit Rear Panel 1. PC IN Jacks Connecting for HDMI signal. 3. VGA Jack Connected to the power adapter for AV signal input in AV mode. 7. COAX Jack Output the coaxial digital audio signal. 8. RF Input Jack Connected to external antenna to receive the ATV/DTV program in YPBPR mode. 4. MINI AV Jack Connecting for power supply. 2. POWER Jack Connect to the VGA output jack on a personal computer. 10. Headphone Jack When headphone is inserted, the loudspeaker is switched...
... USB device. 5 View of Unit Rear Panel 1. PC IN Jacks Connecting for HDMI signal. 3. VGA Jack Connected to the power adapter for AV signal input in AV mode. 7. COAX Jack Output the coaxial digital audio signal. 8. RF Input Jack Connected to external antenna to receive the ATV/DTV program in YPBPR mode. 4. MINI AV Jack Connecting for power supply. 2. POWER Jack Connect to the VGA output jack on a personal computer. 10. Headphone Jack When headphone is inserted, the loudspeaker is switched...
Owners Manual
Page 7
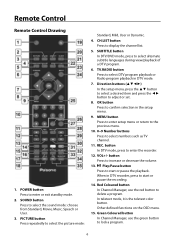
..., User or Dynamic. 4. button In DTV mode, press to lock a program. 6 Green Coloured button In Channel Manager, use the red button to increase or decrease the volume. 13. Play/Pause button Press to enter or exit standby mode. 2. POWER button Press to start or pause the recording. 14. CH.LIST button Press to select numbers such as TV channel. 11. MENU button Press to enter setup menu or return to the previous menu. 10. 0~9 Number buttons Press to display the channel list...
..., User or Dynamic. 4. button In DTV mode, press to lock a program. 6 Green Coloured button In Channel Manager, use the red button to increase or decrease the volume. 13. Play/Pause button Press to enter or exit standby mode. 2. POWER button Press to start or pause the recording. 14. CH.LIST button Press to select numbers such as TV channel. 11. MENU button Press to enter setup menu or return to the previous menu. 10. 0~9 Number buttons Press to display the channel list...

Owners Manual
Page 8
... of the screen. 21. Other defined functions on the OSD menu. 32. TV/TXT Press to resume. 19. DISPLAY button Press to display the Program Guide menu in other modes except DTV mode. 34. Yellow Coloured button In Channel Manager, use the blue button to select sound track in DTV mode. 23. Press to swap programs. In teletext mode, it is the teletext color button. In teletext mode, press HOLD button to...
... of the screen. 21. Other defined functions on the OSD menu. 32. TV/TXT Press to resume. 19. DISPLAY button Press to display the Program Guide menu in other modes except DTV mode. 34. Yellow Coloured button In Channel Manager, use the blue button to select sound track in DTV mode. 23. Press to swap programs. In teletext mode, it is the teletext color button. In teletext mode, press HOLD button to...

Owners Manual
Page 10
... other end to the AC 100~240V wall outlet. NOTES — Please use the power adapter specified by the manufacture. See the figure below: Make sure that the desired file for media play or software upgrade is connected to the POWER jack on the rear panel of the unit, the other connections have been made. — Ensure that you observe the color code when connecting audio and video cables.
... other end to the AC 100~240V wall outlet. NOTES — Please use the power adapter specified by the manufacture. See the figure below: Make sure that the desired file for media play or software upgrade is connected to the POWER jack on the rear panel of the unit, the other connections have been made. — Ensure that you observe the color code when connecting audio and video cables.

Owners Manual
Page 11
... unit and the HDMI signal source. 3. After connection, turn on the power of the unit. Connecting an External AV Signal Source (YPBPR) 1. Use a component cable (not supplied) to connect an external AV signal source to the MINI AV input jacks on the rear panel of the unit and the external AV signal source. 4. System Connections Connecting to confirm. NOTE: Match the jack colors (Y= green, PB= blue, and PR= red). 3. Press INPUT then direction buttons to select HDMI 1, HDMI 2 or HDMI3 mode, and then press...
... unit and the HDMI signal source. 3. After connection, turn on the power of the unit. Connecting an External AV Signal Source (YPBPR) 1. Use a component cable (not supplied) to connect an external AV signal source to the MINI AV input jacks on the rear panel of the unit and the external AV signal source. 4. System Connections Connecting to confirm. NOTE: Match the jack colors (Y= green, PB= blue, and PR= red). 3. Press INPUT then direction buttons to select HDMI 1, HDMI 2 or HDMI3 mode, and then press...

Owners Manual
Page 12
After connection, turn on the rear panel of the unit and the external AV signal source. This feature is designed with coaxial digital audio input connectors. 11 System Connections Connecting to an External AV Signal Source (AV) Use the AV cables to connect the external AV signal source to the AV input jacks on the power of the unit. Press INPUT then direction buttons to select AV mode, and then press the OK button to the digital amplifier, see...
After connection, turn on the rear panel of the unit and the external AV signal source. This feature is designed with coaxial digital audio input connectors. 11 System Connections Connecting to an External AV Signal Source (AV) Use the AV cables to connect the external AV signal source to the AV input jacks on the power of the unit. Press INPUT then direction buttons to select AV mode, and then press the OK button to the digital amplifier, see...

Owners Manual
Page 13
... jack on the power of the unit and the PC. 5. Turn down the volume before you connect the earphones and then raise the volume to confirm. Connect one end of the VGA cable to the VGA jack on the rear panel of the unit for listening to the PC audio output jack. 3. Press INPUT then direction buttons to select PC mode, and then press...
... jack on the power of the unit and the PC. 5. Turn down the volume before you connect the earphones and then raise the volume to confirm. Connect one end of the VGA cable to the VGA jack on the rear panel of the unit for listening to the PC audio output jack. 3. Press INPUT then direction buttons to select PC mode, and then press...

Owners Manual
Page 14
Then press the INPUT button and the direction buttons to select DTV or ATV mode, press the OK button to the RF Jack on the back of the unit so that you can receive television programs. 1. After connection, turn on the rear panel of the unit. 3. Connect TV signal input source from the aerial to the RF jack on the power of the unit. 2. System Connections Connecting to TV-Signal Input Connect the TV signal cable (the antenna cable, for example) to confirm and conduct program selection. 13
Then press the INPUT button and the direction buttons to select DTV or ATV mode, press the OK button to the RF Jack on the back of the unit so that you can receive television programs. 1. After connection, turn on the rear panel of the unit. 3. Connect TV signal input source from the aerial to the RF jack on the power of the unit. 2. System Connections Connecting to TV-Signal Input Connect the TV signal cable (the antenna cable, for example) to confirm and conduct program selection. 13

Owners Manual
Page 15
... the INPUT button repeatedly to enter the selected source immediately. Basic Operation Turning the TV On and Off — Connect the power adaptor to turn on the screen to their original status, the Auto Installation will start. The TV's indicator light will be saved into the channel list. All found TV programs will be illuminated red indicating the TV is turned ON. — Press the POWER button again to wall...
... the INPUT button repeatedly to enter the selected source immediately. Basic Operation Turning the TV On and Off — Connect the power adaptor to turn on the screen to their original status, the Auto Installation will start. The TV's indicator light will be saved into the channel list. All found TV programs will be illuminated red indicating the TV is turned ON. — Press the POWER button again to wall...

Owners Manual
Page 16
... select Color Temperature and then press OK or ►, the available Colour Temperature will be listed on the screen. With the ▲▼buttons you can change the category using the ▲▼ buttons and press OK button or the ►button to select Picture Mode and then press OK or ►button, the available picture modes will be listed on the screen. Note: In different input source...
... select Color Temperature and then press OK or ►, the available Colour Temperature will be listed on the screen. With the ▲▼buttons you can change the category using the ▲▼ buttons and press OK button or the ►button to select Picture Mode and then press OK or ►button, the available picture modes will be listed on the screen. Note: In different input source...

Owners Manual
Page 18
... shall be watched by pressing the MENU button. — Skip a program: 1. Press the red coloured button to lock it . — Lock a program 1. NOTE: A skipped program is skipped when using the number buttons. 17 With the ▲▼ buttons you can be deleted. 2. Press the yellow coloured button. 3. NOTE: The Channel category is only active in DTV mode, the ATV Manual Search is not available. With the ▲...
... shall be watched by pressing the MENU button. — Skip a program: 1. Press the red coloured button to lock it . — Lock a program 1. NOTE: A skipped program is skipped when using the number buttons. 17 With the ▲▼ buttons you can be deleted. 2. Press the yellow coloured button. 3. NOTE: The Channel category is only active in DTV mode, the ATV Manual Search is not available. With the ▲...
Owners Manual
Page 20
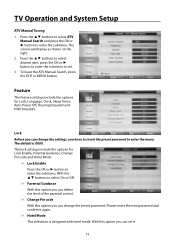
... ► button to enter the submenu to set it again. — Hotel Mode This television is 0000. With this option you can change the settings, you have to insert the preset password to enter the submenu. To leave the ATV Manual Search, press the EXIT or MENU button. The screen will display as shown on the right: 2. TV Operation and System Setup ATV Manual Tuning 1.
... ► button to enter the submenu to set it again. — Hotel Mode This television is 0000. With this option you can change the settings, you have to insert the preset password to enter the submenu. To leave the ATV Manual Search, press the EXIT or MENU button. The screen will display as shown on the right: 2. TV Operation and System Setup ATV Manual Tuning 1.

Owners Manual
Page 22
... not be listed. Press the OK button to play or display depending on the external USB device connected to format depending on the volume of the USB device. ¾ Some USB devices may require longer time to the unit. Also you can: Press the red coloured button to select Record List and press OK, all the scheduled timer will be a high speed USB2.0 in a supported format, some files...
... not be listed. Press the OK button to play or display depending on the external USB device connected to format depending on the volume of the USB device. ¾ Some USB devices may require longer time to the unit. Also you can: Press the red coloured button to select Record List and press OK, all the scheduled timer will be a high speed USB2.0 in a supported format, some files...

Owners Manual
Page 24
... viewing a DTV program, press the button on the remote, the playback stops and an icon appears at will blink with red and blue consecutively. — Before start the 2. During the progress of the time shift, press the from the point where it you can define how the TV set behaves in progress, please don't unplug the power and the external USB...
... viewing a DTV program, press the button on the remote, the playback stops and an icon appears at will blink with red and blue consecutively. — Before start the 2. During the progress of the time shift, press the from the point where it you can define how the TV set behaves in progress, please don't unplug the power and the external USB...

Owners Manual
Page 28
... unit supports NICAM function. When receiving stereo audio signals, press the NICAM/A2 button on the remote control repeatedly to shift the sound tracks between Stereo and Mono and the screen will show the corresponding display as shown below : Under A2 TV broadcast: 1. Under DTV mode: When receiving DTV signal, press the NICAM/A2 button on the screen. Under NICAM TV broadcast: 1. When receiving stereo audio signals, press...
... unit supports NICAM function. When receiving stereo audio signals, press the NICAM/A2 button on the remote control repeatedly to shift the sound tracks between Stereo and Mono and the screen will show the corresponding display as shown below : Under A2 TV broadcast: 1. Under DTV mode: When receiving DTV signal, press the NICAM/A2 button on the screen. Under NICAM TV broadcast: 1. When receiving stereo audio signals, press...
Owners Manual
Page 29
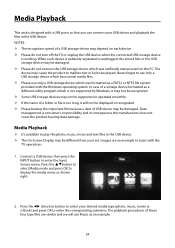
... type files are an example to play the photo, music, movie and text files in the USB device. Connect a USB device, then press the INPUT button to display the media menu as an example. 28 Press the ▲▼button to select Media mode and press OK to enter the Input Source menu....turn off the TV or unplug the USB device when the connected USB storage device is working. Media Playback This unit is designed with a USB ports so that you can connect your USB device and playback the files in the USB device. — The On Screen Display may be different from your desired media type...
... type files are an example to play the photo, music, movie and text files in the USB device. Connect a USB device, then press the INPUT button to display the media menu as an example. 28 Press the ▲▼button to select Media mode and press OK to enter the Input Source menu....turn off the TV or unplug the USB device when the connected USB storage device is working. Media Playback This unit is designed with a USB ports so that you can connect your USB device and playback the files in the USB device. — The On Screen Display may be different from your desired media type...

Owners Manual
Page 31
... the picture menu. LED has no sound. CHECK ITEM Make sure the system connection is correctly connected. Make sure the unit is turned on and the connections are correct. Check if the connections with the external AV signal source are correct. Set the correct sound mode. Other Notes: Static or other external interference may cause the player to the unit. The remote control does not work. Check if the video type input signal is...
... the picture menu. LED has no sound. CHECK ITEM Make sure the system connection is correctly connected. Make sure the unit is turned on and the connections are correct. Check if the connections with the external AV signal source are correct. Set the correct sound mode. Other Notes: Static or other external interference may cause the player to the unit. The remote control does not work. Check if the video type input signal is...


