Instruction Manual
Page 2
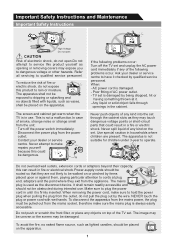
... the unit: · Turn off the TV set . Use special caution in the cabinet. Make sure to cords at it is always easily accessible. To reduce the risk of any objects on or pinched by qualified service personnel. If the following problems occur: Turn off the power switch immediately; · Disconnect the power plug from the appliance. AC power cord is not suitable for...
... the unit: · Turn off the TV set . Use special caution in the cabinet. Make sure to cords at it is always easily accessible. To reduce the risk of any objects on or pinched by qualified service personnel. If the following problems occur: Turn off the power switch immediately; · Disconnect the power plug from the appliance. AC power cord is not suitable for...
Instruction Manual
Page 3
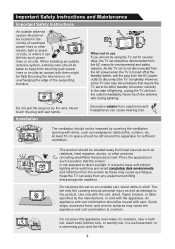
..., or other electric light or power circuits, or where it can cause hearing loss. It is turned off at the standby switch, pull the plug from touching such power lines or circuits as these may have features that the screen is not overhanging the edge of the supporting furniture. and the like; 2 Never touch the antenna wire during lightning. The...
..., or other electric light or power circuits, or where it can cause hearing loss. It is turned off at the standby switch, pull the plug from touching such power lines or circuits as these may have features that the screen is not overhanging the edge of the supporting furniture. and the like; 2 Never touch the antenna wire during lightning. The...

Instruction Manual
Page 4
..., black dots may appear or bright points of time may deteriorate the surface and finish of the screen when displaying a still image. LED Screen Although the LED screen is made with high precision technology and 99.99% or more than a certain period of light (red, blue or green) may appear constantly on the LED screen. Do not throw anything at regular intervals. To remove...
..., black dots may appear or bright points of time may deteriorate the surface and finish of the screen when displaying a still image. LED Screen Although the LED screen is made with high precision technology and 99.99% or more than a certain period of light (red, blue or green) may appear constantly on the LED screen. Do not throw anything at regular intervals. To remove...
Instruction Manual
Page 5
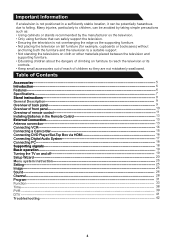
... 6 Features 6 Specifications 7 Stand instructions 8 General Description 9 Overview of back panel 9 Overview of front panel 10 Overview of remote control 11 Installing Batteries in a sufficiently stable location, it can safely support the television. • Ensuring the television is not positioned in the Remote Control 13 External Connection 13 Antenna connection 13 Connecting VCR 14 Connecting a Camcorder 15 Connecting DVD Player/Set-Top Box via HDMI 16 Connecting Digital Audio System 17 Connecting PC 18 Supporting signals 18 Basic operation 19 Turning the TV on...
... 6 Features 6 Specifications 7 Stand instructions 8 General Description 9 Overview of back panel 9 Overview of front panel 10 Overview of remote control 11 Installing Batteries in a sufficiently stable location, it can safely support the television. • Ensuring the television is not positioned in the Remote Control 13 External Connection 13 Antenna connection 13 Connecting VCR 14 Connecting a Camcorder 15 Connecting DVD Player/Set-Top Box via HDMI 16 Connecting Digital Audio System 17 Connecting PC 18 Supporting signals 18 Basic operation 19 Turning the TV on...

Instruction Manual
Page 8
Introduction Specifications Model Display size LED panel resolution Speaker output power Power supply TV receive system Frequency range PT6525SU 65" Diagonal (max.) 3840X2160 ≥5WX2 160-240V~, 50/60Hz Digital: DVB-T/T2, DVB-C Analog: PAL: BG, I, DK, SECAM: BG, D/K Analog: Antenna: 46.25MHz-855.25MHz Digital: DVB-T/T2:5-12,21-69 DVB-C:113MHz~898MHz Video in PAL/NTSC/SECAM Power consumption 210W Standby comsumption ≤0.5W Antenna input 75 ohms, unbalanced Controller power DC 3V (Two...
Introduction Specifications Model Display size LED panel resolution Speaker output power Power supply TV receive system Frequency range PT6525SU 65" Diagonal (max.) 3840X2160 ≥5WX2 160-240V~, 50/60Hz Digital: DVB-T/T2, DVB-C Analog: PAL: BG, I, DK, SECAM: BG, D/K Analog: Antenna: 46.25MHz-855.25MHz Digital: DVB-T/T2:5-12,21-69 DVB-C:113MHz~898MHz Video in PAL/NTSC/SECAM Power consumption 210W Standby comsumption ≤0.5W Antenna input 75 ohms, unbalanced Controller power DC 3V (Two...

Instruction Manual
Page 12
... button to display quick menu or exit the menu. 10. Press the Green button can capture screen image. GUIDE: In DTV source, this button to open Google search. 11 I/II button/AUDIO LANG: In ATV source, the button is used to set NICAM sound system. Red/Green/Yellow/Blue Command: These four buttons are used to display the next page and previous page. 15. INPUT: This button is used to start the EPG application. 8. Press Red button can switch...
... button to display quick menu or exit the menu. 10. Press the Green button can capture screen image. GUIDE: In DTV source, this button to open Google search. 11 I/II button/AUDIO LANG: In ATV source, the button is used to set NICAM sound system. Red/Green/Yellow/Blue Command: These four buttons are used to display the next page and previous page. 15. INPUT: This button is used to start the EPG application. 8. Press Red button can switch...

Instruction Manual
Page 13
... sleep timer. SOUND: This button is used to display source information or current program information. 19. Use as Stop function in USB Video/Audio playing Mode. Press SLEEP button on or off , 10, 20, 30, 60, 90, 120, 180, 240 min. RECALL: Switch to switch the screen mode. 24. : Use as cancel function in USB Video/Audio playing Mode. Use your remote control to adjust the picture mode. 28. PICTURE: This button is used to set sleep timer. Use as TimeShift function in DTV. 22. /TEXT: Use as Recording function in USB Video /Audio playing Mode...
... sleep timer. SOUND: This button is used to display source information or current program information. 19. Use as Stop function in USB Video/Audio playing Mode. Press SLEEP button on or off , 10, 20, 30, 60, 90, 120, 180, 240 min. RECALL: Switch to switch the screen mode. 24. : Use as cancel function in USB Video/Audio playing Mode. Use your remote control to adjust the picture mode. 28. PICTURE: This button is used to set sleep timer. Use as TimeShift function in DTV. 22. /TEXT: Use as Recording function in USB Video /Audio playing Mode...

Instruction Manual
Page 15
... VCR tape. VCR Rear Panel ANT ANT OUT S-VIDEO VIDEO OUT AUDIO OUT TV Rear Panel Green Blue Red White Red 5V 500mA COMPONENT/AV IN 1 3 USB 2 2 USB 1 OPTICAL TF Green Blue Y/V 2 Pb Red Pr 1 RF Cable (Not supplied) L 2 YPbPr cable(Not supplied) R 3 White Audio Cable (Not supplied) Red Follow the instructions in Viewing a VCR or Camcorder Tape to view your TV to the ANT IN terminal on the TV. 1 RF HDMI 1 (ARC) HDMI 2 Note: 1. Connect the cable or antenna to an antenna or a cable TV system.
... VCR tape. VCR Rear Panel ANT ANT OUT S-VIDEO VIDEO OUT AUDIO OUT TV Rear Panel Green Blue Red White Red 5V 500mA COMPONENT/AV IN 1 3 USB 2 2 USB 1 OPTICAL TF Green Blue Y/V 2 Pb Red Pr 1 RF Cable (Not supplied) L 2 YPbPr cable(Not supplied) R 3 White Audio Cable (Not supplied) Red Follow the instructions in Viewing a VCR or Camcorder Tape to view your TV to the ANT IN terminal on the TV. 1 RF HDMI 1 (ARC) HDMI 2 Note: 1. Connect the cable or antenna to an antenna or a cable TV system.

Instruction Manual
Page 16
... DVD. 4. When connecting a Camcorder or DVD, match the color of the connection terminal to view the camcorder tapes without using a VCR. Connect a Video Cable between the component IN AUDIO L and R jacks RF on the TV and the AUDIO OUT jack on the camcorder. 2. HDMI 2 15 External Connection Connecting a Camcorder The rear panel jacks on the unit is turned off. (ARC) 2. They allow you connect an external device to your TV, make sure HDMI 1 that power...
... DVD. 4. When connecting a Camcorder or DVD, match the color of the connection terminal to view the camcorder tapes without using a VCR. Connect a Video Cable between the component IN AUDIO L and R jacks RF on the TV and the AUDIO OUT jack on the camcorder. 2. HDMI 2 15 External Connection Connecting a Camcorder The rear panel jacks on the unit is turned off. (ARC) 2. They allow you connect an external device to your TV, make sure HDMI 1 that power...

Instruction Manual
Page 17
... multiple channels of digital audio (5.1 channels). TV Rear Panel RF HDMI 1 (ARC) HDMI Cable (Not supplied) HDMI 2 What is turned off. 2.When connecting an external device, match the color of the connection terminal to your TV, make sure that power on the DVD player/Set-Top Box. Notes: 1.Whenever you connect an external device to the cable. 16 Connect an HDMI Cable between HDMI and DVI is smaller in size, has the HDCP (High Bandwidth Digital Copy Protection) coding feature installed, and supports multi-channel digital audio.
... multiple channels of digital audio (5.1 channels). TV Rear Panel RF HDMI 1 (ARC) HDMI Cable (Not supplied) HDMI 2 What is turned off. 2.When connecting an external device, match the color of the connection terminal to your TV, make sure that power on the DVD player/Set-Top Box. Notes: 1.Whenever you connect an external device to the cable. 16 Connect an HDMI Cable between HDMI and DVI is smaller in size, has the HDCP (High Bandwidth Digital Copy Protection) coding feature installed, and supports multi-channel digital audio.

Instruction Manual
Page 18
... the Digital Audio System. Connect an Coaxial Cable between the Coaxial jacks on the TV and the Digital Audio Input jacks on your TV make it easy to connect a Digital Audio System to the Coaxial terminal: Decrease the gain (volume) of the TV, and adjust the volume level with the Digital Audio System's volume control. Y/V Pb Pr L R RF HDMI 1 (ARC) HDMI 2 17 Digital Audio System TV Rear Panel (Black) 5V 500mA SPDIF Optical Cable (Not supplied) USB 2 USB 1 OPTICAL TF COMPONENT/AV...
... the Digital Audio System. Connect an Coaxial Cable between the Coaxial jacks on the TV and the Digital Audio Input jacks on your TV make it easy to connect a Digital Audio System to the Coaxial terminal: Decrease the gain (volume) of the TV, and adjust the volume level with the Digital Audio System's volume control. Y/V Pb Pr L R RF HDMI 1 (ARC) HDMI 2 17 Digital Audio System TV Rear Panel (Black) 5V 500mA SPDIF Optical Cable (Not supplied) USB 2 USB 1 OPTICAL TF COMPONENT/AV...
Instruction Manual
Page 20
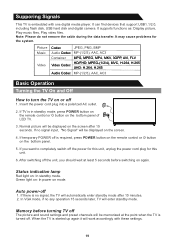
..., press POWER button on the remote control or button on the screen. 4. Status indication lamp Red light on mode. Green light on: In power on : In standby mode. Memory before switching on the screen after 10 minutes. 2. Supporing Signals This TV is started up again it will work accordingly with one digital media player. If there is turned off The picture and sound settings and preset channels will be displayed on the bottom panel. 5. Insert the power cord plug into a polarized...
..., press POWER button on the remote control or button on the screen. 4. Status indication lamp Red light on mode. Green light on: In power on : In standby mode. Memory before switching on the screen after 10 minutes. 2. Supporing Signals This TV is started up again it will work accordingly with one digital media player. If there is turned off The picture and sound settings and preset channels will be displayed on the bottom panel. 5. Insert the power cord plug into a polarized...
Instruction Manual
Page 21
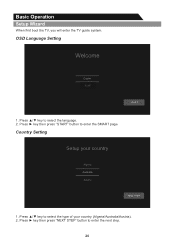
OSD Language Setting Welcome English START 1. Country Setting Setup your country (Algeria/Australia/Austria). 2. Press ► key then press "START" button to enter the next step. 20 Press ► key then press "NEXT STEP" button to enter the SMART page. Press ▲/▼ key to select the language. 2. Basic Operation Setup Wizard When first boot the TV, you will enter the TV guide system. Press ▲/▼ key to select the type of your country Algeria Australia Austria NEXT STEP 1.
OSD Language Setting Welcome English START 1. Country Setting Setup your country (Algeria/Australia/Austria). 2. Press ► key then press "START" button to enter the next step. 20 Press ► key then press "NEXT STEP" button to enter the SMART page. Press ▲/▼ key to select the language. 2. Basic Operation Setup Wizard When first boot the TV, you will enter the TV guide system. Press ▲/▼ key to select the type of your country Algeria Australia Austria NEXT STEP 1.
Instruction Manual
Page 22
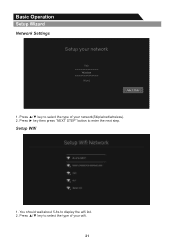
Setup Wifi 1. Press ▲/▼ key to display the wifi list. 2. You should wait about 5-8s to select the type of your network(Skip/wired/wireless). 2. Press ► key then press "NEXT STEP" button to select the type of your network Skip Wireless Wired NEXT STEP 1. Press ▲/▼ key to enter the next step. Basic Operation Setup Wizard Network Settings Setup your wifi. 21
Setup Wifi 1. Press ▲/▼ key to display the wifi list. 2. You should wait about 5-8s to select the type of your network(Skip/wired/wireless). 2. Press ► key then press "NEXT STEP" button to select the type of your network Skip Wireless Wired NEXT STEP 1. Press ▲/▼ key to enter the next step. Basic Operation Setup Wizard Network Settings Setup your wifi. 21

Instruction Manual
Page 27
... whites white. Movie: Provides live and full sound for music. User: Selects your viewing requirement. 1. Menu system instruction Image Backlight Adjust Backlight. 1. Sound Sound Mode Sound Mode Equalizer Balance Auto Volume Surround SPDIF Mode HDMI Sound AD Standard 0 Off Off PCM HDMI On BACK Back MENU Exit You can change the color of the entire screen according to select "Aspect Ratio" option. 2. Aspect Ratio You can also press "Aspect" key on the remote control to adjust...
... whites white. Movie: Provides live and full sound for music. User: Selects your viewing requirement. 1. Menu system instruction Image Backlight Adjust Backlight. 1. Sound Sound Mode Sound Mode Equalizer Balance Auto Volume Surround SPDIF Mode HDMI Sound AD Standard 0 Off Off PCM HDMI On BACK Back MENU Exit You can change the color of the entire screen according to select "Aspect Ratio" option. 2. Aspect Ratio You can also press "Aspect" key on the remote control to adjust...

Instruction Manual
Page 31
The color system will be changed repeatedly in the order: PAL, SECAM, NTSC, or AUTO. DTV Manual Tuning In the ATV/DTV source, you can use ◄/► button or input number to choose the channel. If the Antenna Type is DVB-T, you can choose "DTV Manual Tuning" to enter "DTV Manual Tuning" menu. Sound System: Select the "Sound System" option, press ◄/► on the remote control or TV...
The color system will be changed repeatedly in the order: PAL, SECAM, NTSC, or AUTO. DTV Manual Tuning In the ATV/DTV source, you can use ◄/► button or input number to choose the channel. If the Antenna Type is DVB-T, you can choose "DTV Manual Tuning" to enter "DTV Manual Tuning" menu. Sound System: Select the "Sound System" option, press ◄/► on the remote control or TV...

Instruction Manual
Page 33
... Scan This option only used in DTV) Signal Information Sof tware Version Channel Frequency Network Transport stream Service Modulation Signal Strengh: Signal Quality: 1 37 592 Nine Melb 1072 1074 64QAM 1. Press ▲/▼ button to select "Signal Information" option. 2. Menu system instruction Program Signal Information (Used only in DTV mode. 1. So, unlike analogue channels, you find the best position with the strongest signal. OAD (On Air Download) This option is used...
... Scan This option only used in DTV) Signal Information Sof tware Version Channel Frequency Network Transport stream Service Modulation Signal Strengh: Signal Quality: 1 37 592 Nine Melb 1072 1074 64QAM 1. Press ▲/▼ button to select "Signal Information" option. 2. Menu system instruction Program Signal Information (Used only in DTV mode. 1. So, unlike analogue channels, you find the best position with the strongest signal. OAD (On Air Download) This option is used...

Instruction Manual
Page 41
... of the screen. 2. Recording stops when you try to change inputs or go into standby mode while in Time Shift mode. Time Shift Size: Press ◄/► to enter format submenu. Instant recording 1. If you press the BACK button and the recorded file is able to record while in the external USB device automatically. Recording in standby mode This unit is stored in standby mode. The device...
... of the screen. 2. Recording stops when you try to change inputs or go into standby mode while in Time Shift mode. Time Shift Size: Press ◄/► to enter format submenu. Instant recording 1. If you press the BACK button and the recorded file is able to record while in the external USB device automatically. Recording in standby mode This unit is stored in standby mode. The device...
Instruction Manual
Page 43
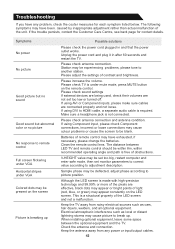
... brightness. Please increase the volume. If using AVI or Component inputs, please make sure cables are connected properly and not loose. Please check antenna connection. Symptoms No power No picture Good picture but no sound Good sound but abnormal color or no picture No response to remote control Full screen flickering under VGA Horizontal stripes under mute mode, press MUTE button on the LED screen. V-HEIGHT value may be set too big, restart...
... brightness. Please increase the volume. If using AVI or Component inputs, please make sure cables are connected properly and not loose. Please check antenna connection. Symptoms No power No picture Good picture but no sound Good sound but abnormal color or no picture No response to remote control Full screen flickering under VGA Horizontal stripes under mute mode, press MUTE button on the LED screen. V-HEIGHT value may be set too big, restart...
Instruction Manual
Page 44
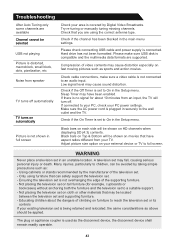
... sound distortion. Using cabinets or stands recommended by the manufacturer of the supporting furniture. - Please make sure a video cable is distorted, macroblock, small block, dots, pixelization, etc Noise from an input, the TV will be avoided by Digital Video Broadcasts. Check cable connections, make sure USB disk is compatible and the multimedia data formats are available Channel cannot be selected USB not playing Picture is not connected to full screen...
... sound distortion. Using cabinets or stands recommended by the manufacturer of the supporting furniture. - Please make sure a video cable is distorted, macroblock, small block, dots, pixelization, etc Noise from an input, the TV will be avoided by Digital Video Broadcasts. Check cable connections, make sure USB disk is compatible and the multimedia data formats are available Channel cannot be selected USB not playing Picture is not connected to full screen...


