Owners Manual
Page 1
User's Manual TFTV478LED 47cm (18.5") HD LED TV with DVB-T RECORD DTV via USB HDTV Integrated Tuner SUPER Slim Design COMPONENT Input USB 2.0 Connection TELETEXT HIGH-DEFINITION MULTIMEDIA INTERFACE VIEW ALL FREE Digital Broadcasts 7 DAY EPG electronic program guide WXGA PC input PARENTAL Lock *Where available LED TV Liquid Crystal Display 75mm 75mm H.264 MPEG-4/AVC Offering Australians quality since 1958 www.palsonic.com.au
User's Manual TFTV478LED 47cm (18.5") HD LED TV with DVB-T RECORD DTV via USB HDTV Integrated Tuner SUPER Slim Design COMPONENT Input USB 2.0 Connection TELETEXT HIGH-DEFINITION MULTIMEDIA INTERFACE VIEW ALL FREE Digital Broadcasts 7 DAY EPG electronic program guide WXGA PC input PARENTAL Lock *Where available LED TV Liquid Crystal Display 75mm 75mm H.264 MPEG-4/AVC Offering Australians quality since 1958 www.palsonic.com.au
Owners Manual
Page 2
... a standard grounded power outlet which is intended to persons. Extension cords used with general household waste. Safety precautions Please read all of electric shock to tell the user that important operating and servicing instructions are provided for later use can result in the cabinet and the back or bottom are described here. This television equipment should use a mounting kit approved by...
... a standard grounded power outlet which is intended to persons. Extension cords used with general household waste. Safety precautions Please read all of electric shock to tell the user that important operating and servicing instructions are provided for later use can result in the cabinet and the back or bottom are described here. This television equipment should use a mounting kit approved by...
Owners Manual
Page 3
... wall outlets and extension cords as the original part. When the power cord or plug is left unattended and unused for service. • UP on the television equipment. • If an outdoor antenna is connected to the television equipment, be damaged due to lightning and power-line surges. • Follow all servicing to qualified service personnel under the following the operating instructions. If the television...
... wall outlets and extension cords as the original part. When the power cord or plug is left unattended and unused for service. • UP on the television equipment. • If an outdoor antenna is connected to the television equipment, be damaged due to lightning and power-line surges. • Follow all servicing to qualified service personnel under the following the operating instructions. If the television...
Owners Manual
Page 4
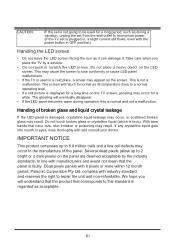
..., such as during operation, this standard is used in OFF position) Handling the LED screen • Do not leave the LED screen facing the sun as acceptable. Do not touch broken glass or crystalline liquid (which is not a malfunction. Several dead pixels (allow up to repair the unit and non-refundable. Dead pixels panels with the power button in a cold...
..., such as during operation, this standard is used in OFF position) Handling the LED screen • Do not leave the LED screen facing the sun as acceptable. Do not touch broken glass or crystalline liquid (which is not a malfunction. Several dead pixels (allow up to repair the unit and non-refundable. Dead pixels panels with the power button in a cold...
Owners Manual
Page 5
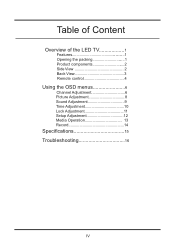
Table of Content Overview of the LED TV 1 Features 1 Opening the packing 1 Product components 2 Side View 2 Back View 3 Remote control 4 Using the OSD menus 6 Channel Adjustment 6 Picture Adjustment 8 Sound Adjustment 9 Time Adjustment 10 Lock Adjustment 11 Setup Adjustment 12 Media Operation 13 Record 14 15 Troubleshooting 16 IV
Table of Content Overview of the LED TV 1 Features 1 Opening the packing 1 Product components 2 Side View 2 Back View 3 Remote control 4 Using the OSD menus 6 Channel Adjustment 6 Picture Adjustment 8 Sound Adjustment 9 Time Adjustment 10 Lock Adjustment 11 Setup Adjustment 12 Media Operation 13 Record 14 15 Troubleshooting 16 IV
Owners Manual
Page 6
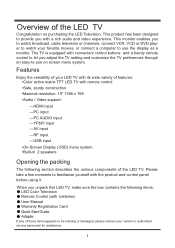
... with remote control Video support: -HDMI input -PC input -PC -YPbPr input - Features Enjoy the versatility of your vendor or authorised service personnel for assistance. 1 Please before using it. Overview of the LED TV Congratulation on screen menu system. This product has been designed to -use the display as a monitor. The TV is equipped with convenient control buttons and a handy remote control to let you to watch broadcast, cable television or channels, connect VCR...
... with remote control Video support: -HDMI input -PC input -PC -YPbPr input - Features Enjoy the versatility of your vendor or authorised service personnel for assistance. 1 Please before using it. Overview of the LED TV Congratulation on screen menu system. This product has been designed to -use the display as a monitor. The TV is equipped with convenient control buttons and a handy remote control to let you to watch broadcast, cable television or channels, connect VCR...

Owners Manual
Page 7
POWER Turn the TV on screen Display (OSD). VOL Increase or decrease the volume. CH Increase or decrease channel numbers. MENU Press the button to enter on or off. 2 Product components Side view 1 2 3 4 5 Remote Inductor and Power Indicator INPUT Switch the input sources .
POWER Turn the TV on screen Display (OSD). VOL Increase or decrease the volume. CH Increase or decrease channel numbers. MENU Press the button to enter on or off. 2 Product components Side view 1 2 3 4 5 Remote Inductor and Power Indicator INPUT Switch the input sources .

Owners Manual
Page 8
... a compatible amp/receiver to 12V Poewer supply. PC IN Connect to the HDMI output of your device. USB Connect to portable USB device such as USB ash / hard device. 8 RF IN Connect to the UHF antenna or coaxial cable from local TV. 9 YPbPr Connect to the component output of your PC (earphone jack) AV IN Connect to the audio output of A/V device. Back view 8 98 DC 12V Connect to enjoy superior audio sound. Connect to...
... a compatible amp/receiver to 12V Poewer supply. PC IN Connect to the HDMI output of your device. USB Connect to portable USB device such as USB ash / hard device. 8 RF IN Connect to the UHF antenna or coaxial cable from local TV. 9 YPbPr Connect to the component output of your PC (earphone jack) AV IN Connect to the audio output of A/V device. Back view 8 98 DC 12V Connect to enjoy superior audio sound. Connect to...

Owners Manual
Page 10
.... Disable the audio output. Select the TV/RADIO mode. Enter or exit the OSD menu. Different input source has different functions. Press to turn off . Display or remove the content that is hidden. SIZE 20. Make sure the adjustment setted previously. To play the next chapter, title or track. button to enter channel numbers. Direction button. FUNCTIONS Press number keys to switch the channels. MUTE 7. button to display electronic program guide menu. Display the channel list. Select the input source. Press...
.... Disable the audio output. Select the TV/RADIO mode. Enter or exit the OSD menu. Different input source has different functions. Press to turn off . Display or remove the content that is hidden. SIZE 20. Make sure the adjustment setted previously. To play the next chapter, title or track. button to enter channel numbers. Direction button. FUNCTIONS Press number keys to switch the channels. MUTE 7. button to display electronic program guide menu. Display the channel list. Select the input source. Press...

Owners Manual
Page 11
...-Screen Display (OSD) menu system provides a quick and simple method to the previous menu. Press MENU button on the front panel or MENU button on the front panel. Press MENU button to go to adjust LED TV base setting. Channel Adjustment 1. After changes settings of the OSD menus, the new settings are confirmed automatically when OSD picture vanish, even did not press the menu to adjust. 4. OSD menu can be viewed using both the remote control and the control buttons...
...-Screen Display (OSD) menu system provides a quick and simple method to the previous menu. Press MENU button on the front panel or MENU button on the front panel. Press MENU button to go to adjust LED TV base setting. Channel Adjustment 1. After changes settings of the OSD menus, the new settings are confirmed automatically when OSD picture vanish, even did not press the menu to adjust. 4. OSD menu can be viewed using both the remote control and the control buttons...

Owners Manual
Page 12
...) Favorite channels; Analogue Manual Search: To search analogue channel by entering parameters manually; Press the green button on the remote control to select the programs to be added into favorite list and press "RED","GREEN","YELLOW" or "BLUE" key to skip the channel; Press the blue button on the remote control to edit. Channel management Channel Edit: Press ▲/▼ button to select the channel you want to lock the channel; Channel Adjustment Sub...
...) Favorite channels; Analogue Manual Search: To search analogue channel by entering parameters manually; Press the green button on the remote control to select the programs to be added into favorite list and press "RED","GREEN","YELLOW" or "BLUE" key to skip the channel; Press the blue button on the remote control to edit. Channel management Channel Edit: Press ▲/▼ button to select the channel you want to lock the channel; Channel Adjustment Sub...

Owners Manual
Page 13
... all digital channels in selected country carried by current signal mode firstly and then switch to scan all analog channels in selected country carried by entering "EXIT" or "MENU" key. User can also stop auto scan directly by entering "EXIT" or "MENU" key. Channel Adjustment County Austradia Portugal DTV Sweden Finland ATV Czech Repbulic OK Press ▲/▼ button to search all digital channels carried by current signal mode. Auto Search...
... all digital channels in selected country carried by current signal mode firstly and then switch to scan all analog channels in selected country carried by entering "EXIT" or "MENU" key. User can also stop auto scan directly by entering "EXIT" or "MENU" key. Channel Adjustment County Austradia Portugal DTV Sweden Finland ATV Czech Repbulic OK Press ▲/▼ button to search all digital channels carried by current signal mode. Auto Search...
Owners Manual
Page 14
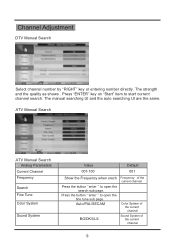
... search sub page. ATV Manual Search OK ATV Manual Search Analog Parameters Current Channel Frequency Search Fine Tune Color System Sound System Value 001-100 Default 001 Show the Frequency when srech Press the button " enter " to open the fine tune sub page. Channel Adjustment DTV Manual Search OK Select channel number by "RIGHT" key or entering number directly. Press the button " enter " to start...
... search sub page. ATV Manual Search OK ATV Manual Search Analog Parameters Current Channel Frequency Search Fine Tune Color System Sound System Value 001-100 Default 001 Show the Frequency when srech Press the button " enter " to open the fine tune sub page. Channel Adjustment DTV Manual Search OK Select channel number by "RIGHT" key or entering number directly. Press the button " enter " to start...
Owners Manual
Page 15
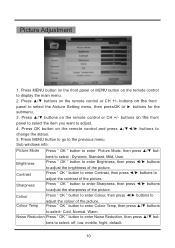
... enter Picture Mode, then press ▲/▼ but - Noise Reduction Press " OK " button to adjust the sharpness of the picture. Press " OK " button to enter Sharpness, then press ◄/► buttons to enter Noise Reduction, then press ▲/▼ but - Press MENU button on the front panel or MENU button on the remote control and press buttons to display the main menu. 2. Press OK button on the remote control to change...
... enter Picture Mode, then press ▲/▼ but - Noise Reduction Press " OK " button to adjust the sharpness of the picture. Press " OK " button to enter Sharpness, then press ◄/► buttons to enter Noise Reduction, then press ▲/▼ but - Press MENU button on the front panel or MENU button on the remote control and press buttons to display the main menu. 2. Press OK button on the remote control to change...
Owners Manual
Page 16
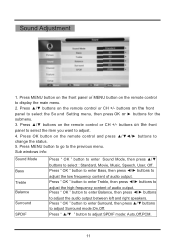
..., then press buttons to display the main menu. 2. Press " OK " button to enter Balance, then press buttons to the previous menu. buttons on the remote control to adjust the low frequency content of audio output. Press MENU button to go to adjust the audio output between left and right speakers. Press MENU button on the front panel or MENU button on the front panel to adjust. 4. buttons on the remote control or CH +/- Sub windows info: Sound Mode Bass Treble...
..., then press buttons to display the main menu. 2. Press " OK " button to enter Balance, then press buttons to the previous menu. buttons on the remote control to adjust the low frequency content of audio output. Press MENU button to go to adjust the audio output between left and right speakers. Press MENU button on the front panel or MENU button on the front panel to adjust. 4. buttons on the remote control or CH +/- Sub windows info: Sound Mode Bass Treble...
Owners Manual
Page 17
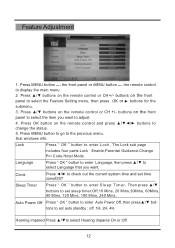
... four parts:Lock Enable,Parental Guidance,Change Pin Code,Hotel Mode. Press ▲/▼ buttons on the remote control to display the main menu. 2. Language Press " OK " button to enter Language, then press ▲/▼ to select Language that you want . Press ▲/▼ buttons on the front panel to adjust. 4. buttons on the remote control and press buttons to select the item you want to select the Feature Setting menu...
... four parts:Lock Enable,Parental Guidance,Change Pin Code,Hotel Mode. Press ▲/▼ buttons on the remote control to display the main menu. 2. Language Press " OK " button to enter Language, then press ▲/▼ to select Language that you want . Press ▲/▼ buttons on the front panel to adjust. 4. buttons on the remote control and press buttons to select the item you want to select the Feature Setting menu...

Owners Manual
Page 18
... select OSD Timer:5, 10, 15, 20, 25, 30 Seconds. Sub windows info: OSD Timer Press ▲/▼button to display the main menu. 2. Blue Screen Select Blue Screen mode between On and Off. Press MENU button on the front panel or MENU button on the remote control and press buttons to the previous menu. Reset TV Setting Reset to update sofeware. 13 PC Setup Set PC(Only available in PC source). Software Update Using the USB device to default setting.
... select OSD Timer:5, 10, 15, 20, 25, 30 Seconds. Sub windows info: OSD Timer Press ▲/▼button to display the main menu. 2. Blue Screen Select Blue Screen mode between On and Off. Press MENU button on the front panel or MENU button on the remote control and press buttons to the previous menu. Reset TV Setting Reset to update sofeware. 13 PC Setup Set PC(Only available in PC source). Software Update Using the USB device to default setting.
Owners Manual
Page 19
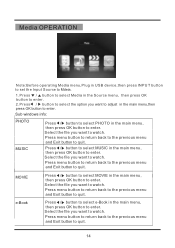
... OK button to enter. Media OPERATION Note:Before operating Media menu,Plug in USB device,then press INPUT button to set the Input S ource to Mdeia. 1.Press / button to select Media in the main menu, then press OK button to enter. Press menu button to return back to the previous menu and Exit button to quit. 14 Press menu button to return back to the previous menu and Exit button to quit. Press menu button to...
... OK button to enter. Media OPERATION Note:Before operating Media menu,Plug in USB device,then press INPUT button to set the Input S ource to Mdeia. 1.Press / button to select Media in the main menu, then press OK button to enter. Press menu button to return back to the previous menu and Exit button to quit. 14 Press menu button to return back to the previous menu and Exit button to quit. Press menu button to...
Owners Manual
Page 20
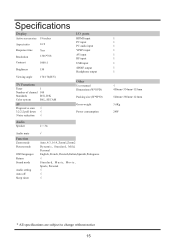
...(H/V) TV Functions Tuner 1 Number of channel 100 Standards B/G, D/K Color system PAL, SECAM AV Progressive scan 3:2/2:2 pull down Noise reduction Audio Speaker 2 × 3w I/O ports HDMI input PC input PC audio input YPbPr input AV input RF input USB input SPDIF output Headphone output Other User manual Dimensions (W*H*D) Packing size (W*H*D) Gross weight Power consumption 1 1 1 1 1 1 1 1 1 450mm×334mm×155mm 520mm×385mm×121mm 3.6Kg 24W Function Zoom mode Picture mode OSD languages Return Sound mode Audio setting Auto off Sleep timer Auto, 4:3, 16:9, Zoom1...
...(H/V) TV Functions Tuner 1 Number of channel 100 Standards B/G, D/K Color system PAL, SECAM AV Progressive scan 3:2/2:2 pull down Noise reduction Audio Speaker 2 × 3w I/O ports HDMI input PC input PC audio input YPbPr input AV input RF input USB input SPDIF output Headphone output Other User manual Dimensions (W*H*D) Packing size (W*H*D) Gross weight Power consumption 1 1 1 1 1 1 1 1 1 450mm×334mm×155mm 520mm×385mm×121mm 3.6Kg 24W Function Zoom mode Picture mode OSD languages Return Sound mode Audio setting Auto off Sleep timer Auto, 4:3, 16:9, Zoom1...
Owners Manual
Page 21
... screen mode adjustments such as lightning or static electricity may look dark in again after first turning on the power, or un plugging the AC cord and plugging it in a room that you pressed POWER on the remote control unit. In this case, operate the unit after 1 to remove dust. Strange color, light color, or color misalignment • Is the room too bright? LED TV does not operate...
... screen mode adjustments such as lightning or static electricity may look dark in again after first turning on the power, or un plugging the AC cord and plugging it in a room that you pressed POWER on the remote control unit. In this case, operate the unit after 1 to remove dust. Strange color, light color, or color misalignment • Is the room too bright? LED TV does not operate...


