Instruction Manual
Page 3
CHANNEL Menu ...13-14 4. PICTURE Menu ...11 2. Contents Power Supply...1 Installation...2 Use and Maintenance...3 Important Safety Instructions ...4-5 Overview(Front View) / Accessories ...6 Overview(Back View) ...7 Remote control ...8-9 Basic Operation ...10 OSD Menu 1. SETUP Menu ...17 Multimedia Operation Multimedia Operation ...18-20 Recording Operation Recording Operation ...21-23 Simple Troubleshooting ...24 Specifications ...25 SOUND Menu ...12 3. FEATURE Menu ...15-16 5.
CHANNEL Menu ...13-14 4. PICTURE Menu ...11 2. Contents Power Supply...1 Installation...2 Use and Maintenance...3 Important Safety Instructions ...4-5 Overview(Front View) / Accessories ...6 Overview(Back View) ...7 Remote control ...8-9 Basic Operation ...10 OSD Menu 1. SETUP Menu ...17 Multimedia Operation Multimedia Operation ...18-20 Recording Operation Recording Operation ...21-23 Simple Troubleshooting ...24 Specifications ...25 SOUND Menu ...12 3. FEATURE Menu ...15-16 5.
Instruction Manual
Page 9
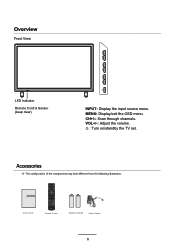
MENU: Display/exit the OSD menu. CH+/-: Scan through channels. LED Indicator Remote Control Sensor (keep clear) INPUT: Display the input source menu. VOL+/-: Adjust the volume. : Turn on/standby the TV set. User's Guide Remote Control Batteries (2xAAA) Power Adaptor 6 VOL+ VOL- Overview Front View INPUT MENU CH+ CH-
MENU: Display/exit the OSD menu. CH+/-: Scan through channels. LED Indicator Remote Control Sensor (keep clear) INPUT: Display the input source menu. VOL+/-: Adjust the volume. : Turn on/standby the TV set. User's Guide Remote Control Batteries (2xAAA) Power Adaptor 6 VOL+ VOL- Overview Front View INPUT MENU CH+ CH-

Instruction Manual
Page 10
... analog output connector of PC. VGA: For PC display. COAX:Digital output to receive TV signal. RF: Connect antenna or cable 75 Ohm coaxial to AV receiver. USB: USB jack for Recording and Media. Connect it to the audio output terminal of the PC. HEADPHONE: Connect it to audio output terminals of DVD. 7 PC IN: Connect it to the power. Overview Back View Pr Pb Y USB COAX POWER Headphone VIDEO L-IN R-IN PC IN HDMI POWER: Connect to video output terminal of DVD...
... analog output connector of PC. VGA: For PC display. COAX:Digital output to receive TV signal. RF: Connect antenna or cable 75 Ohm coaxial to AV receiver. USB: USB jack for Recording and Media. Connect it to the audio output terminal of the PC. HEADPHONE: Connect it to audio output terminals of DVD. 7 PC IN: Connect it to the power. Overview Back View Pr Pb Y USB COAX POWER Headphone VIDEO L-IN R-IN PC IN HDMI POWER: Connect to video output terminal of DVD...

Instruction Manual
Page 11
... input source menu. REC LIST: Record List. Play a second time, display the detail information. Play a third time to start record the program in DTV mode. : Stop program. : Previous chapter. : Next chapter. : Pause program. : Play program. : Fast reverse. : Fast forward. In the ATV/DTV Channel,Press" "or " " you can ajust the volume. MENU: System setup menu. In the ATV/DTV Channel,Press" "or " " you can ajust the channel. REC: Press to exit. CH/LIST: Display the programs list. NUMBER BUTTONS...
... input source menu. REC LIST: Record List. Play a second time, display the detail information. Play a third time to start record the program in DTV mode. : Stop program. : Previous chapter. : Next chapter. : Pause program. : Play program. : Fast reverse. : Fast forward. In the ATV/DTV Channel,Press" "or " " you can ajust the volume. MENU: System setup menu. In the ATV/DTV Channel,Press" "or " " you can ajust the channel. REC: Press to exit. CH/LIST: Display the programs list. NUMBER BUTTONS...

Instruction Manual
Page 12
Remote Control MUTE REC LIST CH/LIST SUBTITLE REPEAT REC INPUT DISPLAY OK MENU 1 2 EXIT 3 4 5 6 7 8 9 0 FAV PICTURE EPG VOL CH SOUND SLEEP SCREEN TV/TXT CANCEL REVEAL NICAM/A2 HOLD SIZE SUBPAGE INDEX CH / : Scan through channels. PICTURE: Select the picture mode. INDEX: Go to enter the EPG menu directly. EPG: Press to index. REVEAL: Reveal any hidden text. SIZE: Press to see the bottom half of page double size. SCREEN: Turn on...
Remote Control MUTE REC LIST CH/LIST SUBTITLE REPEAT REC INPUT DISPLAY OK MENU 1 2 EXIT 3 4 5 6 7 8 9 0 FAV PICTURE EPG VOL CH SOUND SLEEP SCREEN TV/TXT CANCEL REVEAL NICAM/A2 HOLD SIZE SUBPAGE INDEX CH / : Scan through channels. PICTURE: Select the picture mode. INDEX: Go to enter the EPG menu directly. EPG: Press to index. REVEAL: Reveal any hidden text. SIZE: Press to see the bottom half of page double size. SCREEN: Turn on...
Instruction Manual
Page 13
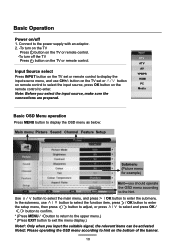
... button on the TV or remote control. -To turn off 1. DTV ATV AV YPBPR HDMI PC Media Basic OSD Menu operation Press MENU button to the hint. Basic Operation Power on the bottom of the banner. 10 Note: Before you should operate the OSD menu according to display the OSD menu as below: Main menu: Picture Sound Channel Feature Setup „ Submenu (Picture menu for example) Hint---you select the input source, make sure the connections...
... button on the TV or remote control. -To turn off 1. DTV ATV AV YPBPR HDMI PC Media Basic OSD Menu operation Press MENU button to the hint. Basic Operation Power on the bottom of the banner. 10 Note: Before you should operate the OSD menu according to display the OSD menu as below: Main menu: Picture Sound Channel Feature Setup „ Submenu (Picture menu for example) Hint---you select the input source, make sure the connections...

Instruction Manual
Page 14
... colour from 4:3,16:9, full, Zoom1, Zoom2 etc... Tint: Control the tint ( NTSC mode only). Brightness: Adjust image black level. Aspect Ratio: Change the aspect for viewing from Dynamic, Standard, Mild and User. Picture menu Description Picture Mode: Select your eyes for the screen from black and white. Noise Reduction: If the broadcast signal received is weak, you can select the Noise Reduction option to suit your...
... colour from 4:3,16:9, full, Zoom1, Zoom2 etc... Tint: Control the tint ( NTSC mode only). Brightness: Adjust image black level. Aspect Ratio: Change the aspect for viewing from Dynamic, Standard, Mild and User. Picture menu Description Picture Mode: Select your eyes for the screen from black and white. Noise Reduction: If the broadcast signal received is weak, you can select the Noise Reduction option to suit your...

Instruction Manual
Page 15
Sound menu OSD Menu Description Sound Mode: Select your desired sound mode from off the surround sound function. Treble: Adjust the level of the lower-pitched sounds. Balance: Adjust the audio output between left and right speakers. OSD Menu 2. Surround: Turn on . SPDIF: Select the spdif mode for the TV from Standard, Movie, Music, Speech and User. Bass: Adjust the level of the higherpitched sounds. Auto Volume Level (AVL): The volumes of all sources will be maintained when the function's on /off , PCM and Auto. 12
Sound menu OSD Menu Description Sound Mode: Select your desired sound mode from off the surround sound function. Treble: Adjust the level of the lower-pitched sounds. Balance: Adjust the audio output between left and right speakers. OSD Menu 2. Surround: Turn on . SPDIF: Select the spdif mode for the TV from Standard, Movie, Music, Speech and User. Bass: Adjust the level of the higherpitched sounds. Auto Volume Level (AVL): The volumes of all sources will be maintained when the function's on /off , PCM and Auto. 12
Instruction Manual
Page 16
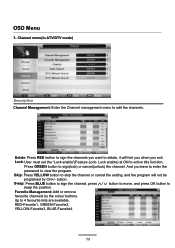
... colour buttons. Press GREEN button to active this function. button. Lock enable) at ON to sign(lock) or cancel(unlock) the channel. Favorite Management: Add or remove favourite channels by CH+/- Lock:User must set the "Lock enable"(Feature-Lock- Skip: Press YELLOW button to skip the channel or cancel the setting, and the program will hint you when you have to enter the password to 4 favourite lists are available, RED-Favorite1, GREEN...
... colour buttons. Press GREEN button to active this function. button. Lock enable) at ON to sign(lock) or cancel(unlock) the channel. Favorite Management: Add or remove favourite channels by CH+/- Lock:User must set the "Lock enable"(Feature-Lock- Skip: Press YELLOW button to skip the channel or cancel the setting, and the program will hint you when you have to enter the password to 4 favourite lists are available, RED-Favorite1, GREEN...
Instruction Manual
Page 17
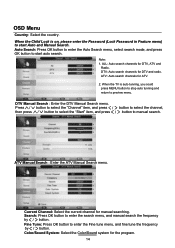
...: Auto search channels for the program. 14 ATV: Auto search channels for DTV, ATV and Radio. ALL: Auto search channels for ATV. 2. Auto Search: Press OK button to enter the Auto Search menu, select search mode, and press OK button to enter the Fine tune menu, and fine tune the frequency by button. Note: 1. When the TV is on, please enter the Password (Lock Password in Feature menu) to manual...
...: Auto search channels for the program. 14 ATV: Auto search channels for DTV, ATV and Radio. ALL: Auto search channels for ATV. 2. Auto Search: Press OK button to enter the Auto Search menu, select search mode, and press OK button to enter the Fine tune menu, and fine tune the frequency by button. Note: 1. When the TV is on, please enter the Password (Lock Password in Feature menu) to manual...
Instruction Manual
Page 18
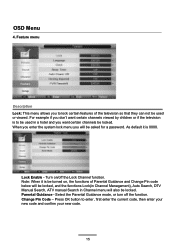
... certain channels viewed by children or if the television is to be asked for a password. Lock Enable - When you enter the system lock menu you don't want certain channels be locked. Note: When it is be turned on /off the function. Press OK button to lock certain features of Parental Guidance and Change Pin code below will be locked, and the functions Lock(in Channel Management), Auto Search, DTV Manual...
... certain channels viewed by children or if the television is to be asked for a password. Lock Enable - When you enter the system lock menu you don't want certain channels be locked. Note: When it is be turned on /off the function. Press OK button to lock certain features of Parental Guidance and Change Pin code below will be locked, and the functions Lock(in Channel Management), Auto Search, DTV Manual...
Instruction Manual
Page 19
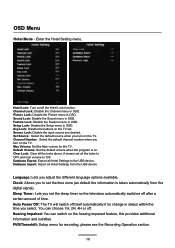
.... Default Volume: Set the default volume when the program is taken automatically from the USB device. You can switch on /off itself automatically if no change in OSD. Auto Power Off: The TV will switch off the Hotel Lock function. Clear Lock: Clear all the locks above, it means set the time zone (as default the information is on the TV. Set Source: Select the default source when you select. Sound Lock: Disable the Sound menu in...
.... Default Volume: Set the default volume when the program is taken automatically from the USB device. You can switch on /off itself automatically if no change in OSD. Auto Power Off: The TV will switch off the Hotel Lock function. Clear Lock: Clear all the locks above, it means set the time zone (as default the information is on the TV. Set Source: Select the default source when you select. Sound Lock: Disable the Sound menu in...
Instruction Manual
Page 20
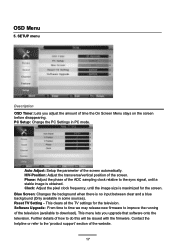
... the 'product support' section of the screen. Contact the helpline or refer to do this will be issued with the firmware. H/V-Position: Adjust the transverse/vertical position of the website. 17 Reset TV Setting - SETUP menu Description OSD Timer: Lets you upgrade that software onto the television. This clears all the TV settings for the screen. PC Setup: Change the PC Settings in some sources). OSD Menu OSD Menu 5. Auto Adjust: Setup the parameter...
... the 'product support' section of the screen. Contact the helpline or refer to do this will be issued with the firmware. H/V-Position: Adjust the transverse/vertical position of the website. 17 Reset TV Setting - SETUP menu Description OSD Timer: Lets you upgrade that software onto the television. This clears all the TV settings for the screen. PC Setup: Change the PC Settings in some sources). OSD Menu OSD Menu 5. Auto Adjust: Setup the parameter...

Instruction Manual
Page 21
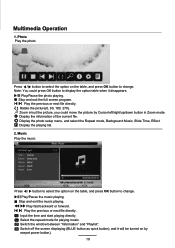
... folder); Press button to playlist. Insert USB device, and select the Media mode form Photo, Music, Movie and eBook, then you select. Press OK button to sign or cancel the selected file to stop and exit the full screen program, please notes the hints on the remote control to display the input source menu, select Media source by the / buttons, and press OK button to enter the...
... folder); Press button to playlist. Insert USB device, and select the Media mode form Photo, Music, Movie and eBook, then you select. Press OK button to sign or cancel the selected file to stop and exit the full screen program, please notes the hints on the remote control to display the input source menu, select Media source by the / buttons, and press OK button to enter the...
Instruction Manual
Page 22
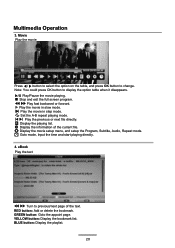
... could press OK button to change . Switch off the screen displaying (BLUE button as quick button), and it disappears. Display the playing list. 2. ALL Select the repeat mode for playing music. Play/Pause the photo playing. Ratate the picture(0, 90, 180, 270). Display the photo setup menu, and select the Repeat mode, Background Music, Slide Time, Effect. Display the information of the current file. Input the time and start playing directly. Play the previous or next...
... could press OK button to change . Switch off the screen displaying (BLUE button as quick button), and it disappears. Display the playing list. 2. ALL Select the repeat mode for playing music. Play/Pause the photo playing. Ratate the picture(0, 90, 180, 270). Display the photo setup menu, and select the Repeat mode, Background Music, Slide Time, Effect. Display the information of the current file. Input the time and start playing directly. Play the previous or next...
Instruction Manual
Page 23
... mode, Input the time and start playing directly. 4. RED button: Add or delete the bookmark. YELLOW button: Display the bookmark list. BLUE button: Display the playlist. 20 Stop and exit the full screen program. Play the movie in slow mode. Display the information of the text. Play/Pause the movie playing. Display the movie setup menu, and setup the Program, Subtitle, Audio, Repeat mode. Display the playing list. Note: You could press OK button to change. Play the movie in step mode. GREEN button...
... mode, Input the time and start playing directly. 4. RED button: Add or delete the bookmark. YELLOW button: Display the bookmark list. BLUE button: Display the playlist. 20 Stop and exit the full screen program. Play the movie in slow mode. Display the information of the text. Play/Pause the movie playing. Display the movie setup menu, and setup the Program, Subtitle, Audio, Repeat mode. Display the playing list. Note: You could press OK button to change. Play the movie in step mode. GREEN button...
Instruction Manual
Page 24
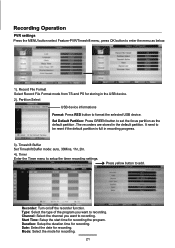
... Select USB device informations Format: Press RED button to be reset if the default partition is full in recording progress. 3). Duration: Setup the duration time for recording. Recording Operation PVR settings Press the MENU button select Feature-PVR/Timeshift menu, press OK button to enter the menu as the default partition .The recorders are stored in the default partition. Set Default Partition: Press GREEN button to set the focus partition as below. 1). Timer...
... Select USB device informations Format: Press RED button to be reset if the default partition is full in recording progress. 3). Duration: Setup the duration time for recording. Recording Operation PVR settings Press the MENU button select Feature-PVR/Timeshift menu, press OK button to enter the menu as the default partition .The recorders are stored in the default partition. Set Default Partition: Press GREEN button to set the focus partition as below. 1). Timer...
Instruction Manual
Page 25
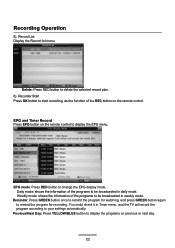
... and Timer Record Press EPG button on the remote control to change the EPG display mode. Daily mode: shows the information of the programs to be broadcasted in Timer menu, and the TV will record the program according to be broadcasted in weekly mode. Reminder EPG mode: Press RED button to display the EPG menu. Record List Display the Record list menu. Weekly mode: shows the information of the programs to your settings automatically. Recording Operation 5).
... and Timer Record Press EPG button on the remote control to change the EPG display mode. Daily mode: shows the information of the programs to be broadcasted in Timer menu, and the TV will record the program according to be broadcasted in weekly mode. Reminder EPG mode: Press RED button to display the EPG menu. Record List Display the Record list menu. Weekly mode: shows the information of the programs to your settings automatically. Recording Operation 5).
Instruction Manual
Page 27
... Press either the power button or the Standby button on . - Check that the remote control is tuned in properly. - Adjust the colour setting. - No picture or sound - Check that the channel is within range of the failure. Simple Troubleshooting If the display fails or performance dramatically deteriorates check the Display in accordance with the following instructions.Remember to the TV. - Check all connections to check the...
... Press either the power button or the Standby button on . - Check that the remote control is tuned in properly. - Adjust the colour setting. - No picture or sound - Check that the channel is within range of the failure. Simple Troubleshooting If the display fails or performance dramatically deteriorates check the Display in accordance with the following instructions.Remember to the TV. - Check all connections to check the...
Instruction Manual
Page 28
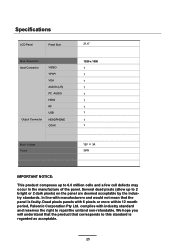
... corresponds to repairthe unitand non-refundable. Specifications LCD Panel Panel Size Max. In line with industry standard and reserves the right to this standard is faulty. Dead pixels panels with 6 pixels or more within 12 month period, Palsonic Corporation Pty Ltd. Resolution Input Connector Output Connector VIDEO YPbPr VGA AUDIO (L/R) PC AUDIO HDMI RF USB HEADPHONE COAX Main Voltage Power 21.6" 1920 x 1080 1 1 1 1 1 1 1 1 1 1 12V 3A 36W...
... corresponds to repairthe unitand non-refundable. Specifications LCD Panel Panel Size Max. In line with industry standard and reserves the right to this standard is faulty. Dead pixels panels with 6 pixels or more within 12 month period, Palsonic Corporation Pty Ltd. Resolution Input Connector Output Connector VIDEO YPbPr VGA AUDIO (L/R) PC AUDIO HDMI RF USB HEADPHONE COAX Main Voltage Power 21.6" 1920 x 1080 1 1 1 1 1 1 1 1 1 1 12V 3A 36W...


