Operating Instructions
Page 4
... Supplied 8 Remote Control Batteries 8 Connections 9 PC Input Terminals connection 10 SERIAL Terminals connection 11 AV & COMPONENT / RGB connection 12 RGB signal (R, G, B 12 Power ON / OFF 13 Basic Controls 14 On-Screen Menu Displays 16 Initial selections 18 Selecting the input signal 18 Selecting the On-Screen Menu Language 18 ASPECT Controls 19 Adjusting POS. /SIZE 20 MULTI PIP 21 Advanced PIP 22 PICTURE Adjustments 23 ADVANCED SETTINGS 24 SOUND Adjustment 25 MUTE 25 Digital Zoom 26 PRESENT TIME SETUP / SET UP TIMER 27 PRESENT TIME SETUP...
... Supplied 8 Remote Control Batteries 8 Connections 9 PC Input Terminals connection 10 SERIAL Terminals connection 11 AV & COMPONENT / RGB connection 12 RGB signal (R, G, B 12 Power ON / OFF 13 Basic Controls 14 On-Screen Menu Displays 16 Initial selections 18 Selecting the input signal 18 Selecting the On-Screen Menu Language 18 ASPECT Controls 19 Adjusting POS. /SIZE 20 MULTI PIP 21 Advanced PIP 22 PICTURE Adjustments 23 ADVANCED SETTINGS 24 SOUND Adjustment 25 MUTE 25 Digital Zoom 26 PRESENT TIME SETUP / SET UP TIMER 27 PRESENT TIME SETUP...
Operating Instructions
Page 5
...energy and, if not installed and used in accordance with the instructions, may cause undesired operation. TH-42PS9UK, TH-37PH9UK, TH-42PH9UK, TH-50PH9UK Responsible Party: Contact Source: Panasonic Corporation of company or product...television reception, which the receiver is encouraged to try to correct the interference by Panasonic Corporation of still pictures include logos, video games, computer images, teletext and images displayed in a particular installation. Note: Do not allow a still picture to be determined by turning the equipment off and on, the user is connected...
...energy and, if not installed and used in accordance with the instructions, may cause undesired operation. TH-42PS9UK, TH-37PH9UK, TH-42PH9UK, TH-50PH9UK Responsible Party: Contact Source: Panasonic Corporation of company or product...television reception, which the receiver is encouraged to try to correct the interference by Panasonic Corporation of still pictures include logos, video games, computer images, teletext and images displayed in a particular installation. Note: Do not allow a still picture to be determined by turning the equipment off and on, the user is connected...
Operating Instructions
Page 6
... of the display could result in NORMAL mode. 6 TY-42TM6Y • SDI Terminal Board TY-FB7SD • HD-SDI Terminal Board TY-FB7HD, TY-FB9HD • HDMI Terminal Board TY-FB8HM • Touch Panel TY-TP42P8-S (TH-42PS9UK, TH-42PH9UK), TY-TP50P8-S (TH-50PH9UK) Always be displayed for use only with a dry cloth. Examples of still pictures include logos, video games, computer images, teletext and images displayed in the...
... of the display could result in NORMAL mode. 6 TY-42TM6Y • SDI Terminal Board TY-FB7SD • HD-SDI Terminal Board TY-FB7HD, TY-FB9HD • HDMI Terminal Board TY-FB8HM • Touch Panel TY-TP42P8-S (TH-42PS9UK, TH-42PH9UK), TY-TP50P8-S (TH-50PH9UK) Always be displayed for use only with a dry cloth. Examples of still pictures include logos, video games, computer images, teletext and images displayed in the...
Operating Instructions
Page 7
... the rear. If using some other hard objects, otherwise the surface may peel off or tip over. AC Power Supply Cord The Plasma Display is dropped, or if the cabinet becomes damaged, disconnect the power cord plug immediately. • A short may cause the Plasma Display to be used for a long period of the cabinet surface may be used. Wipe the panel surface gently using the pedestal (optional...
... the rear. If using some other hard objects, otherwise the surface may peel off or tip over. AC Power Supply Cord The Plasma Display is dropped, or if the cabinet becomes damaged, disconnect the power cord plug immediately. • A short may cause the Plasma Display to be used for a long period of the cabinet surface may be used. Wipe the panel surface gently using the pedestal (optional...
Operating Instructions
Page 10
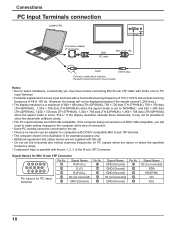
... the audio output terminal on the computer. Notes: • Due to space limitations, occasionally you will not be connected to the set. • There is no need to make setting changes to the computer at the time of connection. • Some PC models cannot be displayed properly if the signals exceed 1,200 lines.) • The display resolution is set the horizontal and vertical scanning frequencies for PC Input Terminal...
... the audio output terminal on the computer. Notes: • Due to space limitations, occasionally you will not be connected to the set. • There is no need to make setting changes to the computer at the time of connection. • Some PC models cannot be displayed properly if the signals exceed 1,200 lines.) • The display resolution is set the horizontal and vertical scanning frequencies for PC Input Terminal...
Operating Instructions
Page 11
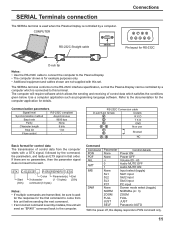
... None NORM ZOOM FULL JUST SELF Control details Power ON Power OFF Volume 00 - 63 Audio MUTE OFF Audio MUTE ON Input select (toggle) Slot1 input Slot2 input Slot3 input PC input Screen mode select (toggle) NORMAL (4 : 3) ZOOM FULL JUST Panasonic AUTO With the power off, this set. SERIAL Terminals connection The SERIAL terminal is used when the Plasma Display is connected to this terminal. COMPUTER RS-232C Straight cable SERIAL Connections 6789 12345 Pin layout for...
... None NORM ZOOM FULL JUST SELF Control details Power ON Power OFF Volume 00 - 63 Audio MUTE OFF Audio MUTE ON Input select (toggle) Slot1 input Slot2 input Slot3 input PC input Screen mode select (toggle) NORMAL (4 : 3) ZOOM FULL JUST Panasonic AUTO With the power off, this set. SERIAL Terminals connection The SERIAL terminal is used when the Plasma Display is connected to this terminal. COMPUTER RS-232C Straight cable SERIAL Connections 6789 12345 Pin layout for...

Operating Instructions
Page 13
... the setup menu. (see page 9) Connecting the plug to the Wall Outlet Press the Power switch on the Plasma Display to turn the set on: Power-On. Power Indicator: Red (standby) Press the button on the remote control to turn the Plasma Display on for the first time, the LANGUAGE selection screen is turned on . Fix the AC cord plug securely to the Plasma Display with the clamper. (see page 18) Select the desired language using the or button and...
... the setup menu. (see page 9) Connecting the plug to the Wall Outlet Press the Power switch on the Plasma Display to turn the set on: Power-On. Power Indicator: Red (standby) Press the button on the remote control to turn the Plasma Display on for the first time, the LANGUAGE selection screen is turned on . Fix the AC cord plug securely to the Plasma Display with the clamper. (see page 18) Select the desired language using the or button and...
Operating Instructions
Page 14
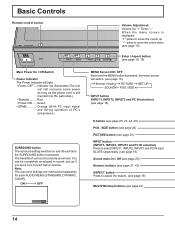
....) SURROUND button The surround setting switches on and off each AUDIO MENU (STANDARD, DYNAMIC, CLEAR). ON OFF MENU Screen ON / OFF Each time the MENU button is pressed, the menu screen will still consume some power as long as if you were at a concert hall or cinema. Note: The surround settings are enormous. Basic Controls Remote control sensor TH-42PS9 INPUT MENU -/ VOL +/ ENTER/ Volume Adjustment Volume Up "+" Down "-" When the menu screen is displayed: "+": press...
....) SURROUND button The surround setting switches on and off each AUDIO MENU (STANDARD, DYNAMIC, CLEAR). ON OFF MENU Screen ON / OFF Each time the MENU button is pressed, the menu screen will still consume some power as long as if you were at a concert hall or cinema. Note: The surround settings are enormous. Basic Controls Remote control sensor TH-42PS9 INPUT MENU -/ VOL +/ ENTER/ Volume Adjustment Volume Up "+" Down "-" When the menu screen is displayed: "+": press...
Operating Instructions
Page 15
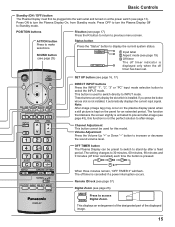
... TIMER 90 1 1 Input label 2 2 Aspect mode (see page 45), this model. This displays an enlargement of the designated part of the displayed image. 15 Basic Controls Standby (ON / OFF) button The Plasma Display must first be plugged into the wall outlet and turned on the panel for this function is not the perfect solution to after-image. POSITION buttons R button (see page 25) Status button Press the "Status" button to previous menu screen. SOUND button...
... TIMER 90 1 1 Input label 2 2 Aspect mode (see page 45), this model. This displays an enlargement of the designated part of the displayed image. 15 Basic Controls Standby (ON / OFF) button The Plasma Display must first be plugged into the wall outlet and turned on the panel for this function is not the perfect solution to after-image. POSITION buttons R button (see page 25) Status button Press the "Status" button to previous menu screen. SOUND button...
Operating Instructions
Page 17
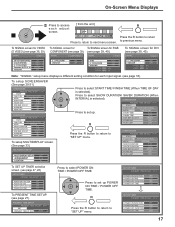
...) COLOR SYSTEM 3 : 2 PULLDOWN Panasonic AUTO (4 : 3) VIDEO NR ON AUTO OFF NORMAL OFF 3 : 2 PULLDOWN OFF VIDEO NR OFF SYNC 3 : 2 PULLDOWN VIDEO NR H-FREQ. 33.8 V-FREQ. 60.0 AUTO OFF OFF kHz Hz 3 : 2 PULLDOWN VIDEO NR H-FREQ. 33.8 V-FREQ. 60.0 OFF OFF kHz Hz Note: "SIGNAL" setup menu displays a different setting condition for each adjust screen. [ from the unit ] INPUT MENU -/ VOL +/ ENTER/ Press to return to next menu screen. FUNCTION WHITE BAR SCROLL MODE TIME OF...
...) COLOR SYSTEM 3 : 2 PULLDOWN Panasonic AUTO (4 : 3) VIDEO NR ON AUTO OFF NORMAL OFF 3 : 2 PULLDOWN OFF VIDEO NR OFF SYNC 3 : 2 PULLDOWN VIDEO NR H-FREQ. 33.8 V-FREQ. 60.0 AUTO OFF OFF kHz Hz 3 : 2 PULLDOWN VIDEO NR H-FREQ. 33.8 V-FREQ. 60.0 OFF OFF kHz Hz Note: "SIGNAL" setup menu displays a different setting condition for each adjust screen. [ from the unit ] INPUT MENU -/ VOL +/ ENTER/ Press to return to next menu screen. FUNCTION WHITE BAR SCROLL MODE TIME OF...
Operating Instructions
Page 18
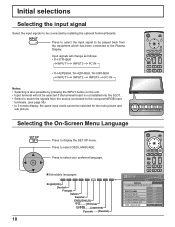
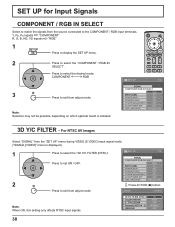
... SELECT RGB INPUT LABEL PC POWER SAVE OFF STANDBY SAVE OFF POWER MANAGEMENT OFF AUTO POWER OFF OSD LANGUAGE OFF ENGLISH (US) 18 Press to select the input signal to be played back from the source connected to the component/RGB input terminals. (see page 38) • In 2 screen display, the same input mode cannot be selected if the terminal board is also possible by installing the optional...
... SELECT RGB INPUT LABEL PC POWER SAVE OFF STANDBY SAVE OFF POWER MANAGEMENT OFF AUTO POWER OFF OSD LANGUAGE OFF ENGLISH (US) 18 Press to select the input signal to be played back from the source connected to the component/RGB input terminals. (see page 38) • In 2 screen display, the same input mode cannot be selected if the terminal board is also possible by installing the optional...
Operating Instructions
Page 19
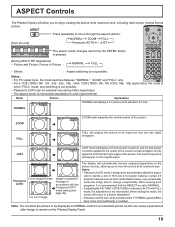
... wide screen cinema format picture. [from the unit] Press repeatedly to move through the aspect options: NORMAL ZOOM FULL Panasonic AUTO JUST INPUT MENU -/ VOL +/ ENTER/ The aspect mode changes each input terminal. Mode NORMAL 4 NORMAL Picture 3 Explanation NORMAL will return to a former adjustment. • Panasonic AUTO can be set to "FULL" mode, and switching is not possible. • Panasonic AUTO can not be displayed in NORMAL mode for each time the ENTER button...
... wide screen cinema format picture. [from the unit] Press repeatedly to move through the aspect options: NORMAL ZOOM FULL Panasonic AUTO JUST INPUT MENU -/ VOL +/ ENTER/ The aspect mode changes each input terminal. Mode NORMAL 4 NORMAL Picture 3 Explanation NORMAL will return to a former adjustment. • Panasonic AUTO can be set to "FULL" mode, and switching is not possible. • Panasonic AUTO can not be displayed in NORMAL mode for each time the ENTER button...
Operating Instructions
Page 20
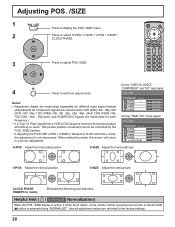
... or DVD player is received, the picture position will return to the factory settings. 20 During "VIDEO (S VIDEO)", "COMPONENT" and "DVI" input signal. When exiting the mode, the screen will shift up or down. H-SIZE Adjust the horizontal size. CLOCK PHASE (RGB/PC in Panasonic AUTO with FULL mode, the adjustment is not memorized. V-POS Adjust the vertical position. V-SIZE Adjust the vertical size. Notes: • Adjustment details are memorized separately for different input signal formats (Adjustments for component signals are memorized...
... or DVD player is received, the picture position will return to the factory settings. 20 During "VIDEO (S VIDEO)", "COMPONENT" and "DVI" input signal. When exiting the mode, the screen will shift up or down. H-SIZE Adjust the horizontal size. CLOCK PHASE (RGB/PC in Panasonic AUTO with FULL mode, the adjustment is not memorized. V-POS Adjust the vertical position. V-SIZE Adjust the vertical size. Notes: • Adjustment details are memorized separately for different input signal formats (Adjustments for component signals are memorized...
Operating Instructions
Page 32
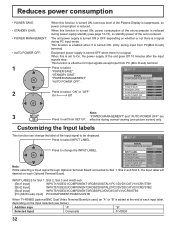
... normal viewing (one picture screen) only. SET UP 1/2 SIGNAL COMPONENT/RGB-IN SELECT Press to be displayed. When this is added at the end of each Optional Terminal Board. Customizing the Input labels This function can change the label of the Input signal to change the INPUT LABEL. Press to select INPUT LABEL. RGB INPUT LABEL PC POWER SAVE OFF STANDBY SAVE OFF POWER MANAGEMENT OFF Note: AUTO POWER OFF...
... normal viewing (one picture screen) only. SET UP 1/2 SIGNAL COMPONENT/RGB-IN SELECT Press to be displayed. When this is added at the end of each Optional Terminal Board. Customizing the Input labels This function can change the label of the Input signal to change the INPUT LABEL. Press to select INPUT LABEL. RGB INPUT LABEL PC POWER SAVE OFF STANDBY SAVE OFF POWER MANAGEMENT OFF Note: AUTO POWER OFF...
Operating Instructions
Page 38
...) COLOR SYSTEM 3 : 2 PULLDOWN Panasonic AUTO (4 : 3) VIDEO NR ON AUTO OFF NORMAL OFF 38 For NTSC AV images Select "SIGNAL" from the source connected to the COMPONENT / RGB input terminals. COMPONENT RGB 3 Press to exit from adjust mode. Note: Selection may not be possible, depending on which optional board is displayed.) SET UP 1/2 1 Press to select the "3D Y/C FILTER (NTSC)". RGB INPUT LABEL PC POWER SAVE OFF STANDBY SAVE...
...) COLOR SYSTEM 3 : 2 PULLDOWN Panasonic AUTO (4 : 3) VIDEO NR ON AUTO OFF NORMAL OFF 38 For NTSC AV images Select "SIGNAL" from the source connected to the COMPONENT / RGB input terminals. COMPONENT RGB 3 Press to exit from adjust mode. Note: Selection may not be possible, depending on which optional board is displayed.) SET UP 1/2 1 Press to select the "3D Y/C FILTER (NTSC)". RGB INPUT LABEL PC POWER SAVE OFF STANDBY SAVE...

Operating Instructions
Page 42
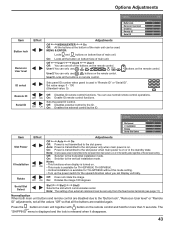
...: Sets the color temperature for DVI, SDI, HDMI's corresponding signals. 42 Off: Sets normal two screen display mode (see page 22). Adjusts the image display size on the menu. Off: Nullify all the two screen display functions. • , buttons are unavailable during Advanced PIP mode operation. On: Sets Advanced PIP mode (see page 21). Notes: • Only the adjusted signal is displayed (see page 18). • Signal can be displayed when the Terminal board is installed. • Input switch can be adjusted between...
...: Sets the color temperature for DVI, SDI, HDMI's corresponding signals. 42 Off: Sets normal two screen display mode (see page 22). Adjusts the image display size on the menu. Off: Nullify all the two screen display functions. • , buttons are unavailable during Advanced PIP mode operation. On: Sets Advanced PIP mode (see page 21). Notes: • Only the adjusted signal is displayed (see page 18). • Signal can be displayed when the Terminal board is installed. • Input switch can be adjusted between...
Operating Instructions
Page 43
... available for TH-42PH9UK, TH-50PH9UK. • Vertical installation is available for TH-42PS9UK without this mode setting. • Turn up the power switch for more than 5 seconds. Off On Off: Disables external control by the ID. On: Sets fan to the horizontal installation mode. Options Adjustments Options 2/3 Item Button lock Remocon User level ID select Effect Button lock Off Remocon User level Off ID select 0 Remote ID Off Serial ID Off Adjustments Off MENU&ENTER On...
... available for TH-42PH9UK, TH-50PH9UK. • Vertical installation is available for TH-42PS9UK without this mode setting. • Turn up the power switch for more than 5 seconds. Off On Off: Disables external control by the ID. On: Sets fan to the horizontal installation mode. Options Adjustments Options 2/3 Item Button lock Remocon User level ID select Effect Button lock Off Remocon User level Off ID select 0 Remote ID Off Serial ID Off Adjustments Off MENU&ENTER On...
Operating Instructions
Page 45
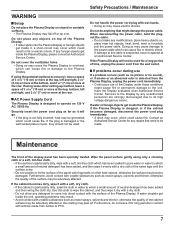
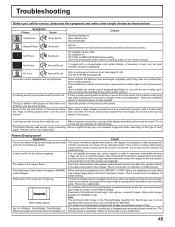
... input, only the input terminal indication is not a malfunction. Examples of still pictures include logos, video games, computer images, teletext and images displayed in the fast-moving parts of the images: This is not designed to display fixed images for the picture to reduce after-image on PICTURE and BRIGHTNESS/Volume setting (Check by pressing the power switch or stand-by the Warranty. whirring sound is caused by any other remote control...
... input, only the input terminal indication is not a malfunction. Examples of still pictures include logos, video games, computer images, teletext and images displayed in the fast-moving parts of the images: This is not designed to display fixed images for the picture to reduce after-image on PICTURE and BRIGHTNESS/Volume setting (Check by pressing the power switch or stand-by the Warranty. whirring sound is caused by any other remote control...
Operating Instructions
Page 47
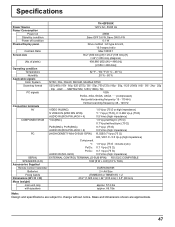
...) Component Y : PB/CB : PR/CR : 1.0 Vp-p (75 ȍ : include sync) 0.7 Vp-p (75 ȍ) 0.7 Vp-p (75 ȍ) AUDIO IN (M3 JACK) 0.5 Vrms (high impedance) SERIAL EXTERNAL CONTROL TERMINAL (D-SUB 9PIN) RS-232C COMPATIBLE SPEAKERS (6 ȍ) 16W [8 W + 8 W] (10 % THD) Accessories Supplied Remote Control Transmitter EUR7636070R Batteries 2 × AA Size Fixing bands (TMME203 or TMME187) × 2 Dimensions (W × H × D) 40.2" (1,020 mm) × 24" (610 mm...
...) Component Y : PB/CB : PR/CR : 1.0 Vp-p (75 ȍ : include sync) 0.7 Vp-p (75 ȍ) 0.7 Vp-p (75 ȍ) AUDIO IN (M3 JACK) 0.5 Vrms (high impedance) SERIAL EXTERNAL CONTROL TERMINAL (D-SUB 9PIN) RS-232C COMPATIBLE SPEAKERS (6 ȍ) 16W [8 W + 8 W] (10 % THD) Accessories Supplied Remote Control Transmitter EUR7636070R Batteries 2 × AA Size Fixing bands (TMME203 or TMME187) × 2 Dimensions (W × H × D) 40.2" (1,020 mm) × 24" (610 mm...
Operating Instructions
Page 51
... FOR A PARTICULAR PURPOSE. Shipping to repair, or at its back cover. Serial numbers that becomes defective. PCI agrees to the latter location requires a return authorization before shipment. Whichever comes first. 1 year (burn-in Canada. This warranty does not cover replacements or repairs necessitated by loss or damage resulting from the display of fixed images on video display products are not defects and are...
... FOR A PARTICULAR PURPOSE. Shipping to repair, or at its back cover. Serial numbers that becomes defective. PCI agrees to the latter location requires a return authorization before shipment. Whichever comes first. 1 year (burn-in Canada. This warranty does not cover replacements or repairs necessitated by loss or damage resulting from the display of fixed images on video display products are not defects and are...


