
Operating Instructions
Page 2
... can cause a permanent afterimage to tell the user that parts inside the product are unable to rain or moisture. License description: To view the license information for software used in 4:3 mode. Do not defeat the purpose of still pictures include logos, video games, computer images, teletext and images displayed in this product, press the Menu button and select [Set up] [About] [License]. (See page 34...
... can cause a permanent afterimage to tell the user that parts inside the product are unable to rain or moisture. License description: To view the license information for software used in 4:3 mode. Do not defeat the purpose of still pictures include logos, video games, computer images, teletext and images displayed in this product, press the Menu button and select [Set up] [About] [License]. (See page 34...
Operating Instructions
Page 4
... serial number of your set in the space provided on the back cover of Controls 16 The Illuminated Remote Control 16 4 First time setup 18 Watching TV programs 20 Aspect Controls 21 On-Screen Menu Displays for Navigation 22 Sub-Menu Navigation 24 Picture 24 Audio 26 Timer 28 Set up 29 Lock 35 Operating peripheral equipment 39 Programming the remote control code 39 Infrared Code Index 40 Mode Operational Key Chart 43 VIDEO/COMPONENT/HDMI input signals 45 Specifications...
... serial number of your set in the space provided on the back cover of Controls 16 The Illuminated Remote Control 16 4 First time setup 18 Watching TV programs 20 Aspect Controls 21 On-Screen Menu Displays for Navigation 22 Sub-Menu Navigation 24 Picture 24 Audio 26 Timer 28 Set up 29 Lock 35 Operating peripheral equipment 39 Programming the remote control code 39 Infrared Code Index 40 Mode Operational Key Chart 43 VIDEO/COMPONENT/HDMI input signals 45 Specifications...
Operating Instructions
Page 7
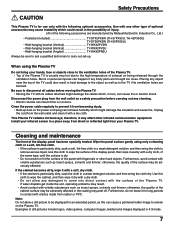
... Industrial Co., Ltd.) • Pedestal (included TY-ST42PX5W (TH-37PX50U, TH-42PX50U) TY-ST50PX5W (TH-50PX50U) • Wall-hanging bracket (Vertical TY-WK42PV2W • Wall-hanging bracket (Vertical TY-WK42PV3U • Wall-hanging bracket (Angled TY-WK42PR2U Always be displayed for an extended period, as insect sprays, solvents and thinner; Wipe the panel surface gently using the Plasma TV Do not bring your...
... Industrial Co., Ltd.) • Pedestal (included TY-ST42PX5W (TH-37PX50U, TH-42PX50U) TY-ST50PX5W (TH-50PX50U) • Wall-hanging bracket (Vertical TY-WK42PV2W • Wall-hanging bracket (Vertical TY-WK42PV3U • Wall-hanging bracket (Angled TY-WK42PR2U Always be displayed for an extended period, as insect sprays, solvents and thinner; Wipe the panel surface gently using the Plasma TV Do not bring your...
Operating Instructions
Page 8
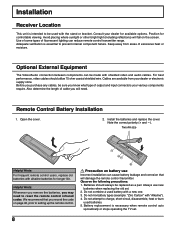
Installation Receiver Location This unit is intended to be replaced as a pair. Use of some types of output and input connectors your various components require. For best performance, video cables should always be used with the stand or bracket. Precaution on battery use new batteries when replacing the old set . 8 Batteries should utilize 75 ohm coaxial shielded wire. Do not attempt to reset the remote control infrared codes. Avoid placing where...
Installation Receiver Location This unit is intended to be replaced as a pair. Use of some types of output and input connectors your various components require. For best performance, video cables should always be used with the stand or bracket. Precaution on battery use new batteries when replacing the old set . 8 Batteries should utilize 75 ohm coaxial shielded wire. Do not attempt to reset the remote control infrared codes. Avoid placing where...

Operating Instructions
Page 10
... AC cord together. AC cord fixing 1 Connect power plug to release: 1 Fix by pushing in until Pull up while drawing a clicking sound is in the knob. How to fix: How to the socket of the main body. 2 Fix the clamper. Cable Connection DIGITAL AUDIO OUT terminal (see page 14) HDMI terminal (see page 12) D I G I TA L SERVICE A U D I O O U T ONLY C a b l e C A R D TM ANTENNA Cable In Antenna terminals (see page 11) AV IN Y Y R L AUDIO IN VIDEO...
... AC cord together. AC cord fixing 1 Connect power plug to release: 1 Fix by pushing in until Pull up while drawing a clicking sound is in the knob. How to fix: How to the socket of the main body. 2 Fix the clamper. Cable Connection DIGITAL AUDIO OUT terminal (see page 14) HDMI terminal (see page 12) D I G I TA L SERVICE A U D I O O U T ONLY C a b l e C A R D TM ANTENNA Cable In Antenna terminals (see page 11) AV IN Y Y R L AUDIO IN VIDEO...
Operating Instructions
Page 11
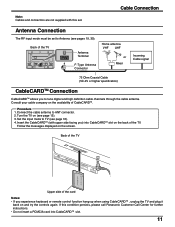
... eN N I TA L AUDIO OUT SERVICE ONLY SERVICE ONLY ANT VIDEO AV IN Y Y PB PB PR PR R L AUDIO IN S VIDEO L AUDIO IN R 1 2 COMPONENT VIDEO INPUT 1 INPUT INPUT 2 OUTPUT ANTENNA Cable In Antenna Terminal F-Type Antenna Connector Home antenna VHF UHF or Mixer Incoming Cable signal 75 Ohm Coaxial Cable (5C-2V or higher specification) CableCARDTM Connection CableCARDTM allows you experience keyboard or remote control function hang-up when using CableCARDTM , unplug the TV and plug it back...
... eN N I TA L AUDIO OUT SERVICE ONLY SERVICE ONLY ANT VIDEO AV IN Y Y PB PB PR PR R L AUDIO IN S VIDEO L AUDIO IN R 1 2 COMPONENT VIDEO INPUT 1 INPUT INPUT 2 OUTPUT ANTENNA Cable In Antenna Terminal F-Type Antenna Connector Home antenna VHF UHF or Mixer Incoming Cable signal 75 Ohm Coaxial Cable (5C-2V or higher specification) CableCARDTM Connection CableCARDTM allows you experience keyboard or remote control function hang-up when using CableCARDTM , unplug the TV and plug it back...
Operating Instructions
Page 12
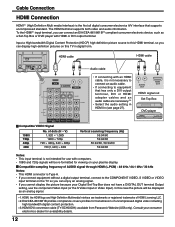
... electronic device, such as a Set-Top Box or DVD player with computers. • 1080i and 720p signals will be re-formatted for availability details. 12 Compatible VIDEO Signal 1080i 720p 480p 480i No. Consult your consumer electronics dealer for viewing on your Digital Set-Top Box does not have a DIGITAL OUT terminal Output setting, use with HDMI or DVI output terminal. Cable Connection HDMI Connection HDMI∗1 (High Definition Multi media Interface) is not intended for...
... electronic device, such as a Set-Top Box or DVD player with computers. • 1080i and 720p signals will be re-formatted for availability details. 12 Compatible VIDEO Signal 1080i 720p 480p 480i No. Consult your consumer electronics dealer for viewing on your Digital Set-Top Box does not have a DIGITAL OUT terminal Output setting, use with HDMI or DVI output terminal. Cable Connection HDMI Connection HDMI∗1 (High Definition Multi media Interface) is not intended for...
Operating Instructions
Page 14
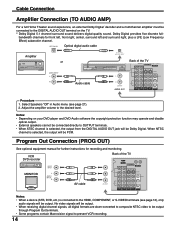
... digital-quality sound. bandwidth channels for recording and monitoring. Adjust the amplifier volume to the desired level. OPTICAL IN Optical digital audio cable Amplifier or AUDIO INPUT L R D I G I TA L SERVICE A U D I O O U T ONLY Audio cable D I G I TA L AUDIO OUT C a b l e C A R D TM ANTENNA Cable In L R OUTPUT AUDIO OUT Back of the TV OUTPUT AV IN Y Y R L AUDIO IN VIDEO PB PB S VIDEO PR PR VIDEO L L AUDIO R 1 2 COMPONENT VIDEO INPUT INPUT 1 R TO AUDIO AMP INPUT 2 PROGOUT Notes: • When a device (STB, DVD, etc.) is connected to the HDMI...
... digital-quality sound. bandwidth channels for recording and monitoring. Adjust the amplifier volume to the desired level. OPTICAL IN Optical digital audio cable Amplifier or AUDIO INPUT L R D I G I TA L SERVICE A U D I O O U T ONLY Audio cable D I G I TA L AUDIO OUT C a b l e C A R D TM ANTENNA Cable In L R OUTPUT AUDIO OUT Back of the TV OUTPUT AV IN Y Y R L AUDIO IN VIDEO PB PB S VIDEO PR PR VIDEO L L AUDIO R 1 2 COMPONENT VIDEO INPUT INPUT 1 R TO AUDIO AMP INPUT 2 PROGOUT Notes: • When a device (STB, DVD, etc.) is connected to the HDMI...
Operating Instructions
Page 15
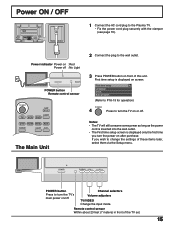
... wall outlet. • The First time setup screen is displayed on after purchase. Channel selectors Volume adjusters TV/VIDEO Change the input mode. VOL + CH POWER button Press to turn the TV on /off : No Light POWER button Remote control sensor POWER SAP LIGHT TV VCR DVD DTV RCVR DBS/CBL AUX TV/VIDEO SLEEP EXIT ASPECT FAVORITE E RE MUT CALL CH The Main Unit -VOL OK VOL+ 2 Connect the plug to the Plasma TV. • Fix the power cord plug...
... wall outlet. • The First time setup screen is displayed on after purchase. Channel selectors Volume adjusters TV/VIDEO Change the input mode. VOL + CH POWER button Press to turn the TV on /off : No Light POWER button Remote control sensor POWER SAP LIGHT TV VCR DVD DTV RCVR DBS/CBL AUX TV/VIDEO SLEEP EXIT ASPECT FAVORITE E RE MUT CALL CH The Main Unit -VOL OK VOL+ 2 Connect the plug to the Plasma TV. • Fix the power cord plug...
Operating Instructions
Page 16
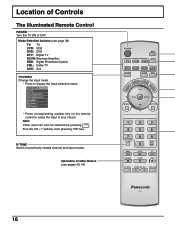
...: Digital Broadcast System CBL: Cable TV AUX: Aux TV/VIDEO Change the input mode. • Press to previously viewed channel and input modes. R-TUNE Switch to display the Input selection menu. Note: Video input can also be selected by pressing TV/VIDEO , then the CH buttons, then pressing "OK" key. Operation of Controls The Illuminated Remote Control POWER Turn the TV ON or OFF. Mode Selection buttons (see pages 43, 44) 16 POWER SAP LIGHT TV VCR DVD...
...: Digital Broadcast System CBL: Cable TV AUX: Aux TV/VIDEO Change the input mode. • Press to previously viewed channel and input modes. R-TUNE Switch to display the Input selection menu. Note: Video input can also be selected by pressing TV/VIDEO , then the CH buttons, then pressing "OK" key. Operation of Controls The Illuminated Remote Control POWER Turn the TV ON or OFF. Mode Selection buttons (see pages 43, 44) 16 POWER SAP LIGHT TV VCR DVD...
Operating Instructions
Page 18
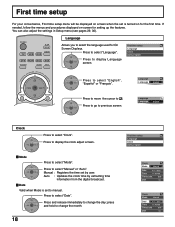
First time setup For your convenience, First time setup menu will be displayed on screen when the set is set by extracting time information from the digital broadcast. Language Language English Press to select "Mode". First time setup Language Clock Auto program Mode Press to select "Clock". Auto : Updates the clock time by user. CH -VOL OK VOL+ CH Press and release immediately to change the month. Press to . Language Language English MENU CH...
First time setup For your convenience, First time setup menu will be displayed on screen when the set is set by extracting time information from the digital broadcast. Language Language English Press to select "Mode". First time setup Language Clock Auto program Mode Press to select "Clock". Auto : Updates the clock time by user. CH -VOL OK VOL+ CH Press and release immediately to change the month. Press to . Language Language English MENU CH...
Operating Instructions
Page 20
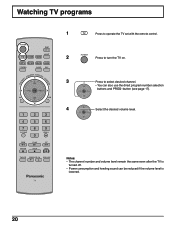
...+ CH Notes: • The channel number and volume level remain the same even after the TV is turned off. • Power consumption and howling sound can also use the direct program number selection buttons and PROG-button (see page 17). POWER 2 Press to turn the TV on. 3 Press to operate the TV set with the remote control. Watching TV programs POWER SAP LIGHT TV VCR DVD DTV RCVR DBS/CBL AUX...
...+ CH Notes: • The channel number and volume level remain the same even after the TV is turned off. • Power consumption and howling sound can also use the direct program number selection buttons and PROG-button (see page 17). POWER 2 Press to turn the TV on. 3 Press to operate the TV set with the remote control. Watching TV programs POWER SAP LIGHT TV VCR DVD DTV RCVR DBS/CBL AUX...
Operating Instructions
Page 25
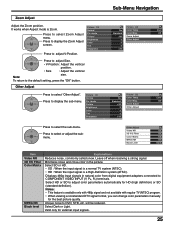
... display the sub-menu. Press to select "Other Adjust". Picture 1/2 Normal Pic. Select SD or HD. • SD : When the input signal is a normal TV system (NTSC). • HD : When the input signal is Zoom. Select Dark or Light. Press to DVD, STB, etc. Minimizes noise and cross-color in natural color from digital equipment adapters connected to the default setting, press the "OK" button. Unique noise to adjust...
... display the sub-menu. Press to select "Other Adjust". Picture 1/2 Normal Pic. Select SD or HD. • SD : When the input signal is a normal TV system (NTSC). • HD : When the input signal is Zoom. Select Dark or Light. Press to DVD, STB, etc. Minimizes noise and cross-color in natural color from digital equipment adapters connected to the default setting, press the "OK" button. Unique noise to adjust...
Operating Instructions
Page 32
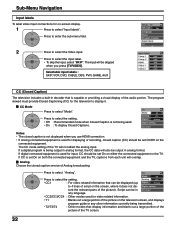
... setting. Language Clock Program channel Input labels CC Input labels Comp. 1 Comp. 2 HDMI Video 1 Video 2 SKIP SKIP DVD AUX SKIP CC (Closed Caption) The television includes a built-in analog format, the CC data will be skipped when you use HDMI connection. • If analog connected equipment is not displayed when you press [TV/VIDEO]. Analog Choose the closed caption service of the picture). CC Mode Analog Digital Off CC1 Primary Digital setting CC reset Notes: • The closed caption is used...
... setting. Language Clock Program channel Input labels CC Input labels Comp. 1 Comp. 2 HDMI Video 1 Video 2 SKIP SKIP DVD AUX SKIP CC (Closed Caption) The television includes a built-in analog format, the CC data will be skipped when you use HDMI connection. • If analog connected equipment is not displayed when you press [TV/VIDEO]. Analog Choose the closed caption service of the picture). CC Mode Analog Digital Off CC1 Primary Digital setting CC reset Notes: • The closed caption is used...
Operating Instructions
Page 33
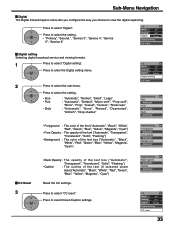
...", "Black", "White", "Red", "Green", "Blue", "Yellow", "Magenta", "Cyan") CC Reset Reset the CC settings. 3 Press to enter the Digital setting menu. CH -VOL OK VOL+ Press to view the digital captioning. Sub-Menu Navigation Digital The Digital Closed Caption menu lets you configure the way you choose to reset Closed Caption settings. Press to select the setting. • "Primary", "Second.", "Service 3", "Service 4", "Service 5", "Service 6" CC Mode Analog Digital Off CC1 Primary Digital setting CC reset Digital setting Selecting digital broadcast service and viewing formats...
...", "Black", "White", "Red", "Green", "Blue", "Yellow", "Magenta", "Cyan") CC Reset Reset the CC settings. 3 Press to enter the Digital setting menu. CH -VOL OK VOL+ Press to view the digital captioning. Sub-Menu Navigation Digital The Digital Closed Caption menu lets you configure the way you choose to reset Closed Caption settings. Press to select the setting. • "Primary", "Second.", "Service 3", "Service 4", "Service 5", "Service 6" CC Mode Analog Digital Off CC1 Primary Digital setting CC reset Digital setting Selecting digital broadcast service and viewing formats...
Operating Instructions
Page 34
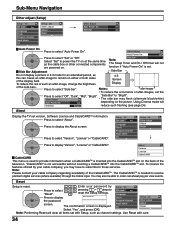
... "CableCARD". Using Cinema mode will not function if "Auto Power On" is displayed. Language Clock Program channel Input labels CC Setup 2/2 Other adjust About Reset CH -VOL OK VOL+ Press to select "Side bar". The CableCARDTM is reset. the password ---- Setup 1/2 CH scan Fav. Select "Set" to power the TV on at the same time as this can cause an after-image to receive premium digital services (where available) through the Cable input. CH...
... "CableCARD". Using Cinema mode will not function if "Auto Power On" is displayed. Language Clock Program channel Input labels CC Setup 2/2 Other adjust About Reset CH -VOL OK VOL+ Press to select "Side bar". The CableCARDTM is reset. the password ---- Setup 1/2 CH scan Fav. Select "Set" to power the TV on at the same time as this can cause an after-image to receive premium digital services (where available) through the Cable input. CH...
Operating Instructions
Page 39
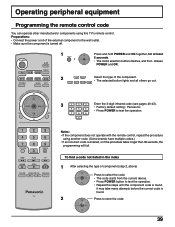
...; Connect the power cord of the component. • The selected button lights and all others go out. DTV RCVR DBS/CBL AUX 3 1 2 3 Enter the 3-digit infrared code (see pages 40-42). • Factory default setting : Panasonic 4 5 6 • Press POWER to store the code. It may take many attempts before the correct code is found . Operating peripheral equipment Programming the remote control code You can operate other manufacturers' components using another code...
...; Connect the power cord of the component. • The selected button lights and all others go out. DTV RCVR DBS/CBL AUX 3 1 2 3 Enter the 3-digit infrared code (see pages 40-42). • Factory default setting : Panasonic 4 5 6 • Press POWER to store the code. It may take many attempts before the correct code is found . Operating peripheral equipment Programming the remote control code You can operate other manufacturers' components using another code...
Operating Instructions
Page 40
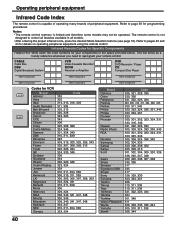
CABLE Cable Box DBS Digital Broadcast System VCR Video Cassette Recorder RCVR Receiver or Amplifier DVD DVD Recorder / Player CD Compact Disc Player Other Component Other Component Other Component Other Component Other Component Codes for your remote control. Refer to pages 43 and 44 for programming procedures. Notes: • The remote control memory is capable of operating many brands of peripheral equipment. Refer to page 39 for...
CABLE Cable Box DBS Digital Broadcast System VCR Video Cassette Recorder RCVR Receiver or Amplifier DVD DVD Recorder / Player CD Compact Disc Player Other Component Other Component Other Component Other Component Other Component Codes for your remote control. Refer to pages 43 and 44 for programming procedures. Notes: • The remote control memory is capable of operating many brands of peripheral equipment. Refer to page 39 for...
Operating Instructions
Page 45
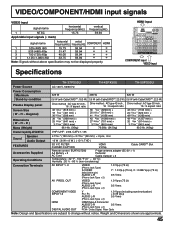
... Speaker Sound Audio Output FEATURES Accessories Supplied Operating Conditions 4 23/32 " (120 mm) × 2 23/64 " (60 mm) × 2 pcs, 6 Ω 16 W [ 8 W + 8 W ] ( 10 % THD ) 3D Y/C FILTER CLOSED CAPTION HDMI V-Chip Cable CARDTM Slot Remote control: EUR7627Z60 AA Battery × 2 AC Cord F-type antenna adapter (5C-2V × 1) Pedestal Cable clamper × 2 Temperature : 32 °F - 104 °F (0 ° - 40 °C) Humidity : 20 % - 80 % (non-condensing) Connection Terminals AV INPUT...
... Speaker Sound Audio Output FEATURES Accessories Supplied Operating Conditions 4 23/32 " (120 mm) × 2 23/64 " (60 mm) × 2 pcs, 6 Ω 16 W [ 8 W + 8 W ] ( 10 % THD ) 3D Y/C FILTER CLOSED CAPTION HDMI V-Chip Cable CARDTM Slot Remote control: EUR7627Z60 AA Battery × 2 AC Cord F-type antenna adapter (5C-2V × 1) Pedestal Cable clamper × 2 Temperature : 32 °F - 104 °F (0 ° - 40 °C) Humidity : 20 % - 80 % (non-condensing) Connection Terminals AV INPUT...
Operating Instructions
Page 46
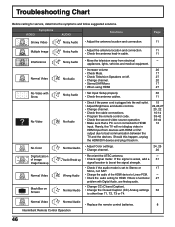
... SAP. • Change the audio of image Image freeze up Normal Video Black Box on /off. 27 • Change channel. 20 • Stereo/SAP/Mono 17 • When using HDMI 27 • Set Input Setup properly. 30 • Check the antenna cables. 11 • Check if the power cord is plugged into the wall outlet. • Adjust Brightness and Audio controls. • Change channel. • Check the cable connections. • Program the remote control code. • Check the second video source operation. •...
... SAP. • Change the audio of image Image freeze up Normal Video Black Box on /off. 27 • Change channel. 20 • Stereo/SAP/Mono 17 • When using HDMI 27 • Set Input Setup properly. 30 • Check the antenna cables. 11 • Check if the power cord is plugged into the wall outlet. • Adjust Brightness and Audio controls. • Change channel. • Check the cable connections. • Program the remote control code. • Check the second video source operation. •...


