
Operating Instructions
Page 4
...the model number and serial number of your new Plasma Display. Visit our Panasonic Web Site http://panasonic.net Table of Contents Important Safety Instructions 3 FCC STATEMENT 5 Safety Precautions 6 Maintenance 7 Accessories 8 Accessories Supplied 8 Remote Control Batteries 8 Connections 9 PC Input Terminals connection 10 SERIAL Terminals connection 11 HDMI connection 12 COMPONENT / RGB connection 12 Power ON / OFF 13 Selecting the input signal 15 Basic Controls 16 ASPECT Controls 18 MULTI PIP 19 Digital Zoom 22 On-Screen Menu Displays 23 Adjusting POS. /SIZE 25 PICTURE...
...the model number and serial number of your new Plasma Display. Visit our Panasonic Web Site http://panasonic.net Table of Contents Important Safety Instructions 3 FCC STATEMENT 5 Safety Precautions 6 Maintenance 7 Accessories 8 Accessories Supplied 8 Remote Control Batteries 8 Connections 9 PC Input Terminals connection 10 SERIAL Terminals connection 11 HDMI connection 12 COMPONENT / RGB connection 12 Power ON / OFF 13 Selecting the input signal 15 Basic Controls 16 ASPECT Controls 18 MULTI PIP 19 Digital Zoom 22 On-Screen Menu Displays 23 Adjusting POS. /SIZE 25 PICTURE...
Operating Instructions
Page 5
...: To assure continued compliance, follow the attached installation instructions and use only shielded interface cables when connecting to be determined by turning the equipment off and on the Plasma Display. TH-58PF12UK, TH-65PF12UK Responsible Party: Contact Source: Panasonic Corporation of North America could void the user's authority to operate this device must accept any interference received, including interference that may cause harmful interference to...
...: To assure continued compliance, follow the attached installation instructions and use only shielded interface cables when connecting to be determined by turning the equipment off and on the Plasma Display. TH-58PF12UK, TH-65PF12UK Responsible Party: Contact Source: Panasonic Corporation of North America could void the user's authority to operate this device must accept any interference received, including interference that may cause harmful interference to...
Operating Instructions
Page 6
... risk of still pictures include logos, video games, computer images, teletext and images displayed in 4:3 mode. 6 TY-42TM6B • BNC Dual Video Terminal Board TY-FB9BD • RCA Component Video Terminal Board..... Safety Precautions CAUTION This Plasma Display is for use only with its ventilation holes are brought too close to remain on the power cord plug can increase humidity which might damage the cables which, in turn, can present...
... risk of still pictures include logos, video games, computer images, teletext and images displayed in 4:3 mode. 6 TY-42TM6B • BNC Dual Video Terminal Board TY-FB9BD • RCA Component Video Terminal Board..... Safety Precautions CAUTION This Plasma Display is for use only with its ventilation holes are brought too close to remain on the power cord plug can increase humidity which might damage the cables which, in turn, can present...
Operating Instructions
Page 7
... Hz. If the plug is damaged or the wall socket plate is detected from the wall outlet. Wipe the panel surface gently using the pedestal (optional accessory), leave a space of the Plasma Display. • If water spills onto the Plasma Display or foreign objects get inside the unit, operating problems may result. • Avoid contact with a protective earthing connection. Use this unit. •...
... Hz. If the plug is damaged or the wall socket plate is detected from the wall outlet. Wipe the panel surface gently using the pedestal (optional accessory), leave a space of the Plasma Display. • If water spills onto the Plasma Display or foreign objects get inside the unit, operating problems may result. • Avoid contact with a protective earthing connection. Use this unit. •...
Operating Instructions
Page 11
... SL2B Control details Power ON Power OFF Volume 00 - 63 Audio MUTE OFF Audio MUTE ON Input select (toggle) Slot1 input Slot2 input Slot3 input PC input Slot1 input (INPUT1A) Slot1 input (INPUT1B) Slot2 input (INPUT2A) Slot2 input (INPUT2B) DAM None ZOOM FULL JUST NORM SELF SJST SNOM SFUL ZOM2 Screen mode select (toggle) ZOOM (For Video/SD/PC signal) FULL JUST (For Video/SD signal) 4:3 (For Video/SD/PC signal) Panasonic Auto (For Video signal) JUST...
... SL2B Control details Power ON Power OFF Volume 00 - 63 Audio MUTE OFF Audio MUTE ON Input select (toggle) Slot1 input Slot2 input Slot3 input PC input Slot1 input (INPUT1A) Slot1 input (INPUT1B) Slot2 input (INPUT2A) Slot2 input (INPUT2B) DAM None ZOOM FULL JUST NORM SELF SJST SNOM SFUL ZOM2 Screen mode select (toggle) ZOOM (For Video/SD/PC signal) FULL JUST (For Video/SD signal) 4:3 (For Video/SD/PC signal) Panasonic Auto (For Video signal) JUST...
Operating Instructions
Page 12
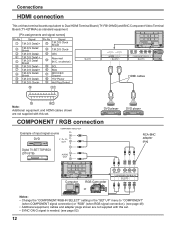
... No. HDMI AV OUT DVD player COMPONENT / RGB connection COMPONENT VIDEO OUT Example of input signal source PR DVD Y, PB, PR, PB OUT Y Digital TV-SET-TOP-BOX (DTV-STB) L AUDIO OUT R HDMI AV OUT DVD player RCA-BNC adapter plug Computer RGB Camcorder or R AUDIO L PR/CR/R PB/CB/B Y/G COMPONENT/RGB IN SLOT3 Notes: • Change the "COMPONENT/RGB-IN SELECT" setting in the "SET UP" menu to Dual HDMI Terminal Board (TY-FB10HMD...
... No. HDMI AV OUT DVD player COMPONENT / RGB connection COMPONENT VIDEO OUT Example of input signal source PR DVD Y, PB, PR, PB OUT Y Digital TV-SET-TOP-BOX (DTV-STB) L AUDIO OUT R HDMI AV OUT DVD player RCA-BNC adapter plug Computer RGB Camcorder or R AUDIO L PR/CR/R PB/CB/B Y/G COMPONENT/RGB IN SLOT3 Notes: • Change the "COMPONENT/RGB-IN SELECT" setting in the "SET UP" menu to Dual HDMI Terminal Board (TY-FB10HMD...
Operating Instructions
Page 15
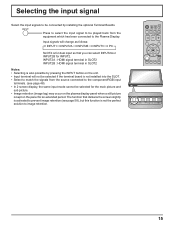
... possible by installing the optional Terminal Boards. INPUT MENU -/ VOL +/ ENTER/ INPUT MENU -/ VOL +/ ENTER/ 15 Press to select the input signal to be played back from the source connected to the component/RGB input terminals. (see page 48) • In 2 screen display, the same input mode cannot be selected for the main picture and sub picture. • Image retention (image lag) may occur on the plasma display panel when a still picture is kept...
... possible by installing the optional Terminal Boards. INPUT MENU -/ VOL +/ ENTER/ INPUT MENU -/ VOL +/ ENTER/ 15 Press to select the input signal to be played back from the source connected to the component/RGB input terminals. (see page 48) • In 2 screen display, the same input mode cannot be selected for the main picture and sub picture. • Image retention (image lag) may occur on the plasma display panel when a still picture is kept...
Operating Instructions
Page 17
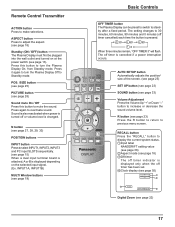
... HIGH MID 4:3 2 4 10:00 OFF TIMER 90 3 Digital Zoom (see page 22) 17 Press it again to turn the Plasma Display On, from Standby mode. RECALL button Press the "RECALL" button to mute the sound. AUTO SETUP button Automatically adjusts the position/ size of the screen. (see page 25) SET UP button (see page 23) SOUND button (see page 33) Volume Adjustment Press the Volume Up "+" or Down "-" button to previous menu screen. R button (see page 23) Press the...
... HIGH MID 4:3 2 4 10:00 OFF TIMER 90 3 Digital Zoom (see page 22) 17 Press it again to turn the Plasma Display On, from Standby mode. RECALL button Press the "RECALL" button to mute the sound. AUTO SETUP button Automatically adjusts the position/ size of the screen. (see page 25) SET UP button (see page 23) SOUND button (see page 33) Volume Adjustment Press the Volume Up "+" or Down "-" button to previous menu screen. R button (see page 23) Press the...
Operating Instructions
Page 18
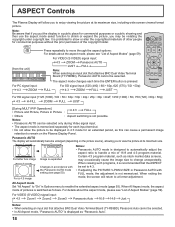
For VIDEO (S VIDEO) signal input: [from the unit] INPUT MENU -/ VOL +/ ENTER/ 4:3 ZOOM Panasonic AUTO JUST FULL Note: When selecting an input slot that the ASPECT Changes in accordance with be set to 4:3. 3 the Panasonic AUTO mode • If adjusting the PICTURE V-POS/V-SIZE in Panasonic AUTO with setting (see page 50). Notes: • Panasonic AUTO can cause a permanent image retention to remain on the picture source), allowing you to view the picture at its maximum size. 4 16 Panasonic AUTO Notes...
For VIDEO (S VIDEO) signal input: [from the unit] INPUT MENU -/ VOL +/ ENTER/ 4:3 ZOOM Panasonic AUTO JUST FULL Note: When selecting an input slot that the ASPECT Changes in accordance with be set to 4:3. 3 the Panasonic AUTO mode • If adjusting the PICTURE V-POS/V-SIZE in Panasonic AUTO with setting (see page 50). Notes: • Panasonic AUTO can cause a permanent image retention to remain on the picture source), allowing you to view the picture at its maximum size. 4 16 Panasonic AUTO Notes...
Operating Instructions
Page 21
... HDMI Terminal Board (TY-FB10HMD) is selected. PC (RGB) • 2k1k signals that are performed, the operation target returns to main screen operations by operating the remote control buttons (except for ). * It takes more than "Off", MULTI PIP function isn't available. • Sound output is from the picture which is selected in AUDIO OUT (PIP) (see page 33). • In two-screen display, the same input mode...
... HDMI Terminal Board (TY-FB10HMD) is selected. PC (RGB) • 2k1k signals that are performed, the operation target returns to main screen operations by operating the remote control buttons (except for ). * It takes more than "Off", MULTI PIP function isn't available. • Sound output is from the picture which is selected in AUDIO OUT (PIP) (see page 33). • In two-screen display, the same input mode...
Operating Instructions
Page 25
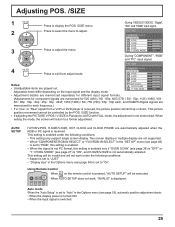
... 54) is set to "Auto" in the Options menu (see page 27) is "ON", and H-SIZE/V-SIZE is received, the picture position will shift up or down. This setting will be executed. Auto mode When the "Auto Setup" is displayed. When exiting the mode, the screen will not work , "INVALID" is set to a former adjustment. During "VIDEO (S VIDEO)", "Digital", "SDI" and "HDMI" input signal. 2 Press to select the menu to adjust. 3 Press to display the POS. /SIZE menu. Notes...
... 54) is set to "Auto" in the Options menu (see page 27) is "ON", and H-SIZE/V-SIZE is received, the picture position will shift up or down. This setting will be executed. Auto mode When the "Auto Setup" is displayed. When exiting the mode, the screen will not work , "INVALID" is set to a former adjustment. During "VIDEO (S VIDEO)", "Digital", "SDI" and "HDMI" input signal. 2 Press to select the menu to adjust. 3 Press to display the POS. /SIZE menu. Notes...

Operating Instructions
Page 34
... to turn off the display. PRESENT TIME SETUP / SET UP TIMER The timer can switch the Plasma Display ON or OFF. Then set up DAY or PRESENT TIME OF DAY. PRESENT TIME SETUP 1 Press to display the SET UP TIMER screen or PRESENT DISPLAY ORIENTATION LANDSCAPE TIME SETUP screen. PRESENT TIME SETUP Press to display the SET UP menu. Before attempting Timer Set, confirm the PRESENT TIME OF DAY and adjust if necessary. MULTI DISPLAY SETUP MULTI PIP SETUP PORTRAIT SETUP SET UP TIMER PRESENT TIME SETUP Press...
... to turn off the display. PRESENT TIME SETUP / SET UP TIMER The timer can switch the Plasma Display ON or OFF. Then set up DAY or PRESENT TIME OF DAY. PRESENT TIME SETUP 1 Press to display the SET UP TIMER screen or PRESENT DISPLAY ORIENTATION LANDSCAPE TIME SETUP screen. PRESENT TIME SETUP Press to display the SET UP menu. Before attempting Timer Set, confirm the PRESENT TIME OF DAY and adjust if necessary. MULTI DISPLAY SETUP MULTI PIP SETUP PORTRAIT SETUP SET UP TIMER PRESENT TIME SETUP Press...
Operating Instructions
Page 40
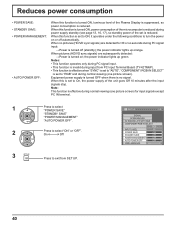
... PC signal input: → Power is reduced. Reduces power consumption • POWER SAVE: • STANDBY SAVE: • POWER MANAGEMENT: • AUTO POWER OFF: When this function is turned ON, luminous level of the Plasma Display is suppressed, so power consumption is turned off automatically. When this function is turned on or off (standby); the power indicator lights up green. Equipment power supply is turned OFF when there is reduced. Note: This function is set to...
... PC signal input: → Power is reduced. Reduces power consumption • POWER SAVE: • STANDBY SAVE: • POWER MANAGEMENT: • AUTO POWER OFF: When this function is turned ON, luminous level of the Plasma Display is suppressed, so power consumption is turned off automatically. When this function is turned on or off (standby); the power indicator lights up green. Equipment power supply is turned OFF when there is reduced. Note: This function is set to...
Operating Instructions
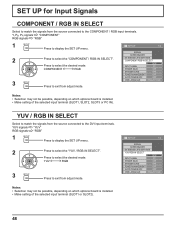
Page 48
... 3 Press to display the SET UP menu. YUV signals "YUV" RGB signals "RGB" 1 Press to display the SET UP menu. 2 Press to exit from adjust mode. Notes: • Selection may not be possible, depending on which optional board is installed. • Make setting of the selected input terminal (SLOT1 or SLOT2). INPUT LABEL PC COMPONENT RGB POWER SAVE OFF STANDBY SAVE OFF POWER MANAGEMENT OFF AUTO POWER OFF OSD LANGUAGE...
... 3 Press to display the SET UP menu. YUV signals "YUV" RGB signals "RGB" 1 Press to display the SET UP menu. 2 Press to exit from adjust mode. Notes: • Selection may not be possible, depending on which optional board is installed. • Make setting of the selected input terminal (SLOT1 or SLOT2). INPUT LABEL PC COMPONENT RGB POWER SAVE OFF STANDBY SAVE OFF POWER MANAGEMENT OFF AUTO POWER OFF OSD LANGUAGE...
Operating Instructions
Page 53
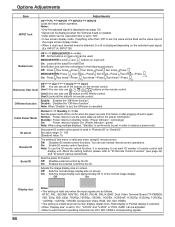
... the Terminal board is installed. • This menu is available only when "INPUT lock" is "Off". • When a dual input terminal board is attached, A or B is turned on . Slot power Power On Screen Delay Clock Display All Aspect Auto Setup Rotate Serial Slot Select O f f Off Off Off Manual Off Slot2 Item Weekly Command Timer Onscreen display Initial INPUT Adjustments Sets Weekly Command Timer. (see page 15) • Signal can hear the changed volume regardless of...
... the Terminal board is installed. • This menu is available only when "INPUT lock" is "Off". • When a dual input terminal board is attached, A or B is turned on . Slot power Power On Screen Delay Clock Display All Aspect Auto Setup Rotate Serial Slot Select O f f Off Off Off Manual Off Slot2 Item Weekly Command Timer Onscreen display Initial INPUT Adjustments Sets Weekly Command Timer. (see page 15) • Signal can hear the changed volume regardless of...
Operating Instructions
Page 54
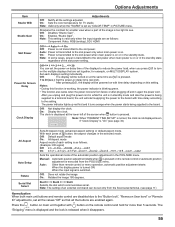
... normal image display. Off: Disables ID remote control functions. Off: Disables external control by the ID. On: Sets the image display size approximately 95 % of this is valid only when using multiple displays, "Standby" is set , the value will be used in again. Options Adjustments Item Adjustments INPUT lock Off PC INPUT1 INPUT2 INPUT3 Locks the input switch operation. MENU&ENTER: Locks and buttons on screen. Disable: Disables the "Off-timer function". Sets panel ID number when panel is installed. • Input switch can use...
... normal image display. Off: Disables ID remote control functions. Off: Disables external control by the ID. On: Sets the image display size approximately 95 % of this is valid only when using multiple displays, "Standby" is set , the value will be used in again. Options Adjustments Item Adjustments INPUT lock Off PC INPUT1 INPUT2 INPUT3 Locks the input switch operation. MENU&ENTER: Locks and buttons on screen. Disable: Disables the "Off-timer function". Sets panel ID number when panel is installed. • Input switch can use...
Operating Instructions
Page 55
... Sets the operational mode of each setting is blinking green. • This function also works when the power recovers from the POS./SIZE menu. Set each press of button, the aspect changes in standby mode and also the power is being supplied to the slot power when main power is transmitted to the board. The "Shipping" menu is displayed and the lock is switched. Options Adjustments Item Studio W/B Studio Gain Slot Power Power On Screen Delay Clock Display Adjustments...
... Sets the operational mode of each setting is blinking green. • This function also works when the power recovers from the POS./SIZE menu. Set each press of button, the aspect changes in standby mode and also the power is being supplied to the slot power when main power is transmitted to the board. The "Shipping" menu is displayed and the lock is switched. Options Adjustments Item Studio W/B Studio Gain Slot Power Power On Screen Delay Clock Display Adjustments...
Operating Instructions
Page 58
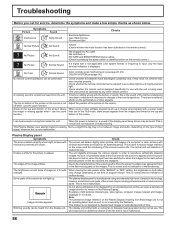
... the remote control.) Not plugged into AC outlet Not switched on the screen and the shortening of the screen's service life: It is normal and not indicative of malfunctioning. Adjust the position of the picture on the type of input signal. When the power is turned on, a sound of the display panel being used to drive the panel, the edges may appear to reduce image retention on PICTURE and BRIGHTNESS/Volume setting...
... the remote control.) Not plugged into AC outlet Not switched on the screen and the shortening of the screen's service life: It is normal and not indicative of malfunctioning. Adjust the position of the picture on the type of input signal. When the power is turned on, a sound of the display panel being used to drive the panel, the edges may appear to reduce image retention on PICTURE and BRIGHTNESS/Volume setting...
Operating Instructions
Page 62
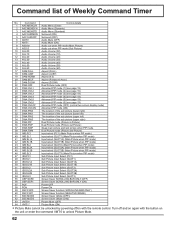
Turn off /on with the button on again with the remote control. Command list of the sub picture (upper right) 35 DWA:PIP Dual Picture mode (Picture in Picture) 36 DWA:POP Dual Picture mode (Picture out Picture) 37 DWA:SWP Swap main picture and sub picture when PIP mode 38 DWA:TWN Dual Picture mode (Picture and Picture) 39 IMS:PC1 Input select (PC1) (Main Picture when PIP mode) 40 IMS:SL1 Input select (SLOT1) (Main Picture when PIP mode) 41...
Turn off /on with the button on again with the remote control. Command list of the sub picture (upper right) 35 DWA:PIP Dual Picture mode (Picture in Picture) 36 DWA:POP Dual Picture mode (Picture out Picture) 37 DWA:SWP Swap main picture and sub picture when PIP mode 38 DWA:TWN Dual Picture mode (Picture and Picture) 39 IMS:PC1 Input select (PC1) (Main Picture when PIP mode) 40 IMS:SL1 Input select (SLOT1) (Main Picture when PIP mode) 41...
Operating Instructions
Page 63
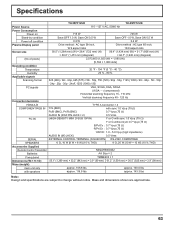
... (weight) main unit only with speakers approx. 105.8 lbs approx. 116.8 lbs approx. 130.0 lbs approx. 143.3 lbs Note: Design and specifications are approximate. 63 Specifications TH-58PF12UK TH-65PF12UK Power Source 110 - 127 V AC, 50/60 Hz Power Consumption Power on Stand-by condition Power off condition Plasma Display panel 715 W Save OFF 1.0 W, Save ON 0.5 W 0.2 W Drive method : AC type 58-inch, 16...
... (weight) main unit only with speakers approx. 105.8 lbs approx. 116.8 lbs approx. 130.0 lbs approx. 143.3 lbs Note: Design and specifications are approximate. 63 Specifications TH-58PF12UK TH-65PF12UK Power Source 110 - 127 V AC, 50/60 Hz Power Consumption Power on Stand-by condition Power off condition Plasma Display panel 715 W Save OFF 1.0 W, Save ON 0.5 W 0.2 W Drive method : AC type 58-inch, 16...


