

Operating Instructions
Page 1
TH-58PF12UK TH-65PF12UK The illustration shown is an image. Please keep this product, please read these instructions completely. English Before connecting, operating or adjusting this manual for future reference. Operating Instructions High Definition Plasma Display Model No.
TH-58PF12UK TH-65PF12UK The illustration shown is an image. Please keep this product, please read these instructions completely. English Before connecting, operating or adjusting this manual for future reference. Operating Instructions High Definition Plasma Display Model No.
Operating Instructions
Page 4
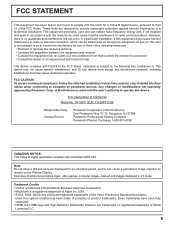
...your purchase receipt as well, and record the model number and serial number of your new Plasma Display. To obtain maximum benefit from your set , please read these instructions. Visit our Panasonic Web Site http://panasonic.net Table of Contents Important Safety Instructions 3 FCC STATEMENT 5 Safety Precautions 6 Maintenance 7...THROUGH 52 Input signal display 52 Options Adjustments 53 Weekly Command Timer 56 Shipping condition 57 Troubleshooting 58 List of Aspect Modes 59 Applicable input signals 60 Command list of Weekly Command Timer........... 62 Specifications 63
...your purchase receipt as well, and record the model number and serial number of your new Plasma Display. To obtain maximum benefit from your set , please read these instructions. Visit our Panasonic Web Site http://panasonic.net Table of Contents Important Safety Instructions 3 FCC STATEMENT 5 Safety Precautions 6 Maintenance 7...THROUGH 52 Input signal display 52 Options Adjustments 53 Weekly Command Timer 56 Shipping condition 57 Troubleshooting 58 List of Aspect Modes 59 Applicable input signals 60 Command list of Weekly Command Timer........... 62 Specifications 63
Operating Instructions
Page 5
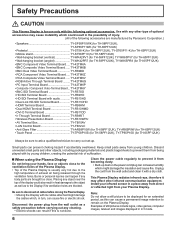
... computer or peripheral devices. Note: Do not allow a still picture to correct the interference by Panasonic Corp. TH-58PF12UK, TH-65PF12UK Responsible Party: Contact Source: Panasonic Corporation of North America could void the user's authority to operate this can be determined by turning...a circuit different from that interference will not occur in 4:3 mode. of North America One Panasonic Way 1F-10, Secaucus, NJ 07094 Panasonic Professional Display Company Panasonic Plasma Concierge 1-800-973-4390 CANADIAN NOTICE: This Class B digital apparatus complies with the instructions, ...
... computer or peripheral devices. Note: Do not allow a still picture to correct the interference by Panasonic Corp. TH-58PF12UK, TH-65PF12UK Responsible Party: Contact Source: Panasonic Corporation of North America could void the user's authority to operate this can be determined by turning...a circuit different from that interference will not occur in 4:3 mode. of North America One Panasonic Way 1F-10, Secaucus, NJ 07094 Panasonic Professional Display Company Panasonic Plasma Concierge 1-800-973-4390 CANADIAN NOTICE: This Class B digital apparatus complies with the instructions, ...
Operating Instructions
Page 6
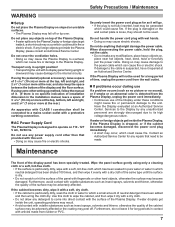
... TY-FB12LC • Anti Glare Filter TY-AR58P10W (for TH-58PF12UK), TY-AR65P9W (for TH-65PF12UK) • Touch Panel TY-TP58P10S (for TH-58PF12UK), TY-TP65P10S (for TH-65PF12UK) Always be displayed for an extended period, as to...Plasma Display is usually very hot due to prevent it with by Panasonic Corporation.) • Speakers TY-SP58P10WK (for TH-58PF12UK), TY-SP65P11WK (for TH-65PF12UK) • Pedestal TY-ST58-K (for TH-58PF12UK), TY-ST65P11-K (for TH-65PF12UK) • Mobile stand TY-ST58PF10 (for TH-58PF12UK) • Wall-hanging bracket (vertical TY-WK42PV7 (for TH-58PF12UK...
... TY-FB12LC • Anti Glare Filter TY-AR58P10W (for TH-58PF12UK), TY-AR65P9W (for TH-65PF12UK) • Touch Panel TY-TP58P10S (for TH-58PF12UK), TY-TP65P10S (for TH-65PF12UK) Always be displayed for an extended period, as to...Plasma Display is usually very hot due to prevent it with by Panasonic Corporation.) • Speakers TY-SP58P10WK (for TH-58PF12UK), TY-SP65P11WK (for TH-65PF12UK) • Pedestal TY-ST58-K (for TH-58PF12UK), TY-ST65P11-K (for TH-65PF12UK) • Mobile stand TY-ST58PF10 (for TH-58PF12UK) • Wall-hanging bracket (vertical TY-WK42PV7 (for TH-58PF12UK...
Operating Instructions
Page 7
...occurs (such as insect sprays, solvents and thinner, otherwise the quality of the display panel has been specially treated. AC Power Supply Cord The Plasma Display is not fully inserted, heat may be connected to the Plasma Display. Do not use of neutral detergent has been added and then wring the cloth...the pedestal (optional accessory), leave a space of time, unplug the power cord from the wall outlet. Furthermore, avoid contact with the surface of the Plasma Display. If any repairs that need to operate on 110 - 127 V AC, 50/60 Hz. If the plug is damaged or the wall ...
...occurs (such as insect sprays, solvents and thinner, otherwise the quality of the display panel has been specially treated. AC Power Supply Cord The Plasma Display is not fully inserted, heat may be connected to the Plasma Display. Do not use of neutral detergent has been added and then wring the cloth...the pedestal (optional accessory), leave a space of time, unplug the power cord from the wall outlet. Furthermore, avoid contact with the surface of the Plasma Display. If any repairs that need to operate on 110 - 127 V AC, 50/60 Hz. If the plug is damaged or the wall ...

Operating Instructions
Page 8
... transmitter. n o t e c o r r e c t polarity ( + and -). Replace the cover. - + + - Do not combine a used batteries. 5. Battery replacement is necessary when the remote control acts sporadically or stops operating the Plasma Display. 6. Do not burn or breakup batteries.
... transmitter. n o t e c o r r e c t polarity ( + and -). Replace the cover. - + + - Do not combine a used batteries. 5. Battery replacement is necessary when the remote control acts sporadically or stops operating the Plasma Display. 6. Do not burn or breakup batteries.
Operating Instructions
Page 11
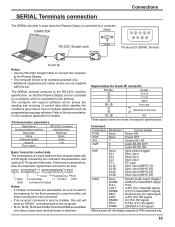
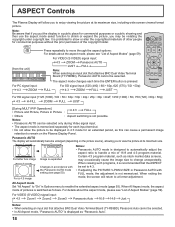
... SJST SNOM SFUL ZOM2 Screen mode select (toggle) ZOOM (For Video/SD/PC signal) FULL JUST (For Video/SD signal) 4:3 (For Video/SD/PC signal) Panasonic Auto (For Video signal) JUST (For HD signal) 4:3 (For HD signal) H-FILL (For HD signal) ZOOM (For HD signal) With the power off,... responds to the documentation for the computer application for D-sub 9P connector Pin No. 2 3 Details R X D T X D 5 GND 4 • 6 7 8 Non use (Shorted in that the Plasma Display can be sure to wait for the response for the first command to come from this unit before sending the next command. •...
... SJST SNOM SFUL ZOM2 Screen mode select (toggle) ZOOM (For Video/SD/PC signal) FULL JUST (For Video/SD signal) 4:3 (For Video/SD/PC signal) Panasonic Auto (For Video signal) JUST (For HD signal) 4:3 (For HD signal) H-FILL (For HD signal) ZOOM (For HD signal) With the power off,... responds to the documentation for the computer application for D-sub 9P connector Pin No. 2 3 Details R X D T X D 5 GND 4 • 6 7 8 Non use (Shorted in that the Plasma Display can be sure to wait for the response for the first command to come from this unit before sending the next command. •...
Operating Instructions
Page 13
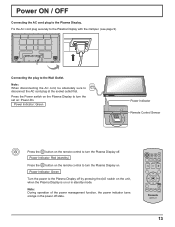
...Indicator: Green Turn the power to turn the set on or in the power off . Press the Power switch on the Plasma Display to the Plasma Display off by pressing the when the Plasma Display is on : Power-On. Power Indicator: Red (standby) Press the button on the remote control to turn the... unit, Note: During operation of the power management function, the power indicator turns orange in standby mode. Fix the AC cord plug securely to the Plasma Display with the clamper. (see page 9) Connecting the plug to disconnect the AC cord plug at the socket outlet first. Power ON / OFF ...
...Indicator: Green Turn the power to turn the set on or in the power off . Press the Power switch on the Plasma Display to the Plasma Display off by pressing the when the Plasma Display is on : Power-On. Power Indicator: Red (standby) Press the button on the remote control to turn the... unit, Note: During operation of the power management function, the power indicator turns orange in standby mode. Fix the AC cord plug securely to the Plasma Display with the clamper. (see page 9) Connecting the plug to disconnect the AC cord plug at the socket outlet first. Power ON / OFF ...
Operating Instructions
Page 15
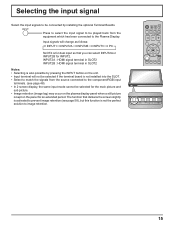
Press to select the input signal to be played back from the source connected to the component/RGB input terminals. (see page 58), but this function is not the perfect solution to image retention. INPUT MENU -/ VOL +/ ENTER/ INPUT MENU -/ VOL +/ ENTER/ 15 The function that ...input mode cannot be selected for the main picture and sub picture. • Image retention (image lag) may occur on the plasma display panel when a still picture is kept on the panel for INPUT2. INPUT2A : HDMI signal terminal in SLOT2 INPUT2B : HDMI signal terminal in SLOT2 Notes: • Selecting is also ...
Press to select the input signal to be played back from the source connected to the component/RGB input terminals. (see page 58), but this function is not the perfect solution to image retention. INPUT MENU -/ VOL +/ ENTER/ INPUT MENU -/ VOL +/ ENTER/ 15 The function that ...input mode cannot be selected for the main picture and sub picture. • Image retention (image lag) may occur on the plasma display panel when a still picture is kept on the panel for INPUT2. INPUT2A : HDMI signal terminal in SLOT2 INPUT2B : HDMI signal terminal in SLOT2 Notes: • Selecting is also ...
Operating Instructions
Page 17
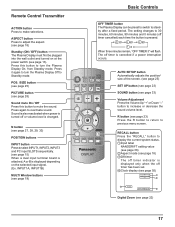
...POS. /SIZE button (see page 25) PICTURE button (see page 28) Sound mute On / Off Press this button to turn the Plasma Display Off to turn the Plasma Display On, from Standby mode. The setting changes to display the current system status. 1 Input label NANODRIFT setting value (see page ...volume level. Press this button to previous menu screen. INPUT1A, INPUT1B) MULTI Window buttons (see page 19) Basic Controls OFF TIMER button The Plasma Display can be plugged into the wall outlet and turned on the selected input signal. (Ex. ASPECT button Press to standby after a &#...
...POS. /SIZE button (see page 25) PICTURE button (see page 28) Sound mute On / Off Press this button to turn the Plasma Display Off to turn the Plasma Display On, from Standby mode. The setting changes to display the current system status. 1 Input label NANODRIFT setting value (see page ...volume level. Press this button to previous menu screen. INPUT1A, INPUT1B) MULTI Window buttons (see page 19) Basic Controls OFF TIMER button The Plasma Display can be plugged into the wall outlet and turned on the selected input signal. (Ex. ASPECT button Press to standby after a &#...
Operating Instructions
Page 18
... copyright holder. When exiting the For a 4:3 image mode, the screen will automatically become enlarged (depending on the Plasma Display Panel. All Aspect mode Set "All Aspect" to "On" in Panasonic AUTO with be set to 4:3. 3 the Panasonic AUTO mode • If adjusting the PICTURE V-POS/V-SIZE in Options menu to enable the extended aspect...
... copyright holder. When exiting the For a 4:3 image mode, the screen will automatically become enlarged (depending on the Plasma Display Panel. All Aspect mode Set "All Aspect" to "On" in Panasonic AUTO with be set to 4:3. 3 the Panasonic AUTO mode • If adjusting the PICTURE V-POS/V-SIZE in Options menu to enable the extended aspect...

Operating Instructions
Page 34
... / POWER OFF TIME. 1 Press to set . 34 SET UP TIMER 1 Press to select ON. PRESENT TIME SETUP / SET UP TIMER The timer can switch the Plasma Display ON or OFF. Interruption of the unit to select POWER ON FUNCTION / POWER OFF FUNCTION. PRESENT TIME OF DAY MON 99:99 button: Forward...
... / POWER OFF TIME. 1 Press to set . 34 SET UP TIMER 1 Press to select ON. PRESENT TIME SETUP / SET UP TIMER The timer can switch the Plasma Display ON or OFF. Interruption of the unit to select POWER ON FUNCTION / POWER OFF FUNCTION. PRESENT TIME OF DAY MON 99:99 button: Forward...
Operating Instructions
Page 40
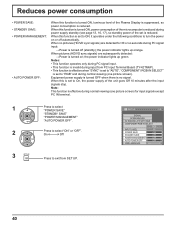
... power indicator lights up green. When this is effective during input from SET UP. 40 When this function is turned ON, luminous level of the Plasma Display is suppressed, so power consumption is turned off automatically.
... power indicator lights up green. When this is effective during input from SET UP. 40 When this function is turned ON, luminous level of the Plasma Display is suppressed, so power consumption is turned off automatically.

Operating Instructions
Page 43
... to select the MULTI DISPLAY SETUP. OFF Select the required arrangement number. (A1-E5 : Refer to the following) Display Number locations for each plasma display has to be displayed across all screens. ON Suitable for moving image display. SET UP 2/2 MULTI DISPLAY SETUP 2 Press to select "ON..." or "OFF". SEAM HIDES VIDEO LOCATION Suitable for still image display. SET UP for MULTI DISPLAY By lining up Plasma Displays in groups, for example, as illustrated below, an enlarged picture may be set MULTI DISPLAY SETUP to ON, PORTRAIT SETUP will be ...
... to select the MULTI DISPLAY SETUP. OFF Select the required arrangement number. (A1-E5 : Refer to the following) Display Number locations for each plasma display has to be displayed across all screens. ON Suitable for moving image display. SET UP 2/2 MULTI DISPLAY SETUP 2 Press to select "ON..." or "OFF". SEAM HIDES VIDEO LOCATION Suitable for still image display. SET UP for MULTI DISPLAY By lining up Plasma Displays in groups, for example, as illustrated below, an enlarged picture may be set MULTI DISPLAY SETUP to ON, PORTRAIT SETUP will be ...
Operating Instructions
Page 46
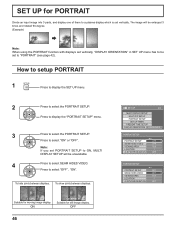
... Divide an input image into 3 parts, and display one of them to select the PORTRAIT SETUP. Press to display the "PORTRAIT SETUP" menu. 3 Press to a plasma display which is set vertically. Press to select the PORTRAIT SETUP. OFF 46 ON Suitable for moving image display. How to setup PORTRAIT 1 Press to...
... Divide an input image into 3 parts, and display one of them to select the PORTRAIT SETUP. Press to display the "PORTRAIT SETUP" menu. 3 Press to a plasma display which is set vertically. Press to select the PORTRAIT SETUP. OFF 46 ON Suitable for moving image display. How to setup PORTRAIT 1 Press to...
Operating Instructions
Page 58
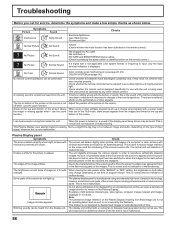
...shown. Check whether the remote control sensor is missing appear when I use the zoom function. Some parts of the images flicker. The plasma display panel is displayed. Do not allow a still picture to be operated by any other pictures with a non-applicable color system format, or frequency is...in 4:3 mode. The unit digitally processes the various signals in the fast-moving parts of the images: This is not a malfunction. 58 When viewing the side panels at minimum level. (see page 28, 29) COLOR SYSTEM (see page 50) No remote control operations can hear sounds coming from the...
...shown. Check whether the remote control sensor is missing appear when I use the zoom function. Some parts of the images flicker. The plasma display panel is displayed. Do not allow a still picture to be operated by any other pictures with a non-applicable color system format, or frequency is...in 4:3 mode. The unit digitally processes the various signals in the fast-moving parts of the images: This is not a malfunction. 58 When viewing the side panels at minimum level. (see page 28, 29) COLOR SYSTEM (see page 50) No remote control operations can hear sounds coming from the...
Operating Instructions
Page 63
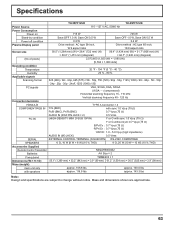
... with sync 1.0 Vp-p (75 Ω) Y or G without notice. Specifications TH-58PF12UK TH-65PF12UK Power Source 110 - 127 V AC, 50/60 Hz Power Consumption Power on Stand-by condition Power off condition Plasma Display panel 715 W Save OFF 1.0 W, Save ON 0.5 W 0.2 W Drive method : AC type 58-inch, 16:9 aspect ratio 745 W Save OFF 1.0 W, Save ON 0.5 W 0.2 W Drive...
... with sync 1.0 Vp-p (75 Ω) Y or G without notice. Specifications TH-58PF12UK TH-65PF12UK Power Source 110 - 127 V AC, 50/60 Hz Power Consumption Power on Stand-by condition Power off condition Plasma Display panel 715 W Save OFF 1.0 W, Save ON 0.5 W 0.2 W Drive method : AC type 58-inch, 16:9 aspect ratio 745 W Save OFF 1.0 W, Save ON 0.5 W 0.2 W Drive...


