Brochure
Page 4
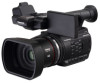
... focus, zoom and iris to 250x. This provides handy support for professional use, produces highly natural gradation and detail. 1080 Nano surface coating lens 1920 hTalhf-epgixreelebnoMthOvSersteicnaslloyraisndshhifotreizdobnytaally. 1920 × 2 1080 × 2 Three Manual Rings - Professional Camera Functions • ZEBRA Button: Displays two zebra patterns (blown highlight warning) and a marker (brightness level percentage). • BARS Button: Outputs a color bar image and test tone audio. • DISP/MODE CHK Button: Shows mode settings...
... focus, zoom and iris to 250x. This provides handy support for professional use, produces highly natural gradation and detail. 1080 Nano surface coating lens 1920 hTalhf-epgixreelebnoMthOvSersteicnaslloyraisndshhifotreizdobnytaally. 1920 × 2 1080 × 2 Three Manual Rings - Professional Camera Functions • ZEBRA Button: Displays two zebra patterns (blown highlight warning) and a marker (brightness level percentage). • BARS Button: Outputs a color bar image and test tone audio. • DISP/MODE CHK Button: Shows mode settings...

Brochure
Page 5
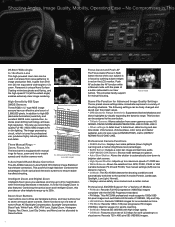
... cable. • USB 2.0 (DEVICE): For transferring files to be used during Back-Up Recording *3: Use SDXC/SDHC/SD memory cards with Mirror mode). • Menu settings and playback by storing about 3 seconds of video and audio data in 5.1-channel surround sound mic, the AG-AC90A features 2-channel XLR audio input terminals for external mic use of Eye-Fi cards with the product. * The Eye-Fi transfer function cannot be captured during recording. Ideal for observation, surveillance and other applications.* • Pre Rec...
... cable. • USB 2.0 (DEVICE): For transferring files to be used during Back-Up Recording *3: Use SDXC/SDHC/SD memory cards with Mirror mode). • Menu settings and playback by storing about 3 seconds of video and audio data in 5.1-channel surround sound mic, the AG-AC90A features 2-channel XLR audio input terminals for external mic use of Eye-Fi cards with the product. * The Eye-Fi transfer function cannot be captured during recording. Ideal for observation, surveillance and other applications.* • Pre Rec...
Brochure
Page 6
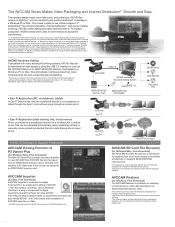
... a Mac. *AVCCAM Importer supports the AVCHD files produced by using the USB 2.0 interface to connect the AVCCAM Series or an SDXC/SDHC/SD Memory Card reader to repair the files using this software. This makes it will not always be possible to a Windows PC or Mac. AVCHD Nonlinear Editing Compatible with a Panasonic AVCCAM series camera. *Note that is a software for Windows/Mac, Free Download) The New P2 Viewer Plus software includes the ability to use motion images...
... a Mac. *AVCCAM Importer supports the AVCHD files produced by using the USB 2.0 interface to connect the AVCCAM Series or an SDXC/SDHC/SD Memory Card reader to repair the files using this software. This makes it will not always be possible to a Windows PC or Mac. AVCHD Nonlinear Editing Compatible with a Panasonic AVCCAM series camera. *Note that is a software for Windows/Mac, Free Download) The New P2 Viewer Plus software includes the ability to use motion images...
Brochure
Page 7
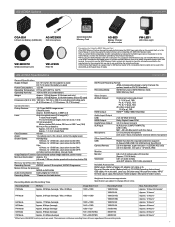
... microphone Other Input/Output USB: Camera Remote: Reader function (No copyright protection support) Hi-Speed USB (USB 2.0), USB terminal Type Mini B 2.5 mm diameter, super mini jack x 1 (ZOOM, REC S/S) 3.5 mm diameter, mini jack x 1 (FOCUS, IRIS) Monitor Monitor: Viewfinder: 8.8 cm (3.5 inches) wide LCD monitor (Approx. 1152 K dots) 0.61 cm (0.24 inches) wide EVF (Approx. 263 K dots equivalent) Included Accessories Battery pack, Battery charger, AC adaptor, AC cable (x 2), Eye cup, Remote control (Battery built-in the User's Manual. Max. UHS-Ⅰcompatible memory cards can...
... microphone Other Input/Output USB: Camera Remote: Reader function (No copyright protection support) Hi-Speed USB (USB 2.0), USB terminal Type Mini B 2.5 mm diameter, super mini jack x 1 (ZOOM, REC S/S) 3.5 mm diameter, mini jack x 1 (FOCUS, IRIS) Monitor Monitor: Viewfinder: 8.8 cm (3.5 inches) wide LCD monitor (Approx. 1152 K dots) 0.61 cm (0.24 inches) wide EVF (Approx. 263 K dots equivalent) Included Accessories Battery pack, Battery charger, AC adaptor, AC cable (x 2), Eye cup, Remote control (Battery built-in the User's Manual. Max. UHS-Ⅰcompatible memory cards can...

Operating Instructions Basic
Page 9
... does not work properly. About connecting to a PC ≥ Do not use any responsibility for the compromise, manipulation, and loss of the unit, and be careful, as it may cause the lens or LCD monitor to any type of problems that Panasonic does not accept any other USB cables except the supplied one hour. About using wireless remote control ≥ Keep the button-type battery out...
... does not work properly. About connecting to a PC ≥ Do not use any responsibility for the compromise, manipulation, and loss of the unit, and be careful, as it may cause the lens or LCD monitor to any type of problems that Panasonic does not accept any other USB cables except the supplied one hour. About using wireless remote control ≥ Keep the button-type battery out...

Operating Instructions Basic
Page 11
.../Viewfinder........25 Using the LCD monitor 25 How to use the touch screen 26 Viewfinder adjustment 26 Setting date and time 27 Using the menu screen 28 Formatting cards 29 Language Selection 29 Recording Selecting a media to record 29 Recording motion pictures 30 Recording still pictures 30 Using the zoom 31 Intelligent Auto Mode/Manual Mode ..... 31 Manual Recording 32 Focus 32 White Balance 32 Iris adjustment 32 Manual shutter speed 33 USER button 33 Setting the USER button 33 Using the USER button 34 Functions of Adobe Systems Incorporated. Please download it from...
.../Viewfinder........25 Using the LCD monitor 25 How to use the touch screen 26 Viewfinder adjustment 26 Setting date and time 27 Using the menu screen 28 Formatting cards 29 Language Selection 29 Recording Selecting a media to record 29 Recording motion pictures 30 Recording still pictures 30 Using the zoom 31 Intelligent Auto Mode/Manual Mode ..... 31 Manual Recording 32 Focus 32 White Balance 32 Iris adjustment 32 Manual shutter speed 33 USER button 33 Setting the USER button 33 Using the USER button 34 Functions of Adobe Systems Incorporated. Please download it from...

Operating Instructions Basic
Page 15
... Wireless remote control sensor 20 Internal microphones 21 Recording lamp 22 Speaker 23 Lens (l 18) 24 Lens hood 25 INPUT 1, 2 (LINE/MIC) switches 26 INPUT 1, 2 (+48V) switches 27 User 1, 2, 3 buttons [USER1, USER2, USER3] (l 33) 28 Intelligent auto/Manual switch [iA/MANU] (l 31) 29 Quick start button [QUICK START] 30 Quick start lamp 31 Focus ring (l 32) 32 Zoom ring (l 31) 33 Iris ring (l 32) 34 Focus assist button [FOCUS ASSIST] 35 Iris auto/Manual button [IRIS A/M] (l 32) 36 Focus auto/Manual/¶ button [FOCUS...
... Wireless remote control sensor 20 Internal microphones 21 Recording lamp 22 Speaker 23 Lens (l 18) 24 Lens hood 25 INPUT 1, 2 (LINE/MIC) switches 26 INPUT 1, 2 (+48V) switches 27 User 1, 2, 3 buttons [USER1, USER2, USER3] (l 33) 28 Intelligent auto/Manual switch [iA/MANU] (l 31) 29 Quick start button [QUICK START] 30 Quick start lamp 31 Focus ring (l 32) 32 Zoom ring (l 31) 33 Iris ring (l 32) 34 Focus assist button [FOCUS ASSIST] 35 Iris auto/Manual button [IRIS A/M] (l 32) 36 Focus auto/Manual/¶ button [FOCUS...

Operating Instructions Basic
Page 21
... approximations. ≥ The indicated charging time is not a malfunction. If the battery discharges, then will flashes red. # # # # 21 SQT0323 Battery capacity indication ≥ The display changes as high/ low temperature. ≥ The actual recordable time refers to the recordable time when repeatedly starting/stopping recording, turning the unit on/off, moving the zoom lever etc. ≥ The batteries heat up after use or charging. Charging time and recordable time vary depending on the...
... approximations. ≥ The indicated charging time is not a malfunction. If the battery discharges, then will flashes red. # # # # 21 SQT0323 Battery capacity indication ≥ The display changes as high/ low temperature. ≥ The actual recordable time refers to the recordable time when repeatedly starting/stopping recording, turning the unit on/off, moving the zoom lever etc. ≥ The batteries heat up after use or charging. Charging time and recordable time vary depending on the...

Operating Instructions Basic
Page 37
... surround microphone (with a zoom microphone/focus microphone function)/stereo microphone Minimum required illumination: Approx. 3 lx (1/30 with [AUTO SLOW SHTR] is set to page 23 for your safety Power source: DC 12 V (When using AC adaptor) DC 7.2 V (When using battery) Power consumption: 12.9 W Recording format: AVCHD format version 2.0 compliant (AVCHD Progressive) Motion picture compression: MPEG-4 AVC/H.264 Audio compression: Dolby® Digital (5.1 ch/2 ch) Recording mode and transfer rate: [PS 1080/60p]; Recording media: SD Memory Card SDHC Memory Card SDXC Memory Card...
... surround microphone (with a zoom microphone/focus microphone function)/stereo microphone Minimum required illumination: Approx. 3 lx (1/30 with [AUTO SLOW SHTR] is set to page 23 for your safety Power source: DC 12 V (When using AC adaptor) DC 7.2 V (When using battery) Power consumption: 12.9 W Recording format: AVCHD format version 2.0 compliant (AVCHD Progressive) Motion picture compression: MPEG-4 AVC/H.264 Audio compression: Dolby® Digital (5.1 ch/2 ch) Recording mode and transfer rate: [PS 1080/60p]; Recording media: SD Memory Card SDHC Memory Card SDXC Memory Card...

Operating Instructions Advanced
Page 3
...date and time 23 Using the menu screen 24 Using with the wireless remote control 25 Operation of direction buttons/ OK button 26 Recording Before recording 27 Formatting cards 28 Selecting a media to record 29 Recording motion pictures 30 Recording still pictures 31 Intelligent Auto Mode/Manual Mode...........33 Using the zoom 35 Ring zoom 35 Image Stabilizer Function 37 Focus 38 White Balance 40 Iris adjustment 42 Manual shutter speed 44 Audio Input 45 Microphone setup 45 Switching Audio Input 46 Adjusting the audio input level 49 Counter display 51 Setting the Time Code...
...date and time 23 Using the menu screen 24 Using with the wireless remote control 25 Operation of direction buttons/ OK button 26 Recording Before recording 27 Formatting cards 28 Selecting a media to record 29 Recording motion pictures 30 Recording still pictures 31 Intelligent Auto Mode/Manual Mode...........33 Using the zoom 35 Ring zoom 35 Image Stabilizer Function 37 Focus 38 White Balance 40 Iris adjustment 42 Manual shutter speed 44 Audio Input 45 Microphone setup 45 Switching Audio Input 46 Adjusting the audio input level 49 Counter display 51 Setting the Time Code...

Operating Instructions Advanced
Page 4
... cable ....... 78 Editing Copying between SD cards 79 Connecting to a PC (File transfer/nonlinear editing 81 Operating environment (mass storage 81 Connecting to a PC 83 About the PC display 84 Dubbing 85 Dubbing with a Blu-ray disc recorder..... 85 Using the Eye-Fi card 86 Using the Menu 89 Camera Setup 89 Recording Setup 94 Switch and display setting 100 Other Functions 106 Video Setup 110 Picture Setup 111 Display Indications 112 Messages 114 Others Troubleshooting 114 About recovery 118 Updating...
... cable ....... 78 Editing Copying between SD cards 79 Connecting to a PC (File transfer/nonlinear editing 81 Operating environment (mass storage 81 Connecting to a PC 83 About the PC display 84 Dubbing 85 Dubbing with a Blu-ray disc recorder..... 85 Using the Eye-Fi card 86 Using the Menu 89 Camera Setup 89 Recording Setup 94 Switch and display setting 100 Other Functions 106 Video Setup 110 Picture Setup 111 Display Indications 112 Messages 114 Others Troubleshooting 114 About recovery 118 Updating...

Operating Instructions Advanced
Page 20
... SETUP] # [POWER LCD]# [ON] ≥ When the AC adaptor is set to view the LCD monitor in use the touch screen You can operate by directly touching the LCD monitor (touch screen) with your finger. ∫ Touch Touch and release the touch screen to select icon or picture. ≥ Touch the center of the icon. ≥ Touching the touch screen will not affect the images actually recorded. [POWER LCD...
... SETUP] # [POWER LCD]# [ON] ≥ When the AC adaptor is set to view the LCD monitor in use the touch screen You can operate by directly touching the LCD monitor (touch screen) with your finger. ∫ Touch Touch and release the touch screen to select icon or picture. ≥ Touch the center of the icon. ≥ Touching the touch screen will not affect the images actually recorded. [POWER LCD...

Operating Instructions Advanced
Page 25
...the power switch of this depends on screen. [Excluding Skip Playback (l 68)] 5 Delete button [ ] (l 74) 6 Direction buttons [3,4,2,1] 7 Zoom/volume/thumbnail display switch buttons [T, W, /VOL]* 8 Recording start/stop button [START/ STOP]* 9 Date/time button [DATE/TIME] (l 102) Remove the insulation sheet A before using. Preparation Using with a new battery (part number: CR2025). MENU : [OTHER FUNCTION] # [REMOTE CONTROL] # [ON] 10 Menu button [MENU]* 11 OK button [OK] (l 26) * means that these buttons function in the same manner as the corresponding playback operation icon...
...the power switch of this depends on screen. [Excluding Skip Playback (l 68)] 5 Delete button [ ] (l 74) 6 Direction buttons [3,4,2,1] 7 Zoom/volume/thumbnail display switch buttons [T, W, /VOL]* 8 Recording start/stop button [START/ STOP]* 9 Date/time button [DATE/TIME] (l 102) Remove the insulation sheet A before using. Preparation Using with a new battery (part number: CR2025). MENU : [OTHER FUNCTION] # [REMOTE CONTROL] # [ON] 10 Menu button [MENU]* 11 OK button [OK] (l 26) * means that these buttons function in the same manner as the corresponding playback operation icon...

Operating Instructions Advanced
Page 67
.../ headphone volume during normal playback. ≥ If pause play is JPEG. (Not all JPEG formatted files will be heard only during Motion Picture Playback Mode. ∫ Speaker/Headphone volume adjustment Operate the volume lever or the sub zoom lever to a scene recorded in a different recording format, the screen goes dark for a moment. Towards "r": Increases the volume Towards "s": Decreases the volume T T W W ≥ Sound will be possible. (Please check compatibility in the instruction manual of your device.) Still picture compatibility ≥...
.../ headphone volume during normal playback. ≥ If pause play is JPEG. (Not all JPEG formatted files will be heard only during Motion Picture Playback Mode. ∫ Speaker/Headphone volume adjustment Operate the volume lever or the sub zoom lever to a scene recorded in a different recording format, the screen goes dark for a moment. Towards "r": Increases the volume Towards "s": Decreases the volume T T W W ≥ Sound will be possible. (Please check compatibility in the instruction manual of your device.) Still picture compatibility ≥...

Operating Instructions Advanced
Page 94
...]*4: Set the recording format to 480/60i. (Frame rate: 60i) A Image quality prioritised B Recording time prioritised *1 Motion picture recorded in [PH 1080/30p] is converted to 1080/60i. *2 If a motion picture is played back or recorded when this unit is connected to a TV with an HDMI cable (optional), it will be output to the TV in 1080/60i. (It will be recorded in 1080/24p.) *3 If a motion picture is recorded...
...]*4: Set the recording format to 480/60i. (Frame rate: 60i) A Image quality prioritised B Recording time prioritised *1 Motion picture recorded in [PH 1080/30p] is converted to 1080/60i. *2 If a motion picture is played back or recorded when this unit is connected to a TV with an HDMI cable (optional), it will be output to the TV in 1080/60i. (It will be recorded in 1080/24p.) *3 If a motion picture is recorded...

Operating Instructions Advanced
Page 99
...] to get strong power feeling at bass level. [2ch MIC ALC] [ON]/[OFF] ≥ Set [MIC SETUP] to [2ch]. (l 45) Distortion of the sound can be reduced when the built-in microphone (2 ch) or external microphone is used by setting to [ON]. ( is displayed on the recording screen) It will record with natural sound when set to [OFF]. ≥ Adjust the audio control knobs (CH1, CH2) to the audio input terminal 1 (XLR 3 pin...
...] to get strong power feeling at bass level. [2ch MIC ALC] [ON]/[OFF] ≥ Set [MIC SETUP] to [2ch]. (l 45) Distortion of the sound can be reduced when the built-in microphone (2 ch) or external microphone is used by setting to [ON]. ( is displayed on the recording screen) It will record with natural sound when set to [OFF]. ≥ Adjust the audio control knobs (CH1, CH2) to the audio input terminal 1 (XLR 3 pin...

Operating Instructions Advanced
Page 102
..., set [VIDEO/PICTURE] to [VIDEO]. (l 65) Select to display the audio level meter. [LENS STATUS] [ON]/[OFF] Display relating to lens can be switched. (Zoom Display, Optical Image Stabilizer, Focus Display, White Balance, Iris, Gain, Auto Iris, Shutter Speed) [CARD&BATTERY] [ON]/[OFF] Display can be switched between the remaining recordable time of the Recording Counter during recording. (l 54) [VIDEO OUT OSD] [ON]/[OFF] The information displayed on the screen (operation icon and counter display etc.) can be displayed/ not displayed on the TV. (l 77) [DATE/TIME] [OFF]/[TIME]/[DATE]/[DATE...
..., set [VIDEO/PICTURE] to [VIDEO]. (l 65) Select to display the audio level meter. [LENS STATUS] [ON]/[OFF] Display relating to lens can be switched. (Zoom Display, Optical Image Stabilizer, Focus Display, White Balance, Iris, Gain, Auto Iris, Shutter Speed) [CARD&BATTERY] [ON]/[OFF] Display can be switched between the remaining recordable time of the Recording Counter during recording. (l 54) [VIDEO OUT OSD] [ON]/[OFF] The information displayed on the screen (operation icon and counter display etc.) can be displayed/ not displayed on the TV. (l 77) [DATE/TIME] [OFF]/[TIME]/[DATE]/[DATE...

Operating Instructions Advanced
Page 115
... areas where the power supply frequency is displayed. Auto Focus function does not work. j Record in the Intelligent Auto Mode j Set the shutter speed to switch the counter display. (l 51) Problem The unit arbitrarily stops recording. Recording Check points ≥ Use an SD card that can be turned off in the image when the object is recorded under fluorescent light, mercury light or sodium light, etc., but this unit from. Problem "ERROR OCCURRED. PLEASE TURN UNIT OFF, THEN TURN ON AGAIN...
... areas where the power supply frequency is displayed. Auto Focus function does not work. j Record in the Intelligent Auto Mode j Set the shutter speed to switch the counter display. (l 51) Problem The unit arbitrarily stops recording. Recording Check points ≥ Use an SD card that can be turned off in the image when the object is recorded under fluorescent light, mercury light or sodium light, etc., but this unit from. Problem "ERROR OCCURRED. PLEASE TURN UNIT OFF, THEN TURN ON AGAIN...

Operating Instructions Advanced
Page 116
.... When the USB cable is disconnected, an error message will appear on a PC, disc etc. Back up important data on the PC. Refer to a TV, images cannot be seen. Problem When connected by the USB cable, this unit is correctly connected to the operating instructions of the device for the connection. ≥ Change the setting of SD card (SD Memory Card/SDHC Memory Card/SDXC Memory Card) that if a media is compatible with the capacity or type of the...
.... When the USB cable is disconnected, an error message will appear on a PC, disc etc. Back up important data on the PC. Refer to a TV, images cannot be seen. Problem When connected by the USB cable, this unit is correctly connected to the operating instructions of the device for the connection. ≥ Change the setting of SD card (SD Memory Card/SDHC Memory Card/SDXC Memory Card) that if a media is compatible with the capacity or type of the...

Operating Instructions Advanced
Page 121
... battery or the battery charger. If the operating time is still flashing, the temperature of the battery or the battery charger are not exposed to record for. Disconnect the AC cable from the radio. ≥ When using the AC adaptor or battery charger, it into fire. ≥ Heating a battery or throwing it may be sure to disconnect the AC cable from the AC outlet. (If you remove...
... battery or the battery charger. If the operating time is still flashing, the temperature of the battery or the battery charger are not exposed to record for. Disconnect the AC cable from the radio. ≥ When using the AC adaptor or battery charger, it into fire. ≥ Heating a battery or throwing it may be sure to disconnect the AC cable from the AC outlet. (If you remove...


