
Operating Instructions
Page 20
... menu setting SETUP BASIC - Except when stopped, pressing this button and the PLAY button simultaneously to activate recording standby. Remote camera recording can be enabled from standby. 15.REC button During playback, press this button and the STILL/PAUSE button simultaneously to start recording. The SETUP - EE mode monitoring is selectable by the menu setting SETUP - FORMAT menu setting. AUTO REC menu setting enables remote recording. (➝ "Setup Menu" Vol. 2, page 50) ◆ NOTE: • Cueing during playback to resume recording from the menu...
... menu setting SETUP BASIC - Except when stopped, pressing this button and the PLAY button simultaneously to activate recording standby. Remote camera recording can be enabled from standby. 15.REC button During playback, press this button and the STILL/PAUSE button simultaneously to start recording. The SETUP - EE mode monitoring is selectable by the menu setting SETUP - FORMAT menu setting. AUTO REC menu setting enables remote recording. (➝ "Setup Menu" Vol. 2, page 50) ◆ NOTE: • Cueing during playback to resume recording from the menu...
Operating Instructions
Page 22
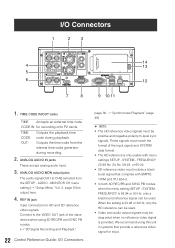
TIME CODE OUT: Outputs the playback time code during recording. 2. ANALOG AUDIO MON output jacks The audio signal (CH1 to the VIDEO OUT jack of the input signal and SYSTEM data format. • The HD reference is provided. MONITOR CH menu setting (➝ "Setup Menu" Vol. 2, page 50) is 59.94 or 50 Hz, only a black burst reference signal can be used. • Video and audio output signals may be used. REF IN jack Input connectors for recording onto P2 cards. When...
TIME CODE OUT: Outputs the playback time code during recording. 2. ANALOG AUDIO MON output jacks The audio signal (CH1 to the VIDEO OUT jack of the input signal and SYSTEM data format. • The HD reference is provided. MONITOR CH menu setting (➝ "Setup Menu" Vol. 2, page 50) is 59.94 or 50 Hz, only a black burst reference signal can be used. • Video and audio output signals may be used. REF IN jack Input connectors for recording onto P2 cards. When...

Operating Instructions
Page 23
... be displayed by another AG-HPD24. (➝ "3D Signal Recording and Playback" page 38, ➝ "Synchronous Playback" page 48) 6. VIDEO OUT jack Provides analog composite video signal output. Connecting it to a VIERA link compatible device with an HD reference or no reference input, the recorded phase may cause VIERA link to a monitor or TV using an HDMI cable. In 3D REC/PB and SYNC PB modes, 3D video can only synchronize playback. 5. SYSTEM - FREQUENCY menu setting...
... be displayed by another AG-HPD24. (➝ "3D Signal Recording and Playback" page 38, ➝ "Synchronous Playback" page 48) 6. VIDEO OUT jack Provides analog composite video signal output. Connecting it to a VIERA link compatible device with an HD reference or no reference input, the recorded phase may cause VIERA link to a monitor or TV using an HDMI cable. In 3D REC/PB and SYNC PB modes, 3D video can only synchronize playback. 5. SYSTEM - FREQUENCY menu setting...

Operating Instructions
Page 27
... the menu setting is OFF, AUTO POWER OFF is the time configured under the menu setting SETUP - When on, the POWER lamp lights green. POWER button POWER lamp ◆ NOTE: The following messages appear during startup. • "STARTING SYSTEM...": blinks during shutdown processing, until the unit turns off. ◆ NOTE: • When a battery fault occurs, turn the unit on. SYSTEM - AUTO POWER OFF. The POWER lamp blinks during startup. • "AUTO POWER...
... the menu setting is OFF, AUTO POWER OFF is the time configured under the menu setting SETUP - When on, the POWER lamp lights green. POWER button POWER lamp ◆ NOTE: The following messages appear during startup. • "STARTING SYSTEM...": blinks during shutdown processing, until the unit turns off. ◆ NOTE: • When a battery fault occurs, turn the unit on. SYSTEM - AUTO POWER OFF. The POWER lamp blinks during startup. • "AUTO POWER...

Operating Instructions
Page 28
... clock setting screen is performed during operation The Auto Power Off function automatically turns the unit off after Auto Power Off, press the POWER button again. ◆ NOTE: • The Auto Power Off time can be changed by the SETUP - Setting the Year, Month, Day and Time Set the clock before use. • The date format on the master unit, and returns to select the SETUP - CLOCK SET menu item, and press the SET button. The default values are displayed in...
... clock setting screen is performed during operation The Auto Power Off function automatically turns the unit off after Auto Power Off, press the POWER button again. ◆ NOTE: • The Auto Power Off time can be changed by the SETUP - Setting the Year, Month, Day and Time Set the clock before use. • The date format on the master unit, and returns to select the SETUP - CLOCK SET menu item, and press the SET button. The default values are displayed in...
Operating Instructions
Page 36
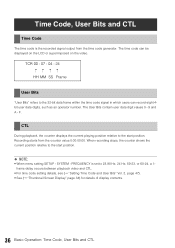
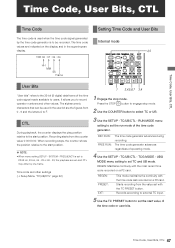
... the start position. ◆ NOTE: • When menu setting SETUP - The User Bits contain user data digit values 0 - 9 and A - The time code can record eight 4bit user data digits, such as an operator number. Recording starts from the time code generator. F. CTL During playback, the counter displays the current playing position relative to the 32-bit data frame within the time code signal in which users can be displayed on the LCD or superimposed on the video. FREQUENCY is the recorded signal output from...
... the start position. ◆ NOTE: • When menu setting SETUP - The User Bits contain user data digit values 0 - 9 and A - The time code can record eight 4bit user data digits, such as an operator number. Recording starts from the time code generator. F. CTL During playback, the counter displays the current playing position relative to the 32-bit data frame within the time code signal in which users can be displayed on the LCD or superimposed on the video. FREQUENCY is the recorded signal output from...

Operating Instructions
Page 58
... mode/SYNC PB mode connection 56 3D Recording/Playback Mode (3D REC/PB) ... 37 3D Signal Recording and Playback 38 3D Thumbnails 46 4:3 MARKER 68 ■A AC adaptor 17, 26 AC power supply cables 17 Access lamp 21 Accidental Deletion 31 Adjusting the recording volume 6 ALL CLIP 50 Ambient operating humidity 53 Ambient operating temperature 53 Ambient storage temperature 53 ANALOG AUDIO IN jacks 22 ANALOG AUDIO MON output jacks 22 Analog inputs...
... mode/SYNC PB mode connection 56 3D Recording/Playback Mode (3D REC/PB) ... 37 3D Signal Recording and Playback 38 3D Thumbnails 46 4:3 MARKER 68 ■A AC adaptor 17, 26 AC power supply cables 17 Access lamp 21 Accidental Deletion 31 Adjusting the recording volume 6 ALL CLIP 50 Ambient operating humidity 53 Ambient operating temperature 53 Ambient storage temperature 53 ANALOG AUDIO IN jacks 22 ANALOG AUDIO MON output jacks 22 Analog inputs...

Operating Instructions
Page 60
...-CONNECTION 52 RECORD 54 Record mode 10 Record/Playback Screen 45 Recording 35, 44 Recording clips 6 Recording formats 53 Recording media 53 Recording Times 30, 54 Recording/Playback Screen 5, 6 REF IN jack 22 REF LEVEL 67 Reference input 55 Remaining card capacity 44 REMOTE button 18 REMOTE connector 23 REMOTE, REF ERROR, TEXT MEMO indicator 45 REMOTE/MODE button 18 Removing 31 REPAIR CLIP 52 REPEAT PLAY 60 Repeat playback 9 Reproducing the Time Code and User Bits ..... 49 RESET/TC PRESET button 19 Resolution 55 REW button 20 REW, PREV button...
...-CONNECTION 52 RECORD 54 Record mode 10 Record/Playback Screen 45 Recording 35, 44 Recording clips 6 Recording formats 53 Recording media 53 Recording Times 30, 54 Recording/Playback Screen 5, 6 REF IN jack 22 REF LEVEL 67 Reference input 55 Remaining card capacity 44 REMOTE button 18 REMOTE connector 23 REMOTE, REF ERROR, TEXT MEMO indicator 45 REMOTE/MODE button 18 Removing 31 REPAIR CLIP 52 REPEAT PLAY 60 Repeat playback 9 Reproducing the Time Code and User Bits ..... 49 RESET/TC PRESET button 19 Resolution 55 REW button 20 REW, PREV button...

Operating Instructions
Page 66
... this first! (For AG-HPD24E) Read this first! (For AG-HPD24P/AG-HPD24E) Usage Precautions Supplied Accessories, Optional Accessories Control Reference Guide Preparation Volume 1 Power Preparations Basic Operation External Connections 3D Signal Recording and Playback Synchronous Playback Setup Menu Specifications Index Volume 2 Available Modes 5 Formatting P2 Cards 39 Checking Card Status 39 Main Mode 6 Recording/Playback Screen 6 Recording Clips 6 Playing Back Clips 8 Thumbnail Screen 10 Thumbnail Screen Names and Functions 10 Changing Thumbnail Display 12 Playing back Clips 14...
... this first! (For AG-HPD24E) Read this first! (For AG-HPD24P/AG-HPD24E) Usage Precautions Supplied Accessories, Optional Accessories Control Reference Guide Preparation Volume 1 Power Preparations Basic Operation External Connections 3D Signal Recording and Playback Synchronous Playback Setup Menu Specifications Index Volume 2 Available Modes 5 Formatting P2 Cards 39 Checking Card Status 39 Main Mode 6 Recording/Playback Screen 6 Recording Clips 6 Playing Back Clips 8 Thumbnail Screen 10 Thumbnail Screen Names and Functions 10 Changing Thumbnail Display 12 Playing back Clips 14...
Operating Instructions
Page 69
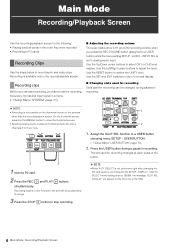
... to set the recording frequency, format and input signal in a menu. (➝ Setup Menu "SYSTEM" page 71) ■ Changing slots used for recording Slots used for recording can start recording, you press the REC VOLUME button (assigned to T&S&M, the message "SLOT SEL INVALID" will appear on the thumbnail screen or the screens other than the record/playback screen. The slot used for recording and the SETUP - Main Mode Recording/Playback Screen Use the recording/playback screen for the following. • Playing back all cards in...
... to set the recording frequency, format and input signal in a menu. (➝ Setup Menu "SYSTEM" page 71) ■ Changing slots used for recording Slots used for recording can start recording, you press the REC VOLUME button (assigned to T&S&M, the message "SLOT SEL INVALID" will appear on the thumbnail screen or the screens other than the record/playback screen. The slot used for recording and the SETUP - Main Mode Recording/Playback Screen Use the recording/playback screen for the following. • Playing back all cards in...

Operating Instructions
Page 92
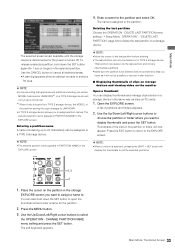
...; "Thumbnail Screen Display" Vol. 1, page 34) turns white (or red). 3 Press the MENU button. 4 Use the Up/Down/Left/Right cursor buttons to (white). 1 Open the thumbnail screen. 2 Connect a USB storage device. USB 2.0 cables, if used, will now open. 5 Press the MENU button and use the Up/Down/Left/ Right cursor buttons to the USB 3.0 standard when connecting USB 3.0 storage devices. Main Mode: Thumbnail Screen 29 ENABLE menu setting. ◆ NOTE: • When set to ENABLE, recording and EE output is...
...; "Thumbnail Screen Display" Vol. 1, page 34) turns white (or red). 3 Press the MENU button. 4 Use the Up/Down/Left/Right cursor buttons to (white). 1 Open the thumbnail screen. 2 Connect a USB storage device. USB 2.0 cables, if used, will now open. 5 Press the MENU button and use the Up/Down/Left/ Right cursor buttons to the USB 3.0 standard when connecting USB 3.0 storage devices. Main Mode: Thumbnail Screen 29 ENABLE menu setting. ◆ NOTE: • When set to ENABLE, recording and EE output is...
Operating Instructions
Page 96
... MENU button. 3. Main Mode: Thumbnail Screen 33 Use the CANCEL button to select a 7th area. ◆ NOTE: • A clip recording that spans several partitions including one whose MODEL has become UNKNOWN*1 on a TYPE S storage device. Use the Up/Down/Left/Right cursor buttons to open the thumbnail list and enter a name for 1 sec or longer) in the EXPLORE screen. Main Mode 4. DELETE LAST PARTITION menu setting (➝ Setup Menu "OPERATION...
... MENU button. 3. Main Mode: Thumbnail Screen 33 Use the CANCEL button to select a 7th area. ◆ NOTE: • A clip recording that spans several partitions including one whose MODEL has become UNKNOWN*1 on a TYPE S storage device. Use the Up/Down/Left/Right cursor buttons to open the thumbnail list and enter a name for 1 sec or longer) in the EXPLORE screen. Main Mode 4. DELETE LAST PARTITION menu setting (➝ Setup Menu "OPERATION...
Operating Instructions
Page 110
... run mode of the time code signal made available to record operator numbers and other settings (➝ Setup Menu "TC/UB/CTL" page 62) 3 Use the SETUP - FREQUENCY is to set the start position. ◆ NOTE: • When menu setting SETUP - REC RUN: FREE RUN: The time code generator advances during recording. Records according to external TC input. 5 Use the TC PRESET button to 23.98 Hz, 24 Hz, 59 - 23 or 60 - 24, the playback screen...
... run mode of the time code signal made available to record operator numbers and other settings (➝ Setup Menu "TC/UB/CTL" page 62) 3 Use the SETUP - FREQUENCY is to set the start position. ◆ NOTE: • When menu setting SETUP - REC RUN: FREE RUN: The time code generator advances during recording. Records according to external TC input. 5 Use the TC PRESET button to 23.98 Hz, 24 Hz, 59 - 23 or 60 - 24, the playback screen...

Operating Instructions
Page 116
...SETUP - MENU THUMBNAIL OPERATION PROPERTY META DATA STORAGE SETUP FILE SYSTEM INFO Item Settings and brief function description XX indicates factory default settings. P2 REMAIN: Remaining capacity indication 23.98 Hz 24 Hz M M M CARD CAP USED: Used capacity indication 59-23 Hz 60-24 Hz Indicates free space on the screen. SYSTEM FREQ indications Mode... FREE CAP. Setup Menu PROPERTY Use this menu to display detailed information of cards in a P2 card slot. 59.94 Hz 50 Hz CARD STATUS 23.98 Hz 24 Hz M M M 59-23 Hz 60-24 Hz DEVICES SD CARD Displays SD memory card ...
...SETUP - MENU THUMBNAIL OPERATION PROPERTY META DATA STORAGE SETUP FILE SYSTEM INFO Item Settings and brief function description XX indicates factory default settings. P2 REMAIN: Remaining capacity indication 23.98 Hz 24 Hz M M M CARD CAP USED: Used capacity indication 59-23 Hz 60-24 Hz Indicates free space on the screen. SYSTEM FREQ indications Mode... FREE CAP. Setup Menu PROPERTY Use this menu to display detailed information of cards in a P2 card slot. 59.94 Hz 50 Hz CARD STATUS 23.98 Hz 24 Hz M M M 59-23 Hz 60-24 Hz DEVICES SD CARD Displays SD memory card ...

Operating Instructions
Page 133
.../OFF button DELETE: Functions as a MENU - DELETE shortcut button. COPY shortcut button. CLIP PROPERTY shortcut button. STORAGE EXPLORE: Functions as a MENU - SLOT SEL: Changes the P2 card slot used for recording. SETUP - STOP EE SEL settings. OUTPUT REF settings. BASIC - TC/UB/CTL - TCG MODE settings. TC/UB/CTL - TC/UB/CTL - INT SG settings. MONITOR CH: Changes MENU - AUDIO - DISPLAY - Item USER1 Settings and brief function description XX indicates factory default settings. CARD STATUS shortcut button. STOP EE SEL: Changes MENU - BASIC - SETUP...
.../OFF button DELETE: Functions as a MENU - DELETE shortcut button. COPY shortcut button. CLIP PROPERTY shortcut button. STORAGE EXPLORE: Functions as a MENU - SLOT SEL: Changes the P2 card slot used for recording. SETUP - STOP EE SEL settings. OUTPUT REF settings. BASIC - TC/UB/CTL - TCG MODE settings. TC/UB/CTL - TC/UB/CTL - INT SG settings. MONITOR CH: Changes MENU - AUDIO - DISPLAY - Item USER1 Settings and brief function description XX indicates factory default settings. CARD STATUS shortcut button. STOP EE SEL: Changes MENU - BASIC - SETUP...

Operating Instructions
Page 134
.... WFM TYPE: Changes MENU - SETUP - DISPLAY - USB HOST: Changes MENU - The factory default setting is LEVEL METER. The factory default setting is COPY. Select this frequency to set to record 2:3 pull-down converted (24 fps signal) output from an AJ-HDC27H camera. Select this frequency to 59 - 23 or 60 - 24. To do that the unit must be assigned to unit settings. DISPLAY - WFM TYPE settings. USB HOST settings. Provides the same functionality as USER1...
.... WFM TYPE: Changes MENU - SETUP - DISPLAY - USB HOST: Changes MENU - The factory default setting is LEVEL METER. The factory default setting is COPY. Select this frequency to set to record 2:3 pull-down converted (24 fps signal) output from an AJ-HDC27H camera. Select this frequency to 59 - 23 or 60 - 24. To do that the unit must be assigned to unit settings. DISPLAY - WFM TYPE settings. USB HOST settings. Provides the same functionality as USER1...

Operating Instructions
Page 148
... frame mode. SYSTEM - Check signal input to a P2 card error. Use a storage device with a matching time code and pull-down sequence. (Appears when menu SETUP - Check the playback clip. Input signals with higher specifications. FREQUENCY is set to 59 - 23 or 60-24 and VFR REC is set the internal calendar and clock. *2 Recording is initially accepted after recording is set to non-drop frame mode. (Appears when menu SETUP - For Long and Trouble-Free Operation Display of...
... frame mode. SYSTEM - Check signal input to a P2 card error. Use a storage device with a matching time code and pull-down sequence. (Appears when menu SETUP - Check the playback clip. Input signals with higher specifications. FREQUENCY is set to 59 - 23 or 60-24 and VFR REC is set the internal calendar and clock. *2 Recording is initially accepted after recording is set to non-drop frame mode. (Appears when menu SETUP - For Long and Trouble-Free Operation Display of...
Operating Instructions
Page 152
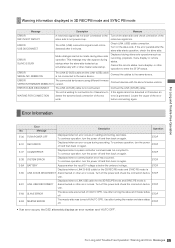
... the slave side. Use after master side startup. For Long and Trouble-Free Operation Warning information displayed in 3D REC/PB mode and SYNC PB mode Message Description Measure ERROR REF IN NOT DETECT A reference signal has not been connected or the Turn on again. reference signal line. Check LINK (USB) cable connection. ERROR SERIAL NO. Connect the LINK (D-SUB) cable. WAITING FOR CONNECTION The unit is waiting for connection for the 3D...
... the slave side. Use after master side startup. For Long and Trouble-Free Operation Warning information displayed in 3D REC/PB mode and SYNC PB mode Message Description Measure ERROR REF IN NOT DETECT A reference signal has not been connected or the Turn on again. reference signal line. Check LINK (USB) cable connection. ERROR SERIAL NO. Connect the LINK (D-SUB) cable. WAITING FOR CONNECTION The unit is waiting for connection for the 3D...

Operating Instructions
Page 156
... mode/SYNC PB mode connection 56 3D Recording/Playback Mode (3D REC/PB 37 3D Signal Recording and Playback 38 3D Thumbnails 46 4:3 MARKER 68 ■A AC adaptor 17, 26 AC power supply cables 17 Access lamp 21 Accidental Deletion 31 Adjusting the recording volume 6 ALL CLIP 50 Ambient operating humidity 53 Ambient operating temperature 53 Ambient storage temperature 53 ANALOG AUDIO IN jacks 22 ANALOG AUDIO MON output jacks 22 Analog inputs...
... mode/SYNC PB mode connection 56 3D Recording/Playback Mode (3D REC/PB 37 3D Signal Recording and Playback 38 3D Thumbnails 46 4:3 MARKER 68 ■A AC adaptor 17, 26 AC power supply cables 17 Access lamp 21 Accidental Deletion 31 Adjusting the recording volume 6 ALL CLIP 50 Ambient operating humidity 53 Ambient operating temperature 53 Ambient storage temperature 53 ANALOG AUDIO IN jacks 22 ANALOG AUDIO MON output jacks 22 Analog inputs...

Brochure
Page 5
... Audio In TC Headphone USB Keyboard Controller AG-HPD24 USB 2.0 USB 3.0 (HOST) RS-422A USB 2.0 (DEVICE) SDI (HD/SD) Out HDMI VIDEO Monitor AUDIO Monitor TC Storage PC/Mac 4 Panasonic cannot guarantee smooth playback without dropped frames. Front Speaker Audio can also be output.* * Not supported in 3D mode. *2: 2 TB or more cannot be monitored from the front speaker. i n a Com pact, Ligh t weigh t 2U Ha l f -Rac k S i z e . This enables high-quality line recording using signals...
... Audio In TC Headphone USB Keyboard Controller AG-HPD24 USB 2.0 USB 3.0 (HOST) RS-422A USB 2.0 (DEVICE) SDI (HD/SD) Out HDMI VIDEO Monitor AUDIO Monitor TC Storage PC/Mac 4 Panasonic cannot guarantee smooth playback without dropped frames. Front Speaker Audio can also be output.* * Not supported in 3D mode. *2: 2 TB or more cannot be monitored from the front speaker. i n a Com pact, Ligh t weigh t 2U Ha l f -Rac k S i z e . This enables high-quality line recording using signals...


