User Manual
Page 6
... battery 19 Remote control setup 19 Turn on/off the camera 20 Tally lamp 20 Viewfinder 21 Using the viewfinder 21 Using the LCD 22 Emphasizing outlines 22 Adjusting the screen display 23 Setting the calendar 24 Shooting Basic shooting operations (P2 card 25 Preparing to shoot using a P2 card 25 Shooting in auto mode 25 Checking photos taken (REC CHECK 26 P2 card access lamps 26 Protecting against a possible erasure 26 Formatting P2 cards 27 Recording times 27 Remove the P2 card 28 Basic shooting operations (Cassette tape...
... battery 19 Remote control setup 19 Turn on/off the camera 20 Tally lamp 20 Viewfinder 21 Using the viewfinder 21 Using the LCD 22 Emphasizing outlines 22 Adjusting the screen display 23 Setting the calendar 24 Shooting Basic shooting operations (P2 card 25 Preparing to shoot using a P2 card 25 Shooting in auto mode 25 Checking photos taken (REC CHECK 26 P2 card access lamps 26 Protecting against a possible erasure 26 Formatting P2 cards 27 Recording times 27 Remove the P2 card 28 Basic shooting operations (Cassette tape...
User Manual
Page 7
...FILE screen 101 CAMERA SETUP screen 103 SW MODE screen 104 AUTO SW screen 106 RECORDING SETUP screen 107 PLAYBACK FUNCTIONS screen 110 DUBBING SETUP screen 112 AV IN/OUT SETUP screen 112 DISPLAY SETUP screen 113 CARD FUNCTIONS screen 115 OTHER FUNCTIONS screen 115 OPTION MENU 119 Reference Before calling for service 120 Operating precautions 124 Updating the driver in the camera 126 Condensation 126 System resetting 127 Cleaning 127 Video Heads 128 Storage Precautions 129 How to handle data recorded on P2 cards ... 130 Checkpoints for using memory cards ...... 131 Recording...
...FILE screen 101 CAMERA SETUP screen 103 SW MODE screen 104 AUTO SW screen 106 RECORDING SETUP screen 107 PLAYBACK FUNCTIONS screen 110 DUBBING SETUP screen 112 AV IN/OUT SETUP screen 112 DISPLAY SETUP screen 113 CARD FUNCTIONS screen 115 OTHER FUNCTIONS screen 115 OPTION MENU 119 Reference Before calling for service 120 Operating precautions 124 Updating the driver in the camera 126 Condensation 126 System resetting 127 Cleaning 127 Video Heads 128 Storage Precautions 129 How to handle data recorded on P2 cards ... 130 Checkpoints for using memory cards ...... 131 Recording...

User Manual
Page 46
...) Adjusting the volume while shooting Adjusting the volume PAGE/ AUDIO MON/VAR If you are monitoring the sound through headphones while shooting, you can adjust the volume with the settings for DATE/TIME Note the following items on the DISPLAY SETUP screen (page 113) for backup recording when using a tape. • OFF for VIDEO OUT OSD • OFF for backup recording still in effect, images on the external unit and set it to MCR/VCR mode...
...) Adjusting the volume while shooting Adjusting the volume PAGE/ AUDIO MON/VAR If you are monitoring the sound through headphones while shooting, you can adjust the volume with the settings for DATE/TIME Note the following items on the DISPLAY SETUP screen (page 113) for backup recording when using a tape. • OFF for VIDEO OUT OSD • OFF for backup recording still in effect, images on the external unit and set it to MCR/VCR mode...
User Manual
Page 49
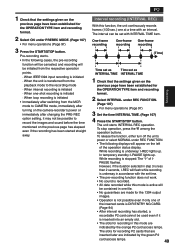
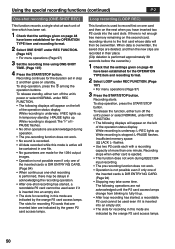
... the set time. • The pre-recording function does not work. • No sound is stopped: The "I -REC lights up . However, if the duration selected in one file. • No guarantees are indicated by the orange P2 card access lamps. 1 Check that the settings given on the previous page have been established for the OPERATION TYPE item and recording Shooting format. 2 Select INTERVAL under PREREC MODE. (Page 107) • For menu operations...
... the set time. • The pre-recording function does not work. • No sound is stopped: The "I -REC lights up . However, if the duration selected in one file. • No guarantees are indicated by the orange P2 card access lamps. 1 Check that the settings given on the previous page have been established for the OPERATION TYPE item and recording Shooting format. 2 Select INTERVAL under PREREC MODE. (Page 107) • For menu operations...
User Manual
Page 50
... card access lamps. While recording is inserted into an empty slot. • The slots for recording P2 cards that the settings given on page 48 have been established for the OPERATION TYPE item and recording format. 2 Select ONE SHOT under REC FUNCTION. (Page 107) • For menu operations (Page 97) 3 Set the recording time using ONE-SHOT TIME. (Page 107) 4 Press the START/STOP button. If there is underway: I -PAUSE lights up . While recording...
... card access lamps. While recording is inserted into an empty slot. • The slots for recording P2 cards that the settings given on page 48 have been established for the OPERATION TYPE item and recording format. 2 Select ONE SHOT under REC FUNCTION. (Page 107) • For menu operations (Page 97) 3 Set the recording time using ONE-SHOT TIME. (Page 107) 4 Press the START/STOP button. If there is underway: I -PAUSE lights up . While recording...
User Manual
Page 54
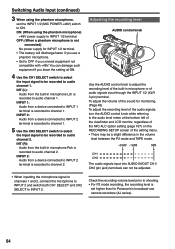
... Panasonic's broadcast-use a phantom microphone. • Set to OFF if you leave the setting at the bottom left of the viewfinder and LCD monitor, regardless of the MIC ALC option setting (page 107) on the RECORDING SETUP screen of the setting menu. • There may be a slight difference in the volume level between the P2 mode and TAPE mode. OFF: (When a phantom microphone is recorded to channel 1. INT (R): Audio from a device connected to INPUT...
... Panasonic's broadcast-use a phantom microphone. • Set to OFF if you leave the setting at the bottom left of the viewfinder and LCD monitor, regardless of the MIC ALC option setting (page 107) on the RECORDING SETUP screen of the setting menu. • There may be a slight difference in the volume level between the P2 mode and TAPE mode. OFF: (When a phantom microphone is recorded to channel 1. INT (R): Audio from a device connected to INPUT...
User Manual
Page 60
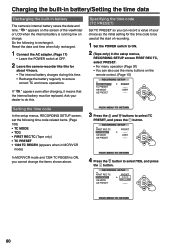
... battery The camera's internal battery saves the date and time. Ask your dealer to do this for the time code to be used at the start of recording. 1 Set the POWER switch to ON. 2 (Tape only) In the setup menus, RECORDING SETUP screen FIRST REC TC, select PRESET. • For menu operation (Page 97) • You can record a value of the viewfinder or LCD when the internal battery is ON, you can also use the menu buttons on charge. Setting the time code...
... battery The camera's internal battery saves the date and time. Ask your dealer to do this for the time code to be used at the start of recording. 1 Set the POWER switch to ON. 2 (Tape only) In the setup menus, RECORDING SETUP screen FIRST REC TC, select PRESET. • For menu operation (Page 97) • You can record a value of the viewfinder or LCD when the internal battery is ON, you can also use the menu buttons on charge. Setting the time code...
User Manual
Page 65
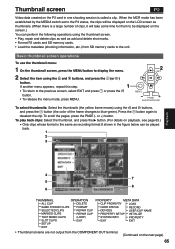
... clips will be played back. 1 2 3 Playback 4 7 5 8 6 THUMBNAIL OPERATION ALL CLIP DELETE SAME FORMAT CLIPS FORMAT SELECTED CLIPS REPAIR CLIP MARKED CLIPS REPAIR CLIP TEXT MEMO CLIPS (LOOP) SLOT CLIPS EXIT SETUP EXIT PROPERTY META DATA CLIP PROPERTY LOAD CARD STATUS RECORD DEVICES USER CLIP NAME PROPERTY SETUP INITIALIZE SYSTEM INFO PROPERTY EXIT EXIT • Thumbnail screens are not output from SD memory cards to be displayed on playback, see page 63...
... clips will be played back. 1 2 3 Playback 4 7 5 8 6 THUMBNAIL OPERATION ALL CLIP DELETE SAME FORMAT CLIPS FORMAT SELECTED CLIPS REPAIR CLIP MARKED CLIPS REPAIR CLIP TEXT MEMO CLIPS (LOOP) SLOT CLIPS EXIT SETUP EXIT PROPERTY META DATA CLIP PROPERTY LOAD CARD STATUS RECORD DEVICES USER CLIP NAME PROPERTY SETUP INITIALIZE SYSTEM INFO PROPERTY EXIT EXIT • Thumbnail screens are not output from SD memory cards to be displayed on playback, see page 63...
User Manual
Page 83
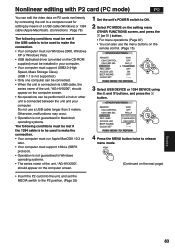
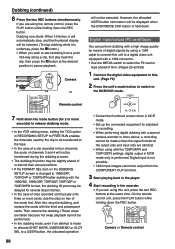
... used to make the connection. • Your computer must run Windows 2000, Windows XP or Windows Vista. • USB dedicated driver (provided on the CD-ROM supplied) must be installed in Windows operating systems. • The series name of the unit, "AG-HVX200", should appear on the computer screen. 1 Set the unit's POWER switch to ON. 2 Select PC MODE on the setting menu OTHER FUNCTIONS screen, and press the (or ) button...
... used to make the connection. • Your computer must run Windows 2000, Windows XP or Windows Vista. • USB dedicated driver (provided on the CD-ROM supplied) must be installed in Windows operating systems. • The series name of the unit, "AG-HVX200", should appear on the computer screen. 1 Set the unit's POWER switch to ON. 2 Select PC MODE on the setting menu OTHER FUNCTIONS screen, and press the (or ) button...
User Manual
Page 88
...; If you are identical. • When using a 1394 cable to connect this unit to be delayed for playback or recording. • When performing digital dubbing with the third and subsequent cards. REC Camera COUNTER RESET TITLE ZOOM MULTI/ P-IN-P REC A.DUB /REW PLAY FF/ STILL ADV PAUSE STILL ADV INDEX STOP INDEX ÐVOL + or Remote control 7 Hold down the REC button. Digital input/output (P2 card/Tape) You can perform dubbing with a high...
...; If you are identical. • When using a 1394 cable to connect this unit to be delayed for playback or recording. • When performing digital dubbing with the third and subsequent cards. REC Camera COUNTER RESET TITLE ZOOM MULTI/ P-IN-P REC A.DUB /REW PLAY FF/ STILL ADV PAUSE STILL ADV INDEX STOP INDEX ÐVOL + or Remote control 7 Hold down the REC button. Digital input/output (P2 card/Tape) You can perform dubbing with a high...
User Manual
Page 92
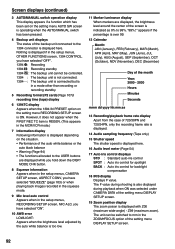
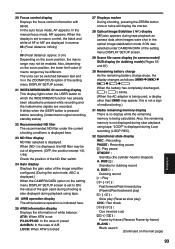
...) 15 Shutter speed The shutter speed is displayed with Z00 (maximum wide-angle) - Z99 (maximum zoom). Screen displays (continued) 3 AUTO/MANUAL switch operation display This display appears if a function which has been set on the situation. • Performance of the auto white balance or the auto black balance • Warning (Page 94) • The functions allocated to the USER buttons are displayed while you hold down the DISP/ MODE CHK button. 8 Squeeze information Appears when in the setup menus, CAMERA SETUP screen...
...) 15 Shutter speed The shutter speed is displayed with Z00 (maximum wide-angle) - Z99 (maximum zoom). Screen displays (continued) 3 AUTO/MANUAL switch operation display This display appears if a function which has been set on the situation. • Performance of the auto white balance or the auto black balance • Warning (Page 94) • The functions allocated to the USER buttons are displayed while you hold down the DISP/ MODE CHK button. 8 Squeeze information Appears when in the setup menus, CAMERA SETUP screen...
User Manual
Page 93
... CAMERA DATA of the setting menu DISPLAY SETUP screen. 29 Scene file name display (in camera mode)/ DUB display (in dubbing mode) (Pages 55 and 87) 30 Remaining battery charge As the remaining battery charge drops, the display changes as camera data when images were shot in reverse. 95 (Focal distance: infinity) : 00 (Focal distance: approx. 5 cm) Depending on the next page) Displays 93 Also, the remaining memory is not displayed during slow playback using tape. 25 AWB operation display The white balance operation...
... CAMERA DATA of the setting menu DISPLAY SETUP screen. 29 Scene file name display (in camera mode)/ DUB display (in dubbing mode) (Pages 55 and 87) 30 Remaining battery charge As the remaining battery charge drops, the display changes as camera data when images were shot in reverse. 95 (Focal distance: infinity) : 00 (Focal distance: approx. 5 cm) Depending on the next page) Displays 93 Also, the remaining memory is not displayed during slow playback using tape. 25 AWB operation display The white balance operation...

User Manual
Page 95
... dealer. ERROR (other type of the card being accessed. If the problem is not fixed by turning the power off the power. • If the warning appears even when recording is carried out again, replace the card with tape running systems, AUTO OFF is displayed when trouble has occurred during playback. P2 MICON ERROR (no files (version upgrade files, etc.). REC WARNING This is displayed. Errors These are no P2 microcomputer response) P2 CONTROL ERROR (trouble in...
... dealer. ERROR (other type of the card being accessed. If the problem is not fixed by turning the power off the power. • If the warning appears even when recording is carried out again, replace the card with tape running systems, AUTO OFF is displayed when trouble has occurred during playback. P2 MICON ERROR (no files (version upgrade files, etc.). REC WARNING This is displayed. Errors These are no P2 microcomputer response) P2 CONTROL ERROR (trouble in...

User Manual
Page 96
... and LCD monitor screen by pressing the DISP/MODE CHK button or by configuring OTHER DISPLAY of the DISPLAY SETUP screen of the setup menus. (Page 114) Displays 1 Time code display 3 AUTO/MANUAL switch operation display 5 Recording format/recording time display 7 Information display 8 Squeeze information display 9 Microphone level auto-control display 12 Calendar display 13 Recording/playback frame rate display 14 Audio-sampling frequency display 15 Shutter speed display 16 Audio level meter display 17 Auto-IRIS control display 18 IRIS display 19 Zoom position display 20 Focus control display...
... and LCD monitor screen by pressing the DISP/MODE CHK button or by configuring OTHER DISPLAY of the DISPLAY SETUP screen of the setup menus. (Page 114) Displays 1 Time code display 3 AUTO/MANUAL switch operation display 5 Recording format/recording time display 7 Information display 8 Squeeze information display 9 Microphone level auto-control display 12 Calendar display 13 Recording/playback frame rate display 14 Audio-sampling frequency display 15 Shutter speed display 16 Audio level meter display 17 Auto-IRIS control display 18 IRIS display 19 Zoom position display 20 Focus control display...
User Manual
Page 108
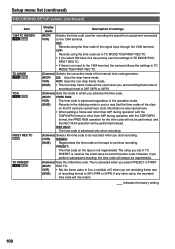
...: Records using the time code of the signal input through the 1394 terminal. If any other than 24P during operation with the 720P/24PN format or other value, the recorded time code will always be regenerated. (Camera) Sets the initial time code. Setup menu list (continued) RECORDING SETUP screen (continued) Item 1394 TC REGEN P2 TAPE TC MODE P2 TAPE TCG P2 TAPE FIRST REC TC TAPE TC PRESET P2 TAPE Display mode Description of settings (MCR/ VCR) Selects the time code used...
...: Records using the time code of the signal input through the 1394 terminal. If any other than 24P during operation with the 720P/24PN format or other value, the recorded time code will always be regenerated. (Camera) Sets the initial time code. Setup menu list (continued) RECORDING SETUP screen (continued) Item 1394 TC REGEN P2 TAPE TC MODE P2 TAPE TCG P2 TAPE FIRST REC TC TAPE TC PRESET P2 TAPE Display mode Description of settings (MCR/ VCR) Selects the time code used...

User Manual
Page 122
... cards or tapes. The playback images are dirty. • You may have connected the camera-recorder properly. Cannot perform hot swap playback. • Make sure the MCR/VCR lamp is on your television is normal. • Make sure the input selector on (press the mode button). This is set it . You can hear two sets of playback operation can be dirty. the time code display. When I cue or review a tape. To replace...
... cards or tapes. The playback images are dirty. • You may have connected the camera-recorder properly. Cannot perform hot swap playback. • Make sure the MCR/VCR lamp is on your television is normal. • Make sure the input selector on (press the mode button). This is set it . You can hear two sets of playback operation can be dirty. the time code display. When I cue or review a tape. To replace...
Brochure
Page 8
... clips and video software. When using a frame rate converter. The 24p Advance mode uses 2:3:3:2 pulldown which allows for Previewing Visual Effects 720p Native Mode In the Native mode, the AG-HVX200A records images at 12 to 22* fps lets you produce a backup copy using a connected external Hard Disk recorder, such as in film cameras. For a standard speed of 30 fps, anything under 26 fps will be set in 1080...
... clips and video software. When using a frame rate converter. The 24p Advance mode uses 2:3:3:2 pulldown which allows for Previewing Visual Effects 720p Native Mode In the Native mode, the AG-HVX200A records images at 12 to 22* fps lets you produce a backup copy using a connected external Hard Disk recorder, such as in film cameras. For a standard speed of 30 fps, anything under 26 fps will be set in 1080...
Brochure
Page 10
...-time as lighting conditions change any value desired. You also can then be assigned to adjust the white balance and black balance. Scene File, User Buttons and Auto Functions for Quicker, Easier Shooting Scene File Dial Set this allows you to turn the zoom ring, you feel . The ATW mode supports fast, active shooting by the use of a button. Manual Focus with the Auto Tracking White Function One press of the AWB button is fixed at the touch of the USER...
...-time as lighting conditions change any value desired. You also can then be assigned to adjust the white balance and black balance. Scene File, User Buttons and Auto Functions for Quicker, Easier Shooting Scene File Dial Set this allows you to turn the zoom ring, you feel . The ATW mode supports fast, active shooting by the use of a button. Manual Focus with the Auto Tracking White Function One press of the AWB button is fixed at the touch of the USER...
Brochure
Page 12
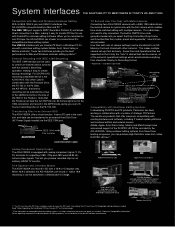
... Compatible with Mac and Windows Nonlinear Editing With its IEEE 1394 (4-pin) and USB 2.0 interfaces, the AG-HVX200A connects directly to Mac and PC.*1 The IEEE 1394 port supports SBP2 (Serial Bus Protocol 2) and allows direct connection to a Mac, making it easy to transfer P2 files for use with FinalCutPro nonlinear editing software. When you can be switched to change in tape mode. TC Set and User File Copy with Multi-Cameras Connecting two AG-HVX200A cameras...
... Compatible with Mac and Windows Nonlinear Editing With its IEEE 1394 (4-pin) and USB 2.0 interfaces, the AG-HVX200A connects directly to Mac and PC.*1 The IEEE 1394 port supports SBP2 (Serial Bus Protocol 2) and allows direct connection to a Mac, making it easy to transfer P2 files for use with FinalCutPro nonlinear editing software. When you can be switched to change in tape mode. TC Set and User File Copy with Multi-Cameras Connecting two AG-HVX200A cameras...

Brochure
Page 15
..., AC Adapter, and Other packages LCD Monitor: 3.5 inches, LCD color Monitor, 210,000 pixels Viewfinder: 0.44 inches, LCD color Viewfinder, 235,000 pixels AC Adapter: Weight: 160g, Dimensions: 70 (W) x 44.5 (H) x 116 (D)mm Supplied Accessories: AC adapter/charger, AC Cord, DC Cord, Battery (5400mAH), Wireless remote controller (Button-type battery), Microphone holder, Eye cup, Shoulder strap, Ferrite core, Component Video cable, Pin-BNC conversion plug, P2 card software driver install (CD-ROM ) *1: For the precise recording rate, multiply...
..., AC Adapter, and Other packages LCD Monitor: 3.5 inches, LCD color Monitor, 210,000 pixels Viewfinder: 0.44 inches, LCD color Viewfinder, 235,000 pixels AC Adapter: Weight: 160g, Dimensions: 70 (W) x 44.5 (H) x 116 (D)mm Supplied Accessories: AC adapter/charger, AC Cord, DC Cord, Battery (5400mAH), Wireless remote controller (Button-type battery), Microphone holder, Eye cup, Shoulder strap, Ferrite core, Component Video cable, Pin-BNC conversion plug, P2 card software driver install (CD-ROM ) *1: For the precise recording rate, multiply...


