

AJCA910 User Guide
Page 1
P Operating Instructions Printed in Japan VQT9058-1 P F1000W @ Audio 4CH Camera Adapter AJ-
P Operating Instructions Printed in Japan VQT9058-1 P F1000W @ Audio 4CH Camera Adapter AJ-
AJCA910 User Guide
Page 2
... ANNOYING INTERFERENCE, USE THE RECOMMENDED ACCESSORIES ONLY. NO USER SERVICEABLE PARTS INSIDE. CAUTION: TO REDUCE THE RISK OF FIRE OR SHOCK HAZARD, REFER MOUNTING OF THE OPTIONAL INTERFACE BOARD TO QUALIFIED SERVICE PERSONNEL. indicates safety information. 2 CAUTION: TO REDUCE THE RISK OF FIRE OR SHOCK HAZARD, REFER CHANGE OF SWITCH SETTING INSIDE THE UNIT TO QUALIFIED SERVICE PERSONNEL. The lightning flash with arrowhead symbol...
... ANNOYING INTERFERENCE, USE THE RECOMMENDED ACCESSORIES ONLY. NO USER SERVICEABLE PARTS INSIDE. CAUTION: TO REDUCE THE RISK OF FIRE OR SHOCK HAZARD, REFER MOUNTING OF THE OPTIONAL INTERFACE BOARD TO QUALIFIED SERVICE PERSONNEL. indicates safety information. 2 CAUTION: TO REDUCE THE RISK OF FIRE OR SHOCK HAZARD, REFER CHANGE OF SWITCH SETTING INSIDE THE UNIT TO QUALIFIED SERVICE PERSONNEL. The lightning flash with arrowhead symbol...
AJCA910 User Guide
Page 3
... the limits for information on how to recycle this battery. This equipment generates, uses, and can radiate radio frequency energy and, if not installed and used in which case the user will be required to correct the interference at his own expense. Please call 1-800-8-BATTERY for a class A digital device, pursuant to Part 15 of the FCC Rules. Operation of the FCC...
... the limits for information on how to recycle this battery. This equipment generates, uses, and can radiate radio frequency energy and, if not installed and used in which case the user will be required to correct the interference at his own expense. Please call 1-800-8-BATTERY for a class A digital device, pursuant to Part 15 of the FCC Rules. Operation of the FCC...
AJCA910 User Guide
Page 4
Contents Models Supported 4 Specifications 4 Parts and Their Functions 5 Attachment to Camera 7 Models Supported Camera recorders O AJ-D910WA, AJ-D900W, AJ-D900WA AJ-PD900W, AJ-PD900WA Specifications Power supply: DC 12 V (11 V-17 V) Power consumption: 7 W (including the optional board) Ambient operating temperature: 0°C to +40°C Storage temperature: -20°C to +60°C Ambient operating humidity: Less than 85% (relative humidity) Audio sampling frequency: 48 kHz (synchronized with video) Audio quantizing: 16 bits 4
Contents Models Supported 4 Specifications 4 Parts and Their Functions 5 Attachment to Camera 7 Models Supported Camera recorders O AJ-D910WA, AJ-D900W, AJ-D900WA AJ-PD900W, AJ-PD900WA Specifications Power supply: DC 12 V (11 V-17 V) Power consumption: 7 W (including the optional board) Ambient operating temperature: 0°C to +40°C Storage temperature: -20°C to +60°C Ambient operating humidity: Less than 85% (relative humidity) Audio sampling frequency: 48 kHz (synchronized with video) Audio quantizing: 16 bits 4
AJCA910 User Guide
Page 5
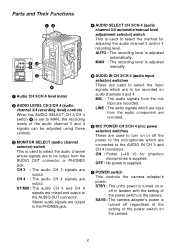
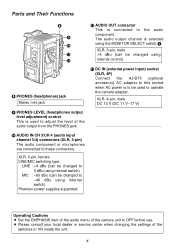
... to the AUDIO OUT connector. Stereo audio signals are output to the PHONES jack. 4 AUDIO SELECT CH 3/CH 4 (audio channel 3/4 automatic/manual level adjustment selector) switch This is used to be output from the audio component are recorded. 6 MIC POWER CH 3/CH 4 (mic power selector) switches These are used to turn on or off in tandem with the setting of the power switch on the camera. 5 Parts and Their Functions 12 POWER STBY SAVE AUDIO IN MIC LINE CH 3 CH 4 MIC POWER ON OFF 53 6 7 4 1 Audio CH 3/CH 4 level meter 2 AUDIO LEVEL CH 3/CH 4 (audio channel 3/4 recording level...
... to the AUDIO OUT connector. Stereo audio signals are output to the PHONES jack. 4 AUDIO SELECT CH 3/CH 4 (audio channel 3/4 automatic/manual level adjustment selector) switch This is used to be output from the audio component are recorded. 6 MIC POWER CH 3/CH 4 (mic power selector) switches These are used to turn on or off in tandem with the setting of the power switch on the camera. 5 Parts and Their Functions 12 POWER STBY SAVE AUDIO IN MIC LINE CH 3 CH 4 MIC POWER ON OFF 53 6 7 4 1 Audio CH 3/CH 4 level meter 2 AUDIO LEVEL CH 3/CH 4 (audio channel 3/4 recording level...
AJCA910 User Guide
Page 6
... dBu using internal switch) Phantom power supplies supported. O Please consult your local dealer or service center when changing the settings of the camera unit to operate the camera adapter. Operating Cautions O Set the EMPHASIS item of the audio menu of the switches or VR inside the unit. 6 XLR, 3-pin, female LINE/MIC switching type LINE : +4 dBu (can be changed using internal control) 8 PHONES (headphones) jack Stereo mini jack < DC IN (external power input) socket (XLR, 4P) Connect the AJ-B75 (optional accessory) AC adapter to...
... dBu using internal switch) Phantom power supplies supported. O Please consult your local dealer or service center when changing the settings of the camera unit to operate the camera adapter. Operating Cautions O Set the EMPHASIS item of the audio menu of the switches or VR inside the unit. 6 XLR, 3-pin, female LINE/MIC switching type LINE : +4 dBu (can be changed using internal control) 8 PHONES (headphones) jack Stereo mini jack < DC IN (external power input) socket (XLR, 4P) Connect the AJ-B75 (optional accessory) AC adapter to...
AJCA910 User Guide
Page 7
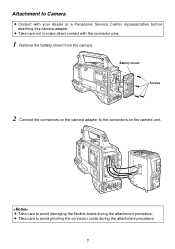
O Take care to avoid damaging the flexible board during the attachment procedure. 7 Attachment to Camera O Consult with the connector pins. 1 Remove the battery mount from the camera. O Take care to avoid pinching the connector cords during the attachment procedure. Battery mount Screws 2 Connect the connectors on the camera unit. O Take care not to the connectors on the camera adapter to make direct contact with your dealer or a Panasonic Service Center representative before attaching this camera adapter.
O Take care to avoid damaging the flexible board during the attachment procedure. 7 Attachment to Camera O Consult with the connector pins. 1 Remove the battery mount from the camera. O Take care to avoid pinching the connector cords during the attachment procedure. Battery mount Screws 2 Connect the connectors on the camera unit. O Take care not to the connectors on the camera adapter to make direct contact with your dealer or a Panasonic Service Center representative before attaching this camera adapter.
AJCA910 User Guide
Page 8
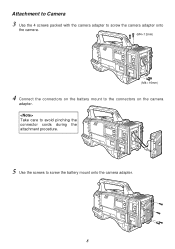
Attachment to Camera 3 Use the 4 screws packed with the camera adapter to screw the camera adapter onto the camera. (M4a12mm) (M4a16mm) 4 Connect the connectors on the battery mount to screw the battery mount onto the camera adapter. 8 Take care to avoid pinching the connector cords during the attachment procedure. 5 Use the screws to the connectors on the camera adapter.
Attachment to Camera 3 Use the 4 screws packed with the camera adapter to screw the camera adapter onto the camera. (M4a12mm) (M4a16mm) 4 Connect the connectors on the battery mount to screw the battery mount onto the camera adapter. 8 Take care to avoid pinching the connector cords during the attachment procedure. 5 Use the screws to the connectors on the camera adapter.


