
AJD250 User Guide
Page 2
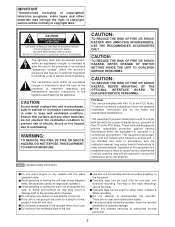
... the FCC Rules. To assure continued compliance follow the attached installation instructions and do not make any objects into the video cassette holder. $ Avoid operating or leaving the unit near strong magnetic fields. Two-way or two-track recordings cannot be made. $ Cassette tape can be contrary to copyright laws." NO USER SERVICEABLE PARTS INSIDE. WARNING: TO REDUCE THE RISK OF FIRE OR SHOCK...
... the FCC Rules. To assure continued compliance follow the attached installation instructions and do not make any objects into the video cassette holder. $ Avoid operating or leaving the unit near strong magnetic fields. Two-way or two-track recordings cannot be made. $ Cassette tape can be contrary to copyright laws." NO USER SERVICEABLE PARTS INSIDE. WARNING: TO REDUCE THE RISK OF FIRE OR SHOCK...
AJD250 User Guide
Page 3
... the power/inserting a cassette 11 STOP mode 12 Recording 13 Pause/recording (frame-to-frame continuity) . . . . 14 Playback 14 Cue/review 14 Still picture playback 14 Frame by frame advance 15 Audio switching 15 REC CHECK 15 Repeat playback 16 Time Codes and User's Bit 18 Time codes 18 User's bit 18 Setting the time code 19 Setting the user's bit 19 Playing back the time code/user's bit 20 Superimposed Screens 21 Setup (Initial Settings 23 How to perform the settings using...
... the power/inserting a cassette 11 STOP mode 12 Recording 13 Pause/recording (frame-to-frame continuity) . . . . 14 Playback 14 Cue/review 14 Still picture playback 14 Frame by frame advance 15 Audio switching 15 REC CHECK 15 Repeat playback 16 Time Codes and User's Bit 18 Time codes 18 User's bit 18 Setting the time code 19 Setting the user's bit 19 Playing back the time code/user's bit 20 Superimposed Screens 21 Setup (Initial Settings 23 How to perform the settings using...
AJD250 User Guide
Page 4
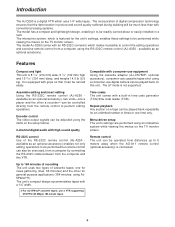
... the setup menus. 2-channel digital audio with high sound quality Time codes The unit comes with a built-in picture and sound quality suffered during dubbing will be much less than with consumer-use equipment Using the cassette adapter (AJ-CS750P: optional accessory), consumer-use a VTR supporting DVCPRO (25 Mbps) 184 minute tapes. 4 Encoder control The video output signals can be adjusted using the items on a tape can be played back repeatedly for an unlimited number of cassette tapes: one a player...
... the setup menus. 2-channel digital audio with high sound quality Time codes The unit comes with a built-in picture and sound quality suffered during dubbing will be much less than with consumer-use equipment Using the cassette adapter (AJ-CS750P: optional accessory), consumer-use a VTR supporting DVCPRO (25 Mbps) 184 minute tapes. 4 Encoder control The video output signals can be adjusted using the items on a tape can be played back repeatedly for an unlimited number of cassette tapes: one a player...

AJD250 User Guide
Page 6
... CTL display, the display will be set when the menu settings are supplied to the video signal input connector. Blue: This lamp lights when the error rate for either the video or audio playback signals have been set to be performed or when the unit is used for repeat playback and it indicates the audio input signal levels; OPTION: Set here to be controlled from the optional board and record them. @ BEGIN button This button sets...
... CTL display, the display will be set when the menu settings are supplied to the video signal input connector. Blue: This lamp lights when the error rate for either the video or audio playback signals have been set to be performed or when the unit is used for repeat playback and it indicates the audio input signal levels; OPTION: Set here to be controlled from the optional board and record them. @ BEGIN button This button sets...
AJD250 User Guide
Page 7
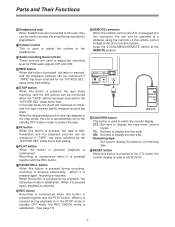
..., and the still picture can be used to adjust the recording level for the "S/F/R EE SEL" setup menu item. Parts and Their Functions D Headphones jack When headphones are used to monitor the sound being recorded or played back. F Audio recording level controls These controls are connected to protect the tape. CTL: Set here to display the user's bit. TC: Set here to display the amount of the unit's function buttons. L REC button Recording is commenced when this...
..., and the still picture can be used to adjust the recording level for the "S/F/R EE SEL" setup menu item. Parts and Their Functions D Headphones jack When headphones are used to monitor the sound being recorded or played back. F Audio recording level controls These controls are connected to protect the tape. CTL: Set here to display the user's bit. TC: Set here to display the amount of the unit's function buttons. L REC button Recording is commenced when this...
AJD250 User Guide
Page 10
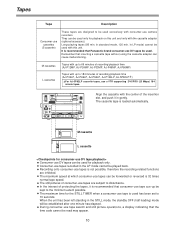
... POWER DIGITAL VIDEO CASSETTE INPUT SELECT S-VIDEO LINE OPTIONAUDIO REC LEVEL BEGIN END CH 1 AUDIO OUT CH 2 SELECT CH 3 CH 4 REW MODE Digital Video Cassette Recorder MENU LOCAL REMOTE STOP FF DOWN MENU UP PLAY PAUSE/STILL - DATA + REC SET RESET COUNTER REMOTE Align the cassette with the cassette adapter (optional accessory). O Recording onto consumer-use tape is used only for the STILL TIMER when a consumer-use tapes is 32 times normal tape speed. in the LP mode cannot be used for playback only. O Consumer-use tapes recorded in standard mode...
... POWER DIGITAL VIDEO CASSETTE INPUT SELECT S-VIDEO LINE OPTIONAUDIO REC LEVEL BEGIN END CH 1 AUDIO OUT CH 2 SELECT CH 3 CH 4 REW MODE Digital Video Cassette Recorder MENU LOCAL REMOTE STOP FF DOWN MENU UP PLAY PAUSE/STILL - DATA + REC SET RESET COUNTER REMOTE Align the cassette with the cassette adapter (optional accessory). O Recording onto consumer-use tape is used only for the STILL TIMER when a consumer-use tapes is 32 times normal tape speed. in the LP mode cannot be used for playback only. O Consumer-use tapes recorded in standard mode...
AJD250 User Guide
Page 11
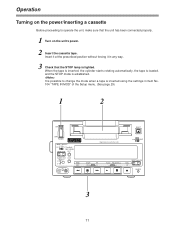
DATA + REC SET RESET COUNTER REMOTE 3 11 Operation Turning on the unit's power. 2 Insert the cassette tape. Insert it at the prescribed position without forcing it in Item No. 104 "TAPE IN MOD" of the Setup menu. (See page 29) 1 2 ON EJECT OFF POWER DIGITAL VIDEO CASSETTE INPUT SELECT S-VIDEO LINE OPTION AUDIO REC LEVEL BEGIN END CH 1 AUDIO OUT CH 2 SELECT CH 3 CH 4 REW MODE Digital Video Cassette Recorder MENU LOCAL REMOTE STOP FF DOWN MENU UP PLAY PAUSE/STILL - It...
DATA + REC SET RESET COUNTER REMOTE 3 11 Operation Turning on the unit's power. 2 Insert the cassette tape. Insert it at the prescribed position without forcing it in Item No. 104 "TAPE IN MOD" of the Setup menu. (See page 29) 1 2 ON EJECT OFF POWER DIGITAL VIDEO CASSETTE INPUT SELECT S-VIDEO LINE OPTION AUDIO REC LEVEL BEGIN END CH 1 AUDIO OUT CH 2 SELECT CH 3 CH 4 REW MODE Digital Video Cassette Recorder MENU LOCAL REMOTE STOP FF DOWN MENU UP PLAY PAUSE/STILL - It...
AJD250 User Guide
Page 12
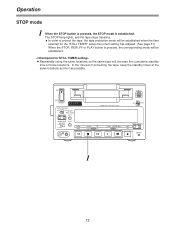
... MODE Digital Video Cassette Recorder MENU LOCAL REMOTE STOP FF DOWN MENU UP PLAY PAUSE/STILL - O Repeatedly using the same locations on the same tape will be established. O In order to protect the tape, the tape protection mode will be established when the time selected for the "STILL TIMER" setup menu item setting has elapsed. (See page 31) When the STOP, REW, FF or PLAY button is established. DATA + REC SET RESET COUNTER REMOTE 1 12 Operation...
... MODE Digital Video Cassette Recorder MENU LOCAL REMOTE STOP FF DOWN MENU UP PLAY PAUSE/STILL - O Repeatedly using the same locations on the same tape will be established. O In order to protect the tape, the tape protection mode will be established when the time selected for the "STILL TIMER" setup menu item setting has elapsed. (See page 31) When the STOP, REW, FF or PLAY button is established. DATA + REC SET RESET COUNTER REMOTE 1 12 Operation...
AJD250 User Guide
Page 13
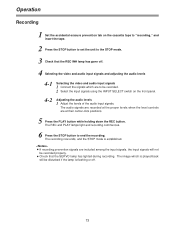
... input signals using the INPUT SELECT switch on the cassette tape to "recording," and insert the tape. 2 Press the STOP button to set the unit to the STOP mode. 3 Check that the SERVO lamp has lighted during recording. The REC and PLAY lamps light and recording commences. 6 Press the STOP button to be disturbed if the lamp is flashing or off . 4 Selecting the video and audio input signals and adjusting the audio...
... input signals using the INPUT SELECT switch on the cassette tape to "recording," and insert the tape. 2 Press the STOP button to set the unit to the STOP mode. 3 Check that the SERVO lamp has lighted during recording. The REC and PLAY lamps light and recording commences. 6 Press the STOP button to be disturbed if the lamp is flashing or off . 4 Selecting the video and audio input signals and adjusting the audio...
AJD250 User Guide
Page 14
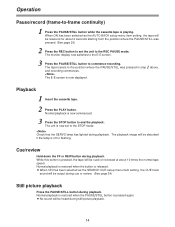
... setup menu item setting, the CUE track sound will be disturbed if the lamp is playing. The monitor display now switches to the E-E screen. 3 Press the PAUSE/STILL button to -frame continuity) 1 Press the PAUSE/STILL button while the cassette tape is off or flashing. Check that the SERVO lamp has lighted during playback. Cue/review Hold down the FF or REW button during playback. O No sound will be output...
... setup menu item setting, the CUE track sound will be disturbed if the lamp is playing. The monitor display now switches to the E-E screen. 3 Press the PAUSE/STILL button to -frame continuity) 1 Press the PAUSE/STILL button while the cassette tape is off or flashing. Check that the SERVO lamp has lighted during playback. Cue/review Hold down the FF or REW button during playback. O No sound will be output...
AJD250 User Guide
Page 16
... of the settings, the time code setting will be set. 4 Select the digit to be changed (blinking display) using the UP button (FF button) or DOWN button (STOP button). The settings are now stored in CTL mode, 00:00:00:00 will be selected. button (PLAY button). 6 Press the SET button (REC button) upon completion of the tape which serves as "00." 5 The value is in the memory. 7 Set the LOCAL/MENU/REMOTE switch to...
... of the settings, the time code setting will be set. 4 Select the digit to be changed (blinking display) using the UP button (FF button) or DOWN button (STOP button). The settings are now stored in CTL mode, 00:00:00:00 will be selected. button (PLAY button). 6 Press the SET button (REC button) upon completion of the tape which serves as "00." 5 The value is in the memory. 7 Set the LOCAL/MENU/REMOTE switch to...
AJD250 User Guide
Page 17
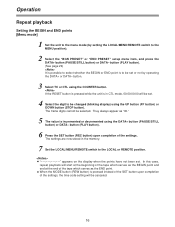
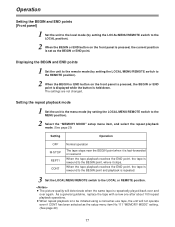
... when it stops. Displaying the BEGIN and END points 1 Set the unit to the remote mode (by setting the LOCAL/MENU/REMOTE switch to be initiated using a consumer-use tape, the unit will deteriorate when the same tape is set as the setup menu item No.111 "MEMORY MODE" setting. (See page 29) 17 The settings are not changed. Setting the repeat playback mode 1 Set the unit to the menu mode (by setting the LOCAL/MENU/REMOTE switch to the LOCAL...
... when it stops. Displaying the BEGIN and END points 1 Set the unit to the remote mode (by setting the LOCAL/MENU/REMOTE switch to be initiated using a consumer-use tape, the unit will deteriorate when the same tape is set as the setup menu item No.111 "MEMORY MODE" setting. (See page 29) 17 The settings are not changed. Setting the repeat playback mode 1 Set the unit to the menu mode (by setting the LOCAL/MENU/REMOTE switch to the LOCAL...
AJD250 User Guide
Page 19
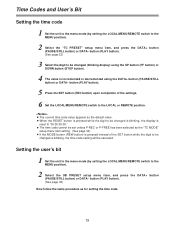
... as for setting the time code. 19 Time Codes and User's Bit Setting the time code 1 Set the unit to the menu mode (by setting the LOCAL/MENU/REMOTE switch to the MENU position). 2 Select the "TC PRESET" setup menu item, and press the DATA+ button (PAUSE/STILL button) or DATA- O The time code cannot be changed is reset to the LOCAL or REMOTE position. button (PLAY button). (See page 32) 3 Select the digit to be set unless P-REC or P-FREE has...
... as for setting the time code. 19 Time Codes and User's Bit Setting the time code 1 Set the unit to the menu mode (by setting the LOCAL/MENU/REMOTE switch to the MENU position). 2 Select the "TC PRESET" setup menu item, and press the DATA+ button (PAUSE/STILL button) or DATA- O The time code cannot be changed is reset to the LOCAL or REMOTE position. button (PLAY button). (See page 32) 3 Select the digit to be set unless P-REC or P-FREE has...
AJD250 User Guide
Page 23
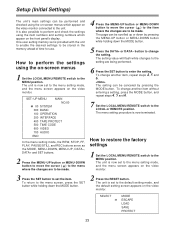
... item where the changes are being performed. 6 Press the SET button to the MENU position. SELECT MODE ESCAPE LOAD SAVE PROTECT 23 Setup (Initial Settings) The unit's main settings can be performed and checked using the on-screen menus which appear on the front panel's display. One user setting memory set to perform and check the settings using the on the video monitor. 3 Press the SET button to change another item, repeat steps 4, 5 and...
... item where the changes are being performed. 6 Press the SET button to the MENU position. SELECT MODE ESCAPE LOAD SAVE PROTECT 23 Setup (Initial Settings) The unit's main settings can be performed and checked using the on-screen menus which appear on the front panel's display. One user setting memory set to perform and check the settings using the on the video monitor. 3 Press the SET button to change another item, repeat steps 4, 5 and...
AJD250 User Guide
Page 25
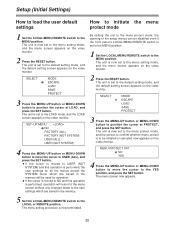
... button or MENU-DOWN button to move the cursor to the LOAD mode, and the LOAD screen appears on the video monitor. The unit is moved to the YES position, and press the SET button. Setup (Initial Settings) How to load the user default settings How to initiate the menu protect mode 1 Set the LOCAL/MENU/REMOTE switch to the menu setting mode, and the menu screen appears on the video monitor. 2 Press the RESET button. The unit is performed, operation will be used...
... button or MENU-DOWN button to move the cursor to the LOAD mode, and the LOAD screen appears on the video monitor. The unit is moved to the YES position, and press the SET button. Setup (Initial Settings) How to load the user default settings How to initiate the menu protect mode 1 Set the LOCAL/MENU/REMOTE switch to the menu setting mode, and the menu screen appears on the video monitor. 2 Press the RESET button. The unit is performed, operation will be used...
AJD250 User Guide
Page 26
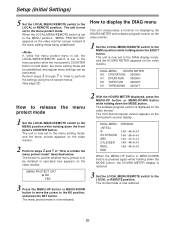
... the EJECT button. The menu protect mode is displayed on the front panel's counter display. DIAG-MENU HOURS METER H0 OPERATION 00000H H1 DRUM RUN 00000H H2 TAPE RUN 00000H H3 THREADING 00000T How to release the menu protect mode 1 Set the LOCAL/MENU/REMOTE switch to the MENU position while holding down the MODE button, the HOURS METER display is now set to the menu setting mode, and the menu screen appears on the video monitor screen instead...
... the EJECT button. The menu protect mode is displayed on the front panel's counter display. DIAG-MENU HOURS METER H0 OPERATION 00000H H1 DRUM RUN 00000H H2 TAPE RUN 00000H H3 THREADING 00000T How to release the menu protect mode 1 Set the LOCAL/MENU/REMOTE switch to the MENU position while holding down the MODE button, the HOURS METER display is now set to the menu setting mode, and the menu screen appears on the video monitor screen instead...
AJD250 User Guide
Page 51
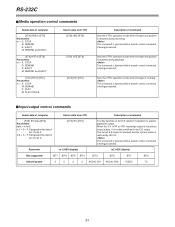
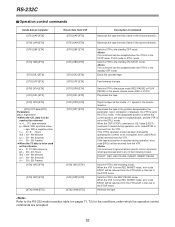
... playback. Sets the VTR's operation mode when the tape end position is being processed. Sets the VTR's operation mode when the tape is restored by IEV:00. This command is ignored while a search control command is reached during recording. m2 = 0 F: Designates the data of bit 3 to bit 0. [STX] IEV [ETX] Forcibly switches to the E-E (electric modulation to bit 4. Parameter m1 (HEX display...
... playback. Sets the VTR's operation mode when the tape end position is being processed. Sets the VTR's operation mode when the tape is restored by IEV:00. This command is ignored while a search control command is reached during recording. m2 = 0 F: Designates the data of bit 3 to bit 0. [STX] IEV [ETX] Forcibly switches to the E-E (electric modulation to bit 4. Parameter m1 (HEX display...
AJD250 User Guide
Page 52
... REC PAUSE mode. Ejects the cassette tape. Sets the VTR to the standby OFF mode. If the VTR's operation mode has been changed by frame in the STOP mode, PLAY mode or STILL mode. This command is ignored while a search control command is being processed and in the reverse direction. Sets the VTR to be used as the reference w = S: TC data reference gh = 00 23: Hours mm = 00...
... REC PAUSE mode. Ejects the cassette tape. Sets the VTR to the standby OFF mode. If the VTR's operation mode has been changed by frame in the STOP mode, PLAY mode or STILL mode. This command is ignored while a search control command is being processed and in the reverse direction. Sets the VTR to be used as the reference w = S: TC data reference gh = 00 23: Hours mm = 00...
AJD250 User Guide
Page 64
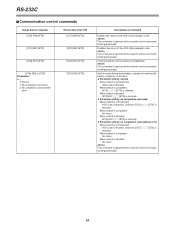
...[ETX] is established. This command is ignored while a search control command is returned. When search is aborted: [STX] ER((( [ETX] is being processed. OParameter setting: no error When search is commenced: ACK code is returned, and then [STX] ((( [ETX] is being ...code. This command is ignored while a search control command is returned. When search is completed: No return. When search is completed: No return. This command is ignored while a search control command is returned. OParameter setting: normal When search is commenced: ACK code is being processed. Sets the send timing...
...[ETX] is established. This command is ignored while a search control command is returned. When search is aborted: [STX] ER((( [ETX] is being processed. OParameter setting: no error When search is commenced: ACK code is returned, and then [STX] ((( [ETX] is being ...code. This command is ignored while a search control command is returned. When search is completed: No return. When search is completed: No return. This command is ignored while a search control command is returned. OParameter setting: normal When search is commenced: ACK code is being processed. Sets the send timing...
AJD250 User Guide
Page 77
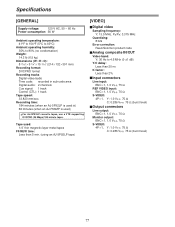
...) Weight: 14.3 lb (6.5 kg) Dimensions (WaHaD): 8 7/16˝a5 1/4˝a15 7/16˝ (214a132a391 mm) Recording format: DVCPRO format Recording tracks Digital video/audio Time code: recorded in sub-code area Digital audio: 2 channels Cue signal: 1 track Control (CTL): 1 track Tape speed: 33.820 mm/sec. Recording time: 184 minutes (when an AJ-5P92LP is used ) 66 minutes (when an AJ-P66MP is used : 1/4˝ thin magnetic layer metal tapes FF/REW time: Less than 2% $Input connectors Line input...
...) Weight: 14.3 lb (6.5 kg) Dimensions (WaHaD): 8 7/16˝a5 1/4˝a15 7/16˝ (214a132a391 mm) Recording format: DVCPRO format Recording tracks Digital video/audio Time code: recorded in sub-code area Digital audio: 2 channels Cue signal: 1 track Control (CTL): 1 track Tape speed: 33.820 mm/sec. Recording time: 184 minutes (when an AJ-5P92LP is used ) 66 minutes (when an AJ-P66MP is used : 1/4˝ thin magnetic layer metal tapes FF/REW time: Less than 2% $Input connectors Line input...


