Installation Guide
Page 7
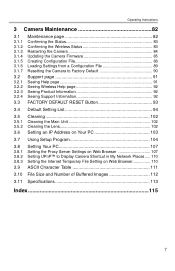
Operating Instructions 3 Camera Maintenance 82 3.1 3.1.1 3.1.2 3.1.3 3.1.4 3.1.5 3.1.6 3.1.7 3.2 3.2.1 3.2.2 3.2.3 3.2.4 3.3 Maintenance page 82 Confirming the Status 83 Confirming the Wireless Status 83 Restarting the Camera 84 Updating the Camera Firmware 85 Creating Configuration File 88 Loading Settings from a Configuration File 89 Resetting the Camera to Factory Default 90 Support page 91 Seeing Help page 91 ...
Operating Instructions 3 Camera Maintenance 82 3.1 3.1.1 3.1.2 3.1.3 3.1.4 3.1.5 3.1.6 3.1.7 3.2 3.2.1 3.2.2 3.2.3 3.2.4 3.3 Maintenance page 82 Confirming the Status 83 Confirming the Wireless Status 83 Restarting the Camera 84 Updating the Camera Firmware 85 Creating Configuration File 88 Loading Settings from a Configuration File 89 Resetting the Camera to Factory Default 90 Support page 91 Seeing Help page 91 ...
Installation Guide
Page 13
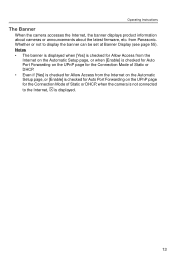
... Banner Display (see page 55). Whether or not to the Internet, is checked for Auto Port Forwarding on the UPnP page for Allow Access from Panasonic. Operating Instructions The Banner When the camera accesses the Internet, the banner displays product information about cameras or announcements about the latest...
... Banner Display (see page 55). Whether or not to the Internet, is checked for Auto Port Forwarding on the UPnP page for Allow Access from Panasonic. Operating Instructions The Banner When the camera accesses the Internet, the banner displays product information about cameras or announcements about the latest...
Installation Guide
Page 25
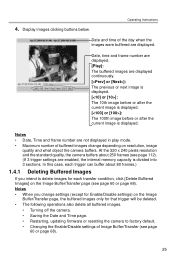
... deleted. • The following operations also delete all buffered images. • Turning off the camera. • Saving the Date and Time page. • Restarting, updating firmware or resetting the camera to delete images for Enable/Disable settings) on the Image Buffer/Transfer page (see page 60 or page 68). At the...
... deleted. • The following operations also delete all buffered images. • Turning off the camera. • Saving the Date and Time page. • Restarting, updating firmware or resetting the camera to delete images for Enable/Disable settings) on the Image Buffer/Transfer page (see page 60 or page 68). At the...

Installation Guide
Page 56
..., Simplified Chinese or Japanese. Banner Display • When the camera accesses the Internet, the banner displays product information about cameras or announcements about the latest firmware, etc. Refresh Interval • Select a refresh interval. (Motion-60-second interval) Limit Continuous Motion JPEG • Limit time of • Set the time to change...
..., Simplified Chinese or Japanese. Banner Display • When the camera accesses the Internet, the banner displays product information about cameras or announcements about the latest firmware, etc. Refresh Interval • Select a refresh interval. (Motion-60-second interval) Limit Continuous Motion JPEG • Limit time of • Set the time to change...
Installation Guide
Page 67
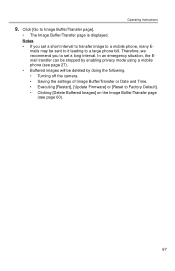
... by doing the following. • Turning off the camera. • Saving the settings of Image Buffer/Transfer or Date and Time. • Executing [Restart], [Update Firmware] or [Reset to a large phone bill. Therefore, we recommend you set a long interval. Click [Go to a mobile phone, many E-
... by doing the following. • Turning off the camera. • Saving the settings of Image Buffer/Transfer or Date and Time. • Executing [Restart], [Update Firmware] or [Reset to a large phone bill. Therefore, we recommend you set a long interval. Click [Go to a mobile phone, many E-
Installation Guide
Page 77
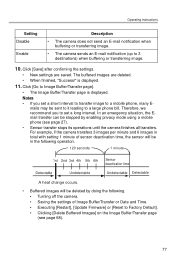
... by doing the following. • Turning off the camera. • Saving the settings of Image Buffer/Transfer or Date and Time. • Executing [Restart], [Update Firmware] or [Reset to a large phone bill. In an emergency situation, the Email transfer can be deleted by enabling privacy mode using a mobile phone (see page...
... by doing the following. • Turning off the camera. • Saving the settings of Image Buffer/Transfer or Date and Time. • Executing [Restart], [Update Firmware] or [Reset to a large phone bill. In an emergency situation, the Email transfer can be deleted by enabling privacy mode using a mobile phone (see page...

Installation Guide
Page 82
Operating Instructions 3 Camera Maintenance 3.1 Maintenance page (1) (2) (3) (4) (5) (6) (7) Maintenance (1) Status Displays the camera settings and status (see page 83). (2) Wireless Status Displays wireless information (see page 83). (3) Restart Restarts the camera (see page 84). (4) Update Firmware Updates the camera firmware (see page 85). (5) Save Settings Creates a configuration file (see page 88). (6) Load Settings Loads settings from a configuration file (see page 89). (7) Reset to Factory Resets the camera to its default settings (see page 90). Default 82
Operating Instructions 3 Camera Maintenance 3.1 Maintenance page (1) (2) (3) (4) (5) (6) (7) Maintenance (1) Status Displays the camera settings and status (see page 83). (2) Wireless Status Displays wireless information (see page 83). (3) Restart Restarts the camera (see page 84). (4) Update Firmware Updates the camera firmware (see page 85). (5) Save Settings Creates a configuration file (see page 88). (6) Load Settings Loads settings from a configuration file (see page 89). (7) Reset to Factory Resets the camera to its default settings (see page 90). Default 82

Installation Guide
Page 85
... Camera support website at http://panasonic.co.jp/pcc/products/en/netwkcam/, and save it into the camera. Click [Update Firmware] on your PC. 2. Notes • Do not turn off the power during firmware update. • All buffered images will be deleted after the firmware update. • The firmware version is available, install it on...
... Camera support website at http://panasonic.co.jp/pcc/products/en/netwkcam/, and save it into the camera. Click [Update Firmware] on your PC. 2. Notes • Do not turn off the power during firmware update. • All buffered images will be deleted after the firmware update. • The firmware version is available, install it on...
Installation Guide
Page 86
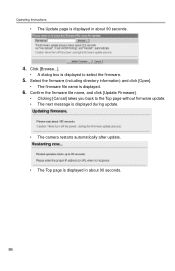
... message is displayed during update. • The camera restarts automatically after update. • The Top page is displayed in about 90 seconds. 86 Select the firmware (including directory information) and click [Open]. • The firmware file name is displayed. 6. Operating Instructions • The Update page is displayed in about 90 seconds. 4.
... message is displayed during update. • The camera restarts automatically after update. • The Top page is displayed in about 90 seconds. 86 Select the firmware (including directory information) and click [Open]. • The firmware file name is displayed. 6. Operating Instructions • The Update page is displayed in about 90 seconds. 4.

Installation Guide
Page 87
Updated version • If the version number is updated, the firmware update is updated. Confirm that the version number on the Top page is complete. 87 Operating Instructions 7.
Updated version • If the version number is updated, the firmware update is updated. Confirm that the version number on the Top page is complete. 87 Operating Instructions 7.
Installation Guide
Page 88
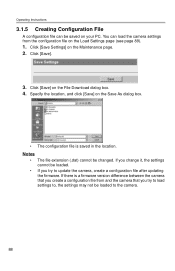
Click [Save] on the Save As dialog box. • The configuration file is a firmware version difference between the camera that you try to load settings to, the settings may not be loaded. • If you try to the camera. .... You can be changed. Click [Save]. 3. If you change it, the settings cannot be loaded to update the camera, create a configuration file after updating the firmware. Click [Save Settings] on the Load Settings page (see page 89). 1. Operating Instructions 3.1.5 Creating Configuration File A configuration file can load the camera settings from and...
Click [Save] on the Save As dialog box. • The configuration file is a firmware version difference between the camera that you try to load settings to, the settings may not be loaded. • If you try to the camera. .... You can be changed. Click [Save]. 3. If you change it, the settings cannot be loaded to update the camera, create a configuration file after updating the firmware. Click [Save Settings] on the Load Settings page (see page 89). 1. Operating Instructions 3.1.5 Creating Configuration File A configuration file can load the camera settings from and...
Installation Guide
Page 89
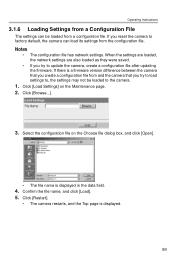
... Top page is displayed. 89 Click [Load Settings] on the Choose file dialog box, and click [Open]. • The file name is a firmware version difference between the camera that you create a configuration file from and the camera that you reset the camera to factory default, the camera can... be loaded to update the camera, create a configuration file after updating the firmware. Click [Browse...]. 3. Operating Instructions 3.1.6 Loading Settings from a Configuration File The settings can load its settings from the configuration file.
... Top page is displayed. 89 Click [Load Settings] on the Choose file dialog box, and click [Open]. • The file name is a firmware version difference between the camera that you create a configuration file from and the camera that you reset the camera to factory default, the camera can... be loaded to update the camera, create a configuration file after updating the firmware. Click [Browse...]. 3. Operating Instructions 3.1.6 Loading Settings from a Configuration File The settings can load its settings from the configuration file.

Installation Guide
Page 117
U Update Firmware page 85 UPnP page 40 V Viewnetcam.com Service 41 W Web Browser 4 Wireless 36 Wireless Help page 92 Operating Instructions 117
U Update Firmware page 85 UPnP page 40 V Viewnetcam.com Service 41 W Web Browser 4 Wireless 36 Wireless Help page 92 Operating Instructions 117
