
Installation Guide
Page 1
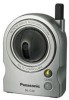
BL-C30 Please read this manual before using and save this manual for future reference. Operating Instructions Network Camera Model No.
BL-C30 Please read this manual before using and save this manual for future reference. Operating Instructions Network Camera Model No.

Installation Guide
Page 2
... differences by E-mail or FTP*2. • Color night view mode (auto-adjusted) enables the camera to display images even in flexible mounting. Operating Instructions Main Features Wireless Communication Network Camera corresponds to the wireless system based on or off with a single touch. Privacy mode •... Privacy mode hides the lens into the unit to +10 °. Monitoring from PC or mobile phone • The camera images can move the ...
... differences by E-mail or FTP*2. • Color night view mode (auto-adjusted) enables the camera to display images even in flexible mounting. Operating Instructions Main Features Wireless Communication Network Camera corresponds to the wireless system based on or off with a single touch. Privacy mode •... Privacy mode hides the lens into the unit to +10 °. Monitoring from PC or mobile phone • The camera images can move the ...

Installation Guide
Page 3
...manually. Multi-Language Display Top page, Single Camera and Multi-Camera page can be displayed in English. 3 See Panasonic Network Camera support website at http://panasonic.co.jp/pcc/products/en/netwkcam/ for Panasonic Network Camera. Supporting Viewnetcam.com service Viewnetcam.com service...for more information. If you to access the camera over the Internet with a UPnPTM enabled router, the camera automatically configures its network settings. * Some UPnPTM enabled routers cannot configure the camera automatically. Operating Instructions Easy installation using UPnPTM (...
...manually. Multi-Language Display Top page, Single Camera and Multi-Camera page can be displayed in English. 3 See Panasonic Network Camera support website at http://panasonic.co.jp/pcc/products/en/netwkcam/ for Panasonic Network Camera. Supporting Viewnetcam.com service Viewnetcam.com service...for more information. If you to access the camera over the Internet with a UPnPTM enabled router, the camera automatically configures its network settings. * Some UPnPTM enabled routers cannot configure the camera automatically. Operating Instructions Easy installation using UPnPTM (...

Installation Guide
Page 4
...the latest information about web browser. Abbreviations • UPnP is the abbreviation for "Universal Plug and Play". • "Network Camera" is called "Camera" in the United States and other countries. • Screen shots reprinted with permission from Microsoft Corporation. • All ...Web Browser Internet Explorer 6.0 or later (Not included on the Setup CDROM) Note See Panasonic Network Camera support website at http://panasonic.co.jp/pcc/products/en/netwkcam/ for the camera to work properly. Item Description Operating System Microsoft® Windows® XP, Microsoft®...
...the latest information about web browser. Abbreviations • UPnP is the abbreviation for "Universal Plug and Play". • "Network Camera" is called "Camera" in the United States and other countries. • Screen shots reprinted with permission from Microsoft Corporation. • All ...Web Browser Internet Explorer 6.0 or later (Not included on the Setup CDROM) Note See Panasonic Network Camera support website at http://panasonic.co.jp/pcc/products/en/netwkcam/ for the camera to work properly. Item Description Operating System Microsoft® Windows® XP, Microsoft®...
Installation Guide
Page 6
... 22 1.4 Viewing Buffered Image page 24 1.4.1 Deleting Buffered Images 25 1.5 Viewing Still Images on Your Mobile Phone 26 2 Various Camera Features 28 2.1 Using Camera Features 28 2.2 Connecting the Camera to Your Network 31 2.3 Using Wireless LAN 36 2.4 Using UPnP™ (Universal Plug and Play 40 2.5 Registering with the Viewnetcam.com service 41 2.6 Setting Date...
... 22 1.4 Viewing Buffered Image page 24 1.4.1 Deleting Buffered Images 25 1.5 Viewing Still Images on Your Mobile Phone 26 2 Various Camera Features 28 2.1 Using Camera Features 28 2.2 Connecting the Camera to Your Network 31 2.3 Using Wireless LAN 36 2.4 Using UPnP™ (Universal Plug and Play 40 2.5 Registering with the Viewnetcam.com service 41 2.6 Setting Date...
Installation Guide
Page 7
... 3.3 Maintenance page 82 Confirming the Status 83 Confirming the Wireless Status 83 Restarting the Camera 84 Updating the Camera Firmware 85 Creating Configuration File 88 Loading Settings from a Configuration File 89 Resetting the Camera to Factory Default 90 Support page 91 Seeing Help page 91 Seeing Wireless Help page 92...3.9 Setting Your PC 107 Setting the Proxy Server Settings on Web Browser 107 Setting UPnP™ to Display Camera Shortcut in My Network Places..... 110 Setting the Internet Temporary File Setting on Web Browser 110 ASCII Character Table 111 3.10 File Size...
... 3.3 Maintenance page 82 Confirming the Status 83 Confirming the Wireless Status 83 Restarting the Camera 84 Updating the Camera Firmware 85 Creating Configuration File 88 Loading Settings from a Configuration File 89 Resetting the Camera to Factory Default 90 Support page 91 Seeing Help page 91 Seeing Wireless Help page 92...3.9 Setting Your PC 107 Setting the Proxy Server Settings on Web Browser 107 Setting UPnP™ to Display Camera Shortcut in My Network Places..... 110 Setting the Internet Temporary File Setting on Web Browser 110 ASCII Character Table 111 3.10 File Size...
Installation Guide
Page 8
... (or URL):Port Number" on the address bar, and press [Enter] on your PC. 2. The Enter Network Password window is set , and click [OK]. See page 33 for details about port number. • If the camera image is 80 (default), you do not need to enter port number. http://192.168.0.253... displayed, and enter the user name and password that were set on the Security: Administrator page, the authentication window will not be displayed. 8 Operating Instructions 1 Camera Monitoring 1.1 Accessing the...
... (or URL):Port Number" on the address bar, and press [Enter] on your PC. 2. The Enter Network Password window is set , and click [OK]. See page 33 for details about port number. • If the camera image is 80 (default), you do not need to enter port number. http://192.168.0.253... displayed, and enter the user name and password that were set on the Security: Administrator page, the authentication window will not be displayed. 8 Operating Instructions 1 Camera Monitoring 1.1 Accessing the...
Installation Guide
Page 10
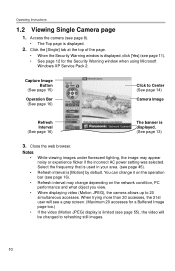
...8226; Refresh interval may appear noisy or experience flicker if the incorrect AC power setting was selected. Operating Instructions 1.2 Viewing Single Camera page 1. Access the camera (see page 55), the video will be changed to refreshing still images. 10 Close the web browser. Notes • ... viewing images under florescent lighting, the image may change it on the network condition, PC performance and what object you view. • When displaying video (Motion JPEG), the camera allows up to Center (See page 14) Camera Image Refresh Interval (See page 16) The banner is limited (see...
...8226; Refresh interval may appear noisy or experience flicker if the incorrect AC power setting was selected. Operating Instructions 1.2 Viewing Single Camera page 1. Access the camera (see page 55), the video will be changed to refreshing still images. 10 Close the web browser. Notes • ... viewing images under florescent lighting, the image may change it on the network condition, PC performance and what object you view. • When displaying video (Motion JPEG), the camera allows up to Center (See page 14) Camera Image Refresh Interval (See page 16) The banner is limited (see...
Installation Guide
Page 11
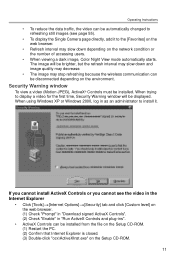
...-ROM. 11 The image will be displayed. If you cannot install ActiveX Controls or you cannot see page 55). • To display the Single Camera page directly, add it . Security Warning window To view a video (Motion JPEG), ActiveX® Controls must be brighter, but the refresh interval ...may slow down and image quality may decrease. • The image may slow down depending on the network condition or the number of accessing users. • When viewing a dark image, Color Night View mode automatically starts. When trying to display a ...
...-ROM. 11 The image will be displayed. If you cannot install ActiveX Controls or you cannot see page 55). • To display the Single Camera page directly, add it . Security Warning window To view a video (Motion JPEG), ActiveX® Controls must be brighter, but the refresh interval ...may slow down and image quality may decrease. • The image may slow down depending on the network condition or the number of accessing users. • When viewing a dark image, Color Night View mode automatically starts. When trying to display a ...
Installation Guide
Page 12
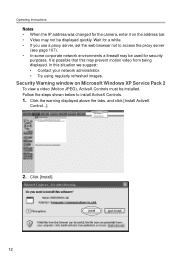
... Instructions Notes • When the IP address was changed for the camera, enter it on Microsoft Windows XP Service Pack 2 To view a...be displayed quickly. Click [Install]. 12 It is possible that this situation we suggest: • Contact your network administrator. • Try using regularly refreshed images. Follow the steps shown below to access the proxy server (see... page 107). • In some corporate network environments a firewall may not be used for a while. • If you use a proxy server, set the...
... Instructions Notes • When the IP address was changed for the camera, enter it on Microsoft Windows XP Service Pack 2 To view a...be displayed quickly. Click [Install]. 12 It is possible that this situation we suggest: • Contact your network administrator. • Try using regularly refreshed images. Follow the steps shown below to access the proxy server (see... page 107). • In some corporate network environments a firewall may not be used for a while. • If you use a proxy server, set the...
Installation Guide
Page 23
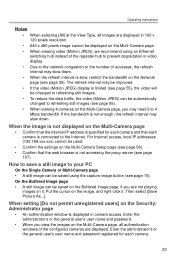
... (see page 58). • Confirm that each camera. 23 Enter the administrator's or the general user's user name and password. • When you may slow down . For Internet access, local IP addresses (192.168.xxx.xxx) cannot be automatically changed to the network congestion or the number of the configured... cameras are not playing images on the Network page (see page 15).
... (see page 58). • Confirm that each camera. 23 Enter the administrator's or the general user's user name and password. • When you may slow down . For Internet access, local IP addresses (192.168.xxx.xxx) cannot be automatically changed to the network congestion or the number of the configured... cameras are not playing images on the Network page (see page 15).
Installation Guide
Page 27
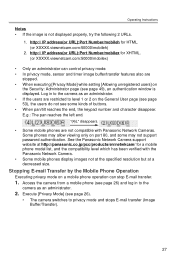
...8226; When executing [Privacy Mode] while setting [Allowing unregistered users] on a mobile phone operation can stop E-mail transfer. 1. See the Panasonic Network Camera support website at a decreased size. Execute [Privacy Mode] (see page 49), an authentication window is not displayed properly, try the following ...2 URLs. 1. Log in to the camera as an administrator. • If the users are not compatible with the Panasonic Network Camera. • Some mobile phones display images not at the specified resolution but at http://panasonic.co.jp/pcc/products/en/netwkcam/ for HTML...
...8226; When executing [Privacy Mode] while setting [Allowing unregistered users] on a mobile phone operation can stop E-mail transfer. 1. See the Panasonic Network Camera support website at a decreased size. Execute [Privacy Mode] (see page 49), an authentication window is not displayed properly, try the following ...2 URLs. 1. Log in to the camera as an administrator. • If the users are not compatible with the Panasonic Network Camera. • Some mobile phones display images not at the specified resolution but at http://panasonic.co.jp/pcc/products/en/netwkcam/ for HTML...
Installation Guide
Page 29
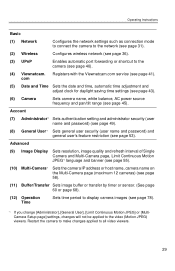
... user's feature restriction (see page 40). (4) Viewnetcam. Operating Instructions Basic (1) Network Configures the network settings such as connection mode to connect the camera to the network (see page 31). (2) Wireless Configures wireless network (see page 36). (3) UPnP Enables automatic port forwarding or shortcut to the camera (see page 53). com (5) Date and Time Sets the date...
... user's feature restriction (see page 40). (4) Viewnetcam. Operating Instructions Basic (1) Network Configures the network settings such as connection mode to connect the camera to the network (see page 31). (2) Wireless Configures wireless network (see page 36). (3) UPnP Enables automatic port forwarding or shortcut to the camera (see page 53). com (5) Date and Time Sets the date...
Installation Guide
Page 31
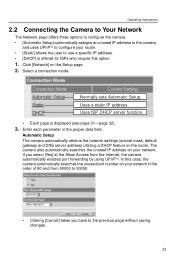
Operating Instructions 2.2 Connecting the Camera to Your Network The Network page offers three options to configure the camera. • [Automatic Setup] automatically assigns an unused IP address to the camera, and uses UPnPTM to configure your network in the proper data field. ...Select a connection mode. In this option. 1. Normally sets Automatic Setup. The camera also automatically searches the unused IP address on the router. Automatic Setup The camera automatically obtains the network settings (subnet mask, default gateway and DNS server address) utilizing a DHCP feature ...
Operating Instructions 2.2 Connecting the Camera to Your Network The Network page offers three options to configure the camera. • [Automatic Setup] automatically assigns an unused IP address to the camera, and uses UPnPTM to configure your network in the proper data field. ...Select a connection mode. In this option. 1. Normally sets Automatic Setup. The camera also automatically searches the unused IP address on the router. Automatic Setup The camera automatically obtains the network settings (subnet mask, default gateway and DNS server address) utilizing a DHCP feature ...

Installation Guide
Page 83
Operating Instructions 3.1.1 Confirming the Status The Status page allows you to check the status of the camera. Note See Panasonic Network Camera support website at http://panasonic.co.jp/ pcc/products/en/netwkcam/ for details about status information. 3.1.2 Confirming the Wireless Status The Wireless Status page allows you to check the wireless ...
Operating Instructions 3.1.1 Confirming the Status The Status page allows you to check the status of the camera. Note See Panasonic Network Camera support website at http://panasonic.co.jp/ pcc/products/en/netwkcam/ for details about status information. 3.1.2 Confirming the Wireless Status The Wireless Status page allows you to check the wireless ...

Installation Guide
Page 85
... images will be deleted after the firmware update. • The firmware version is available, install it on the Panasonic Network Camera support website at http://panasonic.co.jp/pcc/products/en/netwkcam/, and save it into the camera. Download the new firmware on your PC. 2. If the new firmware is displayed on the Maintenance page...
... images will be deleted after the firmware update. • The firmware version is available, install it on the Panasonic Network Camera support website at http://panasonic.co.jp/pcc/products/en/netwkcam/, and save it into the camera. Download the new firmware on your PC. 2. If the new firmware is displayed on the Maintenance page...

Installation Guide
Page 92
...on the Support page displays the URL, click it . Clicking [Wireless Help] on the Panasonic Network Camera support website. Clicking [Product Information] on the Panasonic Network Camera support website. Note If the camera is not connected to the Internet, the website cannot be displayed. 92 Note [Wireless Help... Seeing Support Information You can see support information on the Support page displays the URL, click it . Note If the camera is displayed only when logging in as an administrator. 3.2.3 Seeing Product Information You can see product information on the Support page...
...on the Support page displays the URL, click it . Clicking [Wireless Help] on the Panasonic Network Camera support website. Clicking [Product Information] on the Panasonic Network Camera support website. Note If the camera is not connected to the Internet, the website cannot be displayed. 92 Note [Wireless Help... Seeing Support Information You can see support information on the Support page displays the URL, click it . Note If the camera is displayed only when logging in as an administrator. 3.2.3 Seeing Product Information You can see product information on the Support page...

Installation Guide
Page 96
Auto/Fixed Indoor/ Fixed Fluorescent (White)/Fixed Fluorescent (Daylight)/Fixed Outdoor/Hold - 50 Hz, 60 Hz - -50-+50 degrees - -50-+50 degrees - -50-+50 degrees - -40-+10 degrees - -40-+10 degrees - -40-+10 degrees 96 Operating Instructions Items Camera Camera Name White Balance Default Network Camera Auto AC Power Source Frequency 50 Hz Pan Range (Minimum) -50 degrees (Home Position) 0 degrees (Maximum) +50 degrees Tilt Range (Minimum) -40 degrees (Home Position) 0 degrees (Maximum) +10 degrees Required Notes Required 1-15 characters *6 -
Auto/Fixed Indoor/ Fixed Fluorescent (White)/Fixed Fluorescent (Daylight)/Fixed Outdoor/Hold - 50 Hz, 60 Hz - -50-+50 degrees - -50-+50 degrees - -50-+50 degrees - -40-+10 degrees - -40-+10 degrees - -40-+10 degrees 96 Operating Instructions Items Camera Camera Name White Balance Default Network Camera Auto AC Power Source Frequency 50 Hz Pan Range (Minimum) -50 degrees (Home Position) 0 degrees (Maximum) +50 degrees Tilt Range (Minimum) -40 degrees (Home Position) 0 degrees (Maximum) +10 degrees Required Notes Required 1-15 characters *6 -

Installation Guide
Page 104
... the Ethernet cable to a Static or a DHCP setting. • Displaying the Setup page. Click [Camera Setup]. Displays the camera manuals. Installs Network Camera Recorder Trial Version. Closes the Setup Program. • When the following dialog box is displayed, click [Unblock]. 104 ...Setup CD-ROM into the CD-ROM drive of the camera connected to your network. • Setting up the camera automatically. • Setting up the camera. Sets up the camera manually to the camera following the Getting Started. • If the Network Camera Setup window does not appear, click "setup.exe" ...
... the Ethernet cable to a Static or a DHCP setting. • Displaying the Setup page. Click [Camera Setup]. Displays the camera manuals. Installs Network Camera Recorder Trial Version. Closes the Setup Program. • When the following dialog box is displayed, click [Unblock]. 104 ...Setup CD-ROM into the CD-ROM drive of the camera connected to your network. • Setting up the camera automatically. • Setting up the camera. Sets up the camera manually to the camera following the Getting Started. • If the Network Camera Setup window does not appear, click "setup.exe" ...
Installation Guide
Page 113
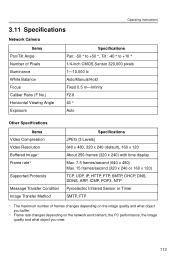
Operating Instructions 3.11 Specifications Network Camera Items Pan/Tilt Angle Number of Pixels Illuminance White Balance Focus Caliber Ratio (F No.) Horizontal Viewing Angle Exposure Specifications Pan: -50 ° to +50 °, ... Timer SMTP, FTP *1 The maximum number of frames changes depending on the image quality and what object you buffer. *2 Frame rate changes depending on the network environment, the PC performance, the image quality and what object you view. 113
Operating Instructions 3.11 Specifications Network Camera Items Pan/Tilt Angle Number of Pixels Illuminance White Balance Focus Caliber Ratio (F No.) Horizontal Viewing Angle Exposure Specifications Pan: -50 ° to +50 °, ... Timer SMTP, FTP *1 The maximum number of frames changes depending on the image quality and what object you buffer. *2 Frame rate changes depending on the network environment, the PC performance, the image quality and what object you view. 113


