

Operating Instructions
Page 3
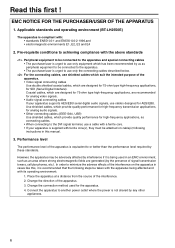
... sources such as power-supply cord or plug is subject to qualified service personnel. The wide blade or the third prong are designed to avoid injury from that may cause undesired operation. This equipment generates, uses, and can be used , use attachments/accessories specified by the manufacturer. 12) Use only with the cart, stand, tripod, bracket, or table specified by compatible interface cable with Part...
... sources such as power-supply cord or plug is subject to qualified service personnel. The wide blade or the third prong are designed to avoid injury from that may cause undesired operation. This equipment generates, uses, and can be used , use attachments/accessories specified by the manufacturer. 12) Use only with the cart, stand, tripod, bracket, or table specified by compatible interface cable with Part...

Operating Instructions
Page 4
... Monitor is for BT-LH2550E) ■ THIS EQUIPMENT MUST BE EARTHED To ensure safe operation, the three-pin plug must have three cores and be injured AC Adapter The rating plate is effectively earthed through normal house-hold wiring. CAUTION: Check the installation at least once a year. indicates safety information. 4 Extension cords used . CAUTION: THE MAINS PLUG OF THE POWER SUPPLY CORD SHALL...
... Monitor is for BT-LH2550E) ■ THIS EQUIPMENT MUST BE EARTHED To ensure safe operation, the three-pin plug must have three cores and be injured AC Adapter The rating plate is effectively earthed through normal house-hold wiring. CAUTION: Check the installation at least once a year. indicates safety information. 4 Extension cords used . CAUTION: THE MAINS PLUG OF THE POWER SUPPLY CORD SHALL...
Operating Instructions
Page 6
... fields are recommended for analog video signals. • Audio signal connecting cables If your apparatus is supplied with ferrite core(s), they must be attached on the apparatus in an EMC environment, such as peripheral equipment to be taken with a ferrite core. • If your apparatus supports AES/EBU serial digital audio signals, use cables designed for high-frequency applications, as connecting cables. • When connecting to minimize the adverse...
... fields are recommended for analog video signals. • Audio signal connecting cables If your apparatus is supplied with ferrite core(s), they must be attached on the apparatus in an EMC environment, such as peripheral equipment to be taken with a ferrite core. • If your apparatus supports AES/EBU serial digital audio signals, use cables designed for high-frequency applications, as connecting cables. • When connecting to minimize the adverse...
Operating Instructions
Page 7
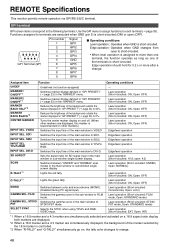
... panel controls 11 Rear panel terminals 12 AC Adapter 13 Power Supply 14 How to Use the On Screen Menu 15 User Data 20 Main Menu 21 Menu configuration 21 MARKER 22 Marker types 24 VIDEO CONFIG 26 SYSTEM CONFIG 29 FUNCTION 32 GPI 35 INPUT SELECT 36 AUDIO 38 DISPLAY SETUP 39 CONTROL 45 HOURMETER 45 REMOTE Specifications 48 Maintenance inspecions 52 Maintenance 52 Error Display 52 Specifications 53 Standard accessories Power cord × 1 Power cord hook...
... panel controls 11 Rear panel terminals 12 AC Adapter 13 Power Supply 14 How to Use the On Screen Menu 15 User Data 20 Main Menu 21 Menu configuration 21 MARKER 22 Marker types 24 VIDEO CONFIG 26 SYSTEM CONFIG 29 FUNCTION 32 GPI 35 INPUT SELECT 36 AUDIO 38 DISPLAY SETUP 39 CONTROL 45 HOURMETER 45 REMOTE Specifications 48 Maintenance inspecions 52 Maintenance 52 Error Display 52 Specifications 53 Standard accessories Power cord × 1 Power cord hook...
Operating Instructions
Page 8
... BT-LH2550 LCD monitor is a 25.5 inch full HD LCD display panel designed especially for broadcasting service and business use. ■ Compact 25.5 type full HD monitor • The monitor is equipped with a high-resolution (1920 x 1200) IPS LCD panel. • Efforts to facilitate composition. ■ Calibration function The monitor can easily be calibrated using a luminance meter. ■ REMOTE control Depending on the intended use of the monitor, you can select between input signal to picture display...
... BT-LH2550 LCD monitor is a 25.5 inch full HD LCD display panel designed especially for broadcasting service and business use. ■ Compact 25.5 type full HD monitor • The monitor is equipped with a high-resolution (1920 x 1200) IPS LCD panel. • Efforts to facilitate composition. ■ Calibration function The monitor can easily be calibrated using a luminance meter. ■ REMOTE control Depending on the intended use of the monitor, you can select between input signal to picture display...
Operating Instructions
Page 11
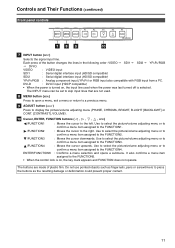
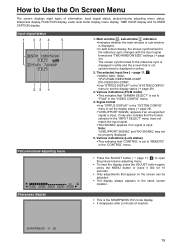
... power was last turned off is on , the input line used . 8 MENU button ( ) Press to open a menu, exit a menu or return to a previous menu. 9 ADJUST button ( ) Press to display the picture/volume adjusting menu (PHASE, CHROMA, BRIGHT, B.LIGHT [BACKLIGHT] or CONT. [CONTRAST], VOLUME). 10 Cursor, ENTER, FUNCTION buttons ( , , , , ) /FUNCTION1 : Moves the cursor to skip input lines that are made of the button changes the lines in the following order: VIDEO DVI-D. Controls and Their Functions (continued) Front panel controls 78 9 10 7 INPUT button...
... power was last turned off is on , the input line used . 8 MENU button ( ) Press to open a menu, exit a menu or return to a previous menu. 9 ADJUST button ( ) Press to display the picture/volume adjusting menu (PHASE, CHROMA, BRIGHT, B.LIGHT [BACKLIGHT] or CONT. [CONTRAST], VOLUME). 10 Cursor, ENTER, FUNCTION buttons ( , , , , ) /FUNCTION1 : Moves the cursor to skip input lines that are made of the button changes the lines in the following order: VIDEO DVI-D. Controls and Their Functions (continued) Front panel controls 78 9 10 7 INPUT button...
Operating Instructions
Page 14
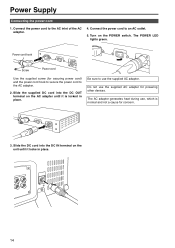
... concern. 3. The POWER LED lights green. Do not use , which is locked in place. 14 Connect the power cord to the AC inlet of the AC adapter. 4. Power cord hook Screw Power cord Use the supplied screw (for powering other devices. The AC adapter generates heat during use the supplied AC adapter for securing power cord) and the power cord hook to secure the power cord to use the supplied AC adapter. Connect the power cord to an AC outlet. 5. Power Supply Connecting the power cord 1. Slide the supplied DC cord into the DC...
... concern. 3. The POWER LED lights green. Do not use , which is locked in place. 14 Connect the power cord to the AC inlet of the AC adapter. 4. Power cord hook Screw Power cord Use the supplied screw (for powering other devices. The AC adapter generates heat during use the supplied AC adapter for securing power cord) and the power cord hook to secure the power cord to use the supplied AC adapter. Connect the power cord to an AC outlet. 5. Power Supply Connecting the power cord 1. Slide the supplied DC cord into the DC...
Operating Instructions
Page 15
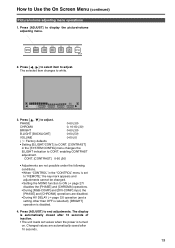
...; Use "STATUS DISPLAY" in white and the screen that appear on the screen can be properly displayed. 5. Various indications (Lock status) • This indicates that "CONTROL" is input. DVI-VIDEO/DVI-COMP. • Use "STATUS DISPLAY" in the "SYSTEM CONFIG" menu to set the display status ( page 29). • "UNSUPPORT SIGNAL" appears if an unsupported signal is set to open the picture/volume adjusting menu. • To clear the display, press the ADJUST button again, press the MENU button or...
...; Use "STATUS DISPLAY" in white and the screen that appear on the screen can be properly displayed. 5. Various indications (Lock status) • This indicates that "CONTROL" is input. DVI-VIDEO/DVI-COMP. • Use "STATUS DISPLAY" in the "SYSTEM CONFIG" menu to set the display status ( page 29). • "UNSUPPORT SIGNAL" appears if an unsupported signal is set to open the picture/volume adjusting menu. • To clear the display, press the ADJUST button again, press the MENU button or...
Operating Instructions
Page 19
...) B.LIGHT [BACKLIGHT] 0-60 (50) VOLUME 0-60 (0) ( ) : Factory defaults • Setting [B.LIGHT/CONT.] to CONT. CONT. [CONTRAST] 0-60 (50) • Adjustments are disabled. • During HV DELAY ( page 33) operation (and a setting other than OFF is selected), [BRIGHT] operation is turned on. Press [ADJUST] to adjust. Press [ , ] to end adjustments. Press [ , ] to select item to white. 3. The selected item changes to adjust. How to display the picture/volume adjusting menu. 2. Press [ADJUST] to Use the On Screen Menu (continued) Picture/volume adjusting menu...
...) B.LIGHT [BACKLIGHT] 0-60 (50) VOLUME 0-60 (0) ( ) : Factory defaults • Setting [B.LIGHT/CONT.] to CONT. CONT. [CONTRAST] 0-60 (50) • Adjustments are disabled. • During HV DELAY ( page 33) operation (and a setting other than OFF is selected), [BRIGHT] operation is turned on. Press [ADJUST] to adjust. Press [ , ] to end adjustments. Press [ , ] to select item to white. 3. The selected item changes to adjust. How to display the picture/volume adjusting menu. 2. Press [ADJUST] to Use the On Screen Menu (continued) Picture/volume adjusting menu...
Operating Instructions
Page 26
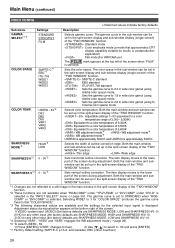
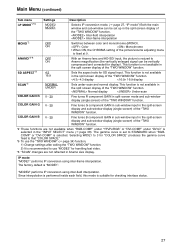
... WB adjustment mode ( page 28). *5 To select USER0 - 63, 1) Press [ENTER] ("USER" changes to blue). 2) Use [ , ] to that approximates CRT display capability suitable for the selected input signal is selected. COMP" or "DVI-COMP" is approximately 6300 K. Selecting WIDE1 to 3 for "COLOR SPACE" produces the gamma curve fixed to select 0 - 63 and press [ENTER]. *7 Factory default setting: SMPTE-C (U.S.A. The color space in the sub-window can be set up...
... WB adjustment mode ( page 28). *5 To select USER0 - 63, 1) Press [ENTER] ("USER" changes to blue). 2) Use [ , ] to that approximates CRT display capability suitable for the selected input signal is selected. COMP" or "DVI-COMP" is approximately 6300 K. Selecting WIDE1 to 3 for "COLOR SPACE" produces the gamma curve fixed to select 0 - 63 and press [ENTER]. *7 Factory default setting: SMPTE-C (U.S.A. The color space in the sub-window can be set up...
Operating Instructions
Page 27
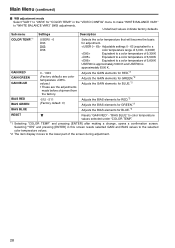
... "DVI-D" is fixed at 0. SD ASPECT*2 4:3 16:9 Sets the aspect ratio for checking interlace status. 27 The gamma curve is suitable for SD signal input. Inter-field interpolation Inter-frame interpolation MONO*2 OFF ON Switches between color and monochrome (MONO). Color Monochrome • When ON, the CHROMA setting of the picture/volume adjusting menu is selected in the split screen display of the "TWO WINDOW" function. 4:3 display 16:9 display...
... "DVI-D" is fixed at 0. SD ASPECT*2 4:3 16:9 Sets the aspect ratio for checking interlace status. 27 The gamma curve is suitable for SD signal input. Inter-field interpolation Inter-frame interpolation MONO*2 OFF ON Switches between color and monochrome (MONO). Color Monochrome • When ON, the CHROMA setting of the picture/volume adjusting menu is selected in the split screen display of the "TWO WINDOW" function. 4:3 display 16:9 display...
Operating Instructions
Page 28
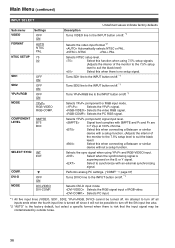
... for adjustment. Main Menu (continued) ■ WB adjustment mode Select "VAR1" to color temperature values selected under "COLOR TEMP." *1 Selecting "COLOR TEMP." "BIAS BLUE" to "VAR3" for "COLOR TEMP." Adjustable settings 0 - 63 (equivalent to a color temperature range of 3,000 - 9,300K) Equivalent to a color temperature of 9,300K Equivalent to a color temperature of 6,500K Equivalent to "WHITE BALANCE VAR3" (WB) adjustments. and pressing [ENTER] after making a change, opens a confirmation screen. in this screen resets selected...
... for adjustment. Main Menu (continued) ■ WB adjustment mode Select "VAR1" to color temperature values selected under "COLOR TEMP." *1 Selecting "COLOR TEMP." "BIAS BLUE" to "VAR3" for "COLOR TEMP." Adjustable settings 0 - 63 (equivalent to a color temperature range of 3,000 - 9,300K) Equivalent to a color temperature of 9,300K Equivalent to a color temperature of 6,500K Equivalent to "WHITE BALANCE VAR3" (WB) adjustments. and pressing [ENTER] after making a change, opens a confirmation screen. in this screen resets selected...
Operating Instructions
Page 29
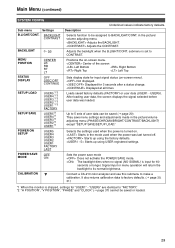
... menu Settings B.LIGHT/CONT. Connect a CA-210 color analyzer and use this submenu to BACKLIGHT/CONT. "USER5" are identical to its normal brightness. Not displayed. Displayed at all times Loads saved factory defaults (FACTORY) or user data (USER1 - Up to CONTRAST. They save mode Does not activate the POWER SAVE mode. Starts up using USER registered settings. Signal input or menu operation will return the backlight to "FACTORY." *2 "H POSITION", "V POSITION", "PHASE" and "CLOCK" ( page 37) cannot be saved ( page 20). Starts in the picture/ volume adjusting menu. The backlight...
... menu Settings B.LIGHT/CONT. Connect a CA-210 color analyzer and use this submenu to BACKLIGHT/CONT. "USER5" are identical to its normal brightness. Not displayed. Displayed at all times Loads saved factory defaults (FACTORY) or user data (USER1 - Up to CONTRAST. They save mode Does not activate the POWER SAVE mode. Starts up using USER registered settings. Signal input or menu operation will return the backlight to "FACTORY." *2 "H POSITION", "V POSITION", "PHASE" and "CLOCK" ( page 37) cannot be saved ( page 20). Starts in the picture/ volume adjusting menu. The backlight...

Operating Instructions
Page 30
... to the CA-210 User's Guide. External light that no external light can enter the standard measurement probe before starting calibration. • Turn off the lights in the room and make sure that enters the probe will not produce a correct calibration unless it has been calibrated. In a fine tuning of low brightness characteristics. • LCD panel characteristics and instrument error in the display color analyzer may sometimes...
... to the CA-210 User's Guide. External light that no external light can enter the standard measurement probe before starting calibration. • Turn off the lights in the room and make sure that enters the probe will not produce a correct calibration unless it has been calibrated. In a fine tuning of low brightness characteristics. • LCD panel characteristics and instrument error in the display color analyzer may sometimes...
Operating Instructions
Page 32
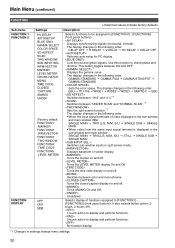
... selects button action (1touch, 2-touch, off . The display changes in split screen mode. Turns the closed caption display on and off . Description Selects functions to be assigned to check phase and chroma. This button toggles between color and monochrome. Main Menu (continued) FUNCTION Sub menu FUNCTION 1 FUNCTION 5 FUNCTION DISPLAY Settings HV DELAY AUTOSETUP BLUE ONLY GAMMA SELECT COLOR SPACE SD ASPECT SCAN TWO WINDOW SUB INPUT SEL. Displays synchronizing signals (horizontal, vertical). EBU...
... selects button action (1touch, 2-touch, off . The display changes in split screen mode. Turns the closed caption display on and off . Description Selects functions to be assigned to check phase and chroma. This button toggles between color and monochrome. Main Menu (continued) FUNCTION Sub menu FUNCTION 1 FUNCTION 5 FUNCTION DISPLAY Settings HV DELAY AUTOSETUP BLUE ONLY GAMMA SELECT COLOR SPACE SD ASPECT SCAN TWO WINDOW SUB INPUT SEL. Displays synchronizing signals (horizontal, vertical). EBU...
Operating Instructions
Page 36
... INPUT button on/off. *1 Selects YPBPR (component) or RGB input mode. Selects the RGB signal input of the monitor to the 7.5% setup level to turn off all inputs ends when the fourth input line is no setup signal. Select this when connecting a Betacam or similar device without a setup function. Selects the PC RGB signal. DVI-D MODE OFF ON DVI-VIDEO DVI-COMP. Description Turns VIDEO line to the INPUT button on /off the 5th input line also. *2 "AUTO" is the factory default...
... INPUT button on/off. *1 Selects YPBPR (component) or RGB input mode. Selects the RGB signal input of the monitor to the 7.5% setup level to turn off all inputs ends when the fourth input line is no setup signal. Select this when connecting a Betacam or similar device without a setup function. Selects the PC RGB signal. DVI-D MODE OFF ON DVI-VIDEO DVI-COMP. Description Turns VIDEO line to the INPUT button on /off the 5th input line also. *2 "AUTO" is the factory default...
Operating Instructions
Page 48
... when GND changes from open (OFF). Turns the center marker display on , the tally color changes to 50%. Switches between color and monochrome (MONO). (Disabled during PC signal input) Switches the gamma curve in the "MARKER" menu. G-TALLY*3 Lights the green tally. Switches the gamma curve in the main window or sub-window single screen display. Use the GPI menu to assign functions to the following terminals. SDI1 INPUT SEL. Switches marker display defined in...
... when GND changes from open (OFF). Turns the center marker display on , the tally color changes to 50%. Switches between color and monochrome (MONO). (Disabled during PC signal input) Switches the gamma curve in the "MARKER" menu. G-TALLY*3 Lights the green tally. Switches the gamma curve in the main window or sub-window single screen display. Use the GPI menu to assign functions to the following terminals. SDI1 INPUT SEL. Switches marker display defined in...
Operating Instructions
Page 50
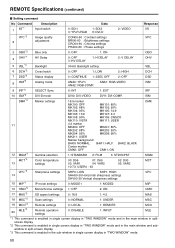
...*1 Input switch VPC*2 2 Image quality adjustment 3 OBO*2 4 OHV*1 5 VBL*2 6 DCH*2 7 DSD*2 8 ISM*2 9 IRF*2 10 ISM*2 DMK*3 Blue only HV Delay Backlight Cross hatch Status display Analog mode SELECT Sync DVI-D mode Marker settings 11 12 MGM*1 MCT*2 13 VPC*2 14 15 MIP*1 16 OMO*2 17 MAS*3 18 MSC*3 19 MCO*2 20 MLE*2 Gamma selection Color temperature settings Sharpness settings IP mode settings Monochrome settings SD aspect settings Scan settings Remote settings Remote operation settings Data...
...*1 Input switch VPC*2 2 Image quality adjustment 3 OBO*2 4 OHV*1 5 VBL*2 6 DCH*2 7 DSD*2 8 ISM*2 9 IRF*2 10 ISM*2 DMK*3 Blue only HV Delay Backlight Cross hatch Status display Analog mode SELECT Sync DVI-D mode Marker settings 11 12 MGM*1 MCT*2 13 VPC*2 14 15 MIP*1 16 OMO*2 17 MAS*3 18 MSC*3 19 MCO*2 20 MLE*2 Gamma selection Color temperature settings Sharpness settings IP mode settings Monochrome settings SD aspect settings Scan settings Remote settings Remote operation settings Data...
Operating Instructions
Page 51
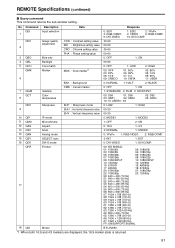
...; 1200(60 Hz) FF: UNSUPPORT SIGNAL 18 QID Model BT-LH2550 *1 When both 16:9 and 4:3 markers are displayed, the 16:9 marker state is returned. 51 QPC 2 Image quality adjustment CON : Contrast setting value BRI : Brightness setting value CRO : Chroma setting value 00-60 00-60 00-60 PHA : Phase setting value 00-60 3 QBO Blue only 0: OFF 1: ON 4 QBL Backlight 00-60 5 QCH Cross hatch...
...; 1200(60 Hz) FF: UNSUPPORT SIGNAL 18 QID Model BT-LH2550 *1 When both 16:9 and 4:3 markers are displayed, the 16:9 marker state is returned. 51 QPC 2 Image quality adjustment CON : Contrast setting value BRI : Brightness setting value CRO : Chroma setting value 00-60 00-60 00-60 PHA : Phase setting value 00-60 3 QBO Blue only 0: OFF 1: ON 4 QBL Backlight 00-60 5 QCH Cross hatch...
Operating Instructions
Page 53
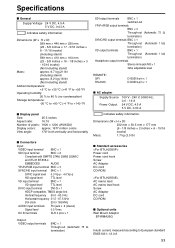
... accessories Power cord Power cord hook Screw AC Adaptor DC cord CD-ROM AC mains lead AC mains lead hook Screw AC Adaptor DC cord CD-ROM ■ Optional units Wall Mount Adaptor BT-WMA26G Inrush current, measured according to +140 °F) ■ Display panel Size: 25.5 inches Aspect ratio: 16:10 Number of pixels: 1920 × 1200 (WUXGA) Display colors: approx. 1677 million colors View angle: 178° both vertically and horizontally SDI output...
... accessories Power cord Power cord hook Screw AC Adaptor DC cord CD-ROM AC mains lead AC mains lead hook Screw AC Adaptor DC cord CD-ROM ■ Optional units Wall Mount Adaptor BT-WMA26G Inrush current, measured according to +140 °F) ■ Display panel Size: 25.5 inches Aspect ratio: 16:10 Number of pixels: 1920 × 1200 (WUXGA) Display colors: approx. 1677 million colors View angle: 178° both vertically and horizontally SDI output...


