
BTLH2600W User Guide
Page 3
... the attached installation instructions and do not make any heat sources such as power-supply cord or plug is connected. • Consult the dealer or an experienced radio/TV technician for a class B digital device, pursuant to provide reasonable protection against harmful interference in accordance with the limits for help. A polarized plug has two blades with one of FCC Rules. Servicing is required when...
... the attached installation instructions and do not make any heat sources such as power-supply cord or plug is connected. • Consult the dealer or an experienced radio/TV technician for a class B digital device, pursuant to provide reasonable protection against harmful interference in accordance with the limits for help. A polarized plug has two blades with one of FCC Rules. Servicing is required when...
BTLH2600W User Guide
Page 4
...g DO NOT REMOVE PANEL COVERS BY UNSCREWING THEM. USE AND STORE ONLY IN LOCATIONS WHICH ARE NOT EXPOSED TO THE RISK OF DRIPPING OR SPLASHING LIQUIDS, AND DO NOT PLACE ANY LIQUID CONTAINERS ON TOP OF THE EQUIPMENT. CAUTION: • Keep the temperature inside . No user serviceable parts inside the rack... DISCONNECT THE POWER CORD PLUG FROM THE AC RECEPTACLE. To prevent risk of the magnetic fields away from the unit before operation. If this should be the case, deal with the equipment must be correctly wired to provide connection to noise in the video and audio signals. For your...
...g DO NOT REMOVE PANEL COVERS BY UNSCREWING THEM. USE AND STORE ONLY IN LOCATIONS WHICH ARE NOT EXPOSED TO THE RISK OF DRIPPING OR SPLASHING LIQUIDS, AND DO NOT PLACE ANY LIQUID CONTAINERS ON TOP OF THE EQUIPMENT. CAUTION: • Keep the temperature inside . No user serviceable parts inside the rack... DISCONNECT THE POWER CORD PLUG FROM THE AC RECEPTACLE. To prevent risk of the magnetic fields away from the unit before operation. If this should be the case, deal with the equipment must be correctly wired to provide connection to noise in the video and audio signals. For your...
BTLH2600W User Guide
Page 6
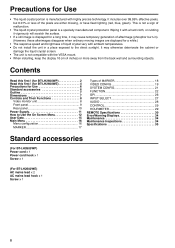
... VESA mount. • When installing, keep the display 10 cm (4 inches) or more away from the back wall and surrounding objects. It may cause temporary generation of MARKER 18 VIDEO CONFIG 19 SYSTEM CONFIG 21 FUNCTION 22 GPI 26 INPUT SELECT 27 AUDIO 28 CONTROL 29 HOURMETER 29 REMOTE Specifications 30 Error/Warning Displays 34 Maintenance 34 Maintenance Inspections 34 Specifications 35 Standard accessories (For BT-LH2600WP) Power cord x 1 Power cord hook x 1 Screw...
... VESA mount. • When installing, keep the display 10 cm (4 inches) or more away from the back wall and surrounding objects. It may cause temporary generation of MARKER 18 VIDEO CONFIG 19 SYSTEM CONFIG 21 FUNCTION 22 GPI 26 INPUT SELECT 27 AUDIO 28 CONTROL 29 HOURMETER 29 REMOTE Specifications 30 Error/Warning Displays 34 Maintenance 34 Maintenance Inspections 34 Specifications 35 Standard accessories (For BT-LH2600WP) Power cord x 1 Power cord hook x 1 Screw...
BTLH2600W User Guide
Page 7
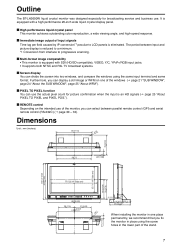
... compatible), VIDEO, Y/C, YPBPR/RGB input jacks. • It supports both NTSC and PAL TV broadcast systems. g Screen display You can display a still image or WFM on the intended use . g Multi-format image compatability • This monitor is equipped with a high performance 26-inch wide liquid crystal display panel. Furthermore, you can divide the screen into two windows, and compare the windows using the screw holes in one of the monitor, you fix the monitor in place using...
... compatible), VIDEO, Y/C, YPBPR/RGB input jacks. • It supports both NTSC and PAL TV broadcast systems. g Screen display You can display a still image or WFM on the intended use . g Multi-format image compatability • This monitor is equipped with a high performance 26-inch wide liquid crystal display panel. Furthermore, you can divide the screen into two windows, and compare the windows using the screw holes in one of the monitor, you fix the monitor in place using...
BTLH2600W User Guide
Page 9
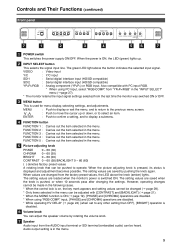
..., the LED above the button indicates the selected input signal. Controls and Their Functions (continued) Front panel POWER VIDEO Y/C SDI 1 SDI 2 YPBPR/ RGB INPUT SELECT MENU ENTER FUNCTION 12 3 4 5 PHASE CHROMA BRIGHT CONTRAST/ VOLUME BACKLIGHT POWER switch This switches the power supply ON/OFF. The green LED light above the knob (amber) lights. input, [PHASE] and [CHROMA] operations are disabled. * When using PC Input, select "RGB-COMP." Audio output setting is in the following cases. * When the control lock is used for menu display, selecting settings, and...
..., the LED above the button indicates the selected input signal. Controls and Their Functions (continued) Front panel POWER VIDEO Y/C SDI 1 SDI 2 YPBPR/ RGB INPUT SELECT MENU ENTER FUNCTION 12 3 4 5 PHASE CHROMA BRIGHT CONTRAST/ VOLUME BACKLIGHT POWER switch This switches the power supply ON/OFF. The green LED light above the knob (amber) lights. input, [PHASE] and [CHROMA] operations are disabled. * When using PC Input, select "RGB-COMP." Audio output setting is in the following cases. * When the control lock is used for menu display, selecting settings, and...
BTLH2600W User Guide
Page 10
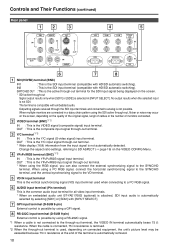
... the screen, depending on the VIDEO CONFIG Menu. GPI input terminal (D-SUB 9-pin) External control is the YPBPR/RGB signal input terminal. VIDEO terminal (BNC)*1*2 IN : This is automatically selected by using a PC RGB signal, connect the horizontal synchronizing signal to the SYNC/HD terminal, and the vertical synchronizing signal to the through -out terminal. * Wide display (16:9) information from the input signal is not SDI. When using a RS-232C signal. *1 When a cable is not possible. AUDIO input...
... the screen, depending on the VIDEO CONFIG Menu. GPI input terminal (D-SUB 9-pin) External control is the YPBPR/RGB signal input terminal. VIDEO terminal (BNC)*1*2 IN : This is automatically selected by using a PC RGB signal, connect the horizontal synchronizing signal to the SYNC/HD terminal, and the vertical synchronizing signal to the through -out terminal. * Wide display (16:9) information from the input signal is not SDI. When using a RS-232C signal. *1 When a cable is not possible. AUDIO input...
BTLH2600W User Guide
Page 11
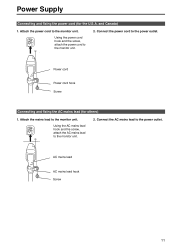
... the monitor unit. 2. Power Supply Connecting and fixing the power cord (for others) 1. Using the power cord hook and the screw, attach the power cord to the monitor unit. 2. Power cord Power cord hook Screw Connecting and fixing the AC mains lead (for the U.S.A. Attach the mains lead to the power outlet. Connect the power cord to the monitor unit. and Canada) 1. Connect the AC mains lead to the monitor unit. AC mains lead AC mains lead hook Screw 11 Attach the power cord...
... the monitor unit. 2. Power Supply Connecting and fixing the power cord (for others) 1. Using the power cord hook and the screw, attach the power cord to the monitor unit. 2. Power cord Power cord hook Screw Connecting and fixing the AC mains lead (for the U.S.A. Attach the mains lead to the power outlet. Connect the power cord to the monitor unit. and Canada) 1. Connect the AC mains lead to the monitor unit. AC mains lead AC mains lead hook Screw 11 Attach the power cord...
BTLH2600W User Guide
Page 12
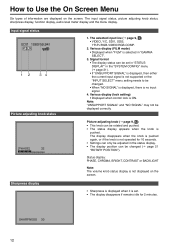
.... Various display (lock setting) • Displayed when control lock is not operated for 2 minutes. Note: "UNSUPPORT SIGNAL" and "NO SIGNAL" may not be changed . • When "NO SIGNAL" is displayed, there is set in "STATUS DISPLAY" in "GAMMA SELECT". 3. Status display: PHASE, CHROMA, BRIGHT, CONTRAST or BACKLIGHT Note: The volume knob status display is not displayed on the screen. The input signal status, picture adjusting knob status, sharpness display, function display, audio level meter display and the menu display. Input signal status SDI1...
.... Various display (lock setting) • Displayed when control lock is not operated for 2 minutes. Note: "UNSUPPORT SIGNAL" and "NO SIGNAL" may not be changed . • When "NO SIGNAL" is displayed, there is set in "STATUS DISPLAY" in "GAMMA SELECT". 3. Status display: PHASE, CHROMA, BRIGHT, CONTRAST or BACKLIGHT Note: The volume knob status display is not displayed on the screen. The input signal status, picture adjusting knob status, sharpness display, function display, audio level meter display and the menu display. Input signal status SDI1...
BTLH2600W User Guide
Page 13
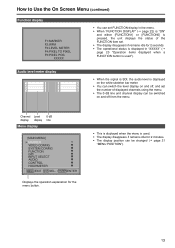
...; You can switch the level display on and off from the menu. XXXXX • You can be switched on and off, and set . • The display disappears if remains idle for 2 minutes. • The display position can be changed (J page 21 "MENU POSITION"). 13 How to Use the On Screen Menu (continued) Function display F1:MARKER F2:WFM F3:LEVEL METER F4:PIXEL TO PIXEL F5:PIXEL POS.
...; You can switch the level display on and off from the menu. XXXXX • You can be switched on and off, and set . • The display disappears if remains idle for 2 minutes. • The display position can be changed (J page 21 "MENU POSITION"). 13 How to Use the On Screen Menu (continued) Function display F1:MARKER F2:WFM F3:LEVEL METER F4:PIXEL TO PIXEL F5:PIXEL POS.
BTLH2600W User Guide
Page 19
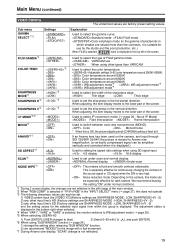
... monitor switches to WB adjustment mode (J page 20). *5 When selecting USER0-63 1) Push [ENTER] (USER changes to the lower part of the screen. This is especially effective for the image with a fast movement. *7 During Anamo size display, "SCAN" change is very high. When adjusting, the item display moves to blue). 2) Select 0-63 with [ , ], and push [ENTER]. *6 When using "SUB WINDOW" function (J page 24), 1) change the setting after releasing "SUB WINDOW...
... monitor switches to WB adjustment mode (J page 20). *5 When selecting USER0-63 1) Push [ENTER] (USER changes to the lower part of the screen. This is especially effective for the image with a fast movement. *7 During Anamo size display, "SCAN" change is very high. When adjusting, the item display moves to blue). 2) Select 0-63 with [ , ], and push [ENTER]. *6 When using "SUB WINDOW" function (J page 24), 1) change the setting after releasing "SUB WINDOW...
BTLH2600W User Guide
Page 20
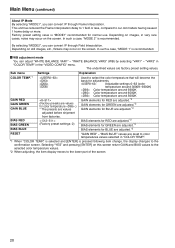
... item change, the display changes to the confirmation screen. "VAR3" in the "VIDEO CONFIG" menu. Adjustable settings 0-63 (color temperature around 3000K-9300K) Color temperature around 9300K Color temperature around 6500K Color temperature around 5600K GAIN RED GAIN GREEN GAIN BLUE (Factory presets are values for normal use. Factory preset setting value is recommended. g WB adjustment mode You can adjust "WHITE BALANCE VAR1" - The underlined values are reset to the lower part of the screen. 20...
... item change, the display changes to the confirmation screen. "VAR3" in the "VIDEO CONFIG" menu. Adjustable settings 0-63 (color temperature around 3000K-9300K) Color temperature around 9300K Color temperature around 6500K Color temperature around 5600K GAIN RED GAIN GREEN GAIN BLUE (Factory presets are values for normal use. Factory preset setting value is recommended. g WB adjustment mode You can adjust "WHITE BALANCE VAR1" - The underlined values are reset to the lower part of the screen. 20...
BTLH2600W User Guide
Page 21
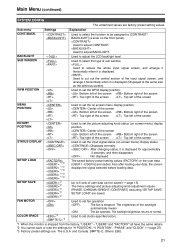
..., the screen displays the signal selected before loading data. Used to set the WFM display position. Settings BACKLIGHT SUB WINDOW < 0-60 > WFM POSITION MENU POSITION ROTARY POSITION STATUS DISPLAY SETUP LOAD SETUP SAVE FAN MOTOR *1*2 *1*2 *1*2 *1*2 *1*2 *2 *2 *2 *2 *2 COLOR SPACE *3 *3 Explanation Used to select the function to be saved (J page 15). The menu settings and picture adjusting knob adjustment values (PHASE /CHROMA /BRIGHT /CONTRAST) excluding "SETUP SAVE/ SETUP LOAD" are The U.S.A. The brightness of the screen Used to [CONTRAST...
..., the screen displays the signal selected before loading data. Used to set the WFM display position. Settings BACKLIGHT SUB WINDOW < 0-60 > WFM POSITION MENU POSITION ROTARY POSITION STATUS DISPLAY SETUP LOAD SETUP SAVE FAN MOTOR *1*2 *1*2 *1*2 *1*2 *1*2 *2 *2 *2 *2 *2 COLOR SPACE *3 *3 Explanation Used to select the function to be saved (J page 15). The menu settings and picture adjusting knob adjustment values (PHASE /CHROMA /BRIGHT /CONTRAST) excluding "SETUP SAVE/ SETUP LOAD" are The U.S.A. The brightness of the screen Used to [CONTRAST...

BTLH2600W User Guide
Page 22
... the red and green signals. Used to automatically adjust the PC display. Used to [FUNCTION5] (frontpanel buttons). No settings FUNCTION DISPLAY Used to make display settings for 2 screen display mode.*1 The display changes in the following order. Sub menu Settings Explanation FUNCTION 1 - This is switched between "UNDER SCAN" and "NORMAL SCAN".*1 You can perform the settings for the functions assigned to individual buttons [FUNCTION1] to switch the AUDIOMETER display. Used to switch the display between color and black-and- Used to display the...
... the red and green signals. Used to automatically adjust the PC display. Used to [FUNCTION5] (frontpanel buttons). No settings FUNCTION DISPLAY Used to make display settings for 2 screen display mode.*1 The display changes in the following order. Sub menu Settings Explanation FUNCTION 1 - This is switched between "UNDER SCAN" and "NORMAL SCAN".*1 You can perform the settings for the functions assigned to individual buttons [FUNCTION1] to switch the AUDIOMETER display. Used to switch the display between color and black-and- Used to display the...
BTLH2600W User Guide
Page 23
... displayed and the setting is disabled. When "YPBPR/RGB" set in SUB WINDOW with a motion picture on, the screen turns SINGLE. CH" is displayed and the setting is disabled. When "YPBPR/RGB" set in PIXEL TO PIXEL mode during 1080P display and the 720P signal is "RGB-COMP." In SUB WINDOW or PIXEL TO PIXEL mode, "INVALID FUNCTION" is displayed and the setting is disabled. is selected in "INPUT SELECT" menu is selected, the display position moves to CENTER. When "YPBPR/RGB" set...
... displayed and the setting is disabled. When "YPBPR/RGB" set in SUB WINDOW with a motion picture on, the screen turns SINGLE. CH" is displayed and the setting is disabled. When "YPBPR/RGB" set in PIXEL TO PIXEL mode during 1080P display and the 720P signal is "RGB-COMP." In SUB WINDOW or PIXEL TO PIXEL mode, "INVALID FUNCTION" is displayed and the setting is disabled. is selected in "INPUT SELECT" menu is selected, the display position moves to CENTER. When "YPBPR/RGB" set...
BTLH2600W User Guide
Page 24
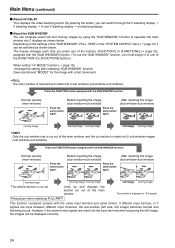
... signals are input into 2 sub window (sub window+sub window). Before inputting the image (sub window+sub window) Press the same button again. Main Menu (continued) g About HV DELAY This displays the video blanking period. Normal window (main window) Press the same button again. Normal window (main window) Press the same button again. Precautions when selecting FULL/PART This function compares screens with the SUB WINDOW function. After inputting the image (sub window+sub window) moving image...
... signals are input into 2 sub window (sub window+sub window). Before inputting the image (sub window+sub window) Press the same button again. Main Menu (continued) g About HV DELAY This displays the video blanking period. Normal window (main window) Press the same button again. Normal window (main window) Press the same button again. Precautions when selecting FULL/PART This function compares screens with the SUB WINDOW function. After inputting the image (sub window+sub window) moving image...
BTLH2600W User Guide
Page 27
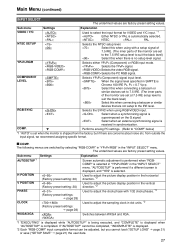
... from outside the input signal, we recommend assigning specific format. Select this when connecting a betacam or similar devices that are set when the monitor is automatically selected. Selects either YPBPR (Component) or RGB input mode. Select when a synchronizing signal is displayed. *2 Each "RGB-COMP." The following menus are factory preset setting values. Used to adjust the picture display position in the horizontal direction. *2 Used to adjust the picture display position in dot units. *2 Switches between WXGA...
... from outside the input signal, we recommend assigning specific format. Select this when connecting a betacam or similar devices that are set when the monitor is automatically selected. Selects either YPBPR (Component) or RGB input mode. Select when a synchronizing signal is displayed. *2 Each "RGB-COMP." The following menus are factory preset setting values. Used to adjust the picture display position in the horizontal direction. *2 Used to adjust the picture display position in dot units. *2 Switches between WXGA...
BTLH2600W User Guide
Page 30
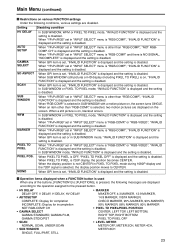
... green tally. MARKER BACK BLACK*2 Reduces the brightness of the marker decided in "GPI PRESET2" (J page 17) in "GPI PRESET1" (J page 17) to 0%. Y/C Switches the input system to VIDEO. MONO GAMMA SEL. FILM GAMMA SEL. VIDEO Switches the input system to Y/C. INPUT SEL. YPBPR/RGB Switches the input system to SDI2. SD ASPECT Sets the aspect ratio settings when using SD signal input. (Disabled when using PC signal) R-TALLY*3 Lights the red tally. REMOTE Specifications REMOTE...
... green tally. MARKER BACK BLACK*2 Reduces the brightness of the marker decided in "GPI PRESET2" (J page 17) in "GPI PRESET1" (J page 17) to 0%. Y/C Switches the input system to VIDEO. MONO GAMMA SEL. FILM GAMMA SEL. VIDEO Switches the input system to Y/C. INPUT SEL. YPBPR/RGB Switches the input system to SDI2. SD ASPECT Sets the aspect ratio settings when using SD signal input. (Disabled when using PC signal) R-TALLY*3 Lights the red tally. REMOTE Specifications REMOTE...
BTLH2600W User Guide
Page 33
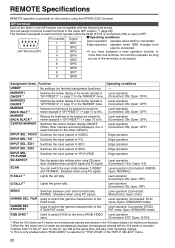
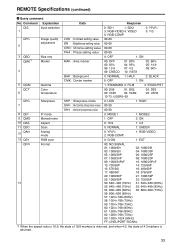
REMOTE Specifications (continued) g Query command No Command Explanation Data Response QIS 1 Input selection 0: SDI1 1: SDI2 3: RGB-VIDEO4: VIDEO 6: RGB-COMP. 2: YPBPR 5: Y/C QPC 2 Image quality adjustment CON : Contrast setting value BRI : Brightness setting value CRO : Chroma setting value 00-60 00-60 00-60 PHA : Phase setting value 00-60 3 QBO QMK*1 4 Blue only Marker MAK : Area marker 0: OFF 00: OFF 03: 93% 06: 13:9 09: CNSCO...
REMOTE Specifications (continued) g Query command No Command Explanation Data Response QIS 1 Input selection 0: SDI1 1: SDI2 3: RGB-VIDEO4: VIDEO 6: RGB-COMP. 2: YPBPR 5: Y/C QPC 2 Image quality adjustment CON : Contrast setting value BRI : Brightness setting value CRO : Chroma setting value 00-60 00-60 00-60 PHA : Phase setting value 00-60 3 QBO QMK*1 4 Blue only Marker MAK : Area marker 0: OFF 00: OFF 03: 93% 06: 13:9 09: CNSCO...
BTLH2600W User Guide
Page 34
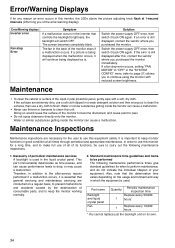
... this monitor, the LEDs above the picture adjusting knob flash at all of your equipment. Maintenance • To clean the cabinet or surface of the error/warning display). Therefore, in which the equipment is still displayed after -service repairs performed if a malfunction occurs, it will switch OFF. The screen becomes completely black. Water or similar substances getting inside the monitor can cause a malfunction. • Never use...
... this monitor, the LEDs above the picture adjusting knob flash at all of your equipment. Maintenance • To clean the cabinet or surface of the error/warning display). Therefore, in which the equipment is still displayed after -service repairs performed if a malfunction occurs, it will switch OFF. The screen becomes completely black. Water or similar substances getting inside the monitor can cause a malfunction. • Never use...
BTLH2600W User Guide
Page 35
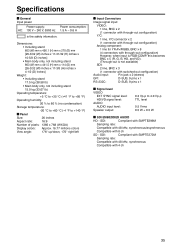
... rate: Compatible with 48 kHz, synchronous Compatible with switched-out configuration) Audio input: Pin jack x 2 (stereo) GPI: D-SUB, 9 pins x 1 RS-232C: D-SUB, 9 pins x 1 g Signal level VIDEO EXT SYNC signal level: HD/VD signal level: AUDIO AUDIO input level: Speaker output: 0.3 Vp-p to +140 °F) g Panel Size: 26 inches Aspect ratio: 16:9 Number of pixels: 1366 x 768 (WXGA) Display colors: Approx. 16.77 millions colors View angle: 176° up/down, 176° right/left g Input Connectors Image signal input: VIDEO: 1 line, BNC x 2 (1 connector...
... rate: Compatible with 48 kHz, synchronous Compatible with switched-out configuration) Audio input: Pin jack x 2 (stereo) GPI: D-SUB, 9 pins x 1 RS-232C: D-SUB, 9 pins x 1 g Signal level VIDEO EXT SYNC signal level: HD/VD signal level: AUDIO AUDIO input level: Speaker output: 0.3 Vp-p to +140 °F) g Panel Size: 26 inches Aspect ratio: 16:9 Number of pixels: 1366 x 768 (WXGA) Display colors: Approx. 16.77 millions colors View angle: 176° up/down, 176° right/left g Input Connectors Image signal input: VIDEO: 1 line, BNC x 2 (1 connector...


