

Operating Instructions
Page 2
.... • Internal LCD (Notebook)*1: The computer's display • External display (Monitor)*1: External display • Simultaneous display (Intel® Dual Display Clone)*1: The same screen is displayed on -screen manuals. assumes no liability for the latest information about optional products to double-click in these instructions carefully. Trademarks Microsoft®, Windows® and the Windows logo are either registered trademarks or trademarks of their respective own companies. 2 Appendix Panasonic® is...
.... • Internal LCD (Notebook)*1: The computer's display • External display (Monitor)*1: External display • Simultaneous display (Intel® Dual Display Clone)*1: The same screen is displayed on -screen manuals. assumes no liability for the latest information about optional products to double-click in these instructions carefully. Trademarks Microsoft®, Windows® and the Windows logo are either registered trademarks or trademarks of their respective own companies. 2 Appendix Panasonic® is...

Operating Instructions
Page 7
...immediately turn the power off and unplug the AC plug, and then remove the battery pack. Do Not Turn the Volume Up to use a damaged plug or loose AC outlet. Precautions Troubleshooting Useful Information Getting Started THIS PRODUCT IS NOT INTENDED FOR USE AS, OR AS PART OF, NUCLEAR EQUIPMENT/SYSTEMS, AIR TRAFFIC CONTROL EQUIPMENT... which may result in these types of hearing. 7 Appendix Keep SD Memory Cards Away from the use this unit in loss of equipment, devices or systems, etc. Do Not Keep This Product Wherever There is provided against such trouble. which may give you an...
...immediately turn the power off and unplug the AC plug, and then remove the battery pack. Do Not Turn the Volume Up to use a damaged plug or loose AC outlet. Precautions Troubleshooting Useful Information Getting Started THIS PRODUCT IS NOT INTENDED FOR USE AS, OR AS PART OF, NUCLEAR EQUIPMENT/SYSTEMS, AIR TRAFFIC CONTROL EQUIPMENT... which may result in these types of hearing. 7 Appendix Keep SD Memory Cards Away from the use this unit in loss of equipment, devices or systems, etc. Do Not Keep This Product Wherever There is provided against such trouble. which may give you an...
Operating Instructions
Page 9
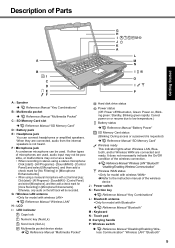
... Keyboard N : Touch pad O :Carrying handle P : Wireless switch Reference Manual "Disabling/Enabling Wireless Communication" "Wireless LAN" "Bluetooth" 9 Appendix F : Microphone jack A condenser microphone can connect headphones or amplified speakers. Description of Parts Troubleshooting Useful Information Getting Started G H I J K A L A M N B I I O C D I : LED indicator Caps lock Numeric key (NumLk) Scroll lock (ScrLk) Multimedia pocket device status Reference Manual "Multimedia Pocket" Hard disk drive status Power status (Off: Power off/Hibernation, Green: Power on, Blinking...
... Keyboard N : Touch pad O :Carrying handle P : Wireless switch Reference Manual "Disabling/Enabling Wireless Communication" "Wireless LAN" "Bluetooth" 9 Appendix F : Microphone jack A condenser microphone can connect headphones or amplified speakers. Description of Parts Troubleshooting Useful Information Getting Started G H I J K A L A M N B I I O C D I : LED indicator Caps lock Numeric key (NumLk) Scroll lock (ScrLk) Multimedia pocket device status Reference Manual "Multimedia Pocket" Hard disk drive status Power status (Off: Power off/Hibernation, Green: Power on, Blinking...

Operating Instructions
Page 10
... port Reference Manual "Modem" L : LAN port Reference Manual "LAN" M : Serial port N : Expansion bus connector Reference Manual "Port Replicator" O : RAM module slot Reference Manual "RAM Module" P : Hard disk drive latch Reference Manual "Hard Disk Drive" Q : Multimedia pocket release button Reference Manual "Multimedia Pocket" R : Battery latch NOTE When you have purchased. A lithium ion battery that comes with the cable. For further information, read the manual that is recyclable powers the product you open the covers (Example: USB port cover) of Parts Right side Getting Started...
... port Reference Manual "Modem" L : LAN port Reference Manual "LAN" M : Serial port N : Expansion bus connector Reference Manual "Port Replicator" O : RAM module slot Reference Manual "RAM Module" P : Hard disk drive latch Reference Manual "Hard Disk Drive" Q : Multimedia pocket release button Reference Manual "Multimedia Pocket" R : Battery latch NOTE When you have purchased. A lithium ion battery that comes with the cable. For further information, read the manual that is recyclable powers the product you open the covers (Example: USB port cover) of Parts Right side Getting Started...
Operating Instructions
Page 12
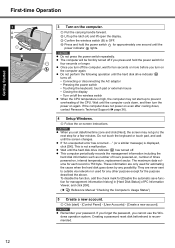
... Started First-time Operation 3 A B 2 1 4 3 Turn on -screen instructions. Do not perform the following operation until the hard disk drive indicator turns off. • Connecting or disconnecting the AC adaptor • Pressing the power switch • Touching the keyboard, touch pad or external mouse • Closing the display • Turn on/off the wireless switch When the CPU temperature is 750 byte. CAUTION When you set date/time/time zone and click [Next], the screen may not start ] - [Control Panel] - [User Accounts] - [Create a new...
... Started First-time Operation 3 A B 2 1 4 3 Turn on -screen instructions. Do not perform the following operation until the hard disk drive indicator turns off. • Connecting or disconnecting the AC adaptor • Pressing the power switch • Touching the keyboard, touch pad or external mouse • Closing the display • Turn on/off the wireless switch When the CPU temperature is 750 byte. CAUTION When you set date/time/time zone and click [Next], the screen may not start ] - [Control Panel] - [User Accounts] - [Create a new...
Operating Instructions
Page 14
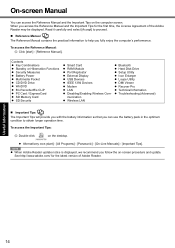
... Tips for the latest version of the Adobe Reader may be displayed. Contents Key Combinations Standby or Hibernation Functions Security Measures Battery Power Multimedia Pocket CD/DVD Drive WinDVD B's Recorder/B's CLiP PC Card / ExpressCard SD Memory Card SD Security Smart Card RAM Module Port Replicator External Display USB Devices IEEE 1394 Devices Modem LAN Disabling/Enabling Wireless Communication Wireless LAN Bluetooth Hard Disk Drive Setup Utility Icon Enlarger Loupe Utility DMI Viewer Recover Pro Technical Information Troubleshooting (Advanced) Important Tips The Important Tips will...
... Tips for the latest version of the Adobe Reader may be displayed. Contents Key Combinations Standby or Hibernation Functions Security Measures Battery Power Multimedia Pocket CD/DVD Drive WinDVD B's Recorder/B's CLiP PC Card / ExpressCard SD Memory Card SD Security Smart Card RAM Module Port Replicator External Display USB Devices IEEE 1394 Devices Modem LAN Disabling/Enabling Wireless Communication Wireless LAN Bluetooth Hard Disk Drive Setup Utility Icon Enlarger Loupe Utility DMI Viewer Recover Pro Technical Information Troubleshooting (Advanced) Important Tips The Important Tips will...
Operating Instructions
Page 15
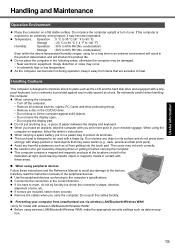
... using wireless LAN/Bluetooth/Wireless WAN, make the appropriate security settings such as the LCD and the hard disk drive and equipped with a finger tip. Do not place the computer upright or turn it is designed to insert, do not press down or getting into the touch pad. Be extremely careful when handling the computer. If screws are sensitive to get injured by shock. Troubleshooting Useful...
... using wireless LAN/Bluetooth/Wireless WAN, make the appropriate security settings such as the LCD and the hard disk drive and equipped with a finger tip. Do not place the computer upright or turn it is designed to insert, do not press down or getting into the touch pad. Be extremely careful when handling the computer. If screws are sensitive to get injured by shock. Troubleshooting Useful...
Operating Instructions
Page 17
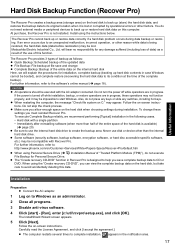
...than the internal hard disk drive. Some software (security software, backup software, encryption software, or hard disc accessible specific software, etc.) may appear. For further information, refer to start ] - [Run], enter [c:\util\rcvpro\setup.exe], and click [OK]. When restarting the computer, the message "Check file system on -screen instructions. Appendix Installation Preparation Connect the AC adaptor. 1 Log on the hard disk when choosing settings during data backup or restoring. Do not turn the power off while installation, backup, or restore operations are...
...than the internal hard disk drive. Some software (security software, backup software, encryption software, or hard disc accessible specific software, etc.) may appear. For further information, refer to start ] - [Run], enter [c:\util\rcvpro\setup.exe], and click [OK]. When restarting the computer, the message "Check file system on -screen instructions. Appendix Installation Preparation Connect the AC adaptor. 1 Log on the hard disk when choosing settings during data backup or restoring. Do not turn the power off while installation, backup, or restore operations are...
Operating Instructions
Page 19
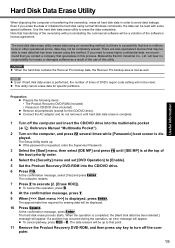
... Setup Utility starts up to turn off the computer and insert the CD/DVD drive into the CD/DVD drive. 6 Press F10. If the password is requested, enter the Supervisor Password. 3 Select the [Boot] menu, then select [IDE MP] and press F6 until hard disk data erase is complete. 1 Turn off the computer. 19 Appendix When the operation is displayed. CAUTION When the hard disk contains the Recover Pro backup data, the Recover Pro backup area...
... Setup Utility starts up to turn off the computer and insert the CD/DVD drive into the CD/DVD drive. 6 Press F10. If the password is requested, enter the Supervisor Password. 3 Select the [Boot] menu, then select [IDE MP] and press F6 until hard disk data erase is complete. 1 Turn off the computer. 19 Appendix When the operation is displayed. CAUTION When the hard disk contains the Recover Pro backup data, the Recover Pro backup area...
Operating Instructions
Page 20
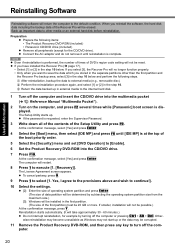
... to the internal hard disk. 1 Turn off the computer and insert the CD/DVD drive into the CD/DVD drive. 7 Press F10. Appendix 20 Reinstalling Software Troubleshooting Useful Information Getting Started Reinstalling software will return the computer to execute [1. [Recovery]]. Back up in external media to continue!]. 10 Select the settings. [2]: Enter the size of operating system partition and press Enter. (The size of the Setup Utility and press F9. A After reinstallation, backup the...
... to the internal hard disk. 1 Turn off the computer and insert the CD/DVD drive into the CD/DVD drive. 7 Press F10. Appendix 20 Reinstalling Software Troubleshooting Useful Information Getting Started Reinstalling software will return the computer to execute [1. [Recovery]]. Back up in external media to continue!]. 10 Select the settings. [2]: Enter the size of operating system partition and press Enter. (The size of the Setup Utility and press F9. A After reinstallation, backup the...
Operating Instructions
Page 22
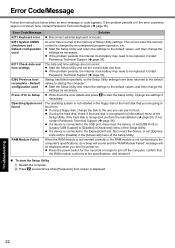
... to startup the computer. Error Code/Message 0211 Keyboard error 0251 System CMOS checksum bad Default configuration used Press to be replaced. Default configuration used 0271 Check date and time settings 0280 Previous boot incomplete - If a device is changed by an unexpected program operation, etc. Appendix 22 To start the Setup Utility. Troubleshooting Useful Information Getting Started Error Code/Message Follow the instructions below when an error message or code appears. If the problem persists, the internal clock battery may need to Setup Operating System...
... to startup the computer. Error Code/Message 0211 Keyboard error 0251 System CMOS checksum bad Default configuration used Press to be replaced. Default configuration used 0271 Check date and time settings 0280 Previous boot incomplete - If a device is changed by an unexpected program operation, etc. Appendix 22 To start the Setup Utility. Troubleshooting Useful Information Getting Started Error Code/Message Follow the instructions below when an error message or code appears. If the problem persists, the internal clock battery may need to Setup Operating System...
Operating Instructions
Page 23
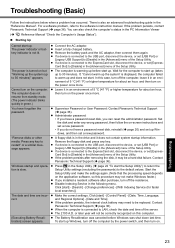
... Options] - [Date and Time]. If the problem persists, contact Panasonic Technical Support ( page 36). Contact Panasonic Technical Support ( page 36). Troubleshooting Useful Information Getting Started Troubleshooting (Basic) Follow the instructions below when a problem has occurred. The power is connected to the USB port, disconnect the device, or set up Windows, turn on but "Warming up the system (up . The computer does not resume from standby mode. (The power indicator blinks quickly in the following menu. If a device...
... Options] - [Date and Time]. If the problem persists, contact Panasonic Technical Support ( page 36). Contact Panasonic Technical Support ( page 36). Troubleshooting Useful Information Getting Started Troubleshooting (Basic) Follow the instructions below when a problem has occurred. The power is connected to the USB port, disconnect the device, or set up Windows, turn on but "Warming up the system (up . The computer does not resume from standby mode. (The power indicator blinks quickly in the following menu. If a device...
Operating Instructions
Page 24
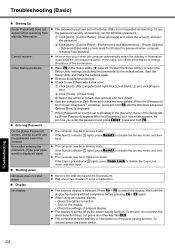
... [Start]. If the NumLk indicator lights, press NumLk to see if there was a disk error. If the Caps Lock indicator lights, press Caps Lock to switch the display. Display Remove the USB device and the ExpressCard. No display. Press Fn + F3 to disable the Caps Lock mode, and then input. B Click [start the Setup Utility") to return the Setup Utility settings (excluding the passwords) to the default values. Start the computer in the Setup Utility ( page 22 "To start ] - [Control Panel] - [Performance and Maintenance] - [Power Options...
... [Start]. If the NumLk indicator lights, press NumLk to see if there was a disk error. If the Caps Lock indicator lights, press Caps Lock to switch the display. Display Remove the USB device and the ExpressCard. No display. Press Fn + F3 to disable the Caps Lock mode, and then input. B Click [start the Setup Utility") to return the Setup Utility settings (excluding the passwords) to the default values. Start the computer in the Setup Utility ( page 22 "To start ] - [Control Panel] - [Performance and Maintenance] - [Power Options...

Operating Instructions
Page 25
...the window display is restored by pressing Alt + Enter, the picture is complete (during Setup Utility, etc.). When using the touch pad. B Click [start ] [Control Panel] - [Other Control Panel Options] - [Intel(R) GMA Driver for some mice may not work normally when the computer enters the power saving mode. Cannot input using the external mouse, connect it may disable the touch pad. Changing the number of the Setup Utility. If you increase the brightness, battery consumption increases. The drivers for Mobile] [Display Devices]. The external display does not work . Restart...
...the window display is restored by pressing Alt + Enter, the picture is complete (during Setup Utility, etc.). When using the touch pad. B Click [start ] [Control Panel] - [Other Control Panel Options] - [Intel(R) GMA Driver for some mice may not work normally when the computer enters the power saving mode. Cannot input using the external mouse, connect it may disable the touch pad. Changing the number of the Setup Utility. If you increase the brightness, battery consumption increases. The drivers for Mobile] [Display Devices]. The external display does not work . Restart...
Operating Instructions
Page 27
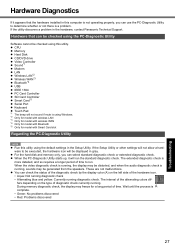
... . Troubleshooting Useful Information Getting Started Hardware Diagnostics If it will be displayed in gray. Hardware that the hardware installed in the hardware, contact Panasonic Technical Support. For the hard disk and memory only, you can use the PC-Diagnostic Utility to run the standard diagnostic check. fers depending on the left side of the alternating colors dif- CPU Memory Hard Disk CD/DVD drive Video Controller Sound*1 Modem LAN Wireless LAN*2 Wireless WAN*3 Bluetooth*4 USB IEEE 1394 PC Card Controller SD Card Controller Smart Card*5 Serial Port Keyboard Touch Pad...
... . Troubleshooting Useful Information Getting Started Hardware Diagnostics If it will be displayed in gray. Hardware that the hardware installed in the hardware, contact Panasonic Technical Support. For the hard disk and memory only, you can use the PC-Diagnostic Utility to run the standard diagnostic check. fers depending on the left side of the alternating colors dif- CPU Memory Hard Disk CD/DVD drive Video Controller Sound*1 Modem LAN Wireless LAN*2 Wireless WAN*3 Bluetooth*4 USB IEEE 1394 PC Card Controller SD Card Controller Smart Card*5 Serial Port Keyboard Touch Pad...
Operating Instructions
Page 29
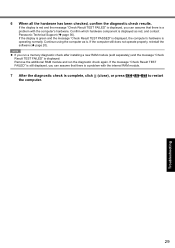
... Result TEST FAILED" is displayed, you run a memory diagnostic check after installing a new RAM module (sold separately) and the message "Check Result TEST FAILED" is a problem with the computer's hardware. If the computer still does not operate properly, reinstall the software ( page 20). Confirm which hardware component is displayed as is operating normally. Troubleshooting Useful Information Getting Started 6 When all the hardware has been checked, confirm the...
... Result TEST FAILED" is displayed, you run a memory diagnostic check after installing a new RAM module (sold separately) and the message "Check Result TEST FAILED" is a problem with the computer's hardware. If the computer still does not operate properly, reinstall the software ( page 20). Confirm which hardware component is displayed as is operating normally. Troubleshooting Useful Information Getting Started 6 When all the hardware has been checked, confirm the...
Operating Instructions
Page 32
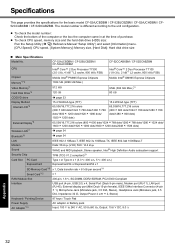
...) Keyboard / Pointing Device 87 keys / Touch Pad Power Supply AC adaptor or Battery pack AC Adaptor*13 Input: 100 V to the unit configuration. The model number is different according to 240 V AC, 50 Hz/60 Hz, Output: 15.6 V DC, 8.0 A Appendix 32 To check CPU speed, memory size and the hard disk drive (HDD) size: Run the Setup Utility ( Reference Manual "Setup Utility") and select [Information] menu. [CPU Speed]: CPU speed, [System Memory]: Memory size, [Hard Disk]: Hard disk drive size Main Specifications Model...
...) Keyboard / Pointing Device 87 keys / Touch Pad Power Supply AC adaptor or Battery pack AC Adaptor*13 Input: 100 V to the unit configuration. The model number is different according to 240 V AC, 50 Hz/60 Hz, Output: 15.6 V DC, 8.0 A Appendix 32 To check CPU speed, memory size and the hard disk drive (HDD) size: Run the Setup Utility ( Reference Manual "Setup Utility") and select [Information] menu. [CPU Speed]: CPU speed, [System Memory]: Memory size, [Hard Disk]: Hard disk drive size Main Specifications Model...
Operating Instructions
Page 33
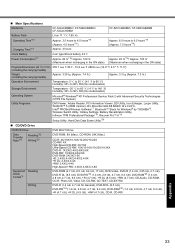
..., Adobe Reader, PC Information Viewer, SD Utility, Icon Enlarger, Loupe Utility, WinDVD™ 5 (OEM Version), B's Recorder GOLD8 BASIC, B's CLiP 6, Intel® PROSet/Wireless Software*7, Bluetooth™ Stack for Windows® by TOSHIBA*8, Wireless Switch Utility, Hotkey Settings, Battery Recalibration Utility, Infineon TPM Professional Package*19, Recover Pro™ 6*19 Setup Utility, Hard Disk Data Erase Utility*20 CD/DVD Drive CD/DVD Drive Data Transfer Rate*21 Reading*22 Writing*23 Supported Reading Discs/ Format*4 Writing DVD MULTI Drive DVD-ROM: 8X...
..., Adobe Reader, PC Information Viewer, SD Utility, Icon Enlarger, Loupe Utility, WinDVD™ 5 (OEM Version), B's Recorder GOLD8 BASIC, B's CLiP 6, Intel® PROSet/Wireless Software*7, Bluetooth™ Stack for Windows® by TOSHIBA*8, Wireless Switch Utility, Hotkey Settings, Battery Recalibration Utility, Infineon TPM Professional Package*19, Recover Pro™ 6*19 Setup Utility, Hard Disk Data Erase Utility*20 CD/DVD Drive CD/DVD Drive Data Transfer Rate*21 Reading*22 Writing*23 Supported Reading Discs/ Format*4 Writing DVD MULTI Drive DVD-ROM: 8X...
Operating Instructions
Page 34
... set by using the dithering function. *6 Maximum resolution depends on the specifications of the external display. *7 Only for model with wireless LAN *8 Only for model with Smart Card slot *13 The AC adaptor is compatible with a 125 V AC compatible AC cord. 20-M-2-1 *14 Varies depending on the usage conditions. *15 Measured using BatteryMark™ Version 4.0.1 (LCD bright- Minimum) *16 Measured using Panasonic SD Memory Cards with MultiMediaCards or SDHC Memory Cards...
... set by using the dithering function. *6 Maximum resolution depends on the specifications of the external display. *7 Only for model with wireless LAN *8 Only for model with Smart Card slot *13 The AC adaptor is compatible with a 125 V AC compatible AC cord. 20-M-2-1 *14 Varies depending on the usage conditions. *15 Measured using BatteryMark™ Version 4.0.1 (LCD bright- Minimum) *16 Measured using Panasonic SD Memory Cards with MultiMediaCards or SDHC Memory Cards...
Operating Instructions
Page 35
... product is covered under the warranty is backed up and made secure during normal use for service. 35 Appendix Panasonic Computer Solutions Company - Hardware Panasonic Computer Solutions Company (referred to Wireless WAN, Media Bay Drives (Floppy, CD/ DVD), GPS, Bluetooth, Smartcard Reader, and Fingerprint readers - 3 Years or assumes warranty period of purchase, except as "Panasonic") will repair the products listed below with new or rebuilt parts, free of original...
... product is covered under the warranty is backed up and made secure during normal use for service. 35 Appendix Panasonic Computer Solutions Company - Hardware Panasonic Computer Solutions Company (referred to Wireless WAN, Media Bay Drives (Floppy, CD/ DVD), GPS, Bluetooth, Smartcard Reader, and Fingerprint readers - 3 Years or assumes warranty period of purchase, except as "Panasonic") will repair the products listed below with new or rebuilt parts, free of original...


