
CSA12CKPG User Guide
Page 1
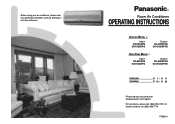
... operating instructions carefully and keep it for future reference. ® Room Air Conditioner OPERATING INSTRUCTIONS Before using your product at www.panasonic.com/register For assistance, please call; (866)-292-7292, for future reference. COOLING MODEL :- P. 22 Please register your air-conditioner, please read this operating instructions carefully and keep it for Hawaii residents call (808)-488-7779. Indoor CS-C9CKPG CS-C12CKPG Outdoor CU-C9CKP6G CU-C12CKP6G HEAT-PUMP MODEL...
... operating instructions carefully and keep it for future reference. ® Room Air Conditioner OPERATING INSTRUCTIONS Before using your product at www.panasonic.com/register For assistance, please call; (866)-292-7292, for future reference. COOLING MODEL :- P. 22 Please register your air-conditioner, please read this operating instructions carefully and keep it for Hawaii residents call (808)-488-7779. Indoor CS-C9CKPG CS-C12CKPG Outdoor CU-C9CKP6G CU-C12CKP6G HEAT-PUMP MODEL...
CSA12CKPG User Guide
Page 2
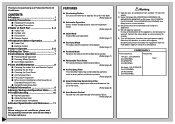
... :How to Operate 5~6 :Setting the Timer 7 :Convenience Operation 7 I Powerful Mode Operation I Economy Mode Operation I Quiet Mode Operation :Care and Maintenance 8 I Cleaning the Indoor Unit and Remote Control I Cleaning the Air Filter I Cleaning the Front Panel I Air Purifying Filters I Pre-season Inspection I When the Air Conditioner is Not Used for an Extended Period of Time I Recommended Inspection :Helpful Information 9 :Energy Saving and Operation Hints ........ 9 :Troubleshooting 10 I Normal Operation I Abnormal Operation I Call the Dealer Immediately :Product Specification and...
... :How to Operate 5~6 :Setting the Timer 7 :Convenience Operation 7 I Powerful Mode Operation I Economy Mode Operation I Quiet Mode Operation :Care and Maintenance 8 I Cleaning the Indoor Unit and Remote Control I Cleaning the Air Filter I Cleaning the Front Panel I Air Purifying Filters I Pre-season Inspection I When the Air Conditioner is Not Used for an Extended Period of Time I Recommended Inspection :Helpful Information 9 :Energy Saving and Operation Hints ........ 9 :Troubleshooting 10 I Normal Operation I Abnormal Operation I Call the Dealer Immediately :Product Specification and...
CSA12CKPG User Guide
Page 3
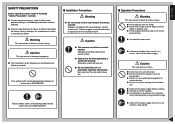
... instructions must be earthed. G The instructions to property. Otherwise, water will cause leakage, electric shock or fire. G Do not install the unit in a potentially explosive atmosphere. G Use specified power cord. Caution This sign warns of usage. Warning G Do not install, remove and reinstall the unit by the following "Safety Precautions" carefully. OFF These symbols (with a white background) denotes an action that the drainage piping...
... instructions must be earthed. G The instructions to property. Otherwise, water will cause leakage, electric shock or fire. G Do not install the unit in a potentially explosive atmosphere. G Use specified power cord. Caution This sign warns of usage. Warning G Do not install, remove and reinstall the unit by the following "Safety Precautions" carefully. OFF These symbols (with a white background) denotes an action that the drainage piping...
CSA12CKPG User Guide
Page 4
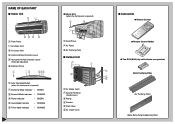
... cover) 3 Piping 4 Conduit 5 Drain Hose 6 Air Outlet Vents I Indoor Unit 1 2 ECONOMY POWERFUL POWER QQUUIIEETT TIMER 65 4 3 1 Front Panel 2 Air Intake Vent 3 Air Outlet Vent 4 Vertical Airflow Direction Louver 5 Horizontal Airflow Direction Louver (manually adjusted) 6 Indicator Panel 1 23 456 ECONOMY POWERFUL POWER QUIET TIMER 1 Auto Operation Button (when the front panel is opened) 2 Economy Mode Indicator - GREEN 3 Powerful Mode Indicator - ORANGE 6 Timer Mode Indicator - NAME OF EACH PART I Accessories G Remote Control QUIET ON OFF AUTO F HEATACUOTOOL DRY FAN...
... cover) 3 Piping 4 Conduit 5 Drain Hose 6 Air Outlet Vents I Indoor Unit 1 2 ECONOMY POWERFUL POWER QQUUIIEETT TIMER 65 4 3 1 Front Panel 2 Air Intake Vent 3 Air Outlet Vent 4 Vertical Airflow Direction Louver 5 Horizontal Airflow Direction Louver (manually adjusted) 6 Indicator Panel 1 23 456 ECONOMY POWERFUL POWER QUIET TIMER 1 Auto Operation Button (when the front panel is opened) 2 Economy Mode Indicator - GREEN 3 Powerful Mode Indicator - ORANGE 6 Timer Mode Indicator - NAME OF EACH PART I Accessories G Remote Control QUIET ON OFF AUTO F HEATACUOTOOL DRY FAN...
CSA12CKPG User Guide
Page 5
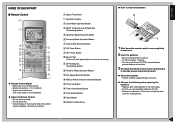
...remove it. 2 Insert the batteries - NAME OF EACH PART I Remote Control 1 2 AUTO HEAT COOL DRY FAN AUTO F ON OFF AUTO FAN TEMP 3 QUIET 4 OFF/ON ! 5 # 6 MODE ECONOMY POWERFUL AIR SWING $ 7 AUTO MANUAL FAN SPEED $ 8 1 2 3 % ON SET 9 OFF ^ CANCEL TIMER & 0 CHECK RESET CLOCK * ( G Remote Control Signal • Make sure it is correct - 12:00 on display - flashing • Set the current time (CLOCK) immediately to clear the memory) ! Consult your dealer. 1 Signal Transmitter 2 Operation Display 3 Quiet Mode Operation Button 4 Room Temperature Setting Button...
...remove it. 2 Insert the batteries - NAME OF EACH PART I Remote Control 1 2 AUTO HEAT COOL DRY FAN AUTO F ON OFF AUTO FAN TEMP 3 QUIET 4 OFF/ON ! 5 # 6 MODE ECONOMY POWERFUL AIR SWING $ 7 AUTO MANUAL FAN SPEED $ 8 1 2 3 % ON SET 9 OFF ^ CANCEL TIMER & 0 CHECK RESET CLOCK * ( G Remote Control Signal • Make sure it is correct - 12:00 on display - flashing • Set the current time (CLOCK) immediately to clear the memory) ! Consult your dealer. 1 Signal Transmitter 2 Operation Display 3 Quiet Mode Operation Button 4 Room Temperature Setting Button...
CSA12CKPG User Guide
Page 6
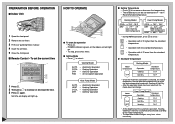
... Operation Heat Pump Model AUTO HEAT COOL DRY - Soft Dry Operation I Setting Mode • Press 2 to select the desired operation mode with 4°F lower than the room temperature HEAT -> 68°F ~ 75°F • During AUTO Operation, press 3 to increase or decrease the time. 3 Press 1 again. Cooling Operation - PREPARATION BEFORE OPERATION I Indoor Unit 1 5 2 43 1 Open the front panel AUTO HEAT COOL DRY FAN 2 Remove the air filters AUTO 3 Fit the air purifying filters in place AUTO 4 Insert the air filters FAN 5 Close the front panel I To start the operation...
... Operation Heat Pump Model AUTO HEAT COOL DRY - Soft Dry Operation I Setting Mode • Press 2 to select the desired operation mode with 4°F lower than the room temperature HEAT -> 68°F ~ 75°F • During AUTO Operation, press 3 to increase or decrease the time. 3 Press 1 again. Cooling Operation - PREPARATION BEFORE OPERATION I Indoor Unit 1 5 2 43 1 Open the front panel AUTO HEAT COOL DRY FAN 2 Remove the air filters AUTO 3 Fit the air purifying filters in place AUTO 4 Insert the air filters FAN 5 Close the front panel I To start the operation...
CSA12CKPG User Guide
Page 7
... the indoor unit has been turned off the main power supply. HEAT Operation AUTO - As the temperature rises, the hot air blows in a horizontal direction. I Setting the Fan Speed • Press 4 to select:- G Operation Details COOL - Cooling Operation • To set temperature. (It is not displayed on the remote control during cooling operation. DRY - It does not lower the room temperature. • During Soft Dry operation, the indoor fan operates at the start of the unit might be used for Heat Pump Model only) • Heat is obtained from outdoor air...
... the indoor unit has been turned off the main power supply. HEAT Operation AUTO - As the temperature rises, the hot air blows in a horizontal direction. I Setting the Fan Speed • Press 4 to select:- G Operation Details COOL - Cooling Operation • To set temperature. (It is not displayed on the remote control during cooling operation. DRY - It does not lower the room temperature. • During Soft Dry operation, the indoor fan operates at the start of the unit might be used for Heat Pump Model only) • Heat is obtained from outdoor air...
CSA12CKPG User Guide
Page 8
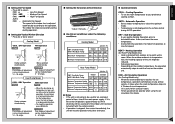
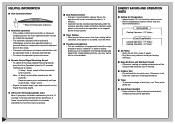
... Automatic Powerful Mode Operation COOL / DRY HEAT (for Heat Pump model only) Temperature 5°F lower than set temp. 5°F higher than set time. I Economy Mode Operation To save electrical power consumption. I ON-TIMER Operation To start before setting the timer. The timer cannot be set time. G Operation Details • Air flow sound will light up . • To cancel this operation, press 4. Please use this mode when the room has reached your desired temperature. • Press 7. * Economy mode indicator (green) on the indoor unit will light up. * Powerful mode...
... Automatic Powerful Mode Operation COOL / DRY HEAT (for Heat Pump model only) Temperature 5°F lower than set temp. 5°F higher than set time. I Economy Mode Operation To save electrical power consumption. I ON-TIMER Operation To start before setting the timer. The timer cannot be set time. G Operation Details • Air flow sound will light up . • To cancel this operation, press 4. Please use this mode when the room has reached your desired temperature. • Press 7. * Economy mode indicator (green) on the indoor unit will light up. * Powerful mode...
CSA12CKPG User Guide
Page 9
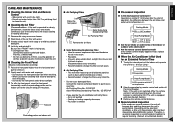
... or outlet vents of the air filter with water. 3 If badly soiled, wash it with soap or a mild household detergent. 4 Let it dry and reinstall it. If the remote control display appears weak, replace the batteries. Cooling Model FAN operation Heat Pump Model COOL operation with 86°F set temperature 2 Stop the operation by remote control and switch off by the remote control, it will start of operation, the difference between the air intake and outlet vents temperature is Not Used for an...
... or outlet vents of the air filter with water. 3 If badly soiled, wash it with soap or a mild household detergent. 4 Let it dry and reinstall it. If the remote control display appears weak, replace the batteries. Cooling Model FAN operation Heat Pump Model COOL operation with 86°F set temperature 2 Stop the operation by remote control and switch off by the remote control, it will start of operation, the difference between the air intake and outlet vents temperature is Not Used for an...
CSA12CKPG User Guide
Page 10
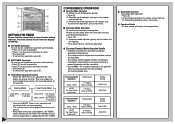
...;F higher Heat Pump Model Cooling Operation : 2°F higher Heating Operation : 4°F lower I Auto Operation Button ECONOMY POWERFUL POWER QUIET TIMER • Raise the front panel and press. Note : A "beep" sound will be adjusted when in this button continuously for 5 to avoid direct sunlight during cooling operation. 9 G (This is resumed, reset the timer. I Setting the Temperature • Approximately 10% of electricity, use Timer when going out. HELPFUL INFORMATION I Air Filters • Clean the air filters every 2 weeks. • Dirty filters may switch off the...
...;F higher Heat Pump Model Cooling Operation : 2°F higher Heating Operation : 4°F lower I Auto Operation Button ECONOMY POWERFUL POWER QUIET TIMER • Raise the front panel and press. Note : A "beep" sound will be adjusted when in this button continuously for 5 to avoid direct sunlight during cooling operation. 9 G (This is resumed, reset the timer. I Setting the Temperature • Approximately 10% of electricity, use Timer when going out. HELPFUL INFORMATION I Air Filters • Clean the air filters every 2 weeks. • Dirty filters may switch off the...
CSA12CKPG User Guide
Page 11
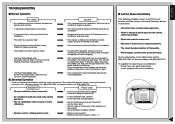
... air conditioner does not cool or warm effectively. • Remote control / display doesn't work. • Has the circuit breaker been tripped? • Is the timer being used correctly? • Is the installation work slanted? • Is the front grille closed properly? • Has the temperature been set incorrectly? • Are the filters dirty? • Are the intake or outlet vents of outdoor unit piping that causes dripping. • (For Heat Pump Model only) Operation stops for...
... air conditioner does not cool or warm effectively. • Remote control / display doesn't work. • Has the circuit breaker been tripped? • Is the timer being used correctly? • Is the installation work slanted? • Is the front grille closed properly? • Has the temperature been set incorrectly? • Are the filters dirty? • Are the intake or outlet vents of outdoor unit piping that causes dripping. • (For Heat Pump Model only) Operation stops for...
CSA12CKPG User Guide
Page 12
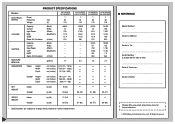
...) • Specifications are subject to change without notice for further improvement. 11 I REFERENCE Model Number Dealer's Address Dealer's Tel Serial Number : (Located on the side of unit Date of Purchase Dealer's Name Please affix your proof of purchase here for future reference. © 2002 Matsushita Electrical Co, Ltd. Input Power (Watts) - COP (Btu/Watt.h) - Models ELECTRICAL RATING COOLING HEATING MOISTURE REMOVAL DIMENSIONS NET WEIGHT GROSS WEIGHT PRODUCT SPECIFICATIONS Phase Frequency...
...) • Specifications are subject to change without notice for further improvement. 11 I REFERENCE Model Number Dealer's Address Dealer's Tel Serial Number : (Located on the side of unit Date of Purchase Dealer's Name Please affix your proof of purchase here for future reference. © 2002 Matsushita Electrical Co, Ltd. Input Power (Watts) - COP (Btu/Watt.h) - Models ELECTRICAL RATING COOLING HEATING MOISTURE REMOVAL DIMENSIONS NET WEIGHT GROSS WEIGHT PRODUCT SPECIFICATIONS Phase Frequency...
CSA12CKPG User Guide
Page 24
..., misapplication, alteration, faulty installation, set-up adjustments, operating the product in a corrosive atmosphere containing chlorine, fluorine, or any other chemicals, misadjustment of consumer controls, improper maintenance, power line surge, lightning damage, modification, or service by anyone other proof of Split Air Conditioner except Compressor and Remote Control Transmitter Compressor Remote Control Transmitter (in the United States or Puerto Rico and is attributable to acts of a new product which was not...
..., misapplication, alteration, faulty installation, set-up adjustments, operating the product in a corrosive atmosphere containing chlorine, fluorine, or any other chemicals, misadjustment of consumer controls, improper maintenance, power line surge, lightning damage, modification, or service by anyone other proof of Split Air Conditioner except Compressor and Remote Control Transmitter Compressor Remote Control Transmitter (in the United States or Puerto Rico and is attributable to acts of a new product which was not...


