
User Manual
Page 6
... functions or settings shown on the page. MENU /SET Convenient or helpful information for DMC-FX07 as an example. ∫ About illustrations of the cursor button and [MENU/SET] button In these operating instructions show DMC-FX07. The procedure is described. 6 VQT0Y69 Rotate the mode dial slowly and surely to adjust to each mode. : Normal picture mode (P24) Use this mode for normal recording. : Macro mode (P48) This mode allows you to take a close-up picture...
... functions or settings shown on the page. MENU /SET Convenient or helpful information for DMC-FX07 as an example. ∫ About illustrations of the cursor button and [MENU/SET] button In these operating instructions show DMC-FX07. The procedure is described. 6 VQT0Y69 Rotate the mode dial slowly and surely to adjust to each mode. : Normal picture mode (P24) Use this mode for normal recording. : Macro mode (P48) This mode allows you to take a close-up picture...
User Manual
Page 7
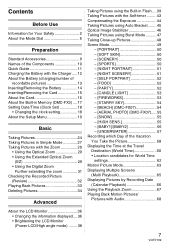
... Setting Date/Time (Clock Set 18 • Changing the clock setting 18 About the Setup Menu 19 Basic Taking Pictures 24 Taking Pictures in Simple Mode 27 Taking Pictures with the Zoom 29 • Using the Optical Zoom 29 • Using the Extended Optical Zoom (EZ 29 • Using the Digital Zoom Further extending the zoom 31 Checking the Recorded Picture (Review 32 Playing Back Pictures 33 Deleting Pictures 34 Advanced Taking Pictures using the Built-in Flash ....39 Taking Pictures with the Self-timer ......... 43 Compensating the Exposure 44 Taking Pictures using Auto...
... Setting Date/Time (Clock Set 18 • Changing the clock setting 18 About the Setup Menu 19 Basic Taking Pictures 24 Taking Pictures in Simple Mode 27 Taking Pictures with the Zoom 29 • Using the Optical Zoom 29 • Using the Extended Optical Zoom (EZ 29 • Using the Digital Zoom Further extending the zoom 31 Checking the Recorded Picture (Review 32 Playing Back Pictures 33 Deleting Pictures 34 Advanced Taking Pictures using the Built-in Flash ....39 Taking Pictures with the Self-timer ......... 43 Compensating the Exposure 44 Taking Pictures using Auto...

User Manual
Page 8
... .... 87 • [ASPECT CONV.] Changing the aspect ratio of a 16:9 picture 88 • [COPY] (DMC-FX3) Copying the picture data 89 • [FORMAT] Initializing the card 90 Connecting to other equipment Connecting to a PC 91 Printing the Pictures 94 Playing Back Pictures on a TV Screen .... 98 Others Screen Display 99 Cautions for Use 102 Message Display 104 Troubleshooting 106 Number of Recordable Pictures and Available Recording Time 111 Specifications 114 Digital Camera Accessory System ....... 117 Digital Camera Accessory Order Form (For USA...
... .... 87 • [ASPECT CONV.] Changing the aspect ratio of a 16:9 picture 88 • [COPY] (DMC-FX3) Copying the picture data 89 • [FORMAT] Initializing the card 90 Connecting to other equipment Connecting to a PC 91 Printing the Pictures 94 Playing Back Pictures on a TV Screen .... 98 Others Screen Display 99 Cautions for Use 102 Message Display 104 Troubleshooting 106 Number of Recordable Pictures and Available Recording Time 111 Specifications 114 Digital Camera Accessory System ....... 117 Digital Camera Accessory Order Form (For USA...
User Manual
Page 13
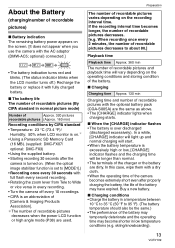
....] Playback time Playback time Approx. 360 min The number of recordable pictures and playback time will start. • When the battery temperature is an abbreviation of [Camera & Imaging Products Association]. ¢The number of recordable pictures decreases when the power LCD function or high angle mode (P38) are the same as above. • The [CHARGE] indicator lights when charging starts. ∫ When the [CHARGE] indicator flashes • The battery is over discharged (discharged excessively). Buy a new battery. ∫ Charging conditions • Charge...
....] Playback time Playback time Approx. 360 min The number of recordable pictures and playback time will start. • When the battery temperature is an abbreviation of [Camera & Imaging Products Association]. ¢The number of recordable pictures decreases when the power LCD function or high angle mode (P38) are the same as above. • The [CHARGE] indicator lights when charging starts. ∫ When the [CHARGE] indicator flashes • The battery is over discharged (discharged excessively). Buy a new battery. ∫ Charging conditions • Charge...
User Manual
Page 16
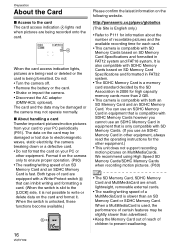
... being recorded onto the card. 3 When the card access indication lights, pictures are equipped with a Write-Protect switch B that is only compatible with SDHC Memory Cards however you cannot use an SDHC Memory Card in equipment that can use an SDHC Memory Card in equipment that is compatible with SD Memory Cards. (If you use an SDHC Memory Card in other equipment, always read or deleted or the card is compatible with SD Memory Cards based on SD Memory Card Specifications and formatted...
... being recorded onto the card. 3 When the card access indication lights, pictures are equipped with a Write-Protect switch B that is only compatible with SDHC Memory Cards however you cannot use an SDHC Memory Card in equipment that can use an SDHC Memory Card in equipment that is compatible with SD Memory Cards. (If you use an SDHC Memory Card in other equipment, always read or deleted or the card is compatible with SD Memory Cards based on SD Memory Card Specifications and formatted...

User Manual
Page 19
... menu screen items • There are 4 menu screens (1/4, 2/4, 3/4 and 4/4). • You can switch menu screens from any menu item by rotating the zoom lever. About the Setup Menu • Set items as required. (Refer to P20 to select the menu item. P OFFVOLUME NO.RESET SHUTTER SELECT RESET EXIT MENU USB MODE VIDEO OUT SELECT 3/4 LEVEL3 SETUP TV ASPECT SCENE MENU NLTSACNGUAGE EXIT MENU 4/4 AUTO ENG SELECT EXIT MENU SETUP 2/4 AUTO REVIEW 1SEC. SETUP 1/4 CLOCK SET WORLD TIME MONITOR n0 GUIDE LINE TRAVEL DATE...
... menu screen items • There are 4 menu screens (1/4, 2/4, 3/4 and 4/4). • You can switch menu screens from any menu item by rotating the zoom lever. About the Setup Menu • Set items as required. (Refer to P20 to select the menu item. P OFFVOLUME NO.RESET SHUTTER SELECT RESET EXIT MENU USB MODE VIDEO OUT SELECT 3/4 LEVEL3 SETUP TV ASPECT SCENE MENU NLTSACNGUAGE EXIT MENU 4/4 AUTO ENG SELECT EXIT MENU SETUP 2/4 AUTO REVIEW 1SEC. SETUP 1/4 CLOCK SET WORLD TIME MONITOR n0 GUIDE LINE TRAVEL DATE...
User Manual
Page 20
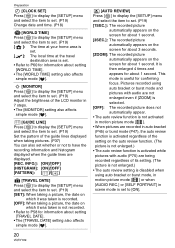
... [ MENU ] to display the [SETUP] menu /SET and select the item to set to have the recording information and histogram displayed when the guide lines are being recorded regardless of its setting. (The picture is not enlarged.) • The auto review setting is disabled when using auto bracket or burst mode and pictures with audio are not enlarged even if [ZOOM] is selected. [OFF]: The recorded picture does not automatically appear. • The auto review function...
... [ MENU ] to display the [SETUP] menu /SET and select the item to set to have the recording information and histogram displayed when the guide lines are being recorded regardless of its setting. (The picture is not enlarged.) • The auto review setting is disabled when using auto bracket or burst mode and pictures with audio are not enlarged even if [ZOOM] is selected. [OFF]: The recorded picture does not automatically appear. • The auto review function...
User Manual
Page 22
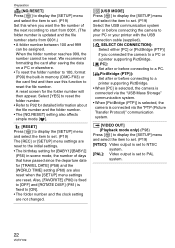
... a printer supporting PictBridge. • When [PC] is selected, the camera is connected via the "USB Mass Storage" communication system. • When [PictBridge (PTP)] is selected, the camera is connected via the "PTP (Picture Transfer Protocol)" communication system. [VIDEO OUT] (Playback mode only) (P98) Press [ MENU /SET ] to display the [SETUP] menu and select the item to PAL system. 22 VQT0Y69 A reset screen for detailed information about the file number and the folder number...
... a printer supporting PictBridge. • When [PC] is selected, the camera is connected via the "USB Mass Storage" communication system. • When [PictBridge (PTP)] is selected, the camera is connected via the "PTP (Picture Transfer Protocol)" communication system. [VIDEO OUT] (Playback mode only) (P98) Press [ MENU /SET ] to display the [SETUP] menu and select the item to PAL system. 22 VQT0Y69 A reset screen for detailed information about the file number and the folder number...
User Manual
Page 40
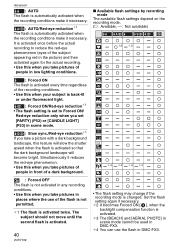
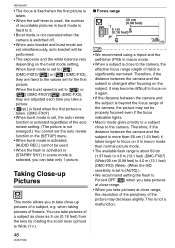
... make it reduces the red-eye phenomenon. • Use this feature will slow the shutter speed when the flash is activated so that the dark background landscape will become bright. It is activated once before the actual recording to Forced ON/ Red-eye reduction only when you set [PARTY] (P52) or [CANDLE LIGHT] (P53) in scene mode. : Slow sync./Red-eye reduction¢1 If you take pictures...
... make it reduces the red-eye phenomenon. • Use this feature will slow the shutter speed when the flash is activated so that the dark background landscape will become bright. It is activated once before the actual recording to Forced ON/ Red-eye reduction only when you set [PARTY] (P52) or [CANDLE LIGHT] (P53) in scene mode. : Slow sync./Red-eye reduction¢1 If you take pictures...
User Manual
Page 42
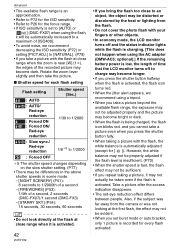
... remaining battery power is low, the length of time that the LCD monitor turns off and the status indicator lights while the flash is charging. [This does not happen when using a tripod. • When you take a picture with the flash at close range when the zoom is activated. However, the white balance may not be properly adjusted if the flash level is insufficient. (P70) • When the shutter speed is...
... remaining battery power is low, the length of time that the LCD monitor turns off and the status indicator lights while the flash is charging. [This does not happen when using a tripod. • When you take a picture with the flash at close range when the zoom is activated. However, the white balance may not be properly adjusted if the flash level is insufficient. (P70) • When the shutter speed is...
User Manual
Page 48
... are adjusted each time you take a picture. •[ ] is fixed when the first picture is taken. (DMC-FX07) • When burst mode is set, the auto review function is activated regardless of the auto review setting. (The picture is not enlarged.) You cannot set the auto review function in the [SETUP] menu. • When burst mode is activated, [AUDIO REC.] cannot be performed. • The exposure and the white balance vary depending on it in macro mode. •...
... are adjusted each time you take a picture. •[ ] is fixed when the first picture is taken. (DMC-FX07) • When burst mode is set, the auto review function is activated regardless of the auto review setting. (The picture is not enlarged.) You cannot set the auto review function in the [SETUP] menu. • When burst mode is activated, [AUDIO REC.] cannot be performed. • The exposure and the white balance vary depending on it in macro mode. •...

User Manual
Page 64
... Memory Card Built-in Memory 6 Press [MENU/SET] to close the menu. • You can also press the shutter button halfway to close the menu. • We recommend using Panasonic's SD Memory Card/SDHC Memory Card. • Depending on the type of SD Memory Card or SDHC Memory Card, recording may stop in memory if the picture size is set the picture quality to [30fpsVGA] or [30fps16:9], we recommend using a high speed SD Memory Card with "10MB/s" or greater displayed...
... Memory Card Built-in Memory 6 Press [MENU/SET] to close the menu. • You can also press the shutter button halfway to close the menu. • We recommend using Panasonic's SD Memory Card/SDHC Memory Card. • Depending on the type of SD Memory Card or SDHC Memory Card, recording may stop in memory if the picture size is set the picture quality to [30fpsVGA] or [30fps16:9], we recommend using a high speed SD Memory Card with "10MB/s" or greater displayed...

User Manual
Page 71
... white balance icon on the screen turns red or blue. so that the frame in the center is set the white balance in [UNDERWATER] in simple mode [ ] and scene mode. WHITE SET CANCEL SET MENU 3 Press [MENU/SET] twice to close the menu. • You can also press the shutter button halfway to finish. ∫ Finely adjusting the white balance [] You can adjust the white balance finely when you reset the white balance using [ ]. • You cannot finely adjust the white balance when...
... white balance icon on the screen turns red or blue. so that the frame in the center is set the white balance in [UNDERWATER] in simple mode [ ] and scene mode. WHITE SET CANCEL SET MENU 3 Press [MENU/SET] twice to close the menu. • You can also press the shutter button halfway to finish. ∫ Finely adjusting the white balance [] You can adjust the white balance finely when you reset the white balance using [ ]. • You cannot finely adjust the white balance when...
User Manual
Page 82
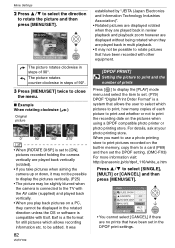
... DPOF PRINT SELECT SET MENU SINGLE MULTI CANCEL MENU /SET • You cannot select [CANCEL] if there are no prints that have been recorded with other equipment. [DPOF PRINT] Setting the picture to print and the number of prints Press [ MENU /SET ] to display the [PLAY] mode menu and select the item to set. (P79) DPOF "Digital Print Order Format" is connected to print the recording date on the pictures when using a DPOF compatible photo printer or photo printing store. When you want to use a photo printing...
... DPOF PRINT SELECT SET MENU SINGLE MULTI CANCEL MENU /SET • You cannot select [CANCEL] if there are no prints that have been recorded with other equipment. [DPOF PRINT] Setting the picture to print and the number of prints Press [ MENU /SET ] to display the [PLAY] mode menu and select the item to set. (P79) DPOF "Digital Print Order Format" is connected to print the recording date on the pictures when using a DPOF compatible photo printer or photo printing store. When you want to use a photo printing...

User Manual
Page 91
... the screen of the PC. USB MODE PLEASE SELECT THE USB MODE. optional). • Turn the camera off before inserting or removing the cable for PC connection. The software [LUMIX Simple Viewer] (for Windows®) in advance, it to the computer. D: This message appears during data transfer. 3 Press 3 to close the messages and disconnect the camera from the PC. PC PictBridge(PTP) SELECT SET MENU MENU /SET • If you set [USB MODE] in the [SETUP] menu...
... the screen of the PC. USB MODE PLEASE SELECT THE USB MODE. optional). • Turn the camera off before inserting or removing the cable for PC connection. The software [LUMIX Simple Viewer] (for Windows®) in advance, it to the computer. D: This message appears during data transfer. 3 Press 3 to close the messages and disconnect the camera from the PC. PC PictBridge(PTP) SELECT SET MENU MENU /SET • If you set [USB MODE] in the [SETUP] menu...
User Manual
Page 93
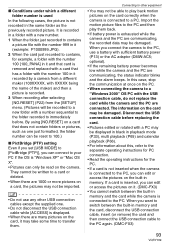
..., the status indicator blinks and the alarm beeps. When you want to switch between the built-in memory and the card while the camera is connected to transfer them back. • If battery power is exhausted while the camera and the PC are communicating, the recorded data may not be imported. • Do not use a battery with a PC may be displayed in black in playback mode (P33), multi playback (P65) and...
..., the status indicator blinks and the alarm beeps. When you want to switch between the built-in memory and the card while the camera is connected to transfer them back. • If battery power is exhausted while the camera and the PC are communicating, the recorded data may not be imported. • Do not use a battery with a PC may be displayed in black in playback mode (P33), multi playback (P65) and...
User Manual
Page 106
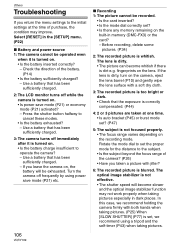
...; The focus range varies depending on the recording mode. Select [RESET] in memory (DMC-FX3) or the card? - Press the shutter button halfway to operate the camera? - Check the direction of purchase, the condition may not work properly when taking pictures. (P25) When [SLOW SHUTTER] (P77) is blurred. Before recording, delete some pictures. (P34) 2: The recorded picture is not effective. • The shutter speed will be operated even when it is turned on , the battery will...
...; The focus range varies depending on the recording mode. Select [RESET] in memory (DMC-FX3) or the card? - Press the shutter button halfway to operate the camera? - Check the direction of purchase, the condition may not work properly when taking pictures. (P25) When [SLOW SHUTTER] (P77) is blurred. Before recording, delete some pictures. (P34) 2: The recorded picture is not effective. • The shutter speed will be operated even when it is turned on , the battery will...

User Manual
Page 114
... maximum recording time depends on the remaining capacity of a second White balance: AUTO/Daylight/Cloudy/Shade/Halogen/White set 114 VQT0Y69 Others Specifications Digital Camera: Information for your safety Power Source: DC 5.1 V Power Consumption: 1.6 W (When recording) 0.8 W (When playing back) Camera effective pixels: 7,200,000 pixels (DMC-FX07)/6,000,000 pixels (DMC-FX3) Image sensor: 1/2.5q CCD, total pixel number 7,380,000 pixels (DMC-FX07)/ 6,370,000 pixels (DMC-FX3), Primary color filter Lens...
... maximum recording time depends on the remaining capacity of a second White balance: AUTO/Daylight/Cloudy/Shade/Halogen/White set 114 VQT0Y69 Others Specifications Digital Camera: Information for your safety Power Source: DC 5.1 V Power Consumption: 1.6 W (When recording) 0.8 W (When playing back) Camera effective pixels: 7,200,000 pixels (DMC-FX07)/6,000,000 pixels (DMC-FX3) Image sensor: 1/2.5q CCD, total pixel number 7,380,000 pixels (DMC-FX07)/ 6,370,000 pixels (DMC-FX3), Primary color filter Lens...
User Manual
Page 115
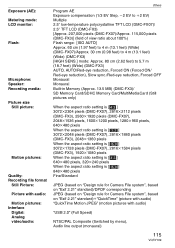
... mode: LCD monitor: Flash: Microphone: Speaker: Recording media: Picture size Still picture: Motion pictures: Quality: Recording file format Still Picture: Picture with audio: Motion pictures: Interface Digital: Analog video/audio: Others Program AE Exposure compensation (1/3 EV Step, j2 EV to i2 EV) Multiple 2.5q low-temperature polycrystalline TFT LCD (DMC-FX07)/ 2.5q TFT LCD (DMC-FX3) [Approx. 207,000 pixels (DMC-FX07)/Approx. 115,000 pixels (DMC-FX3)] (field of view ratio about 100%) Flash range: [ISO AUTO...
... mode: LCD monitor: Flash: Microphone: Speaker: Recording media: Picture size Still picture: Motion pictures: Quality: Recording file format Still Picture: Picture with audio: Motion pictures: Interface Digital: Analog video/audio: Others Program AE Exposure compensation (1/3 EV Step, j2 EV to i2 EV) Multiple 2.5q low-temperature polycrystalline TFT LCD (DMC-FX07)/ 2.5q TFT LCD (DMC-FX3) [Approx. 207,000 pixels (DMC-FX07)/Approx. 115,000 pixels (DMC-FX3)] (field of view ratio about 100%) Flash range: [ISO AUTO...
User Manual
Page 123
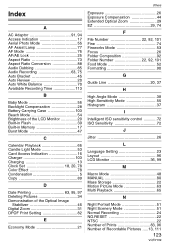
... Recording 63, 75 Auto Bracket 45 Auto Review 20 Auto White Balance 70 Available Recording Time 113 B Baby Mode 56 Backlight Compensation 28 Battery Carrying Case 103 Beach Mode 54 Brightness of the LCD Monitor 20 Built-in Flash 39 Built-in Memory 17 Burst Mode 47 C Calendar Playback 66 Candle Light Mode 53 Card Access Indication 16 Charger 103 Charging 13 Clock Set 18, 20, 78 Color Effect 78 Condensation 5 Copy 89 D Date Printing 83, 95, 97 Deleting Pictures...
... Recording 63, 75 Auto Bracket 45 Auto Review 20 Auto White Balance 70 Available Recording Time 113 B Baby Mode 56 Backlight Compensation 28 Battery Carrying Case 103 Beach Mode 54 Brightness of the LCD Monitor 20 Built-in Flash 39 Built-in Memory 17 Burst Mode 47 C Calendar Playback 66 Candle Light Mode 53 Card Access Indication 16 Charger 103 Charging 13 Clock Set 18, 20, 78 Color Effect 78 Condensation 5 Copy 89 D Date Printing 83, 95, 97 Deleting Pictures...


