
User Manual
Page 6
... Card 25 Setting Date/Time (Clock Set 26 • Changing the clock setting 26 Setting the Menu 27 • Setting menu items 28 Setting the Quick Menu 30 About the Setup Menu 31 Holding and using your camera 37 Basic Selecting the [REC] mode, and record still pictures or motion pictures 38 • Setting [AFS] or [AFC 39 • Taking a still picture 39 • Recording a motion picture 40 • Playback the recorded still pictures or motion picture 40 Taking pictures using the automatic function (Intelligent Auto Mode...
... Card 25 Setting Date/Time (Clock Set 26 • Changing the clock setting 26 Setting the Menu 27 • Setting menu items 28 Setting the Quick Menu 30 About the Setup Menu 31 Holding and using your camera 37 Basic Selecting the [REC] mode, and record still pictures or motion pictures 38 • Setting [AFS] or [AFC 39 • Taking a still picture 39 • Recording a motion picture 40 • Playback the recorded still pictures or motion picture 40 Taking pictures using the automatic function (Intelligent Auto Mode...
User Manual
Page 7
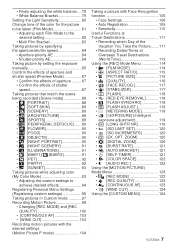
...; Recording Dates/Times at Overseas Travel Destinations (World Time 113 Using the [REC] Mode Menu 114 • [FILM MODE 114 • ? [ASPECT RATIO 115 • @ [PICTURE SIZE 115 • A [QUALITY 116 • [FACE RECOG 117 • [STABILIZER 117 • [FLASH 118 • [RED-EYE REMOVAL 118 • [FLASH SYNCHRO 118 • [FLASH ADJUST 118 • C [METERING MODE 119 • [I.EXPOSURE] (Intelligent exposure adjustment 119 • [LONG SHTR NR 119 • [ISO LIMIT SET...
...; Recording Dates/Times at Overseas Travel Destinations (World Time 113 Using the [REC] Mode Menu 114 • [FILM MODE 114 • ? [ASPECT RATIO 115 • @ [PICTURE SIZE 115 • A [QUALITY 116 • [FACE RECOG 117 • [STABILIZER 117 • [FLASH 118 • [RED-EYE REMOVAL 118 • [FLASH SYNCHRO 118 • [FLASH ADJUST 118 • C [METERING MODE 119 • [I.EXPOSURE] (Intelligent exposure adjustment 119 • [LONG SHTR NR 119 • [ISO LIMIT SET...

User Manual
Page 8
... Printing the Pictures 155 • Selecting a single picture and printing it 156 • Selecting multiple pictures and printing them 156 • Print Settings 157 Using the optional External Viewfinder 159 Using an external flash (optional) ......... 161 Using the Protector/Filter (optional)...... 162 Using the Remote Shutter (optional) .... 163 Using the AC Adaptor 164 Screen Display/ optional external viewfinder 165 Cautions for Use 168 Message Display 172 Troubleshooting 175 Number of Recordable Pictures and Available Recording Time 184 Specifications 189 Digital Camera...
... Printing the Pictures 155 • Selecting a single picture and printing it 156 • Selecting multiple pictures and printing them 156 • Print Settings 157 Using the optional External Viewfinder 159 Using an external flash (optional) ......... 161 Using the Protector/Filter (optional)...... 162 Using the Remote Shutter (optional) .... 163 Using the AC Adaptor 164 Screen Display/ optional external viewfinder 165 Cautions for Use 168 Message Display 172 Troubleshooting 175 Number of Recordable Pictures and Available Recording Time 184 Specifications 189 Digital Camera...

User Manual
Page 9
... operating instructions.) 2 Interchangeable Lens¢1 "LUMIX G 20 mm/F1.7 ASPH." (This is referred to as lens in these operating instructions is based on the 14 mm-45 mm/F3.5-5.6 lens included in the DMC-GF1K. • For information about obtaining replacement parts. 9 VQT2G44 Product numbers correct as battery charger or charger in the text) 13 AC Cable 14 AV Cable 15 USB Connection Cable 16 CD-ROM • Software: Use it to install the software...
... operating instructions.) 2 Interchangeable Lens¢1 "LUMIX G 20 mm/F1.7 ASPH." (This is referred to as lens in these operating instructions is based on the 14 mm-45 mm/F3.5-5.6 lens included in the DMC-GF1K. • For information about obtaining replacement parts. 9 VQT2G44 Product numbers correct as battery charger or charger in the text) 13 AC Cable 14 AV Cable 15 USB Connection Cable 16 CD-ROM • Software: Use it to install the software...
User Manual
Page 22
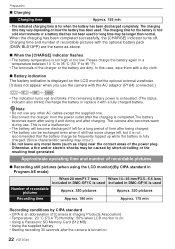
... charging time may vary depending on the LCD monitor/the optional external viewfinder. [It does not appear when you use . This is not a malfunction. • The battery will become discharged if left for a long period of recordable pictures ∫ Recording still pictures (when using it and during use the camera with the AC adaptor (P164) connected.] • The indication turns red and blinks if the remaining battery power is...
... charging time may vary depending on the LCD monitor/the optional external viewfinder. [It does not appear when you use . This is not a malfunction. • The battery will become discharged if left for a long period of recordable pictures ∫ Recording still pictures (when using it and during use the camera with the AC adaptor (P164) connected.] • The indication turns red and blinks if the remaining battery power is...
User Manual
Page 32
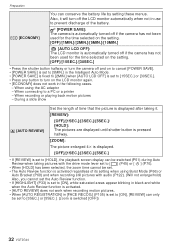
... Intelligent Auto Mode. • [POWER SAVE] is fixed to [2MIN.] when [AUTO LCD OFF] is set . • The Auto Review function is activated regardless of time that the picture is displayed after taking it will turn off and on the LCD monitor again. • [ECONOMY] does not work when recording motion pictures. • When [AUTO REGISTRATION] in [FACE RECOG.] (P105) is set to [ON], [REVIEW] can conserve the battery life by setting these menus. When connecting...
... Intelligent Auto Mode. • [POWER SAVE] is fixed to [2MIN.] when [AUTO LCD OFF] is set . • The Auto Review function is activated regardless of time that the picture is displayed after taking it will turn off and on the LCD monitor again. • [ECONOMY] does not work when recording motion pictures. • When [AUTO REGISTRATION] in [FACE RECOG.] (P105) is set to [ON], [REVIEW] can conserve the battery life by setting these menus. When connecting...

User Manual
Page 35
... set based on this unit can display, and select number of effective scanning lines. (Please read the operating instructions for the TV.) • This will work when the HDMI mini cable (optional) is connected. • Refer to enjoy progressive and high definition images. • If the images are possible) Button operation of the main unit will work when the AV cable is connected. [HDMI MODE] Set the format...
... set based on this unit can display, and select number of effective scanning lines. (Please read the operating instructions for the TV.) • This will work when the HDMI mini cable (optional) is connected. • Refer to enjoy progressive and high definition images. • If the images are possible) Button operation of the main unit will work when the AV cable is connected. [HDMI MODE] Set the format...
User Manual
Page 45
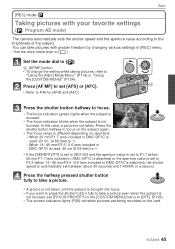
... by changing various settings in the [CUSTOM MENU] menu to [OFF]. (P126) • The access indication lights (P25) red when pictures are being recorded on used lens. - Press the shutter button halfway to focus on the subject again. • The focus range is brought into focus. • If you want to press the shutter button fully to take pictures with your favorite settings ( : Program AE mode) The camera automatically sets the shutter speed and the aperture value...
... by changing various settings in the [CUSTOM MENU] menu to [OFF]. (P126) • The access indication lights (P25) red when pictures are being recorded on used lens. - Press the shutter button halfway to focus on the subject again. • The focus range is brought into focus. • If you want to press the shutter button fully to take pictures with your favorite settings ( : Program AE mode) The camera automatically sets the shutter speed and the aperture value...
User Manual
Page 59
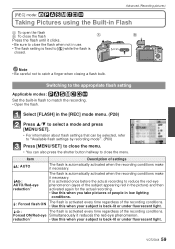
... recording. • Use this when you take pictures of people in low lighting conditions. ‰: Forced flash ON The flash is activated every time regardless of the recording conditions. VQT2G44 59 Advanced (Recording pictures) [REC] mode: Taking Pictures using the Built-in Flash A To open the flash B To close the flash Press the flash until it necessary. Item Description of settings ‡: AUTO The flash is automatically activated when the recording conditions make it necessary. : AUTO/Red-eye...
... recording. • Use this when you take pictures of people in low lighting conditions. ‰: Forced flash ON The flash is activated every time regardless of the recording conditions. VQT2G44 59 Advanced (Recording pictures) [REC] mode: Taking Pictures using the Built-in Flash A To open the flash B To close the flash Press the flash until it necessary. Item Description of settings ‡: AUTO The flash is automatically activated when the recording conditions make it necessary. : AUTO/Red-eye...
User Manual
Page 61
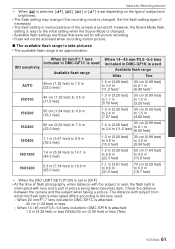
... in DMC-GF1K is used . - Check the distance between the camera and the subject when taking a picture. Advanced (Recording pictures) ¢ When [‡] is selected or [ ] is set depending on the type of subject and brightness. • The flash setting may change if the recording mode is changed . • Available flash settings are those that were set to [OFF] • At the time of picture being taken becomes dark. Set the flash setting...
... in DMC-GF1K is used . - Check the distance between the camera and the subject when taking a picture. Advanced (Recording pictures) ¢ When [‡] is selected or [ ] is set depending on the type of subject and brightness. • The flash setting may change if the recording mode is changed . • Available flash settings are those that were set to [OFF] • At the time of picture being taken becomes dark. Set the flash setting...
User Manual
Page 66
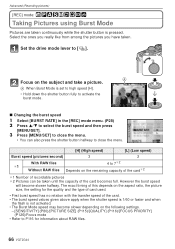
... ratio, the picture size, the setting for information about RAW files. 66 VQT2G44 A Focus on the remaining capacity of the card¢2 ¢1 Number of recordable pictures ¢2 Pictures can be taken until the capacity of the card becomes full. A When Burst Mode is not activated. • The Burst Mode speed may become slower halfway. Advanced (Recording pictures) [REC] mode: Taking Pictures using Burst Mode Pictures are taken continuously while the shutter button is pressed...
... ratio, the picture size, the setting for information about RAW files. 66 VQT2G44 A Focus on the remaining capacity of the card¢2 ¢1 Number of recordable pictures ¢2 Pictures can be taken until the capacity of the card becomes full. A When Burst Mode is not activated. • The Burst Mode speed may become slower halfway. Advanced (Recording pictures) [REC] mode: Taking Pictures using Burst Mode Pictures are taken continuously while the shutter button is pressed...

User Manual
Page 70
... using a tripod when recording with the Self-timer Set the drive mode lever to [ë]. A Press the shutter button halfway to focus and then press it fully to take a picture even when the subject is not focused, set [FOCUS PRIORITY] in the [CUSTOM MENU] menu to [OFF]. (P126) • The self-timer indicator B blinks and the shutter is activated after 10 seconds (or 2 seconds). • If you set [ ], after 10 seconds the camera takes 3 pictures...
... using a tripod when recording with the Self-timer Set the drive mode lever to [ë]. A Press the shutter button halfway to focus and then press it fully to take a picture even when the subject is not focused, set [FOCUS PRIORITY] in the [CUSTOM MENU] menu to [OFF]. (P126) • The self-timer indicator B blinks and the shutter is activated after 10 seconds (or 2 seconds). • If you set [ ], after 10 seconds the camera takes 3 pictures...

User Manual
Page 82
... displayed. (When you press [DISPLAY] on the screen shown right, explanations about each Film Mode to the desired setting Press 2/1 to select a film. Brighter red, green and blue. Press 3/4 to select an item and 2/1 to adjust. • You can also set from the Quick Menu. (P30) • Use the Quick Menu (P30) to set when in accordance with the setting every time the shutter button is the standard setting. Advanced (Recording pictures...
... displayed. (When you press [DISPLAY] on the screen shown right, explanations about each Film Mode to the desired setting Press 2/1 to select a film. Brighter red, green and blue. Press 3/4 to select an item and 2/1 to adjust. • You can also set from the Quick Menu. (P30) • Use the Quick Menu (P30) to set when in accordance with the setting every time the shutter button is the standard setting. Advanced (Recording pictures...
User Manual
Page 102
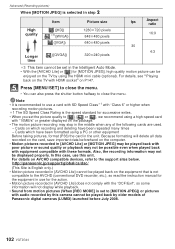
... will delete all data recorded on the card, save important data beforehand on AVCHD compatible devices, refer to the support sites below. In this case, use for successive writes. • When you set the picture quality to the AVCHD (conventional DVD recorder, etc.), so read the instruction manual for the equipment in use this camera cannot be played back by using the HDMI mini cable (optional). http://panasonic.jp/support/global/cs/dsc/ (This...
... will delete all data recorded on the card, save important data beforehand on AVCHD compatible devices, refer to the support sites below. In this case, use for successive writes. • When you set the picture quality to the AVCHD (conventional DVD recorder, etc.), so read the instruction manual for the equipment in use this camera cannot be played back by using the HDMI mini cable (optional). http://panasonic.jp/support/global/cs/dsc/ (This...
User Manual
Page 116
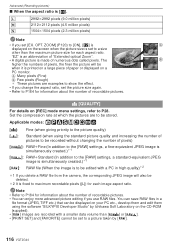
...;1 [ ]: RAW file (When the image is printed on a large piece of recordable pictures. • You can enjoy more advanced picture editing if you delete a RAW file from the camera, the corresponding JPEG image will be stored. A [QUALITY] For details on the screen when the picture size is made of recordable pictures. You can be displayed on a PC monitor. ZOOM] (P120) to [ON], [ ] is displayed on [REC] mode menu settings, refer to...
...;1 [ ]: RAW file (When the image is printed on a large piece of recordable pictures. • You can enjoy more advanced picture editing if you delete a RAW file from the camera, the corresponding JPEG image will be stored. A [QUALITY] For details on the screen when the picture size is made of recordable pictures. You can be displayed on a PC monitor. ZOOM] (P120) to [ON], [ ] is displayed on [REC] mode menu settings, refer to...
User Manual
Page 148
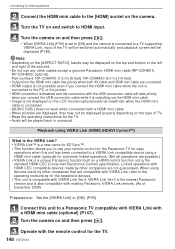
... to the operating instructions for EZ Sync™. • This function allows you connect the USB connection cable while it is outputting via the HDMI mini cable. • Image is not displayed on the LCD monitor/optional external viewfinder when the HDMI mini cable is connected to a TV supporting VIERA Link, input of the TV will be switched automatically and playback screen will be displayed on the camera. Playback using VIERA...
... to the operating instructions for EZ Sync™. • This function allows you connect the USB connection cable while it is outputting via the HDMI mini cable. • Image is not displayed on the LCD monitor/optional external viewfinder when the HDMI mini cable is connected to a TV supporting VIERA Link, input of the TV will be switched automatically and playback screen will be displayed on the camera. Playback using VIERA...
User Manual
Page 151
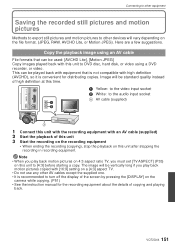
Image will vary depending on the camera while copying. (P51) • See the instruction manual for distributing copies. Note • When you play back motion pictures on 4:3 aspect ratio TV, you play back motion pictures copied with high definition (AVCHD), so it is recommended to DVD disc, hard disk, or video using an AV cable File formats that is not compatible with [16:9] setting on a [4:3] aspect TV. • Do not...
Image will vary depending on the camera while copying. (P51) • See the instruction manual for distributing copies. Note • When you play back motion pictures on 4:3 aspect ratio TV, you play back motion pictures copied with high definition (AVCHD), so it is recommended to DVD disc, hard disk, or video using an AV cable File formats that is not compatible with [16:9] setting on a [4:3] aspect TV. • Do not...
User Manual
Page 172
... to remove the card or the battery when using a tripod or unipod. • Make sure that such tripods/unipods will damage the camera or lens so their use excessive force when turning it. Message Display Confirmation messages or error messages will not be set . 172 VQT2G44 Panasonic will be displayed on the screen/optional external viewfinder in some pictures, format the card after saving necessary data on the SD Memory Card and the SDHC Memory Card are...
... to remove the card or the battery when using a tripod or unipod. • Make sure that such tripods/unipods will damage the camera or lens so their use excessive force when turning it. Message Display Confirmation messages or error messages will not be set . 172 VQT2G44 Panasonic will be displayed on the screen/optional external viewfinder in some pictures, format the card after saving necessary data on the SD Memory Card and the SDHC Memory Card are...

User Manual
Page 173
... the camera. > Format the card again with the camera after saving necessary data on a PC etc. (P36) [PLEASE CHECK THAT THE LENS IS ATTACHED CORRECTLY]/[PLEASE CHECK THE STATUS OF A LENS.] • Do not press the lens release button. • Check that it stops even after using a "10MB/s" card or higher, the data writing speed has deteriorated so it again. (P17) [MEMORY CARD PARAMETER ERROR]/[THIS MEMORY CARD CANNOT BE USED] > Use a card compatible...
... the camera. > Format the card again with the camera after saving necessary data on a PC etc. (P36) [PLEASE CHECK THAT THE LENS IS ATTACHED CORRECTLY]/[PLEASE CHECK THE STATUS OF A LENS.] • Do not press the lens release button. • Check that it stops even after using a "10MB/s" card or higher, the data writing speed has deteriorated so it again. (P17) [MEMORY CARD PARAMETER ERROR]/[THIS MEMORY CARD CANNOT BE USED] > Use a card compatible...
User Manual
Page 190
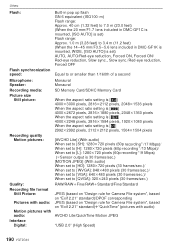
..., [ISO AUTO] is set) Flash range: Approx. 1.0 m (3.28 feet) to 3.4 m (11.2 feet) (When the 14- 45 mm/F3.5 -5.6 lens included in DMC-GF1K is mounted, WIDE, [ISO AUTO] is set) AUTO, AUTO/Red-eye reduction, Forced ON, Forced ON/ Red-eye reduction, Slow sync., Slow sync./Red-eye reduction, Forced OFF Equal to or smaller than 1/160th of a second Microphone: Speaker: Recording media: Picture size Still picture: Recording quality Motion pictures: Quality: Recording file format Still Picture: Pictures with...
..., [ISO AUTO] is set) Flash range: Approx. 1.0 m (3.28 feet) to 3.4 m (11.2 feet) (When the 14- 45 mm/F3.5 -5.6 lens included in DMC-GF1K is mounted, WIDE, [ISO AUTO] is set) AUTO, AUTO/Red-eye reduction, Forced ON, Forced ON/ Red-eye reduction, Slow sync., Slow sync./Red-eye reduction, Forced OFF Equal to or smaller than 1/160th of a second Microphone: Speaker: Recording media: Picture size Still picture: Recording quality Motion pictures: Quality: Recording file format Still Picture: Pictures with...


