User Manual
Page 1
Operating Instructions Digital Camera/Lens Kit Body Model No. For USA and Puerto Rico assistance, please call: 1-800-211-PANA(7262) or, contact us via the web at: http://www.panasonic.com/contactinfo For Canadian assistance, please call: 1-800-99-LUMIX (1-800-995-8649) or send e-mail to: lumixconcierge@ca.panasonic.com PP VQT2G44 DMC-GF1C/DMC-GF1K DMC-GF1 Before connecting, operating or adjusting this product, please read the instructions completely.
Operating Instructions Digital Camera/Lens Kit Body Model No. For USA and Puerto Rico assistance, please call: 1-800-211-PANA(7262) or, contact us via the web at: http://www.panasonic.com/contactinfo For Canadian assistance, please call: 1-800-99-LUMIX (1-800-995-8649) or send e-mail to: lumixconcierge@ca.panasonic.com PP VQT2G44 DMC-GF1C/DMC-GF1K DMC-GF1 Before connecting, operating or adjusting this product, please read the instructions completely.

User Manual
Page 2
...OUTLET SHALL BE INSTALLED NEAR THE EQUIPMENT AND SHALL BE EASILY ACCESSIBLE. Be sure to retain this battery. Before Use Information for choosing Panasonic! Please note that is located on the market today. A lithium ion battery that the actual controls and components, menu items, ... take time to recycle this manual as your family years of enjoyment. of pre-recorded tapes or discs or other than your Digital Camera may infringe copyright laws. Please call 1-800-8-BATTERY for purposes other published or broadcast material for information on the below. Carefully ...
...OUTLET SHALL BE INSTALLED NEAR THE EQUIPMENT AND SHALL BE EASILY ACCESSIBLE. Be sure to retain this battery. Before Use Information for choosing Panasonic! Please note that is located on the market today. A lithium ion battery that the actual controls and components, menu items, ... take time to recycle this manual as your family years of enjoyment. of pre-recorded tapes or discs or other than your Digital Camera may infringe copyright laws. Please call 1-800-8-BATTERY for purposes other published or broadcast material for information on the below. Carefully ...
User Manual
Page 5
... strong pressure. Places where water can come into the space around the lens, buttons etc. • This camera is a precision apparatus, it may cause this product, please contact your hands inside the mount of the digital camera body. If water or seawater splashes on a beach. • Do not touch the lens or the...
... strong pressure. Places where water can come into the space around the lens, buttons etc. • This camera is a precision apparatus, it may cause this product, please contact your hands inside the mount of the digital camera body. If water or seawater splashes on a beach. • Do not touch the lens or the...

User Manual
Page 6
... a picture with Manual Focus (MF 46 • Focusing 47 • When the subject is not in focus....... 47 • Preventing jitter (camera shake)....... 47 • Program Shift 48 Taking Pictures with the Zoom 49 • Using the Optical Zoom/Using the Extended Optical Zoom (EZ)/ Using... the Digital Zoom 49 Playing back Pictures 50 • Changing the Information Displayed on the playback screen 51 • Displaying Multiple Screens (Multi Playback 51...
... a picture with Manual Focus (MF 46 • Focusing 47 • When the subject is not in focus....... 47 • Preventing jitter (camera shake)....... 47 • Program Shift 48 Taking Pictures with the Zoom 49 • Using the Optical Zoom/Using the Extended Optical Zoom (EZ)/ Using... the Digital Zoom 49 Playing back Pictures 50 • Changing the Information Displayed on the playback screen 51 • Displaying Multiple Screens (Multi Playback 51...

User Manual
Page 8
.../ optional external viewfinder 165 Cautions for Use 168 Message Display 172 Troubleshooting 175 Number of Recordable Pictures and Available Recording Time 184 Specifications 189 Digital Camera Accessory System ....... 193 Digital Camera Accessory Order Form (For USA and Puerto Rico Customers 195 Request for Service Notice (For USA and Puerto Rico Only 196 Limited Warranty...
.../ optional external viewfinder 165 Cautions for Use 168 Message Display 172 Troubleshooting 175 Number of Recordable Pictures and Available Recording Time 184 Specifications 189 Digital Camera Accessory System ....... 193 Digital Camera Accessory Order Form (For USA and Puerto Rico Customers 195 Request for Service Notice (For USA and Puerto Rico Only 196 Limited Warranty...

User Manual
Page 9
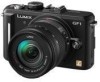
... time of purchase.) 19 Hot shoe cover (This is attached to the "Digital Camera Accessory System". (P193) • If any accessories are lost, customers in the USA and Puerto Rico should contact 1 800 99-LUMIX (1-800-995-8649) for further information about obtaining replacement parts. 9 VQT2G44 ...based on the 14 mm-45 mm/F3.5-5.6 lens included in the DMC-GF1K. • For information about optional accessories, refer to the camera body at 1 800 833-9626 and customers in Canada should contact Panasonic's parts department at the time of September 2009. About unavailable functions such...
... time of purchase.) 19 Hot shoe cover (This is attached to the "Digital Camera Accessory System". (P193) • If any accessories are lost, customers in the USA and Puerto Rico should contact 1 800 99-LUMIX (1-800-995-8649) for further information about obtaining replacement parts. 9 VQT2G44 ...based on the 14 mm-45 mm/F3.5-5.6 lens included in the DMC-GF1K. • For information about optional accessories, refer to the camera body at 1 800 833-9626 and customers in Canada should contact Panasonic's parts department at the time of September 2009. About unavailable functions such...
User Manual
Page 11
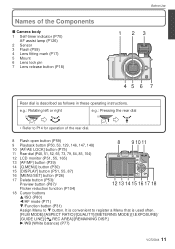
It is convenient to 4 button. e.g.: Rotating left or right e.g.: Pressing the rear dial • Refer to P14 for operation of the Components ∫ Camera body 1 Self-timer indicator (P70) AF assist lamp (P126) 2 Sensor 3 Flash (P59) 4 Lens fitting mark (P17) 5 Mount 6 Lens lock pin 7 Lens release button (P18) Before ...
It is convenient to 4 button. e.g.: Rotating left or right e.g.: Pressing the rear dial • Refer to P14 for operation of the Components ∫ Camera body 1 Self-timer indicator (P70) AF assist lamp (P126) 2 Sensor 3 Flash (P59) 4 Lens fitting mark (P17) 5 Mount 6 Lens lock pin 7 Lens release button (P18) Before ...

User Manual
Page 12
... (P68): Self-timer (P70): 22 Shutter button (P40) 23 Hot shoe cover (P14, 159, 161) 24 Microphone (P99, 122, 144) 25 Mode dial (P38) 26 Camera ON/OFF switch (P26) 27 Status indicator (P38) 28 Motion picture button (P40) 29 Shoulder strap eyelet (P20) • Be sure to attach the shoulder... strap when using the camera to ensure that you will not drop it. 30 [REMOTE] socket (P163) 31 [HDMI] socket (P147, 148) 32 [AV OUT/DIGITAL] socket (P146, 151, 153, 155) 33 DC cable cover (P164) 21 19 20 22 23...
... (P68): Self-timer (P70): 22 Shutter button (P40) 23 Hot shoe cover (P14, 159, 161) 24 Microphone (P99, 122, 144) 25 Mode dial (P38) 26 Camera ON/OFF switch (P26) 27 Status indicator (P38) 28 Motion picture button (P40) 29 Shoulder strap eyelet (P20) • Be sure to attach the shoulder... strap when using the camera to ensure that you will not drop it. 30 [REMOTE] socket (P163) 31 [HDMI] socket (P147, 148) 32 [AV OUT/DIGITAL] socket (P146, 151, 153, 155) 33 DC cable cover (P164) 21 19 20 22 23...

User Manual
Page 13
...of operation bothers you use a tripod, make sure the tripod is stable when the camera is attached to it is not possible to set to [OFF]. As a 37... when auto focus is recommended to record with [CONTINUOUS AF] (P103) set the Focus mode to [AFC]. (P46) H-FS014045 (LUMIX G VARIO 14- 45 mm/F3.5 - 5.6 ASPH./MEGA O.I.S.) 41 Tele 42 Lens surface 43 Focus ring (P74) 44 Wide ...36 Tripod receptacle (P172) • When you . (P98) Also, it . 34 35 36 Before Use ∫ Lens H-H020 (LUMIX G 2 0 mm/F1.7 ASPH.) 37 Lens surface 38 Focus ring (P74) 39 Contact point 40 Lens fitting mark (P17) •...
...of operation bothers you use a tripod, make sure the tripod is stable when the camera is attached to it is not possible to set to [OFF]. As a 37... when auto focus is recommended to record with [CONTINUOUS AF] (P103) set the Focus mode to [AFC]. (P46) H-FS014045 (LUMIX G VARIO 14- 45 mm/F3.5 - 5.6 ASPH./MEGA O.I.S.) 41 Tele 42 Lens surface 43 Focus ring (P74) 44 Wide ...36 Tripod receptacle (P172) • When you . (P98) Also, it . 34 35 36 Before Use ∫ Lens H-H020 (LUMIX G 2 0 mm/F1.7 ASPH.) 37 Lens surface 38 Focus ring (P74) 39 Contact point 40 Lens fitting mark (P17) •...
User Manual
Page 14
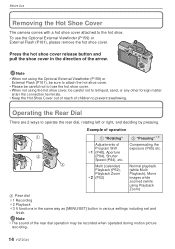
... Hot Shoe Cover out of reach of Program Shift ¢1 (P48), Aperture (P84), Shutter Speed (P84), etc. Before Use Removing the Hot Shoe Cover The camera comes with a hot shoe cover attached to operate the rear dial, rotating left or right, and deciding by pressing.
... Hot Shoe Cover out of reach of Program Shift ¢1 (P48), Aperture (P84), Shutter Speed (P84), etc. Before Use Removing the Hot Shoe Cover The camera comes with a hot shoe cover attached to operate the rear dial, rotating left or right, and deciding by pressing.

User Manual
Page 15
... dedicated for the "Micro Four Thirds System". For certain lenses, the actual distance at which the subject is the lens mount standard for digital cameras. ∫ About the functions of your use of the employed lens is effectively doubled. (A 50 mm lens is equivalent to use the... Lens with the Micro Four Thirds™ System lens mount specification (Micro Four Thirds mount). differs depending on the Micro Four Thirds mount specification cameras. • When you may differ slightly from the rated distance. Before Use About the Lens This unit can use Leica M Mount or Leica...
... dedicated for the "Micro Four Thirds System". For certain lenses, the actual distance at which the subject is the lens mount standard for digital cameras. ∫ About the functions of your use of the employed lens is effectively doubled. (A 50 mm lens is equivalent to use the... Lens with the Micro Four Thirds™ System lens mount specification (Micro Four Thirds mount). differs depending on the Micro Four Thirds mount specification cameras. • When you may differ slightly from the rated distance. Before Use About the Lens This unit can use Leica M Mount or Leica...
User Manual
Page 17
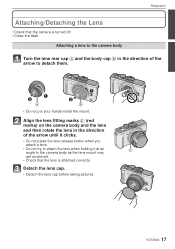
... the lens cap before taking pictures. Attaching a lens to the camera body Turn the lens rear cap A and the body cap B in the direction of the arrow to the camera body as the lens mount may get scratched. • Check that the camera is attached correctly. Align the lens fitting marks C (red marks...) on the camera body and the lens and then rotate the lens in the direction of...
... the lens cap before taking pictures. Attaching a lens to the camera body Turn the lens rear cap A and the body cap B in the direction of the arrow to the camera body as the lens mount may get scratched. • Check that the camera is attached correctly. Align the lens fitting marks C (red marks...) on the camera body and the lens and then rotate the lens in the direction of...

User Manual
Page 18
... Stabilizer function is set to [MODE1] at the time of the arrow to detach it. • Always attach the body cap to the camera body so that dirt or dust does not get inside. • Attach the lens rear cap so that the lens contact point does not ...] in the direction of purchase. • We recommend setting the [O.I .S.] switch is set to the camera body. A lens which supports the stabilizer function is attached to [OFF], [ ] is set for activation when the lens is required. - The 20 mm/F1.7 interchangeable lens supplied with the DMC-GF1K supports the stabilizer function.
... Stabilizer function is set to [MODE1] at the time of the arrow to detach it. • Always attach the body cap to the camera body so that dirt or dust does not get inside. • Attach the lens rear cap so that the lens contact point does not ...] in the direction of purchase. • We recommend setting the [O.I .S.] switch is set to the camera body. A lens which supports the stabilizer function is attached to [OFF], [ ] is set for activation when the lens is required. - The 20 mm/F1.7 interchangeable lens supplied with the DMC-GF1K supports the stabilizer function.
User Manual
Page 19
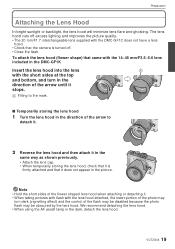
... disabled because the photo flash may turn in the picture. We recommend detaching the lens hood. • When using the AF assist lamp in the DMC-GF1K Insert the lens hood into the lens with the lens hood attached, the lower portion of the photo may be obscured by the lens hood... is turned off excess lighting and improves the picture quality. • The 20 mm/F1.7 interchangeable lens supplied with the DMC-GF1C does not have a lens hood. • Check that the camera is firmly attached and that came with the 14-45 mm/F3.5-5.6 lens included in the dark, detach the lens...
... disabled because the photo flash may turn in the picture. We recommend detaching the lens hood. • When using the AF assist lamp in the DMC-GF1K Insert the lens hood into the lens with the lens hood attached, the lower portion of the photo may be obscured by the lens hood... is turned off excess lighting and improves the picture quality. • The 20 mm/F1.7 interchangeable lens supplied with the DMC-GF1C does not have a lens hood. • Check that the camera is firmly attached and that came with the 14-45 mm/F3.5-5.6 lens included in the dark, detach the lens...
User Manual
Page 20
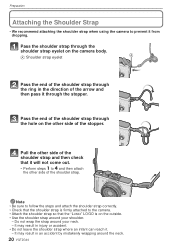
Pass the end of the shoulder strap through the hole on the other side of the shoulder strap and then check that the "LUMIX" LOGO is firmly attached to the camera. • Attach the shoulder strap so that it will not come out. • Perform steps 1 to prevent it from dropping. Pull ...leave the shoulder strap where an infant can reach it. - Preparation Attaching the Shoulder Strap • We recommend attaching the shoulder strap when using the camera to 4 and then attach the other side of the arrow and then pass it through the stopper. A: Shoulder strap eyelet Pass the end of ...
Pass the end of the shoulder strap through the hole on the other side of the shoulder strap and then check that the "LUMIX" LOGO is firmly attached to the camera. • Attach the shoulder strap so that it will not come out. • Perform steps 1 to prevent it from dropping. Pull ...leave the shoulder strap where an infant can reach it. - Preparation Attaching the Shoulder Strap • We recommend attaching the shoulder strap when using the camera to 4 and then attach the other side of the arrow and then pass it through the stopper. A: Shoulder strap eyelet Pass the end of ...
User Manual
Page 21
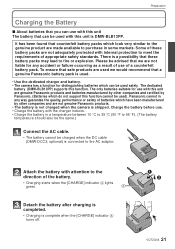
... the dedicated charger and battery. • The camera has a function for distinguishing batteries which can be used ). The only batteries suitable for any way guarantee the quality, performance or safety of use with this unit are genuine Panasonic products and batteries manufactured by other companies and certified...do not support this unit The battery that can be used we would recommend that we are not genuine Panasonic products. • The battery is not charged when the camera is DMW-BLB13PP. Detach the battery after charging is completed. • Charging is connected to the AC...
... the dedicated charger and battery. • The camera has a function for distinguishing batteries which can be used ). The only batteries suitable for any way guarantee the quality, performance or safety of use with this unit are genuine Panasonic products and batteries manufactured by other companies and certified...do not support this unit The battery that can be used we would recommend that we are not genuine Panasonic products. • The battery is not charged when the camera is DMW-BLB13PP. Detach the battery after charging is completed. • Charging is connected to the AC...
User Manual
Page 22
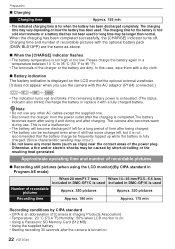
... monitor)(By CIPA standard in Program AE mode) When 20 mm/F1.7 lens When 14 -45 mm/F3.5 - 5.6 lens included in DMC-GF1K is on. • Using a Panasonic SD Memory Card (512 MB). • Using the supplied battery. • Starting recording 30 seconds after charging. Note • Do... [It does not appear when you use . This is an abbreviation of recordable pictures with a fully charged battery. Charging time and number of [Camera & Imaging Products Association]. • Temperature: 23 oC (73.4 oF)/Humidity: 50% when LCD monitor is used for when the battery has been ...
... monitor)(By CIPA standard in Program AE mode) When 20 mm/F1.7 lens When 14 -45 mm/F3.5 - 5.6 lens included in DMC-GF1K is on. • Using a Panasonic SD Memory Card (512 MB). • Using the supplied battery. • Starting recording 30 seconds after charging. Note • Do... [It does not appear when you use . This is an abbreviation of recordable pictures with a fully charged battery. Charging time and number of [Camera & Imaging Products Association]. • Temperature: 23 oC (73.4 oF)/Humidity: 50% when LCD monitor is used for when the battery has been ...
User Manual
Page 23
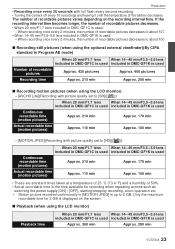
...is used included in DMC-GF1K is used Continuous recordable time (motion pictures) Approx. 210 min Approx. 170 min Actual recordable time (motion pictures) Approx. 110 min Approx. 100 min - [MOTION JPEG](Recording with full flash every second recording. • Turning the camera off every 10 ...with picture quality set to [HD]([ ])) When 20 mm/F1.7 lens When 14 - 45 mm/F3.5 - 5.6 lens included in DMC-GF1C is used included in DMC-GF1K is used Continuous recordable time (motion pictures) Approx. 210 min Approx. 170 min Actual recordable time (motion pictures) Approx. 110 min ...
...is used included in DMC-GF1K is used Continuous recordable time (motion pictures) Approx. 210 min Approx. 170 min Actual recordable time (motion pictures) Approx. 110 min Approx. 100 min - [MOTION JPEG](Recording with full flash every second recording. • Turning the camera off every 10 ...with picture quality set to [HD]([ ])) When 20 mm/F1.7 lens When 14 - 45 mm/F3.5 - 5.6 lens included in DMC-GF1C is used included in DMC-GF1K is used Continuous recordable time (motion pictures) Approx. 210 min Approx. 170 min Actual recordable time (motion pictures) Approx. 110 min ...

User Manual
Page 24
...and the operating conditions. In low-temperature environments, such as flash and zoom are used repeatedly. • When the operating time of the camera becomes extremely short even after properly charging the battery, the life of the battery may be completely closed, remove the card, check its direction... the card/battery door. 2:Slide the release lever in the direction of the arrow and open the card/battery door. • Always use genuine Panasonic batteries (DMW-BLB13PP). • If you use other batteries, we cannot guarantee the quality of this unit is locked by the lever A being ...
...and the operating conditions. In low-temperature environments, such as flash and zoom are used repeatedly. • When the operating time of the camera becomes extremely short even after properly charging the battery, the life of the battery may be completely closed, remove the card, check its direction... the card/battery door. 2:Slide the release lever in the direction of the arrow and open the card/battery door. • Always use genuine Panasonic batteries (DMW-BLB13PP). • If you use other batteries, we cannot guarantee the quality of this unit is locked by the lever A being ...
User Manual
Page 25
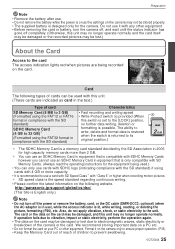
... be damaged or lost .) About the Card Access to the card The access indication lights red when pictures are indicated as the settings on the camera may no longer operate normally. Card The following website. Preparation Note • Remove the battery after use. • Do not remove the battery while the...; (Formatted using cards with 4 GB or more capacity. • It is recommended to use a card with SD Speed Class¢ with any other equipment. http://panasonic.jp/support/global/cs/dsc/ (This Site is lit, while writing, reading, or deleting the picture, formatting (P36), etc.
... be damaged or lost .) About the Card Access to the card The access indication lights red when pictures are indicated as the settings on the camera may no longer operate normally. Card The following website. Preparation Note • Remove the battery after use. • Do not remove the battery while the...; (Formatted using cards with 4 GB or more capacity. • It is recommended to use a card with SD Speed Class¢ with any other equipment. http://panasonic.jp/support/global/cs/dsc/ (This Site is lit, while writing, reading, or deleting the picture, formatting (P36), etc.


