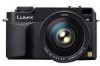

Digital Slr
Page 7
... pictures 39 • Continuously focusing on a subject (AFC) (When taking pictures with the Viewfinder 39 Taking Pictures in Auto Mode 40 Aperture-priority AE 41 Shutter-priority AE 42 Manual Exposure 42 Compensating the Exposure 44 Taking Pictures with Manual Focus ....... 45 Taking Pictures with the Zoom 47 Playing Back Pictures 48 • Changing the Information Displayed on the playback screen 48 Deleting Pictures 49 Using the Playback Zoom 51 Displaying Multiple Screens (Multi Playback 52 Displaying Pictures by Recording Date (Calendar Playback 53 Advanced Taking Pictures...
... pictures 39 • Continuously focusing on a subject (AFC) (When taking pictures with the Viewfinder 39 Taking Pictures in Auto Mode 40 Aperture-priority AE 41 Shutter-priority AE 42 Manual Exposure 42 Compensating the Exposure 44 Taking Pictures with Manual Focus ....... 45 Taking Pictures with the Zoom 47 Playing Back Pictures 48 • Changing the Information Displayed on the playback screen 48 Deleting Pictures 49 Using the Playback Zoom 51 Displaying Multiple Screens (Multi Playback 52 Displaying Pictures by Recording Date (Calendar Playback 53 Advanced Taking Pictures...
Digital Slr
Page 10
... to as battery in these operating instructions.) 4 Battery Charger/AC Adaptor (This is referred to as charger in these operating instructions.) 5 AC Cable 6 Video Cable 7 USB Connection Cable 8 CD-ROM 9 Strap 10 Eyepiece Cap (This is attached to the strap at the time of purchase.) 11 Body Cap (This is attached to the camera body at the time of purchase.) 12 Lens Hood 13 Magnifier Eye Cup 14 Lens Cap...
... to as battery in these operating instructions.) 4 Battery Charger/AC Adaptor (This is referred to as charger in these operating instructions.) 5 AC Cable 6 Video Cable 7 USB Connection Cable 8 CD-ROM 9 Strap 10 Eyepiece Cap (This is attached to the strap at the time of purchase.) 11 Body Cap (This is attached to the camera body at the time of purchase.) 12 Lens Hood 13 Magnifier Eye Cup 14 Lens Cap...
Digital Slr
Page 19
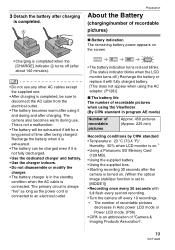
... use any other AC cables except the supplied one. • After charging is connected. The primary circuit is always "live" as long as the power cord is connected to an electrical outlet. • The battery indication turns red and blinks. (The status indicator blinks when the LCD monitor turns off.) Recharge the battery or replace it with full flash every second recording. • Turn the camera off every 10 recordings. ¢ The number of recordable pictures...
... use any other AC cables except the supplied one. • After charging is connected. The primary circuit is always "live" as long as the power cord is connected to an electrical outlet. • The battery indication turns red and blinks. (The status indicator blinks when the LCD monitor turns off.) Recharge the battery or replace it with full flash every second recording. • Turn the camera off every 10 recordings. ¢ The number of recordable pictures...
Digital Slr
Page 25
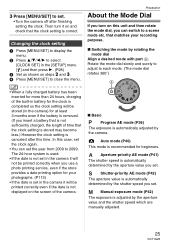
... can switch to a scene mode etc. The 24-hour system is used. • If the date is automatically adjusted by the camera. Auto mode (P40) This mode is adjusted by rotating the mode dial Align a desired mode with part A. Changing the clock setting 1 Press [MENU/SET] to display the menu. 2 Press 3/4/2/1 to 2099. Manual exposure mode (P42) The exposure is recommended for your recording purpose. ∫ Switching the mode by the aperture value and the shutter speed which are manually adjusted...
... can switch to a scene mode etc. The 24-hour system is used. • If the date is automatically adjusted by the camera. Auto mode (P40) This mode is adjusted by rotating the mode dial Align a desired mode with part A. Changing the clock setting 1 Press [MENU/SET] to display the menu. 2 Press 3/4/2/1 to 2099. Manual exposure mode (P42) The exposure is recommended for your recording purpose. ∫ Switching the mode by the aperture value and the shutter speed which are manually adjusted...
Digital Slr
Page 29
... settings for the folder number will appear after saving the data on a PC or elsewhere. • To reset the folder number to 100, format the card first (P32) and then use [NO.RESET] to reset the file number. When the folder number reaches 999, the number cannot be assigned. The [WORLD TIME] (P129) setting • The folder number and the clock setting are not changed. 29 VQT1G28 Select [YES] to reset the folder number. [RESET] Press [ MENU /SET ] to display the [SETUP] menu...
... settings for the folder number will appear after saving the data on a PC or elsewhere. • To reset the folder number to 100, format the card first (P32) and then use [NO.RESET] to reset the file number. When the folder number reaches 999, the number cannot be assigned. The [WORLD TIME] (P129) setting • The folder number and the clock setting are not changed. 29 VQT1G28 Select [YES] to reset the folder number. [RESET] Press [ MENU /SET ] to display the [SETUP] menu...
Digital Slr
Page 43
... LCD monitor (information display screen) turn red. Use this when you want to keep the shutter open while the shutter button is displayed on the LCD monitor. • When you take the picture. ∫ Manual Exposure Assistance The exposure is adequate. Set to manual exposure.) - Refer to P127 for a long time to take pictures of the dials with [DIAL SET.] (P105) in the [CUSTOM MENU] menu. • If you press the shutter button fully when the shutter speed is slow, the shutter speed...
... LCD monitor (information display screen) turn red. Use this when you want to keep the shutter open while the shutter button is displayed on the LCD monitor. • When you take the picture. ∫ Manual Exposure Assistance The exposure is adequate. Set to manual exposure.) - Refer to P127 for a long time to take pictures of the dials with [DIAL SET.] (P105) in the [CUSTOM MENU] menu. • If you press the shutter button fully when the shutter speed is slow, the shutter speed...
Digital Slr
Page 67
... the lens and one part of a second. • Do not look directly at the flash at the first flash, the effect may not be set to faster than 2.0 m (6.6 feet) when taking pictures. (P78) ∫ Shutter speed for every flash activated. • If you repeat taking pictures due to Auto/Red-eye reduction etc. Take a picture after it is activated. Advanced • Do not carry the camera using the opened built-in [ ] mode...
... the lens and one part of a second. • Do not look directly at the flash at the first flash, the effect may not be set to faster than 2.0 m (6.6 feet) when taking pictures. (P78) ∫ Shutter speed for every flash activated. • If you repeat taking pictures due to Auto/Red-eye reduction etc. Take a picture after it is activated. Advanced • Do not carry the camera using the opened built-in [ ] mode...
Digital Slr
Page 72
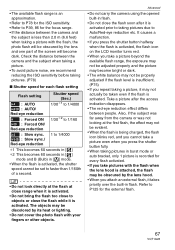
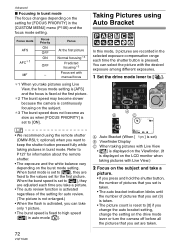
... ON OFF MF - When burst mode is set to [ ], they are recorded in burst mode. Taking Pictures using Auto Bracket In this mode, 3 pictures are adjusted each time the shutter button is set to [ON]. B ISO A C P F5.6 125 ISO100 • We recommend using Live View, the focus mode setting is [AFS] and the focus is fixed at the first picture. ¢2 The burst speed may become slower because the camera is continuously focusing on the subject. ¢3 The...
... ON OFF MF - When burst mode is set to [ ], they are recorded in burst mode. Taking Pictures using Auto Bracket In this mode, 3 pictures are adjusted each time the shutter button is set to [ON]. B ISO A C P F5.6 125 ISO100 • We recommend using Live View, the focus mode setting is [AFS] and the focus is fixed at the first picture. ¢2 The burst speed may become slower because the camera is continuously focusing on the subject. ¢3 The...
Digital Slr
Page 101
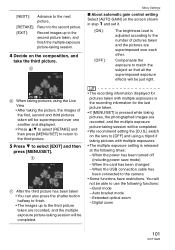
...; We recommend setting the [O.I.S.] switch on the lens to use the following times: - Digital zoom 101 VQT1G28 When the card has been changed - F F After the third picture has been taken • You can also press the shutter button halfway to finish. • The images up to the camera • Some functions have restrictions. Extended optical zoom - E When taking pictures using a tripod if taking session. 4 Decide on the screen shown in step...
...; We recommend setting the [O.I.S.] switch on the lens to use the following times: - Digital zoom 101 VQT1G28 When the card has been changed - F F After the third picture has been taken • You can also press the shutter button halfway to finish. • The images up to the camera • Some functions have restrictions. Extended optical zoom - E When taking pictures using a tripod if taking session. 4 Decide on the screen shown in step...
Digital Slr
Page 107
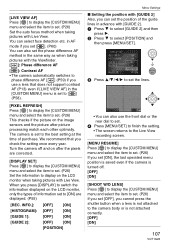
... Live View recording screen. [MENU RESUME] Press [ MENU /SET ] to display the [CUSTOM MENU] menu and select the item to set. (P26) If you set [ON], the last operated menu position is saved even if the camera is turned off and on after picture processing match each other optimally. Turn the camera off . [OFF] [ON] [SHOOT W/O LENS] Press [ MENU /SET ] to display the [CUSTOM MENU] menu and select the item to set. (P26) If you set . (P26) Set the auto focus...
... Live View recording screen. [MENU RESUME] Press [ MENU /SET ] to display the [CUSTOM MENU] menu and select the item to set. (P26) If you set [ON], the last operated menu position is saved even if the camera is turned off and on after picture processing match each other optimally. Turn the camera off . [OFF] [ON] [SHOOT W/O LENS] Press [ MENU /SET ] to display the [CUSTOM MENU] menu and select the item to set. (P26) If you set . (P26) Set the auto focus...
Digital Slr
Page 118
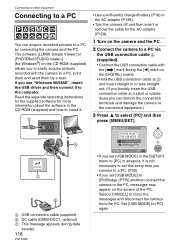
...) C This message appears during data transfer. 118 VQT1G28 • Use a sufficiently charged battery (P18) or the AC adaptor (P128). • Turn the camera off and then insert or remove the cable for the AC adaptor (P128). 1 Turn on the camera and the PC. 2 Connect the camera to a PC via the USB connection cable A (supplied). • Connect the USB connection cable with the camera to a PC, print them and send them by connecting the camera and...
...) C This message appears during data transfer. 118 VQT1G28 • Use a sufficiently charged battery (P18) or the AC adaptor (P128). • Turn the camera off and then insert or remove the cable for the AC adaptor (P128). 1 Turn on the camera and the PC. 2 Connect the camera to a PC via the USB connection cable A (supplied). • Connect the USB connection cable with the camera to a PC, print them and send them by connecting the camera and...
Digital Slr
Page 137
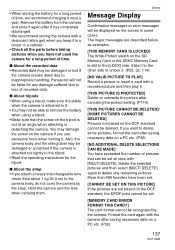
... loss of time, we recommend charging it . (P23, 32, 114) [NO VALID PICTURE TO PLAY] Record a picture or insert a card with the camera after saving necessary data on the screen in a closet or a cabinet. • Check all the parts before taking pictures when you use excessive force when turning it . [THIS PICTURE IS PROTECTED] Delete or overwrite the picture after canceling the protect setting. (P114) [THIS PICTURE CANNOT BE DELETED]/ [SOME PICTURES CANNOT BE DELETED] Pictures not...
... loss of time, we recommend charging it . (P23, 32, 114) [NO VALID PICTURE TO PLAY] Record a picture or insert a card with the camera after saving necessary data on the screen in a closet or a cabinet. • Check all the parts before taking pictures when you use excessive force when turning it . [THIS PICTURE IS PROTECTED] Delete or overwrite the picture after canceling the protect setting. (P114) [THIS PICTURE CANNOT BE DELETED]/ [SOME PICTURES CANNOT BE DELETED] Pictures not...
Digital Slr
Page 138
...) [PICTURE IS DISPLAYED FOR 4:3 TV]/ [PICTURE IS DISPLAYED FOR 16:9 TV] • The video cable is connected to avoid damage. [A FOLDER CANNOT BE CREATED] A folder cannot be used. (P119) Format the card after saving necessary data on a PC etc. (P32) If you execute [NO.RESET] in the [SETUP] menu to change the TV aspect. (P31) • This message also appears when the USB connection cable is connected to using the Viewfinder for taking pictures or turn the camera...
...) [PICTURE IS DISPLAYED FOR 4:3 TV]/ [PICTURE IS DISPLAYED FOR 16:9 TV] • The video cable is connected to avoid damage. [A FOLDER CANNOT BE CREATED] A folder cannot be used. (P119) Format the card after saving necessary data on a PC etc. (P32) If you execute [NO.RESET] in the [SETUP] menu to change the TV aspect. (P31) • This message also appears when the USB connection cable is connected to using the Viewfinder for taking pictures or turn the camera...
Digital Slr
Page 148
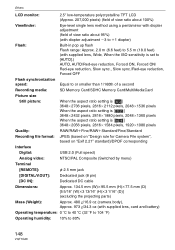
... diopter adjustment j3 to i1 diopter) Flash: Built-in pop up flash Flash range: Approx. 2.0 m (6.6 feet) to 5.5 m (18.0 feet) (with supplied lens, Wide, When the ISO sensitivity is set to [AUTO].) AUTO, AUTO/Red-eye reduction, Forced ON, Forced ON/ Red-eye reduction, Slow sync., Slow sync./Red-eye reduction, Forced OFF Flash synchronization speed: Equal to or smaller than 1/160th of a second Recording media: SD Memory Card/SDHC Memory Card/MultiMediaCard Picture size Still picture...
... diopter adjustment j3 to i1 diopter) Flash: Built-in pop up flash Flash range: Approx. 2.0 m (6.6 feet) to 5.5 m (18.0 feet) (with supplied lens, Wide, When the ISO sensitivity is set to [AUTO].) AUTO, AUTO/Red-eye reduction, Forced ON, Forced ON/ Red-eye reduction, Slow sync., Slow sync./Red-eye reduction, Forced OFF Flash synchronization speed: Equal to or smaller than 1/160th of a second Recording media: SD Memory Card/SDHC Memory Card/MultiMediaCard Picture size Still picture...
Digital Slr
Page 159
... M Macro Mode 86 MANUAL 109 Manual exposure 42 Manual Exposure Assistance 43 Manual Focus 45 Mass Storage 30 MC Protector 126 Menu Resume 107 Metering Mode 81 MF 45 MF Assist 63 Mirror Up 102 Monitor 29 Multi Playback 52 Multiple 81 Multiple Exposure 100 N Night Portrait Mode 87 NO.Reset 29 NTSC 30 Number of prints 112, 122 Number of recordable pictures .......... 19, 144 O Optical Image Stabilizer 14, 96 Optical Zoom 47 P PAL 30 Paper Size...
... M Macro Mode 86 MANUAL 109 Manual exposure 42 Manual Exposure Assistance 43 Manual Focus 45 Mass Storage 30 MC Protector 126 Menu Resume 107 Metering Mode 81 MF 45 MF Assist 63 Mirror Up 102 Monitor 29 Multi Playback 52 Multiple 81 Multiple Exposure 100 N Night Portrait Mode 87 NO.Reset 29 NTSC 30 Number of prints 112, 122 Number of recordable pictures .......... 19, 144 O Optical Image Stabilizer 14, 96 Optical Zoom 47 P PAL 30 Paper Size...
Digital Still Camera -english/ Spanish
Page 14
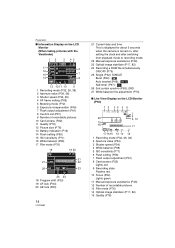
... 27 White balance fine adjustment (P70) ∫ Live View Display on the LCD Monitor (P50) 1 2 34 5 6 P F2.8 2000 20 A ISO100 1/3 7 8 9, 10 19 18 -2 -1 0 +1 +2 11 STD 19 171615 14 13 12 1 Recording mode (P32, 36, 38) 2 Aperture value (P54) 3 Shutter speed (P54) 4 White balance (P68) 5 ISO sensitivity (P71) 6 Flash setting (P58) 7 Flash output adjustment (P61) 8 Card access (P22) Lights red. 9 Recording state Flashes red. 10 Focus (P54) Lights green. 11 Manual exposure assistance (P39) 12 Number of recordable pictures 13 Film mode (P76) 14 Optical image...
... 27 White balance fine adjustment (P70) ∫ Live View Display on the LCD Monitor (P50) 1 2 34 5 6 P F2.8 2000 20 A ISO100 1/3 7 8 9, 10 19 18 -2 -1 0 +1 +2 11 STD 19 171615 14 13 12 1 Recording mode (P32, 36, 38) 2 Aperture value (P54) 3 Shutter speed (P54) 4 White balance (P68) 5 ISO sensitivity (P71) 6 Flash setting (P58) 7 Flash output adjustment (P61) 8 Card access (P22) Lights red. 9 Recording state Flashes red. 10 Focus (P54) Lights green. 11 Manual exposure assistance (P39) 12 Number of recordable pictures 13 Film mode (P76) 14 Optical image...
Digital Still Camera -english/ Spanish
Page 19
... the operating time may have expired. skiing/ snowboarding). 19 VQT0W82 About the Battery (charging/number of recordable pictures) ∫ Battery indication The remaining battery power appears on the screen. • The battery indication turns red and blinks. (The status indicator blinks when the LCD monitor turns off every 10 recordings. • CIPA is an abbreviation of "Camera & Imaging Products Association". ¢The card is over discharged (discharged excessively). The number of recordable pictures decreases. [e.g. If the recording interval time becomes...
... the operating time may have expired. skiing/ snowboarding). 19 VQT0W82 About the Battery (charging/number of recordable pictures) ∫ Battery indication The remaining battery power appears on the screen. • The battery indication turns red and blinks. (The status indicator blinks when the LCD monitor turns off every 10 recordings. • CIPA is an abbreviation of "Camera & Imaging Products Association". ¢The card is over discharged (discharged excessively). The number of recordable pictures decreases. [e.g. If the recording interval time becomes...
Digital Still Camera -english/ Spanish
Page 28
... cancel power save mode. • Power save mode is not activated when using the AC adaptor, connecting to a PC or a printer and during a slide show. (However, the setting for power save mode is fixed to [10 MIN.] while pausing a slide show or playing back a manual slide show.) [MF ASSIST] (When taking pictures with Live View only) Press [ MENU SET ] to display the [SETUP] menu and select the item to set. (P27) When taking pictures with Live View in manual focus, the...
... cancel power save mode. • Power save mode is not activated when using the AC adaptor, connecting to a PC or a printer and during a slide show. (However, the setting for power save mode is fixed to [10 MIN.] while pausing a slide show or playing back a manual slide show.) [MF ASSIST] (When taking pictures with Live View only) Press [ MENU SET ] to display the [SETUP] menu and select the item to set. (P27) When taking pictures with Live View in manual focus, the...
Digital Still Camera -english/ Spanish
Page 29
... USB connection cable (supplied). (P98, 100) [ SELECT ON CONNECTION]: Select either [PC] or [PictBridge (PTP)] if you want the file number of the next recording to the initial settings. - [REC] mode menu settings - [SETUP]/[CUSTOM] menu settings • The following settings are reset to start from 0001.) • A folder number between 100 and 999 can be reset. When the folder number reaches 999, the number cannot be assigned. We recommend formatting the card after saving the data...
... USB connection cable (supplied). (P98, 100) [ SELECT ON CONNECTION]: Select either [PC] or [PictBridge (PTP)] if you want the file number of the next recording to the initial settings. - [REC] mode menu settings - [SETUP]/[CUSTOM] menu settings • The following settings are reset to start from 0001.) • A folder number between 100 and 999 can be reset. When the folder number reaches 999, the number cannot be assigned. We recommend formatting the card after saving the data...
Digital Still Camera -english/ Spanish
Page 123
Flash: Flash synchronization speed: Recording media: Picture size Still picture: Quality: Recording file format: Interface Digital: Analog video: Terminal [USB]: [V OUT/REMOTE]: [DC IN]: Dimensions: Mass: Operating temperature: Operating humidity: Others Built-in pop up flash Flash range: Approx. 2.5 m (8.2 feet) to 7.0 m (23.0 feet) (Supplied lens attached, Wide, When the ISO sensitivity is set to [AUTO].) AUTO, AUTO/Red-eye reduction, Forced ON, Forced ON/ Red-eye reduction, Slow sync., Slow sync./Red-eye reduction, Forced OFF Equal to or smaller than...
Flash: Flash synchronization speed: Recording media: Picture size Still picture: Quality: Recording file format: Interface Digital: Analog video: Terminal [USB]: [V OUT/REMOTE]: [DC IN]: Dimensions: Mass: Operating temperature: Operating humidity: Others Built-in pop up flash Flash range: Approx. 2.5 m (8.2 feet) to 7.0 m (23.0 feet) (Supplied lens attached, Wide, When the ISO sensitivity is set to [AUTO].) AUTO, AUTO/Red-eye reduction, Forced ON, Forced ON/ Red-eye reduction, Slow sync., Slow sync./Red-eye reduction, Forced OFF Equal to or smaller than...


