
Digital Slr
Page 1
DMC-L10K Before connecting, operating or adjusting this product, please read the instructions completely. Operating Instructions Digital Camera/Lens Kit Model No. For USA assistance, please call: 1-800-272-7033 or send e-mail to : digitalstillcam@us.panasonic.com For Canadian assistance, please call: 1-800-99-LUMIX (1-800-995-8649) or send e-mail to: lumixconcierge@ca.panasonic.com PP VQT1G28
DMC-L10K Before connecting, operating or adjusting this product, please read the instructions completely. Operating Instructions Digital Camera/Lens Kit Model No. For USA assistance, please call: 1-800-272-7033 or send e-mail to : digitalstillcam@us.panasonic.com For Canadian assistance, please call: 1-800-99-LUMIX (1-800-995-8649) or send e-mail to: lumixconcierge@ca.panasonic.com PP VQT1G28
Digital Slr
Page 6
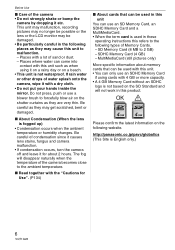
...unit is used in this unit such as they are very thin. Be careful of condensation since it causes lens stains, fungus and camera malfunction. • If condensation occurs, turn the camera off and leave it on a rainy day or on the SD Standard and will disappear naturally when the...to forcefully blow air on the following types of sand or dust. - MultiMediaCard (still pictures only) More specific information about 2 hours. http://panasonic.co.jp/pavc/global/cs (This Site is fogged up) • Condensation occurs when the ambient temperature or humidity changes. Be careful as they...
...unit is used in this unit such as they are very thin. Be careful of condensation since it causes lens stains, fungus and camera malfunction. • If condensation occurs, turn the camera off and leave it on a rainy day or on the SD Standard and will disappear naturally when the...to forcefully blow air on the following types of sand or dust. - MultiMediaCard (still pictures only) More specific information about 2 hours. http://panasonic.co.jp/pavc/global/cs (This Site is fogged up) • Condensation occurs when the ambient temperature or humidity changes. Be careful as they...

Digital Slr
Page 7
... for Your Safety 2 Preparation Standard Accessories 9 Names of the Components 11 Rotating the LCD monitor 13 About the Lens 13 Attaching/Detaching the Lens 14 Attaching the Lens Hood 15 Attaching the Strap 16 Attaching the Eyepiece Cap 17 Attaching the Magnifier Eye Cup 18 Charging the Battery with...charging/number of recordable pictures 19 Inserting/Removing the Battery 21 Inserting/Removing the Card (Optional 22 About the Card (optional 23 Turning the Camera On 24 Setting Date/Time (Clock Set 24 • Changing the clock setting 25 About the Mode Dial 25 Setting the Menu 26...
... for Your Safety 2 Preparation Standard Accessories 9 Names of the Components 11 Rotating the LCD monitor 13 About the Lens 13 Attaching/Detaching the Lens 14 Attaching the Lens Hood 15 Attaching the Strap 16 Attaching the Eyepiece Cap 17 Attaching the Magnifier Eye Cup 18 Charging the Battery with...charging/number of recordable pictures 19 Inserting/Removing the Battery 21 Inserting/Removing the Card (Optional 22 About the Card (optional 23 Turning the Camera On 24 Setting Date/Time (Clock Set 24 • Changing the clock setting 25 About the Mode Dial 25 Setting the Menu 26...
Digital Slr
Page 10
...to the camera body at the time of purchase.) 12 Lens Hood 13 Magnifier Eye Cup 14 Lens Cap (This is attached to the interchangeable lens at the time of purchase.) 15 Lens Rear Cap (This is attached to the interchangeable lens at the time of purchase.) 16 Lens Storage Bag...For information about optional accessories, refer to the "Digital Camera Accessory System". (P150) • If any accessories are lost, customers in the USA should contact Panasonic's parts department at 1 800 833-9626 and customers in Canada should contact 1 800 99-LUMIX (1-800-995-8649) for further information about ...
...to the camera body at the time of purchase.) 12 Lens Hood 13 Magnifier Eye Cup 14 Lens Cap (This is attached to the interchangeable lens at the time of purchase.) 15 Lens Rear Cap (This is attached to the interchangeable lens at the time of purchase.) 16 Lens Storage Bag...For information about optional accessories, refer to the "Digital Camera Accessory System". (P150) • If any accessories are lost, customers in the USA should contact Panasonic's parts department at 1 800 833-9626 and customers in Canada should contact 1 800 99-LUMIX (1-800-995-8649) for further information about ...
Digital Slr
Page 11
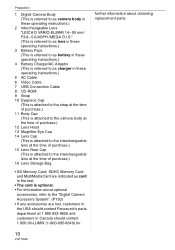
Names of the Components ∫ Camera body 12 34 5 6 78 1 Front dial (P41, 42, 45, 51) 2 AF assist lamp (P106) Self-timer indicator (P74) 3 Flash (P64) 4 Mirror 5 Lens fitting mark (P14) 6 Mount 7 Lens lock pin 8 Lens release button (P15) Preparation 9 10 11 AFS AFC MF 12 13 AFL AEL 14 15 16 22 23 17... Viewfinder (P32, 35, 131) 12 Diopter adjustment dial (P35) 13 Focus mode lever (P36, 40, 45, 58, 60, 62) 14 [AFL/AEL] button (P69) 15 Camera ON/OFF switch (P24) 16 Rear dial (P42, 44, 51, 52, 116) 17 LCD monitor (P33, 36, 48, 54, 55, 56, 57, 131) 18 Playback...
Names of the Components ∫ Camera body 12 34 5 6 78 1 Front dial (P41, 42, 45, 51) 2 AF assist lamp (P106) Self-timer indicator (P74) 3 Flash (P64) 4 Mirror 5 Lens fitting mark (P14) 6 Mount 7 Lens lock pin 8 Lens release button (P15) Preparation 9 10 11 AFS AFC MF 12 13 AFL AEL 14 15 16 22 23 17... Viewfinder (P32, 35, 131) 12 Diopter adjustment dial (P35) 13 Focus mode lever (P36, 40, 45, 58, 60, 62) 14 [AFL/AEL] button (P69) 15 Camera ON/OFF switch (P24) 16 Rear dial (P42, 44, 51, 52, 116) 17 LCD monitor (P33, 36, 48, 54, 55, 56, 57, 131) 18 Playback...
Digital Slr
Page 12
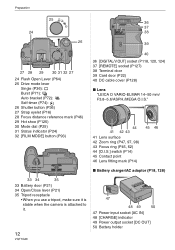
...) 30 Mode dial (P25) 31 Status indicator (P24) 32 [FILM MODE] button (P93) 40 36 [DIGITAL/V.OUT] socket (P118, 120, 124) 37 [REMOTE] socket (P127) 38 Terminal door 39 Card door (P22) 40 DC cable... cover (P128) ∫ Lens "LEICA D VARIO-ELMAR 14-50 mm/ F3.8-5.6/ASPH./MEGA O.I.S." 44 41 42 43 41 Lens surface 42 Zoom ring (P47, 97, 98) 43 Focus ring (P45, 62)...lever (P21) 35 Tripod receptacle • When you use a tripod, make sure it is stable when the camera is attached to it. 12 VQT1G28 47 48 49 50 47 Power input socket [AC IN] 48 [CHARGE] ...
...) 30 Mode dial (P25) 31 Status indicator (P24) 32 [FILM MODE] button (P93) 40 36 [DIGITAL/V.OUT] socket (P118, 120, 124) 37 [REMOTE] socket (P127) 38 Terminal door 39 Card door (P22) 40 DC cable... cover (P128) ∫ Lens "LEICA D VARIO-ELMAR 14-50 mm/ F3.8-5.6/ASPH./MEGA O.I.S." 44 41 42 43 41 Lens surface 42 Zoom ring (P47, 97, 98) 43 Focus ring (P45, 62)...lever (P21) 35 Tripod receptacle • When you use a tripod, make sure it is stable when the camera is attached to it. 12 VQT1G28 47 48 49 50 47 Power input socket [AC IN] 48 [CHARGE] ...

Digital Slr
Page 13
... available flash range etc. If you use a lens other than the supplied lens • Depending on the aperture value of lens, you . 3 Return the monitor to its original position. • Refer to the following for the optical design requirements of digital cameras. ∫ Using a lens other than a dedicated interchangeable lens, auto focus cannot be able to rotate...
... available flash range etc. If you use a lens other than the supplied lens • Depending on the aperture value of lens, you . 3 Return the monitor to its original position. • Refer to the following for the optical design requirements of digital cameras. ∫ Using a lens other than a dedicated interchangeable lens, auto focus cannot be able to rotate...
Digital Slr
Page 14
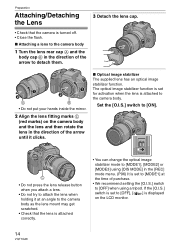
...stabilizer function is set to [OFF], [ ] is attached to [ON]. If the [O.I.S.] switch is set for activation when the lens is displayed on the camera body and the lens and then rotate the lens in the direction of the arrow to [OFF] when using [OIS MODE] in the [REC] mode menu. (P96) It ...is set to [MODE1] at an angle to the camera body as the lens mount may get scratched. • Check that the camera is turned off. • Close the flash. ∫ Attaching a lens to the camera body 1 Turn the lens rear cap A and the body cap B in the direction of purchase. •...
...stabilizer function is set to [OFF], [ ] is attached to [ON]. If the [O.I.S.] switch is set for activation when the lens is displayed on the camera body and the lens and then rotate the lens in the direction of the arrow to [OFF] when using [OIS MODE] in the [REC] mode menu. (P96) It ...is set to [MODE1] at an angle to the camera body as the lens mount may get scratched. • Check that the camera is turned off. • Close the flash. ∫ Attaching a lens to the camera body 1 Turn the lens rear cap A and the body cap B in the direction of purchase. •...
Digital Slr
Page 15
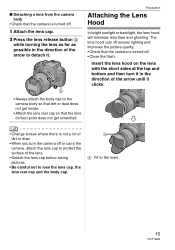
...or backlight, the lens hood will minimize lens flare and ghosting. Insert the lens hood on the lens with the short sides at the top and bottom and then turn the camera off or carry the camera, attach the lens cap to protect the surface of the lens. • Detach the lens cap before taking pictures... of dirt or dust. • When you turn it . ∫ Detaching a lens from the camera body • Check that the camera is turned off. 1 Attach the lens cap. 2 Press the lens release button D while turning the lens as far as possible in the direction of the arrow until it clicks. • ...
...or backlight, the lens hood will minimize lens flare and ghosting. Insert the lens hood on the lens with the short sides at the top and bottom and then turn the camera off or carry the camera, attach the lens cap to protect the surface of the lens. • Detach the lens cap before taking pictures... of dirt or dust. • When you turn it . ∫ Detaching a lens from the camera body • Check that the camera is turned off. 1 Attach the lens cap. 2 Press the lens release button D while turning the lens as far as possible in the direction of the arrow until it clicks. • ...

Digital Slr
Page 16
... Strap 1 Pass the strap through the hole on the camera body. We recommend detaching the lens hood. • When using the AF assist lamp in the picture. A Eyepiece cap • Attach the strap so that it does not appear in the dark, detach the lens hood. • For details on how to attach... P126. 3 Pass the end of the strap through the strap eyelet on the other side of the stopper. 16 VQT1G28 Preparation ∫ Temporarily storing the lens hood 1 Turn the lens hood in the direction of the arrow and then pass it through the stopper. • Hold the short sides of the...
... Strap 1 Pass the strap through the hole on the camera body. We recommend detaching the lens hood. • When using the AF assist lamp in the picture. A Eyepiece cap • Attach the strap so that it does not appear in the dark, detach the lens hood. • For details on how to attach... P126. 3 Pass the end of the strap through the strap eyelet on the other side of the stopper. 16 VQT1G28 Preparation ∫ Temporarily storing the lens hood 1 Turn the lens hood in the direction of the arrow and then pass it through the stopper. • Hold the short sides of the...
Digital Slr
Page 19
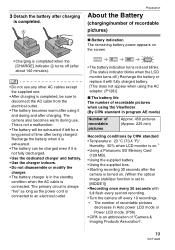
...recordable pictures when using it and during use any other AC cables except the supplied one. • After charging is an abbreviation of "Camera & Imaging Products Association". 19 VQT1G28 Recharge the battery when it is exhausted. • The battery can be charged even if it ...73.4 oF)/ Humidity: 50% when LCD monitor is on.¢ • Using a Panasonic SD Memory Card (128 MB). • Using the supplied battery. • Using the supplied lens. • Starting recording 30 seconds after the camera is turned on the screen. • Charging is completed when the [CHARGE] indicator A...
...recordable pictures when using it and during use any other AC cables except the supplied one. • After charging is an abbreviation of "Camera & Imaging Products Association". 19 VQT1G28 Recharge the battery when it is exhausted. • The battery can be charged even if it ...73.4 oF)/ Humidity: 50% when LCD monitor is on.¢ • Using a Panasonic SD Memory Card (128 MB). • Using the supplied battery. • Using the supplied lens. • Starting recording 30 seconds after the camera is turned on the screen. • Charging is completed when the [CHARGE] indicator A...
Digital Slr
Page 31
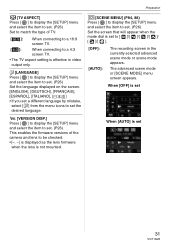
... ] to display the [SETUP] menu and select the item to set. (P26) Set to match the type of the camera and lens to be checked. • [-. -] is displayed as the lens firmware when the lens is not mounted. [SCENE MENU] (P84, 88) Press [ MENU /SET ] to display the [SETUP] menu and select the item...
... ] to display the [SETUP] menu and select the item to set. (P26) Set to match the type of the camera and lens to be checked. • [-. -] is displayed as the lens firmware when the lens is not mounted. [SCENE MENU] (P84, 88) Press [ MENU /SET ] to display the [SETUP] menu and select the item...

Digital Slr
Page 35
... for compatible lenses.) Making the Viewfinder easier to see (Diopter adjustment) Look at your side and stand with the camera aimed up or down. • You can take pictures while showing the subject on the Viewfinder. A When taking... pictures with Live View B When taking good pictures with Viewfinder • Hold the camera gently with both hands, keep your footing is stable and there is no danger of the AF frame is ...the Viewfinder You can only use the direction detection function when using a compatible lens. (P13) (Refer to the catalog, website etc.
... for compatible lenses.) Making the Viewfinder easier to see (Diopter adjustment) Look at your side and stand with the camera aimed up or down. • You can take pictures while showing the subject on the Viewfinder. A When taking... pictures with Live View B When taking good pictures with Viewfinder • Hold the camera gently with both hands, keep your footing is stable and there is no danger of the AF frame is ...the Viewfinder You can only use the direction detection function when using a compatible lens. (P13) (Refer to the catalog, website etc.

Digital Slr
Page 36
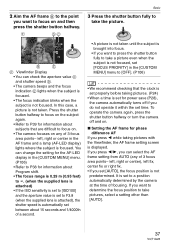
...when you press the shutter button halfway. 36 VQT1G28 The focus is activated when taking pictures with the Viewfinder. • Remove the lens cap. • Turn the camera on the LCD monitor Press [DISPLAY] to P54 for details. A • You can make the LCD monitor screen easier to ...Matching the Focus and the Exposure Automatically (AF: Auto Focus/Program AE mode [ ]) C Normal display D No display E E [DISPLAY]/[LCD MODE] button F LCD monitor The camera automatically sets the aperture value and the shutter speed according to select a mode. • Read P56 for more information.
...when you press the shutter button halfway. 36 VQT1G28 The focus is activated when taking pictures with the Viewfinder. • Remove the lens cap. • Turn the camera on the LCD monitor Press [DISPLAY] to P54 for details. A • You can make the LCD monitor screen easier to ...Matching the Focus and the Exposure Automatically (AF: Auto Focus/Program AE mode [ ]) C Normal display D No display E E [DISPLAY]/[LCD MODE] button F LCD monitor The camera automatically sets the aperture value and the shutter speed according to select a mode. • Read P56 for more information.
Digital Slr
Page 37
... of a second. • A picture is not taken until the subject is displayed. You can check the aperture value C and shutter speed D. • The camera beeps and the focus indication E lights when the subject is focused. • The focus indication blinks when the subject is not taken. F Viewfinder Display •...attached) • If the ISO sensitivity is set to [ISO100] and the aperture value is set to F3.8 (when the supplied lens is attached), the shutter speed is automatically set between about subjects that the clock is set properly before taking pictures with the Viewfinder, ...
... of a second. • A picture is not taken until the subject is displayed. You can check the aperture value C and shutter speed D. • The camera beeps and the focus indication E lights when the subject is focused. • The focus indication blinks when the subject is not taken. F Viewfinder Display •...attached) • If the ISO sensitivity is set to [ISO100] and the aperture value is set to F3.8 (when the supplied lens is attached), the shutter speed is automatically set between about subjects that the clock is set properly before taking pictures with the Viewfinder, ...
Digital Slr
Page 38
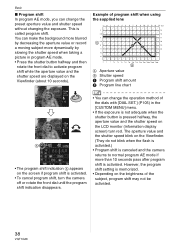
... shutter button is pressed halfway, the aperture value and the shutter speed on the LCD monitor (information display screen) turn the camera off or rotate the front dial until the program shift indication disappears. However, the program shift setting is called program shift. ...This is memorized. • Depending on the brightness of program shift when using the supplied lens j1 0 1 2 3 4 5 6 7 8 9 10 11 12 13 14ʢČĽʣ 2 15 2.8 16 4 17 A 5.6 18 8 19 11 20 16 22 4 2 1 1/2 1/4 1/8 ...
... shutter button is pressed halfway, the aperture value and the shutter speed on the LCD monitor (information display screen) turn the camera off or rotate the front dial until the program shift indication disappears. However, the program shift setting is called program shift. ...This is memorized. • Depending on the brightness of program shift when using the supplied lens j1 0 1 2 3 4 5 6 7 8 9 10 11 12 13 14ʢČĽʣ 2 15 2.8 16 4 17 A 5.6 18 8 19 11 20 16 22 4 2 1 1/2 1/4 1/8 ...
Digital Slr
Page 39
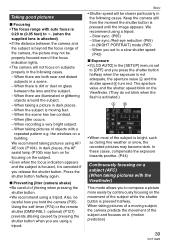
...When taking pictures of a moving fast. - Keep the camera still from the moment the shutter button is canceled if you...) Continuously focusing on glass between the camera and the subject is bright, such ...there is moving subject, the camera predicts the movement of the ...Press the shutter button halfway again. ∫ Preventing jitter (camera shake) • Be careful of the subject while the... mode allows you to [OFF] and you hold the camera (P35). When the subject is dirt or dust on... on a building. When taking pictures of the camera, the picture may become dark. When there are...
...When taking pictures of a moving fast. - Keep the camera still from the moment the shutter button is canceled if you...) Continuously focusing on glass between the camera and the subject is bright, such ...there is moving subject, the camera predicts the movement of the ...Press the shutter button halfway again. ∫ Preventing jitter (camera shake) • Be careful of the subject while the... mode allows you to [OFF] and you hold the camera (P35). When the subject is dirt or dust on... on a building. When taking pictures of the camera, the picture may become dark. When there are...
Digital Slr
Page 41
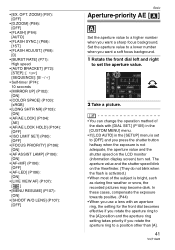
... [ON] • [AF+MF] (P106): [OFF] • [AF-LED] (P106): [ON] • [LIVE VIEW AF] (P107): [] • [MENU RESUME] (P107): [ON] • [SHOOT W/O LENS] (P107): [OFF] Basic Aperture-priority AE [ ] Set the aperture value to a higher number when you press the shutter button halfway when the exposure is not... value to a lower number when you want a sharp focus background. In these cases, compensate the exposure towards positive. (P44) • When you use a lens with [DIAL SET.] (P105) in the [CUSTOM MENU] menu. • If [LCD AUTO] in the [SETUP] menu is bright, such as during fine...
... [ON] • [AF+MF] (P106): [OFF] • [AF-LED] (P106): [ON] • [LIVE VIEW AF] (P107): [] • [MENU RESUME] (P107): [ON] • [SHOOT W/O LENS] (P107): [OFF] Basic Aperture-priority AE [ ] Set the aperture value to a higher number when you press the shutter button halfway when the exposure is not... value to a lower number when you want a sharp focus background. In these cases, compensate the exposure towards positive. (P44) • When you use a lens with [DIAL SET.] (P105) in the [CUSTOM MENU] menu. • If [LCD AUTO] in the [SETUP] menu is bright, such as during fine...
Digital Slr
Page 43
... is an approximation. Intelligent ISO sensitivity control or [AUTO] in manual exposure. - optional) when you switch from Intelligent ISO sensitivity control or [AUTO] to [B], use a lens with the shutter speed set to manual exposure.) - Set to slower shutter speed or smaller aperture value. • The manual exposure assistance is slow, the...
... is an approximation. Intelligent ISO sensitivity control or [AUTO] in manual exposure. - optional) when you switch from Intelligent ISO sensitivity control or [AUTO] to [B], use a lens with the shutter speed set to manual exposure.) - Set to slower shutter speed or smaller aperture value. • The manual exposure assistance is slow, the...
Digital Slr
Page 45
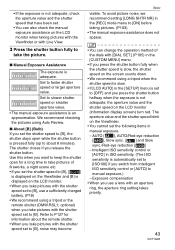
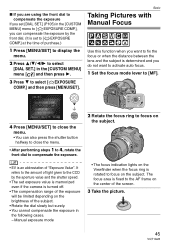
... menu. • You can compensate the exposure by the aperture value and the shutter speed. • The set exposure value is memorized even if the camera is set to [ EXPOSURE COMP.] at the time of purchase.) 1 Press [MENU/SET] to display the menu. 2 Press 3/4/2/1 to select [DIAL SET.] in the following... cases. - Basic Taking Pictures with Manual Focus Use this function when you do not want to fix the focus or when the distance between the lens and the subject is fixed to focus on the subject. The focus area is determined and you want to activate auto focus. 1 Set the focus...
... menu. • You can compensate the exposure by the aperture value and the shutter speed. • The set exposure value is memorized even if the camera is set to [ EXPOSURE COMP.] at the time of purchase.) 1 Press [MENU/SET] to display the menu. 2 Press 3/4/2/1 to select [DIAL SET.] in the following... cases. - Basic Taking Pictures with Manual Focus Use this function when you do not want to fix the focus or when the distance between the lens and the subject is fixed to focus on the subject. The focus area is determined and you want to activate auto focus. 1 Set the focus...

