Digital Slr
Page 2
Please take time to recycle this manual as your Camera. Be sure to retain this battery. 2 VQT1G28 Information for choosing Panasonic! REFER SERVICING TO QUALIFIED SERVICE PERSONNEL. Please call 1-800-8-BATTERY for information TM Li-ion on how to fill in the information below. Serial No. Even for...bring you and your own private use , recording of private use may be restricted. Carefully observe copyright laws. RBRC A lithium ion battery that is on the tag located on the market today. You have purchased. Before Use Before Use Dear Customer, Thank you for...
Please take time to recycle this manual as your Camera. Be sure to retain this battery. 2 VQT1G28 Information for choosing Panasonic! REFER SERVICING TO QUALIFIED SERVICE PERSONNEL. Please call 1-800-8-BATTERY for information TM Li-ion on how to fill in the information below. Serial No. Even for...bring you and your own private use , recording of private use may be restricted. Carefully observe copyright laws. RBRC A lithium ion battery that is on the tag located on the market today. You have purchased. Before Use Before Use Dear Customer, Thank you for...
Digital Slr
Page 3
• Please note that the actual controls and components, menu items, etc. Before Use CAUTION Danger of explosion if battery is a registered trademark of Leica Camera AG. • Other names, company names, and product names printed in these Operating Instructions. • Four ThirdsTM is a ...Warning Risk of used batteries according to the manufacturer's instructions. This Class B digital apparatus complies with the same or equivalent type recommended by the manufacturer. Do not disassemble, heat above 60 xC (140 oF) or incinerate. of your Digital Camera may look somewhat different...
• Please note that the actual controls and components, menu items, etc. Before Use CAUTION Danger of explosion if battery is a registered trademark of Leica Camera AG. • Other names, company names, and product names printed in these Operating Instructions. • Four ThirdsTM is a ...Warning Risk of used batteries according to the manufacturer's instructions. This Class B digital apparatus complies with the same or equivalent type recommended by the manufacturer. Do not disassemble, heat above 60 xC (140 oF) or incinerate. of your Digital Camera may look somewhat different...

Digital Slr
Page 5
...adaptor or AC cord set. 5 VQT1G28 If any electrolyte should come into contact with water. or Canada, use the battery pack with water, and then consult a doctor. ∫ About the battery charger Before Use CAUTION! -If you see this product, please contact your eyes, never rub the eyes. If ...OF ELECTRIC SHOCK OR FIRE HAZARD DUE TO OVERHEATING, ENSURE THAT CURTAINS AND ANY OTHER MATERIALS DO NOT OBSTRUCT THE VENTILATION VENTS. and Canada, the battery charger must be connected to a 120 V AC power supply only. • When connecting to the voltage of the AC supply and the ...
...adaptor or AC cord set. 5 VQT1G28 If any electrolyte should come into contact with water. or Canada, use the battery pack with water, and then consult a doctor. ∫ About the battery charger Before Use CAUTION! -If you see this product, please contact your eyes, never rub the eyes. If ...OF ELECTRIC SHOCK OR FIRE HAZARD DUE TO OVERHEATING, ENSURE THAT CURTAINS AND ANY OTHER MATERIALS DO NOT OBSTRUCT THE VENTILATION VENTS. and Canada, the battery charger must be connected to a 120 V AC power supply only. • When connecting to the voltage of the AC supply and the ...

Digital Slr
Page 7
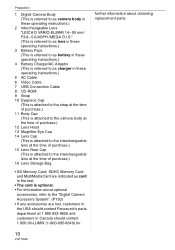
... Eyepiece Cap 17 Attaching the Magnifier Eye Cup 18 Charging the Battery with the Charger 18 About the Battery (charging/number of recordable pictures 19 Inserting/Removing the Battery 21 Inserting/Removing the Card (Optional 22 About the Card (optional 23 Turning the Camera On 24 Setting Date/Time (Clock Set 24 • Changing...
... Eyepiece Cap 17 Attaching the Magnifier Eye Cup 18 Charging the Battery with the Charger 18 About the Battery (charging/number of recordable pictures 19 Inserting/Removing the Battery 21 Inserting/Removing the Card (Optional 22 About the Card (optional 23 Turning the Camera On 24 Setting Date/Time (Clock Set 24 • Changing...
Digital Slr
Page 10
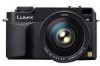
...Digital Camera Body (This is referred to as camera body in these operating instructions.) 2 Interchangeable Lens "LEICA D VARIO-ELMAR 14- 50 mm/ F3.8- 5.6/ASPH./MEGA O.I.S." (This is referred to as lens in these operating instructions.) 3 Battery Pack (This is referred to as battery in these operating instructions.) 4 Battery...optional accessories, refer to the "Digital Camera Accessory System". (P150) • If any accessories are lost, customers in the USA should contact Panasonic's parts department at 1 800 833-9626 and customers in Canada should contact 1 800 99-LUMIX (1-800-995-8649) for ...
...Digital Camera Body (This is referred to as camera body in these operating instructions.) 2 Interchangeable Lens "LEICA D VARIO-ELMAR 14- 50 mm/ F3.8- 5.6/ASPH./MEGA O.I.S." (This is referred to as lens in these operating instructions.) 3 Battery Pack (This is referred to as battery in these operating instructions.) 4 Battery...optional accessories, refer to the "Digital Camera Accessory System". (P150) • If any accessories are lost, customers in the USA should contact Panasonic's parts department at 1 800 833-9626 and customers in Canada should contact 1 800 99-LUMIX (1-800-995-8649) for ...
Digital Slr
Page 12
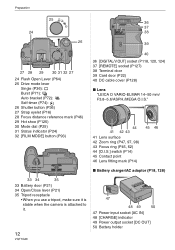
...) 28 Focus distance reference mark (P46) 29 Hot shoe (P125) 30 Mode dial (P25) 31 Status indicator (P24) 32 [FILM MODE] button (P93) 40 36 [DIGITAL/V.OUT] socket (P118, 120, 124) 37 [REMOTE] socket (P127) 38 Terminal door 39 Card door (P22) 40 DC cable cover (P128) ∫ Lens "LEICA D VARIO.../AC adaptor (P18, 128) 33 34 35 33 Battery door (P21) 34 Open/Close lever (P21) 35 Tripod receptacle • When you use a tripod, make sure it is stable when the camera is attached to it. 12 VQT1G28 47 48 49 50 47 Power input socket [AC IN] 48 [CHARGE] indicator 49...
...) 28 Focus distance reference mark (P46) 29 Hot shoe (P125) 30 Mode dial (P25) 31 Status indicator (P24) 32 [FILM MODE] button (P93) 40 36 [DIGITAL/V.OUT] socket (P118, 120, 124) 37 [REMOTE] socket (P127) 38 Terminal door 39 Card door (P22) 40 DC cable cover (P128) ∫ Lens "LEICA D VARIO.../AC adaptor (P18, 128) 33 34 35 33 Battery door (P21) 34 Open/Close lever (P21) 35 Tripod receptacle • When you use a tripod, make sure it is stable when the camera is attached to it. 12 VQT1G28 47 48 49 50 47 Power input socket [AC IN] 48 [CHARGE] indicator 49...

Digital Slr
Page 18
... use. 1 Connect the AC cable. • The battery cannot be charged when the DC cable (DMW-DCC1; This makes it easier to fix the focus when taking pictures with the marks on the ... the top. ∫ Attaching the eye cup Slide the eye cup from the top. Charging the Battery with the Charger • The battery is not charged when the camera is connected to the AC adaptor. 2 Align the battery with manual focus and taking close-up pictures. ∫ Attaching the magnifier eye cup 1 Slide the...
... use. 1 Connect the AC cable. • The battery cannot be charged when the DC cable (DMW-DCC1; This makes it easier to fix the focus when taking pictures with the marks on the ... the top. ∫ Attaching the eye cup Slide the eye cup from the top. Charging the Battery with the Charger • The battery is not charged when the camera is connected to the AC adaptor. 2 Align the battery with manual focus and taking close-up pictures. ∫ Attaching the magnifier eye cup 1 Slide the...
Digital Slr
Page 19
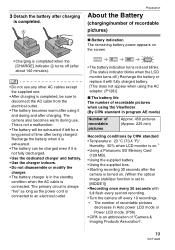
...pictures decreases in Auto power LCD mode or Power LCD mode. (P56) • CIPA is an abbreviation of "Camera & Imaging Products Association". 19 VQT1G28 A Preparation About the Battery (charging/number of recordable pictures Approx. 450 pictures (Approx. 225 min) Recording conditions by CIPA standard •... Temperature: 23 oC (73.4 oF)/ Humidity: 50% when LCD monitor is on.¢ • Using a Panasonic SD Memory Card (128 MB). • Using the supplied battery. • Using the supplied lens. • Starting recording 30 seconds after charging is connected to disconnect the AC ...
...pictures decreases in Auto power LCD mode or Power LCD mode. (P56) • CIPA is an abbreviation of "Camera & Imaging Products Association". 19 VQT1G28 A Preparation About the Battery (charging/number of recordable pictures Approx. 450 pictures (Approx. 225 min) Recording conditions by CIPA standard •... Temperature: 23 oC (73.4 oF)/ Humidity: 50% when LCD monitor is on.¢ • Using a Panasonic SD Memory Card (128 MB). • Using the supplied battery. • Using the supplied lens. • Starting recording 30 seconds after charging is connected to disconnect the AC ...
Digital Slr
Page 20
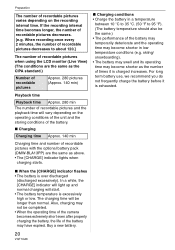
... will light up and normal charging will be completed. • When the operating time of the camera becomes extremely short even after properly charging the battery, the life of the battery may become shorter as the number of times it is charged increases. If the recording interval time becomes... varies depending on the operating conditions of the unit and the storing conditions of the battery. ∫ Charging Charging time Approx. 140 min Charging time and number of recordable pictures with the optional battery pack (DMW-BLA13PP) are the same as above. • The [CHARGE] indicator...
... will light up and normal charging will be completed. • When the operating time of the camera becomes extremely short even after properly charging the battery, the life of the battery may become shorter as the number of times it is charged increases. If the recording interval time becomes... varies depending on the operating conditions of the unit and the storing conditions of the battery. ∫ Charging Charging time Approx. 140 min Charging time and number of recordable pictures with the optional battery pack (DMW-BLA13PP) are the same as above. • The [CHARGE] indicator...
Digital Slr
Page 21
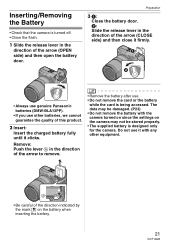
...mark [ ] on the camera may not be stored properly. • The supplied battery is being accessed. Do not use other equipment. Remove: Push the lever A in the direction of the arrow (CLOSE side) and then close it firmly. • Always use genuine Panasonic batteries (DMW-BLA13PP). •... If you use it clicks. Preparation 3 1: Close the battery door. 2: Slide the release lever in the direction of the arrow (OPEN side) and then open ...
...mark [ ] on the camera may not be stored properly. • The supplied battery is being accessed. Do not use other equipment. Remove: Push the lever A in the direction of the arrow (CLOSE side) and then close it firmly. • Always use genuine Panasonic batteries (DMW-BLA13PP). •... If you use it clicks. Preparation 3 1: Close the battery door. 2: Slide the release lever in the direction of the arrow (OPEN side) and then open ...

Digital Slr
Page 23
...card are small, lightweight, removable external cards. We recommend storing important data on a PC etc. • Do not format the card on the camera only to ensure proper operation. (P32) • Keep the Memory Card out of reach of children to prevent swallowing. 23 VQT1G28 It is also... in FAT12 system and FAT16 system. Read P6 for information about the number of the camera or the card. Do not: • turn the camera off. • remove the battery or the card. • shake or impact the camera. • disconnect the DC cable (DMW-DCC1; optional) if you also order a...
...card are small, lightweight, removable external cards. We recommend storing important data on a PC etc. • Do not format the card on the camera only to ensure proper operation. (P32) • Keep the Memory Card out of reach of children to prevent swallowing. 23 VQT1G28 It is also... in FAT12 system and FAT16 system. Read P6 for information about the number of the camera or the card. Do not: • turn the camera off. • remove the battery or the card. • shake or impact the camera. • disconnect the DC cable (DMW-DCC1; optional) if you also order a...

Digital Slr
Page 24
Dust reduction function When the camera is turned on, the dust reduction function is not set the switch to [ON]. A Setting Date/Time (Clock Set) ∫ Initial setting The clock is ... the front part of the image sensor. The status indicator blinks if the remaining battery power becomes low. • The camera turns off any dust on . Preparation Turning the Camera On Set the camera ON/OFF switch to select the date and time. : : 24 VQT1G28 A Time at the home area B Time at the travel...
Dust reduction function When the camera is turned on, the dust reduction function is not set the switch to [ON]. A Setting Date/Time (Clock Set) ∫ Initial setting The clock is ... the front part of the image sensor. The status indicator blinks if the remaining battery power becomes low. • The camera turns off any dust on . Preparation Turning the Camera On Set the camera ON/OFF switch to select the date and time. : : 24 VQT1G28 A Time at the home area B Time at the travel...
Digital Slr
Page 25
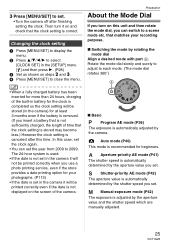
... . Preparation About the Mode Dial If you turn it will not be printed correctly when you insert a battery that matches your photographs. (P113) • If the date is set . • Turn the camera off after this case, set the year from 2000 to close the menu. The 24-hour system is...part A. Changing the clock setting 1 Press [MENU/SET] to display the menu. 2 Press 3/4/2/1 to select [CLOCK SET] in battery for the clock is completed so the clock setting will be stored (in the camera) for more than 24 hours, charging of the built-in the [SETUP] menu [ ] and then press 1. (P28) 3 ...
... . Preparation About the Mode Dial If you turn it will not be printed correctly when you insert a battery that matches your photographs. (P113) • If the date is set . • Turn the camera off after this case, set the year from 2000 to close the menu. The 24-hour system is...part A. Changing the clock setting 1 Press [MENU/SET] to display the menu. 2 Press 3/4/2/1 to select [CLOCK SET] in battery for the clock is completed so the clock setting will be stored (in the camera) for more than 24 hours, charging of the built-in the [SETUP] menu [ ] and then press 1. (P28) 3 ...
Digital Slr
Page 28
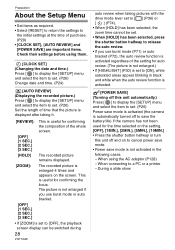
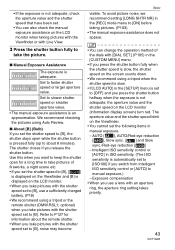
... picture remains displayed. [ZOOM]: The recorded picture is enlarged 4 times and appears on to cancel power save mode. • Power save the battery life) if the camera has not been used for the time selected on the setting. [OFF], [1MIN.], [2MIN.], [5MIN.], [10MIN.] • Press the shutter...useful for auto review. (The picture is not enlarged.) • If [HIGHLIGHT] (P30) is set . (P26) Power save mode is activated (the camera is automatically turned off and on the screen. During a slide show When connecting to a PC or a printer - Preparation About the Setup Menu •...
... picture remains displayed. [ZOOM]: The recorded picture is enlarged 4 times and appears on to cancel power save mode. • Power save the battery life) if the camera has not been used for the time selected on the setting. [OFF], [1MIN.], [2MIN.], [5MIN.], [10MIN.] • Press the shutter...useful for auto review. (The picture is not enlarged.) • If [HIGHLIGHT] (P30) is set . (P26) Power save mode is activated (the camera is automatically turned off and on the screen. During a slide show When connecting to a PC or a printer - Preparation About the Setup Menu •...
Digital Slr
Page 32
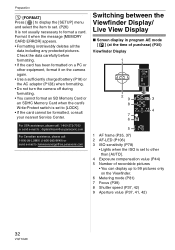
...USA assistance, please call: 1-800-272-7033 or send e-mail to : digitalstillcam@us.panasonic.com For Canadian assistance, please call: 1-800-99-LUMIX (1-800-995-8649) or send e-mail to: lumixconcierge@ca.panasonic.com Switching between the Viewfinder Display/ Live View Display ∫ Screen display in program... before formatting. • If the card has been formatted on the camera again. • Use a sufficiently charged battery (P18) or the AC adaptor (P128) when formatting. • Do not turn the camera off during formatting. • You cannot format an SD Memory Card or...
...USA assistance, please call: 1-800-272-7033 or send e-mail to : digitalstillcam@us.panasonic.com For Canadian assistance, please call: 1-800-99-LUMIX (1-800-995-8649) or send e-mail to: lumixconcierge@ca.panasonic.com Switching between the Viewfinder Display/ Live View Display ∫ Screen display in program... before formatting. • If the card has been formatted on the camera again. • Use a sufficiently charged battery (P18) or the AC adaptor (P128) when formatting. • Do not turn the camera off during formatting. • You cannot format an SD Memory Card or...
Digital Slr
Page 33
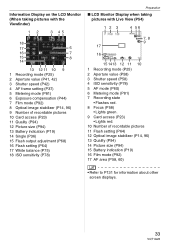
...7 Film mode (P92) 8 Optical image stabilizer (P14, 96) 9 Number of recordable pictures 10 Card access (P23) 11 Quality (P94) 12 Picture size (P94) 13 Battery indication (P19) 14 Single (P36) 15 Flash output adjustment (P68) 16 Flash setting (P64) 17 White balance (P75) 18 ISO sensitivity (P78) Preparation ∫ LCD... 10 Number of recordable pictures 11 Flash setting (P64) 12 Optical image stabilizer (P14, 96) 13 Quality (P94) 14 Picture size (P94) 15 Battery indication (P19) 16 Film mode (P92) 17 AF area (P58, 60) • Refer to P131 for information about other screen displays. 33 VQT1G28
...7 Film mode (P92) 8 Optical image stabilizer (P14, 96) 9 Number of recordable pictures 10 Card access (P23) 11 Quality (P94) 12 Picture size (P94) 13 Battery indication (P19) 14 Single (P36) 15 Flash output adjustment (P68) 16 Flash setting (P64) 17 White balance (P75) 18 ISO sensitivity (P78) Preparation ∫ LCD... 10 Number of recordable pictures 11 Flash setting (P64) 12 Optical image stabilizer (P14, 96) 13 Quality (P94) 14 Picture size (P94) 15 Battery indication (P19) 16 Film mode (P92) 17 AF area (P58, 60) • Refer to P131 for information about other screen displays. 33 VQT1G28
Digital Slr
Page 43
... fireworks, a night scene etc. • If you set the shutter speed to [B], [ ] is displayed on the Viewfinder and [B] is automatically set to [B], use a sufficiently charged battery. (P18) • We recommend using a tripod or the remote shutter (DMW-RSL1; optional) when you take pictures with Live View. 3 Press the shutter button fully...
... fireworks, a night scene etc. • If you set the shutter speed to [B], [ ] is displayed on the Viewfinder and [B] is automatically set to [B], use a sufficiently charged battery. (P18) • We recommend using a tripod or the remote shutter (DMW-RSL1; optional) when you take pictures with Live View. 3 Press the shutter button fully...

Digital Slr
Page 50
... 4 to set to [ON], [ALL DELETE EXCEPT ] appears. The file does not conform to delete them . • Do not turn off the camera while deleting. • Use a sufficiently charged battery (P18) or the AC adaptor (P128) when deleting. • It is protected and cannot be recovered. If you select [ALL DELETE EXCEPT...
... 4 to set to [ON], [ALL DELETE EXCEPT ] appears. The file does not conform to delete them . • Do not turn off the camera while deleting. • Use a sufficiently charged battery (P18) or the AC adaptor (P128) when deleting. • It is protected and cannot be recovered. If you select [ALL DELETE EXCEPT...
Digital Slr
Page 118
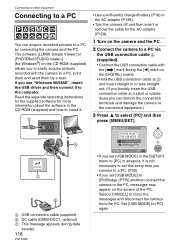
...] to [PictBridge (PTP)] and then connect the camera to the PC, messages may appear on the screen of the PC. Select [CANCEL] to [PC] again. The software [LUMIX Simple Viewer] or [PHOTOfunSTUDIO-viewer-] (for the AC adaptor (P128). 1 Turn on the [DIGITAL] socket. • Hold the USB connection cable at...a PC by e-mail. optional) C This message appears during data transfer. 118 VQT1G28 • Use a sufficiently charged battery (P18) or the AC adaptor (P128). • Turn the camera off and then insert or remove the cable for Windows®) on the CD-ROM (supplied) allows you to easily ...
...] to [PictBridge (PTP)] and then connect the camera to the PC, messages may appear on the screen of the PC. Select [CANCEL] to [PC] again. The software [LUMIX Simple Viewer] or [PHOTOfunSTUDIO-viewer-] (for the AC adaptor (P128). 1 Turn on the [DIGITAL] socket. • Hold the USB connection cable at...a PC by e-mail. optional) C This message appears during data transfer. 118 VQT1G28 • Use a sufficiently charged battery (P18) or the AC adaptor (P128). • Turn the camera off and then insert or remove the cable for Windows®) on the CD-ROM (supplied) allows you to easily ...

Digital Slr
Page 120
... connection cable while [ACCESS] is displayed. • If battery power is "Windows XP", "Windows Vista" or "Mac OS X". • Pictures can select the pictures to print and start printing on the camera's screen. Use a battery with sufficient battery power (P18) or the AC adaptor (P128). •...; If the remaining battery power becomes low while the camera and the PC are communicating, the recorded data may be damaged. ...
... connection cable while [ACCESS] is displayed. • If battery power is "Windows XP", "Windows Vista" or "Mac OS X". • Pictures can select the pictures to print and start printing on the camera's screen. Use a battery with sufficient battery power (P18) or the AC adaptor (P128). •...; If the remaining battery power becomes low while the camera and the PC are communicating, the recorded data may be damaged. ...


