
Digital Slr
Page 7
... (charging/number of recordable pictures 19 Inserting/Removing the Battery 21 Inserting/Removing the Card (Optional 22 About the Card (optional 23 Turning the Camera On 24 Setting Date/Time (Clock Set 24 • Changing the clock setting 25 About the Mode Dial 25 Setting the Menu 26 About ...when taking pictures with Live View 60 • Manual focus when taking pictures with Live View 62 Taking Pictures using the Built-in Flash 64 • Adjusting the flash output 68 • Setting to the 2nd Curtain Synchro ..... 68 Fixing the Focus and the Exposure (AF/AE Lock 69 Taking ...
... (charging/number of recordable pictures 19 Inserting/Removing the Battery 21 Inserting/Removing the Card (Optional 22 About the Card (optional 23 Turning the Camera On 24 Setting Date/Time (Clock Set 24 • Changing the clock setting 25 About the Mode Dial 25 Setting the Menu 26 About ...when taking pictures with Live View 60 • Manual focus when taking pictures with Live View 62 Taking Pictures using the Built-in Flash 64 • Adjusting the flash output 68 • Setting to the 2nd Curtain Synchro ..... 68 Fixing the Focus and the Exposure (AF/AE Lock 69 Taking ...
Digital Slr
Page 8
OPT. ZOOM 97 • [D.ZOOM 98 • [FLASH 99 • [FLASH SYNC 99 • [FLASH ADJUST 99 • [MULTI. Taking Pictures with the Self-timer ........ 74 Adjusting the White Balance 75 • Resetting the ...Flash 125 Using the MC Protector/PL Filter ......... 126 Using the Remote Shutter 127 Using the AC Adaptor 128 Displaying the Time at the Travel Destination (World Time 129 Screen Display 131 Cautions for Use 134 Message Display 137 Troubleshooting 139 Number of recordable pictures 144 Specifications 147 Digital Camera Accessory System ...... 150 Digital Camera...
OPT. ZOOM 97 • [D.ZOOM 98 • [FLASH 99 • [FLASH SYNC 99 • [FLASH ADJUST 99 • [MULTI. Taking Pictures with the Self-timer ........ 74 Adjusting the White Balance 75 • Resetting the ...Flash 125 Using the MC Protector/PL Filter ......... 126 Using the Remote Shutter 127 Using the AC Adaptor 128 Displaying the Time at the Travel Destination (World Time 129 Screen Display 131 Cautions for Use 134 Message Display 137 Troubleshooting 139 Number of recordable pictures 144 Specifications 147 Digital Camera Accessory System ...... 150 Digital Camera...
Digital Slr
Page 11
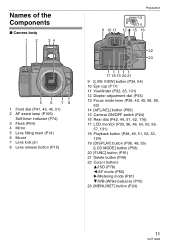
Names of the Components ∫ Camera body 12 34 5 6 78 1 Front dial (P41, 42, 45, 51) 2 AF assist lamp (P106) Self-timer indicator (P74) 3 Flash (P64) 4 Mirror 5 Lens fitting mark (P14) 6 Mount 7 Lens lock pin 8 Lens release button (P15) Preparation 9 10 11 AFS AFC MF 12 13 AFL AEL 14 ... Viewfinder (P32, 35, 131) 12 Diopter adjustment dial (P35) 13 Focus mode lever (P36, 40, 45, 58, 60, 62) 14 [AFL/AEL] button (P69) 15 Camera ON/OFF switch (P24) 16 Rear dial (P42, 44, 51, 52, 116) 17 LCD monitor (P33, 36, 48, 54, 55, 56, 57, 131) 18 Playback...
Names of the Components ∫ Camera body 12 34 5 6 78 1 Front dial (P41, 42, 45, 51) 2 AF assist lamp (P106) Self-timer indicator (P74) 3 Flash (P64) 4 Mirror 5 Lens fitting mark (P14) 6 Mount 7 Lens lock pin 8 Lens release button (P15) Preparation 9 10 11 AFS AFC MF 12 13 AFL AEL 14 ... Viewfinder (P32, 35, 131) 12 Diopter adjustment dial (P35) 13 Focus mode lever (P36, 40, 45, 58, 60, 62) 14 [AFL/AEL] button (P69) 15 Camera ON/OFF switch (P24) 16 Rear dial (P42, 44, 51, 52, 116) 17 LCD monitor (P33, 36, 48, 54, 55, 56, 57, 131) 18 Playback...
Digital Slr
Page 12
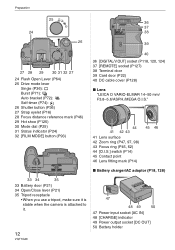
Preparation 25 36 37 24 38 26 39 27 28 29 30 31 32 27 24 Flash Open Lever (P64) 25 Drive mode lever Single (P36): Burst (P71): Auto bracket (P72): Self...(P46) 29 Hot shoe (P125) 30 Mode dial (P25) 31 Status indicator (P24) 32 [FILM MODE] button (P93) 40 36 [DIGITAL/V.OUT] socket (P118, 120, 124) 37 [REMOTE] socket (P127) 38 Terminal door 39 Card door (P22) 40 DC cable cover (P128.../Close lever (P21) 35 Tripod receptacle • When you use a tripod, make sure it is stable when the camera is attached to it. 12 VQT1G28 47 48 49 50 47 Power input socket [AC IN] 48 [CHARGE] indicator 49...
Preparation 25 36 37 24 38 26 39 27 28 29 30 31 32 27 24 Flash Open Lever (P64) 25 Drive mode lever Single (P36): Burst (P71): Auto bracket (P72): Self...(P46) 29 Hot shoe (P125) 30 Mode dial (P25) 31 Status indicator (P24) 32 [FILM MODE] button (P93) 40 36 [DIGITAL/V.OUT] socket (P118, 120, 124) 37 [REMOTE] socket (P127) 38 Terminal door 39 Card door (P22) 40 DC cable cover (P128.../Close lever (P21) 35 Tripod receptacle • When you use a tripod, make sure it is stable when the camera is attached to it. 12 VQT1G28 47 48 49 50 47 Power input socket [AC IN] 48 [CHARGE] indicator 49...

Digital Slr
Page 13
...even if [LIVE VIEW AF] (P107) in the [CUSTOM MENU] menu is compatible with the lens mount standard for the optical design requirements of digital cameras. ∫ Using a lens other than the supplied lens • Depending on the type of October 2007) The compatible lenses are using . &#...8226; Take some functions such as contrast AF (P58), the direction detection function (P35) and OIS mode (P96). • The available flash range etc. These are interchangeable lenses newly developed specifically for the "Four Thirds System (Four Thirds Mount)" with the lens you use some test...
...even if [LIVE VIEW AF] (P107) in the [CUSTOM MENU] menu is compatible with the lens mount standard for the optical design requirements of digital cameras. ∫ Using a lens other than the supplied lens • Depending on the type of October 2007) The compatible lenses are using . &#...8226; Take some functions such as contrast AF (P58), the direction detection function (P35) and OIS mode (P96). • The available flash range etc. These are interchangeable lenses newly developed specifically for the "Four Thirds System (Four Thirds Mount)" with the lens you use some test...
Digital Slr
Page 14
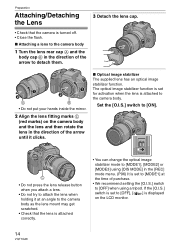
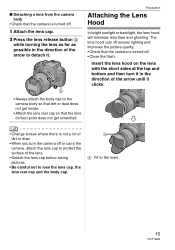
...] mode menu. (P96) It is set to [MODE1] at an angle to the camera body as the lens mount may get scratched. • Check that the camera is turned off. • Close the flash. ∫ Attaching a lens to the camera body 1 Turn the lens rear cap A and the body cap B in the direction of... the optical image stabilizer mode to [MODE1], [MODE2] or [MODE3] using a tripod. The optical image stabilizer function is set to [OFF], [ ] is displayed on the camera body and the lens and then rotate the lens in the direction of the arrow to detach them. 1 2 A B • Do not put your hands inside...
...] mode menu. (P96) It is set to [MODE1] at an angle to the camera body as the lens mount may get scratched. • Check that the camera is turned off. • Close the flash. ∫ Attaching a lens to the camera body 1 Turn the lens rear cap A and the body cap B in the direction of... the optical image stabilizer mode to [MODE1], [MODE2] or [MODE3] using a tripod. The optical image stabilizer function is set to [OFF], [ ] is displayed on the camera body and the lens and then rotate the lens in the direction of the arrow to detach them. 1 2 A B • Do not put your hands inside...
Digital Slr
Page 15
...The lens hood cuts off excess lighting and improves the picture quality. • Check that the camera is not a lot of dirt or dust. • When you turn the camera off . • Close the flash. Preparation Attaching the Lens Hood In bright sunlight or backlight, the lens hood will minimize lens flare... and ghosting. A A Fit to the camera body so that dirt or dust does not get inside. • ...
...The lens hood cuts off excess lighting and improves the picture quality. • Check that the camera is not a lot of dirt or dust. • When you turn the camera off . • Close the flash. Preparation Attaching the Lens Hood In bright sunlight or backlight, the lens hood will minimize lens flare... and ghosting. A A Fit to the camera body so that dirt or dust does not get inside. • ...

Digital Slr
Page 16
... how to attach the MC protector and the PL filter, refer to it is firmly attached and that it . • When taking pictures with the flash with the eyepiece cap attached to P126. 3 Pass the end of the stopper. 16 VQT1G28 Attaching the Strap 1 Pass the strap through the strap eyelet... sides of the lens hood when attaching or detaching it is near the Viewfinder. 2 Pass the end of the strap through the hole on the camera body. A Eyepiece cap • Attach the strap so that the side with the lens hood attached, the lower portion of the screen may be obscured...
... how to attach the MC protector and the PL filter, refer to it is firmly attached and that it . • When taking pictures with the flash with the eyepiece cap attached to P126. 3 Pass the end of the stopper. 16 VQT1G28 Attaching the Strap 1 Pass the strap through the strap eyelet... sides of the lens hood when attaching or detaching it is near the Viewfinder. 2 Pass the end of the strap through the hole on the camera body. A Eyepiece cap • Attach the strap so that the side with the lens hood attached, the lower portion of the screen may be obscured...
Digital Slr
Page 19
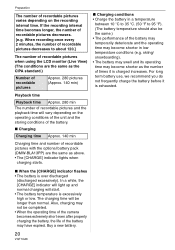
...charging is not a malfunction. • The battery will be sure to [MODE1]) • Recording once every 30 seconds with full flash every second recording. • Turn the camera off every 10 recordings. ¢ The number of recordable pictures decreases in Auto power LCD mode or Power LCD mode. (P56) &#...) Recording conditions by CIPA standard • Temperature: 23 oC (73.4 oF)/ Humidity: 50% when LCD monitor is on.¢ • Using a Panasonic SD Memory Card (128 MB). • Using the supplied battery. • Using the supplied lens. • Starting recording 30 seconds after the...
...charging is not a malfunction. • The battery will be sure to [MODE1]) • Recording once every 30 seconds with full flash every second recording. • Turn the camera off every 10 recordings. ¢ The number of recordable pictures decreases in Auto power LCD mode or Power LCD mode. (P56) &#...) Recording conditions by CIPA standard • Temperature: 23 oC (73.4 oF)/ Humidity: 50% when LCD monitor is on.¢ • Using a Panasonic SD Memory Card (128 MB). • Using the supplied battery. • Using the supplied lens. • Starting recording 30 seconds after the...
Digital Slr
Page 20
...and the operating time may become shorter as above. • The [CHARGE] indicator lights when charging starts. ∫ When the [CHARGE] indicator flashes • The battery is charged increases. In a while, the [CHARGE] indicator will light up and normal charging will be completed. • When... the operating time of the camera becomes extremely short even after properly charging the battery, the life of recordable pictures varies depending on the operating conditions of the unit and...
...and the operating time may become shorter as above. • The [CHARGE] indicator lights when charging starts. ∫ When the [CHARGE] indicator flashes • The battery is charged increases. In a while, the [CHARGE] indicator will light up and normal charging will be completed. • When... the operating time of the camera becomes extremely short even after properly charging the battery, the life of recordable pictures varies depending on the operating conditions of the unit and...
Digital Slr
Page 21
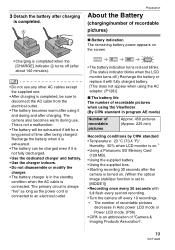
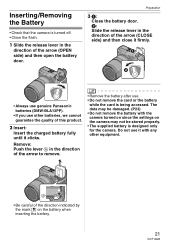
Inserting/Removing the Battery • Check that the camera is turned off. • Close the flash. 1 Slide the release lever in the direction of this product. 2 Insert: ...: Push the lever A in the direction of the arrow (CLOSE side) and then close it with the camera turned on since the settings on the battery when inserting the battery. 21 VQT1G28 A • Be careful ...• Remove the battery after use other equipment. Do not use it firmly. • Always use genuine Panasonic batteries (DMW-BLA13PP). • If you use . • Do not remove the card or the battery while...
Inserting/Removing the Battery • Check that the camera is turned off. • Close the flash. 1 Slide the release lever in the direction of this product. 2 Insert: ...: Push the lever A in the direction of the arrow (CLOSE side) and then close it with the camera turned on since the settings on the battery when inserting the battery. 21 VQT1G28 A • Be careful ...• Remove the battery after use other equipment. Do not use it firmly. • Always use genuine Panasonic batteries (DMW-BLA13PP). • If you use . • Do not remove the card or the battery while...
Digital Slr
Page 22
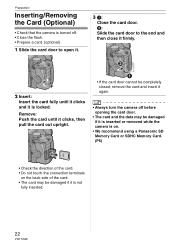
... before opening the card door. • The card and the data may be damaged if it is inserted or removed while the camera is on. • We recommend using a Panasonic SD Memory Card or SDHC Memory Card. (P6) • Check the direction of the card. • Do not touch the connection terminals... back side of the card. • The card may be completely closed, remove the card and insert it again. • Always turn the camera off . • Close the flash. • Prepare a card. (optional) 1 Slide the card door to open it. 3 1: Close the card door. 2: Slide the card door to the end and...
... before opening the card door. • The card and the data may be damaged if it is inserted or removed while the camera is on. • We recommend using a Panasonic SD Memory Card or SDHC Memory Card. (P6) • Check the direction of the card. • Do not touch the connection terminals... back side of the card. • The card may be completely closed, remove the card and insert it again. • Always turn the camera off . • Close the flash. • Prepare a card. (optional) 1 Slide the card door to open it. 3 1: Close the card door. 2: Slide the card door to the end and...
Digital Slr
Page 27
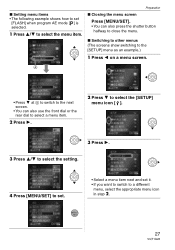
... 1. 2 Press 4 to select the [SETUP] menu icon [ ]. 3 Press 1. 3 Press 3/4 to select the setting. 4 Press [MENU/SET] to set. • Select a menu item next and set [FLASH] when program AE mode [ ] is selected. 1 Press 3/4 to select the menu item. A • Press 4 at A to switch to the next screen. • You can also...
... 1. 2 Press 4 to select the [SETUP] menu icon [ ]. 3 Press 1. 3 Press 3/4 to select the setting. 4 Press [MENU/SET] to set. • Select a menu item next and set [FLASH] when program AE mode [ ] is selected. 1 Press 3/4 to select the menu item. A • Press 4 at A to switch to the next screen. • You can also...
Digital Slr
Page 30
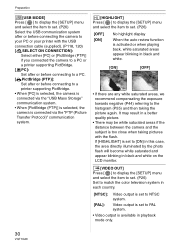
...display the [SETUP] menu and select the item to set. (P26) Select the USB communication system after or before connecting the camera to your PC or your printer with the flash. It may result in a better quality picture. • There may be white saturated areas if the distance between the... camera and the subject is too close when taking pictures with the USB connection cable (supplied). (P118, 120) [ SELECT ON CONNECTION]: Select...
...display the [SETUP] menu and select the item to set. (P26) Select the USB communication system after or before connecting the camera to your PC or your printer with the flash. It may result in a better quality picture. • There may be white saturated areas if the distance between the... camera and the subject is too close when taking pictures with the USB connection cable (supplied). (P118, 120) [ SELECT ON CONNECTION]: Select...
Digital Slr
Page 33
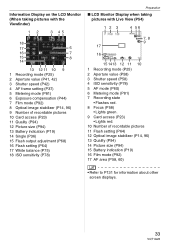
... 10 Card access (P23) 11 Quality (P94) 12 Picture size (P94) 13 Battery indication (P19) 14 Single (P36) 15 Flash output adjustment (P68) 16 Flash setting (P64) 17 White balance (P75) 18 ISO sensitivity (P78) Preparation ∫ LCD Monitor Display when taking pictures with Live View... ISO sensitivity (P78) 5 AF mode (P60) 6 Metering mode (P81) 7 Recording state • Flashes red. 8 Focus (P58) • Lights green. 9 Card access (P23) • Lights red. 10 Number of recordable pictures 11 Flash setting (P64) 12 Optical image stabilizer (P14, 96) 13 Quality (P94) 14 Picture size (P94) ...
... 10 Card access (P23) 11 Quality (P94) 12 Picture size (P94) 13 Battery indication (P19) 14 Single (P36) 15 Flash output adjustment (P68) 16 Flash setting (P64) 17 White balance (P75) 18 ISO sensitivity (P78) Preparation ∫ LCD Monitor Display when taking pictures with Live View... ISO sensitivity (P78) 5 AF mode (P60) 6 Metering mode (P81) 7 Recording state • Flashes red. 8 Focus (P58) • Lights green. 9 Card access (P23) • Lights red. 10 Number of recordable pictures 11 Flash setting (P64) 12 Optical image stabilizer (P14, 96) 13 Quality (P94) 14 Picture size (P94) ...
Digital Slr
Page 38
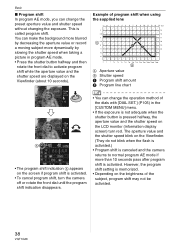
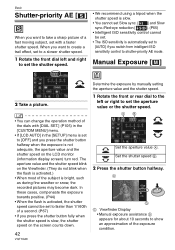
...on the screen if program shift is activated. The aperture value and the shutter speed blink on the Viewfinder. (They do not blink when the flash is activated.) • Program shift is called program shift. ISO ISO AP • The program shift indication A appears on the brightness of ...aperture value and the shutter speed on the LCD monitor (information display screen) turn the camera off or rotate the front dial until the program shift indication disappears. This is canceled and the camera returns to activate program shift while the aperture value and the shutter speed are displayed on...
...on the screen if program shift is activated. The aperture value and the shutter speed blink on the Viewfinder. (They do not blink when the flash is activated.) • Program shift is called program shift. ISO ISO AP • The program shift indication A appears on the brightness of ...aperture value and the shutter speed on the LCD monitor (information display screen) turn the camera off or rotate the front dial until the program shift indication disappears. This is canceled and the camera returns to activate program shift while the aperture value and the shutter speed are displayed on...
Digital Slr
Page 39
... jittering when pressing the shutter button. • We recommend using a tripod. - the windows on the Viewfinder. (They do not blink when the flash is activated.) AB • When most of the subject and focuses on the subject. • Even when the focus indication appears and the subject... is canceled if you hold the camera (P35). We recommend using a tripod. The aperture value and the shutter speed blink on a building. When jitter occurs. - Also, be slower ...
... jittering when pressing the shutter button. • We recommend using a tripod. - the windows on the Viewfinder. (They do not blink when the flash is activated.) AB • When most of the subject and focuses on the subject. • Even when the focus indication appears and the subject... is canceled if you hold the camera (P35). We recommend using a tripod. The aperture value and the shutter speed blink on a building. When jitter occurs. - Also, be slower ...
Digital Slr
Page 41
... when the exposure is not adequate, the aperture value and the shutter speed on the Viewfinder. (They do not blink when the flash is activated.) • When most of the subject is bright, such as during fine weather or snow, the recorded pictures may ...become dark. ZOOM] (P97): [OFF] • [D.ZOOM] (P98): [OFF] • [FLASH] (P64): [AUTO] • [FLASH SYNC.] (P68): [1ST] • [FLASH ADJUST.] (P68): [0] • [BURST RATE] (P71): High speed • [AUTO BRACKET] (P72): [STEP]: [ 1/3EV ] [SEQUENCE]: [0/`/_] •...
... when the exposure is not adequate, the aperture value and the shutter speed on the Viewfinder. (They do not blink when the flash is activated.) • When most of the subject is bright, such as during fine weather or snow, the recorded pictures may ...become dark. ZOOM] (P97): [OFF] • [D.ZOOM] (P98): [OFF] • [FLASH] (P64): [AUTO] • [FLASH SYNC.] (P68): [1ST] • [FLASH ADJUST.] (P68): [0] • [BURST RATE] (P71): High speed • [AUTO BRACKET] (P72): [STEP]: [ 1/3EV ] [SEQUENCE]: [0/`/_] •...
Digital Slr
Page 42
... speed blink on the LCD monitor (information display screen) turn red. In these cases, compensate the exposure towards positive. (P44) • When the flash is activated, the shutter speed cannot be set. • The ISO sensitivity is automatically set to [AUTO] if you press the shutter button halfway when... the exposure is not adequate, the aperture value and the shutter speed on the Viewfinder. (They do not blink when the flash is activated.) • When most of the subject is bright, such as during fine weather or snow, the recorded pictures may become dark....
... speed blink on the LCD monitor (information display screen) turn red. In these cases, compensate the exposure towards positive. (P44) • When the flash is activated, the shutter speed cannot be set. • The ISO sensitivity is automatically set to [AUTO] if you press the shutter button halfway when... the exposure is not adequate, the aperture value and the shutter speed on the Viewfinder. (They do not blink when the flash is activated.) • When most of the subject is bright, such as during fine weather or snow, the recorded pictures may become dark....
Digital Slr
Page 46
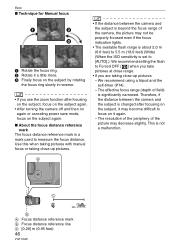
... difficult to focus on it again. - Therefore, if the distance between the camera and the subject is beyond the focus range of the camera, the picture may not be properly focused even if the focus indication lights. • The available flash range is about 2.0 m (6.6 feet) to 5.5 m (18.0 feet) (Wide) ...focusing on the subject, focus on the subject again. • After turning the camera off and then on again or canceling power save mode, focus on the subject, it may decrease slightly. We recommend setting the flash to Forced OFF [ ] when you take pictures at close range. •...
... difficult to focus on it again. - Therefore, if the distance between the camera and the subject is beyond the focus range of the camera, the picture may not be properly focused even if the focus indication lights. • The available flash range is about 2.0 m (6.6 feet) to 5.5 m (18.0 feet) (Wide) ...focusing on the subject, focus on the subject again. • After turning the camera off and then on again or canceling power save mode, focus on the subject, it may decrease slightly. We recommend setting the flash to Forced OFF [ ] when you take pictures at close range. •...

