
Digital Slr
Page 1
For USA assistance, please call: 1-800-272-7033 or send e-mail to : digitalstillcam@us.panasonic.com For Canadian assistance, please call: 1-800-99-LUMIX (1-800-995-8649) or send e-mail to: lumixconcierge@ca.panasonic.com PP VQT1G28 DMC-L10K Before connecting, operating or adjusting this product, please read the instructions completely. Operating Instructions Digital Camera/Lens Kit Model No.
For USA assistance, please call: 1-800-272-7033 or send e-mail to : digitalstillcam@us.panasonic.com For Canadian assistance, please call: 1-800-99-LUMIX (1-800-995-8649) or send e-mail to: lumixconcierge@ca.panasonic.com PP VQT1G28 DMC-L10K Before connecting, operating or adjusting this product, please read the instructions completely. Operating Instructions Digital Camera/Lens Kit Model No.
Digital Slr
Page 10
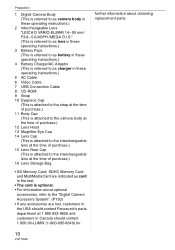
Preparation 1 Digital Camera Body (This is referred to as camera body in these operating instructions.) 2 Interchangeable Lens "LEICA D VARIO-ELMAR 14- 50 mm/ F3.8- 5.6/ASPH./MEGA O.I.S." (This is referred to as lens in these ...optional. • For information about optional accessories, refer to the "Digital Camera Accessory System". (P150) • If any accessories are lost, customers in the USA should contact Panasonic's parts department at 1 800 833-9626 and customers in Canada should contact 1 800 99-LUMIX (1-800-995-8649) for further information about obtaining replacement parts. 10...
Preparation 1 Digital Camera Body (This is referred to as camera body in these operating instructions.) 2 Interchangeable Lens "LEICA D VARIO-ELMAR 14- 50 mm/ F3.8- 5.6/ASPH./MEGA O.I.S." (This is referred to as lens in these ...optional. • For information about optional accessories, refer to the "Digital Camera Accessory System". (P150) • If any accessories are lost, customers in the USA should contact Panasonic's parts department at 1 800 833-9626 and customers in Canada should contact 1 800 99-LUMIX (1-800-995-8649) for further information about obtaining replacement parts. 10...
Digital Slr
Page 17
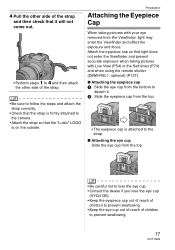
... cup from the bottom to detach it will not come out. • Perform steps 1 to 4 and then attach the other side of children to the camera. • Attach the strap so that the strap is on the outside. Preparation Attaching the Eyepiece Cap When taking pictures with your eye removed from... the eye cup out of reach of the strap. • Be sure to follow the steps and attach the strap correctly. • Check that the "LUMIX" LOGO is firmly attached to prevent swallowing. 17 VQT1G28
... cup from the bottom to detach it will not come out. • Perform steps 1 to 4 and then attach the other side of children to the camera. • Attach the strap so that the strap is on the outside. Preparation Attaching the Eyepiece Cap When taking pictures with your eye removed from... the eye cup out of reach of the strap. • Be sure to follow the steps and attach the strap correctly. • Check that the "LUMIX" LOGO is firmly attached to prevent swallowing. 17 VQT1G28
Digital Slr
Page 32
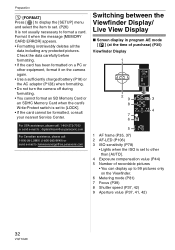
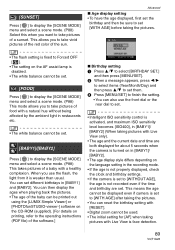
...VQT1G28 For USA assistance, please call: 1-800-272-7033 or send e-mail to : digitalstillcam@us.panasonic.com For Canadian assistance, please call: 1-800-99-LUMIX (1-800-995-8649) or send e-mail to: lumixconcierge@ca.panasonic.com Switching between the Viewfinder Display/ Live View Display ∫ Screen display in program AE mode... [AUTO]. 4 Exposure compensation value (P44) 5 Number of recordable pictures • You can display up to 99 pictures only on the camera again. • Use a sufficiently charged battery (P18) or the AC adaptor (P128) when formatting. • Do not turn the...
...VQT1G28 For USA assistance, please call: 1-800-272-7033 or send e-mail to : digitalstillcam@us.panasonic.com For Canadian assistance, please call: 1-800-99-LUMIX (1-800-995-8649) or send e-mail to: lumixconcierge@ca.panasonic.com Switching between the Viewfinder Display/ Live View Display ∫ Screen display in program AE mode... [AUTO]. 4 Exposure compensation value (P44) 5 Number of recordable pictures • You can display up to 99 pictures only on the camera again. • Use a sufficiently charged battery (P18) or the AC adaptor (P128) when formatting. • Do not turn the...
Digital Slr
Page 89
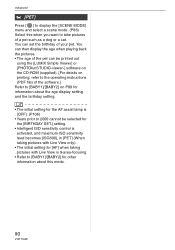
... AGE] after taking the pictures. • You can reset the birthday setting with [RESET]. • Digital zoom cannot be used. • The initial setting for [AF] when taking pictures with Live View only...8226; The age and the current date and time are both displayed for about 5 seconds when the camera is turned on in [BABY1]/ [BABY2]. • The age display style differs depending on the ...[ISO400], in [BABY1] and [BABY2]. This means the age cannot be printed out using the [LUMIX Simple Viewer] or [PHOTOfunSTUDIO-viewer-] software on the CD-ROM (supplied). [For details on printing, ...
... AGE] after taking the pictures. • You can reset the birthday setting with [RESET]. • Digital zoom cannot be used. • The initial setting for [AF] when taking pictures with Live View only...8226; The age and the current date and time are both displayed for about 5 seconds when the camera is turned on in [BABY1]/ [BABY2]. • The age display style differs depending on the ...[ISO400], in [BABY1] and [BABY2]. This means the age cannot be printed out using the [LUMIX Simple Viewer] or [PHOTOfunSTUDIO-viewer-] software on the CD-ROM (supplied). [For details on printing, ...
Digital Slr
Page 90
You can be printed out using the [LUMIX Simple Viewer] or [PHOTOfunSTUDIO-viewer-] software on the CD-ROM (supplied). [For details on printing, refer to the operating instructions (PDF file) of the software.] ...
You can be printed out using the [LUMIX Simple Viewer] or [PHOTOfunSTUDIO-viewer-] software on the CD-ROM (supplied). [For details on printing, refer to the operating instructions (PDF file) of the software.] ...
Digital Slr
Page 110
... at a photo printing store, [ALL DELETE EXCEPT ] (P49) is useful so only the pictures you want to be printed remain on the card. • Use [LUMIX Simple Viewer] or [PHOTOfunSTUDIO-viewer-] on the CD-ROM (supplied), to set, confirm or delete favorites. [For details, refer to the operating instructions (PDF file...
... at a photo printing store, [ALL DELETE EXCEPT ] (P49) is useful so only the pictures you want to be printed remain on the card. • Use [LUMIX Simple Viewer] or [PHOTOfunSTUDIO-viewer-] on the CD-ROM (supplied), to set, confirm or delete favorites. [For details, refer to the operating instructions (PDF file...
Digital Slr
Page 118
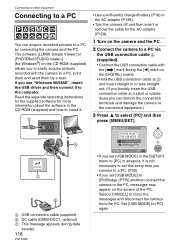
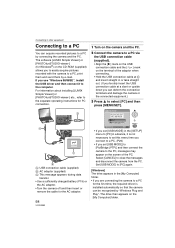
...VQT1G28 • Use a sufficiently charged battery (P18) or the AC adaptor (P128). • Turn the camera off and then insert or remove the cable for Windows®) on the [DIGITAL] socket. • Hold the USB connection cable at D and insert straight in advance, it is not ... PC You can deform the connection terminals and damage the camera or the connected equipment.) 3 Press 3 to [PC] again. The software [LUMIX Simple Viewer] or [PHOTOfunSTUDIO-viewer-] (for the AC adaptor (P128). 1 Turn on the camera and the PC. 2 Connect the camera to a PC via the USB connection cable A (supplied...
...VQT1G28 • Use a sufficiently charged battery (P18) or the AC adaptor (P128). • Turn the camera off and then insert or remove the cable for Windows®) on the [DIGITAL] socket. • Hold the USB connection cable at D and insert straight in advance, it is not ... PC You can deform the connection terminals and damage the camera or the connected equipment.) 3 Press 3 to [PC] again. The software [LUMIX Simple Viewer] or [PHOTOfunSTUDIO-viewer-] (for the AC adaptor (P128). 1 Turn on the camera and the PC. 2 Connect the camera to a PC via the USB connection cable A (supplied...
Digital Slr
Page 121
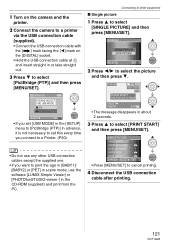
...to other USB connection cables except the supplied one. • If you connect to a Printer. (P30) • Do not use the software [LUMIX Simple Viewer] or [PHOTOfunSTUDIO-viewer-] in scene mode, use any other equipment ∫ Single picture 1 Press 3 to select [SINGLE PICTURE] and then... the printer. 2 Connect the camera to a printer via the USB connection cable (supplied). • Connect the USB connection cable with the [ ] mark facing the [2] mark on the [DIGITAL] socket. • Hold the USB connection cable at C and insert straight in about 2 seconds. 3 Press 3 to select [PRINT...
...to other USB connection cables except the supplied one. • If you connect to a Printer. (P30) • Do not use the software [LUMIX Simple Viewer] or [PHOTOfunSTUDIO-viewer-] in scene mode, use any other equipment ∫ Single picture 1 Press 3 to select [SINGLE PICTURE] and then... the printer. 2 Connect the camera to a printer via the USB connection cable (supplied). • Connect the USB connection cable with the [ ] mark facing the [2] mark on the [DIGITAL] socket. • Hold the USB connection cable at C and insert straight in about 2 seconds. 3 Press 3 to select [PRINT...
Digital Still Camera -english/ Spanish
Page 24
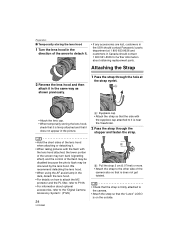
...833-9626 and customers in Canada should contact 1 800 561-5505 for further information about optional accessories, refer to the "Digital Camera Accessory System". (P125) 24 VQT0W82 B B: Pull the strap 2 cm (0.07 feet) or more. • Attach the ...is does not get twisted. • Check that the strap is firmly attached to the camera. • Attach the strap so that the "LUMIX" LOGO is firmly attached and that it does not appear in the picture. Attaching the Strap... it. • If any accessories are lost, customers in the USA should contact Panasonic's parts department at the strap eyelet.
...833-9626 and customers in Canada should contact 1 800 561-5505 for further information about optional accessories, refer to the "Digital Camera Accessory System". (P125) 24 VQT0W82 B B: Pull the strap 2 cm (0.07 feet) or more. • Attach the ...is does not get twisted. • Check that the strap is firmly attached to the camera. • Attach the strap so that the "LUMIX" LOGO is firmly attached and that it does not appear in the picture. Attaching the Strap... it. • If any accessories are lost, customers in the USA should contact Panasonic's parts department at the strap eyelet.
Digital Still Camera -english/ Spanish
Page 90
... at a photo printing store, [ALL DELETE EXCEPT ] (P46) is useful so only the pictures you want to be printed remain on the card. • Use [LUMIX Simple Viewer] or [PHOTOfunSTUDIO-viewer-] on the CD-ROM (supplied), to set, confirm or delete favorites. (For information about this, refer to the separate operating...
... at a photo printing store, [ALL DELETE EXCEPT ] (P46) is useful so only the pictures you want to be printed remain on the card. • Use [LUMIX Simple Viewer] or [PHOTOfunSTUDIO-viewer-] on the CD-ROM (supplied), to set, confirm or delete favorites. (For information about this, refer to the separate operating...
Digital Still Camera -english/ Spanish
Page 98
...(If you forcibly insert the USB connection cable at a slant or upside down you set [USB MODE] to [PictBridge (PTP)] and then connect the camera to the PC, messages may appear on the [My Computer] folder. Set [USB MODE] to [PC] again. [Windows] The drive appears in ...equipment Connecting to other equipment Connecting to a PC You can deform the connection terminals and damage the camera or the connected equipment.) 3 Press 3 to select [PC] and then press [MENU/SET]. The software [LUMIX Simple Viewer] or [PHOTOfunSTUDIO-viewer-] (for Windows®) on the terminal of the PC. Select...
...(If you forcibly insert the USB connection cable at a slant or upside down you set [USB MODE] to [PictBridge (PTP)] and then connect the camera to the PC, messages may appear on the [My Computer] folder. Set [USB MODE] to [PC] again. [Windows] The drive appears in ...equipment Connecting to other equipment Connecting to a PC You can deform the connection terminals and damage the camera or the connected equipment.) 3 Press 3 to select [PC] and then press [MENU/SET]. The software [LUMIX Simple Viewer] or [PHOTOfunSTUDIO-viewer-] (for Windows®) on the terminal of the PC. Select...


