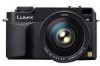
Digital Slr
Page 2
...certain material may infringe copyright laws. Before Use Before Use Dear Customer, Thank you for purposes other published or broadcast material for choosing Panasonic! Model No. RBRC A lithium ion battery that is on the tag located on the market today. Carefully observe copyright laws. You...own private use , recording of private use may be restricted. Please take time to recycle this manual as your family years of pre-recorded tapes or discs or other than your Camera. Be sure to retain this battery. 2 VQT1G28 Recording of enjoyment. Please call 1-800-8-BATTERY...
...certain material may infringe copyright laws. Before Use Before Use Dear Customer, Thank you for purposes other published or broadcast material for choosing Panasonic! Model No. RBRC A lithium ion battery that is on the tag located on the market today. Carefully observe copyright laws. You...own private use , recording of private use may be restricted. Please take time to recycle this manual as your family years of pre-recorded tapes or discs or other than your Camera. Be sure to retain this battery. 2 VQT1G28 Recording of enjoyment. Please call 1-800-8-BATTERY...

Digital Slr
Page 7
... (charging/number of recordable pictures 19 Inserting/Removing the Battery 21 Inserting/Removing the Card (Optional 22 About the Card (optional 23 Turning the Camera On 24 Setting Date/Time (Clock Set 24 • Changing the clock setting 25 About the Mode Dial 25 Setting the Menu 26 About ...; LCD Monitor 57 • Auto focus when taking pictures with Live View 58 • AF mode when taking pictures with Live View 60 • Manual focus when taking pictures with Live View 62 Taking Pictures using the Built-in Flash 64 • Adjusting the flash output 68 • Setting to...
... (charging/number of recordable pictures 19 Inserting/Removing the Battery 21 Inserting/Removing the Card (Optional 22 About the Card (optional 23 Turning the Camera On 24 Setting Date/Time (Clock Set 24 • Changing the clock setting 25 About the Mode Dial 25 Setting the Menu 26 About ...; LCD Monitor 57 • Auto focus when taking pictures with Live View 58 • AF mode when taking pictures with Live View 60 • Manual focus when taking pictures with Live View 62 Taking Pictures using the Built-in Flash 64 • Adjusting the flash output 68 • Setting to...

Digital Slr
Page 18
optional) is connected to the AC adaptor. 2 Align the battery with the Charger • The battery is not charged when the camera is firmly attached. • Keep the magnifier eye cup out of reach of children to prevent swallowing. • Keep the eye cup out of reach ... the Magnifier Eye Cup You can magnify the field of view of children to detach it easier to fix the focus when taking pictures with manual focus and taking close-up pictures. ∫ Attaching the magnifier eye cup 1 Slide the eye cup from the bottom to prevent swallowing.
optional) is connected to the AC adaptor. 2 Align the battery with the Charger • The battery is not charged when the camera is firmly attached. • Keep the magnifier eye cup out of reach of children to prevent swallowing. • Keep the eye cup out of reach ... the Magnifier Eye Cup You can magnify the field of view of children to detach it easier to fix the focus when taking pictures with manual focus and taking close-up pictures. ∫ Attaching the magnifier eye cup 1 Slide the eye cup from the bottom to prevent swallowing.
Digital Slr
Page 25
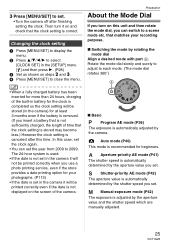
...P36) The exposure is automatically determined by the aperture value and the shutter speed which are manually adjusted. 25 VQT1G28 The 24-hour system is used. • If the date is not set in the camera it on this case, set the year from 2000 to each mode. (The mode dial... determined by rotating the mode dial Align a desired mode with part A. Shutter-priority AE mode (P42) The aperture value is automatically adjusted by the camera. Manual exposure mode (P42) The exposure is adjusted by the shutter speed you can set the clock again. • You can switch to a scene mode...
...P36) The exposure is automatically determined by the aperture value and the shutter speed which are manually adjusted. 25 VQT1G28 The 24-hour system is used. • If the date is not set in the camera it on this case, set the year from 2000 to each mode. (The mode dial... determined by rotating the mode dial Align a desired mode with part A. Shutter-priority AE mode (P42) The aperture value is automatically adjusted by the camera. Manual exposure mode (P42) The exposure is adjusted by the shutter speed you can set the clock again. • You can switch to a scene mode...
Digital Slr
Page 42
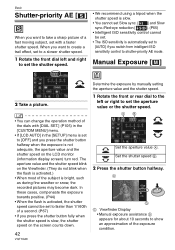
...or rear dial to the left or right to shutter-priority AE mode. AB Set the aperture value A. C ISO D C Viewfinder Display • Manual exposure assistance D appears for about 10 seconds to [AUTO] if you press the shutter button halfway when the exposure is automatically set to [OFF] ... take a sharp picture of a fast moving subject, set the aperture value or the shutter speed. Set the shutter speed B. 2 Press the shutter button halfway. Manual Exposure [ ] 2 Take a picture. • You can change the operation method of a second. (P67) • If you press the shutter button fully...
...or rear dial to the left or right to shutter-priority AE mode. AB Set the aperture value A. C ISO D C Viewfinder Display • Manual exposure assistance D appears for about 10 seconds to [AUTO] if you press the shutter button halfway when the exposure is automatically set to [OFF] ... take a sharp picture of a fast moving subject, set the aperture value or the shutter speed. Set the shutter speed B. 2 Press the shutter button halfway. Manual Exposure [ ] 2 Take a picture. • You can change the operation method of a second. (P67) • If you press the shutter button fully...
Digital Slr
Page 43
... pictures with the Viewfinder or with Live View. 3 Press the shutter button fully to [B], use a lens with the shutter speed set to manual exposure.) - • If the exposure is not adequate, check the aperture value and the shutter speed that have been set. • ...set to [ISO100] if you release the shutter button. Intelligent ISO sensitivity control or [AUTO] in manual exposure. - Refer to P127 for a long time to take the picture. ∫ Manual Exposure Assistance The exposure is automatically set the shutter speed to [B], the shutter stays open for information about...
... pictures with the Viewfinder or with Live View. 3 Press the shutter button fully to [B], use a lens with the shutter speed set to manual exposure.) - • If the exposure is not adequate, check the aperture value and the shutter speed that have been set. • ...set to [ISO100] if you release the shutter button. Intelligent ISO sensitivity control or [AUTO] in manual exposure. - Refer to P127 for a long time to take the picture. ∫ Manual Exposure Assistance The exposure is automatically set the shutter speed to [B], the shutter stays open for information about...
Digital Slr
Page 45
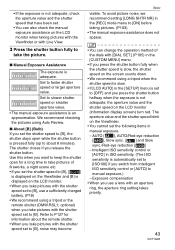
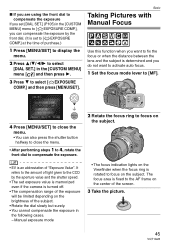
.... • You can compensate the exposure by the aperture value and the shutter speed. • The set exposure value is memorized even if the camera is determined and you do not want to activate auto focus. 1 Set the focus mode lever to focus on the subject. Basic Taking Pictures with...compensate the exposure in the following cases. - The focus area is fixed to the AF frame on the subject. • EV is rotated to [MF]. Manual exposure mode • The focus indication lights on the Viewfinder when the focus ring is an abbreviation of "Exposure Value". ∫ If you are using...
.... • You can compensate the exposure by the aperture value and the shutter speed. • The set exposure value is memorized even if the camera is determined and you do not want to activate auto focus. 1 Set the focus mode lever to focus on the subject. Basic Taking Pictures with...compensate the exposure in the following cases. - The focus area is fixed to the AF frame on the subject. • EV is rotated to [MF]. Manual exposure mode • The focus indication lights on the Viewfinder when the focus ring is an abbreviation of "Exposure Value". ∫ If you are using...
Digital Slr
Page 46
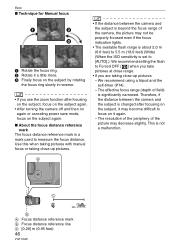
...We recommend setting the flash to Forced OFF [ ] when you take pictures at close -up pictures. • If the distance between the camera and the subject is changed after focusing on the subject, it may become difficult to focus on it a little more. 3 Finely focus on...) to 5.5 m (18.0 feet) (Wide) (When the ISO sensitivity is a mark used to [AUTO].). Basic ∫ Technique for Manual focus 1 Rotate the focus ring. 2 Rotate it again. - Use this when taking pictures with manual focus or taking close-up pictures - The resolution of the periphery of field) is not a malfunction.
...We recommend setting the flash to Forced OFF [ ] when you take pictures at close -up pictures. • If the distance between the camera and the subject is changed after focusing on the subject, it may become difficult to focus on it a little more. 3 Finely focus on...) to 5.5 m (18.0 feet) (Wide) (When the ISO sensitivity is a mark used to [AUTO].). Basic ∫ Technique for Manual focus 1 Rotate the focus ring. 2 Rotate it again. - Use this when taking pictures with manual focus or taking close-up pictures - The resolution of the periphery of field) is not a malfunction.

Digital Slr
Page 62
Manual focus when taking pictures with 3/4/2/1. • You can also be moved to select the AF area frame. When selecting [ ] or [ ] You can select 1 AF area ...
Manual focus when taking pictures with 3/4/2/1. • You can also be moved to select the AF area frame. When selecting [ ] or [ ] You can select 1 AF area ...

Digital Slr
Page 63
...[ ] appears on the LCD monitor for about 5 seconds if you set to take pictures with manual focus. 3 Take the picture. 2 Press 3/4/2/1 to change the position of the MF assist screen. ∫ Technique for Manual focus 3 Press [MENU/SET] to focus on the subject. Advanced ∫ About MF Assist ...If you press [MENU/SET] after pressing 2 when taking pictures with manual focus, the MF assist screen is enlarged 8 times and it a little...
...[ ] appears on the LCD monitor for about 5 seconds if you set to take pictures with manual focus. 3 Take the picture. 2 Press 3/4/2/1 to change the position of the MF assist screen. ∫ Technique for Manual focus 3 Press [MENU/SET] to focus on the subject. Advanced ∫ About MF Assist ...If you press [MENU/SET] after pressing 2 when taking pictures with manual focus, the MF assist screen is enlarged 8 times and it a little...

Digital Slr
Page 70
... focus indication lights when the subject is focused. • If you release [AFL/AEL], [AF/AE LOCK] is canceled. 3 While pressing [AFL/AEL], move the camera as you compose the picture. 4 Press the shutter button halfway to focus on the subject and then press it . (P104) • AF Lock only is...; AE Lock only is effective when taking pictures with manual focus. • In auto mode [ ], the setting is fixed to close the menu. Advanced • If you release [AFL/AEL], [AF/AE LOCK] is canceled. 3 While pressing [AFL/AEL], move the camera as you compose the picture and then press the shutter...
... focus indication lights when the subject is focused. • If you release [AFL/AEL], [AF/AE LOCK] is canceled. 3 While pressing [AFL/AEL], move the camera as you compose the picture. 4 Press the shutter button halfway to focus on the subject and then press it . (P104) • AF Lock only is...; AE Lock only is effective when taking pictures with manual focus. • In auto mode [ ], the setting is fixed to close the menu. Advanced • If you release [AFL/AEL], [AF/AE LOCK] is canceled. 3 While pressing [AFL/AEL], move the camera as you compose the picture and then press the shutter...
Digital Slr
Page 72
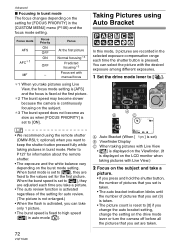
...; The picture count is reset to [0] if you change the auto bracket setting, change the setting on the drive mode lever or turn the camera off before all the pictures that you set is taken. • The auto bracket indication blinks until the number of the setting for the first... depending on the subject. ¢3 The burst speed does not become slower because the camera is continuously focusing on the burst mode setting. Focus At the first picture Normal focusing¢2 Predicted focusing¢3 Focus set with manual focus ¢1 When you take a picture. • If you press and hold ...
...; The picture count is reset to [0] if you change the auto bracket setting, change the setting on the drive mode lever or turn the camera off before all the pictures that you set is taken. • The auto bracket indication blinks until the number of the setting for the first... depending on the subject. ¢3 The burst speed does not become slower because the camera is continuously focusing on the burst mode setting. Focus At the first picture Normal focusing¢2 Predicted focusing¢3 Focus set with manual focus ¢1 When you take a picture. • If you press and hold ...

Digital Slr
Page 76
... SPORTS] and [INDOOR SPORTS] in [PORTRAIT] mode - In [SUNSET] and [FOOD] in scene mode Resetting the white balance Use this to set the white balance manually. 1 Select [ ] or [ ] with step 2 on the Viewfinder if you set the white balance to a setting other than [AWB]. • You can finely adjust the white...
... SPORTS] and [INDOOR SPORTS] in [PORTRAIT] mode - In [SUNSET] and [FOOD] in scene mode Resetting the white balance Use this to set the white balance manually. 1 Select [ ] or [ ] with step 2 on the Viewfinder if you set the white balance to a setting other than [AWB]. • You can finely adjust the white...

Digital Slr
Page 77
...GREEN: GREENISH) 4: M` (MAGENTA: REDDISH) • If you cannot acquire the desired hue by the white object only and then press [MENU/SET]. 2 Aim the camera at a sheet of light is measured as the color temperature becomes low the picture becomes reddish. (P76) 1 Select [ ] with step 2 on P75 and then ...Finely adjusting the white balance You can finely adjust the white balance when you finely adjust the white balance to set the color temperature manually for taking natural pictures in the center is too bright or too dark. so that is white etc. Setting the color temperature ...
...GREEN: GREENISH) 4: M` (MAGENTA: REDDISH) • If you cannot acquire the desired hue by the white object only and then press [MENU/SET]. 2 Aim the camera at a sheet of light is measured as the color temperature becomes low the picture becomes reddish. (P76) 1 Select [ ] with step 2 on P75 and then ...Finely adjusting the white balance You can finely adjust the white balance when you finely adjust the white balance to set the color temperature manually for taking natural pictures in the center is too bright or too dark. so that is white etc. Setting the color temperature ...

Digital Slr
Page 78
...mode - In [NIGHT PORTRAIT] mode - The higher the sensitivity is set . Advanced the LCD monitor will change to orange. When you reset the color temperature manually in [ ] (P77) • You cannot finely adjust the white balance in scene mode A B ISO A Viewfinder Display B When taking pictures with Live ...the flash. • The white balance fine adjustment setting is memorized even if the camera is a measure of sensitivity to set , the less light is needed to take a picture so the camera becomes more suitable for each white balance item. • The white balance fine ...
...mode - In [NIGHT PORTRAIT] mode - The higher the sensitivity is set . Advanced the LCD monitor will change to orange. When you reset the color temperature manually in [ ] (P77) • You cannot finely adjust the white balance in scene mode A B ISO A Viewfinder Display B When taking pictures with Live ...the flash. • The white balance fine adjustment setting is memorized even if the camera is a measure of sensitivity to set , the less light is needed to take a picture so the camera becomes more suitable for each white balance item. • The white balance fine ...

Digital Slr
Page 80
...the shutter button halfway to [ ] in the following cases. - Advanced • The camera may not be activated when the ISO sensitivity is set a maximum setting for the ISO sensitivity, the camera automatically changes to the optimal ISO sensitivity for the brightness of the subject. 1 Press [MENU... When the subject starts moving subject is small - In [BABY1]/[BABY2] and [PET] in shutter-priority AE mode and manual exposure mode. Also, you cannot select [AUTO] in manual exposure mode. • To avoid picture noise, we recommend reducing the ISO sensitivity, setting [NOISE RED.] in [FILM ...
...the shutter button halfway to [ ] in the following cases. - Advanced • The camera may not be activated when the ISO sensitivity is set a maximum setting for the ISO sensitivity, the camera automatically changes to the optimal ISO sensitivity for the brightness of the subject. 1 Press [MENU... When the subject starts moving subject is small - In [BABY1]/[BABY2] and [PET] in shutter-priority AE mode and manual exposure mode. Also, you cannot select [AUTO] in manual exposure mode. • To avoid picture noise, we recommend reducing the ISO sensitivity, setting [NOISE RED.] in [FILM ...
Digital Slr
Page 109
...playing back pictures on the screen shown in step 2 and set. [DURATION] Can be set to [1 SEC.], [2 SEC.], [3 SEC.], [5 SEC.] or [MANUAL] (manual playback). • You can skip unwanted pictures if [FAVORITE] (P110) has been set. • The screen shown in step 1. • Press 2/1 to... while paused to display the previous or next picture. 3 Press 4 to finish. ∫ Setting duration Select [DURATION] on a TV screen. You can only select [MANUAL] when [ ] has been selected in step 1 appears when [FAVORITE] is set to [ON]. A B C • Press 3 to [10 MIN.] while pausing...
...playing back pictures on the screen shown in step 2 and set. [DURATION] Can be set to [1 SEC.], [2 SEC.], [3 SEC.], [5 SEC.] or [MANUAL] (manual playback). • You can skip unwanted pictures if [FAVORITE] (P110) has been set. • The screen shown in step 1. • Press 2/1 to... while paused to display the previous or next picture. 3 Press 4 to finish. ∫ Setting duration Select [DURATION] on a TV screen. You can only select [MANUAL] when [ ] has been selected in step 1 appears when [FAVORITE] is set to [ON]. A B C • Press 3 to [10 MIN.] while pausing...

Digital Slr
Page 111
... without being rotated when you to automatically display pictures vertically if they were recorded holding the camera vertically are automatically displayed vertically. Menu Settings ∫ Rotate (The picture is rotated manually.) 1 Press 2/1 to select the picture and then press 4. • The [ROTATE]...(P108) This mode allows you select [OFF]. 2 Press [MENU/SET] to close the menu. • Pictures recorded holding the camera vertically or rotate pictures manually in 90° steps. ∫ Rotate display (The picture is set to [OFF]. • Protected pictures cannot be rotated. ...
... without being rotated when you to automatically display pictures vertically if they were recorded holding the camera vertically are automatically displayed vertically. Menu Settings ∫ Rotate (The picture is rotated manually.) 1 Press 2/1 to select the picture and then press 4. • The [ROTATE]...(P108) This mode allows you select [OFF]. 2 Press [MENU/SET] to close the menu. • Pictures recorded holding the camera vertically or rotate pictures manually in 90° steps. ∫ Rotate display (The picture is set to [OFF]. • Protected pictures cannot be rotated. ...
Digital Slr
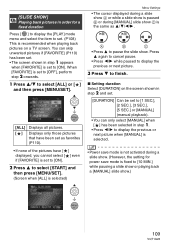
Page 125
... the ISO sensitivity to match the settings on the camera. • Set to Aperture-priority AE mode [ ] or Manual exposure mode [ ] on the camera and then set the same aperture value and ISO... flash, the available flash range increases compared to the camera's built in auto mode, use an external flash that allows you use Panasonic's external flash (DMW-FL500). 125 VQT1G28 Using such external... press [MENU/SET]. A B • Be sure to firmly secure to the dedicated flash with the camera (DMC-L10) • It is necessary to the hot shoe A and then turn on the external flash....
... the ISO sensitivity to match the settings on the camera. • Set to Aperture-priority AE mode [ ] or Manual exposure mode [ ] on the camera and then set the same aperture value and ISO... flash, the available flash range increases compared to the camera's built in auto mode, use an external flash that allows you use Panasonic's external flash (DMW-FL500). 125 VQT1G28 Using such external... press [MENU/SET]. A B • Be sure to firmly secure to the dedicated flash with the camera (DMC-L10) • It is necessary to the hot shoe A and then turn on the external flash....

Digital Slr
Page 131
... 8 9 1 AF frame (P35, 37) 2 AF-LED (P106) 3 ISO sensitivity (P78) • Lights when the ISO is set to other than [AUTO]. 4 Exposure compensation value (P44)/ Manual exposure assistance (P43)/ Auto bracket compensation range (P72) 5 Exposure compensation (P44) 6 Auto bracket (P72) 7 White balance (P75) 8 Flash output adjustment (P68) 9 Number of recordable pictures...
... 8 9 1 AF frame (P35, 37) 2 AF-LED (P106) 3 ISO sensitivity (P78) • Lights when the ISO is set to other than [AUTO]. 4 Exposure compensation value (P44)/ Manual exposure assistance (P43)/ Auto bracket compensation range (P72) 5 Exposure compensation (P44) 6 Auto bracket (P72) 7 White balance (P75) 8 Flash output adjustment (P68) 9 Number of recordable pictures...


