
DMCFH1 User Guide
Page 2
.../ Using the Extended Optical Zoom (EZ)/Using the Digital Zoom 38 Playing back Pictures ([NORMAL PLAY 40 • Displaying Multiple Screens (Multi Playback 41 • Using the Playback Zoom 41 • Switching the [PLAYBACK] Mode.....42 Deleting Pictures 43 • To delete a single picture 43 About the LCD Monitor 45 Taking Pictures using the Built-in Flash 47 • Switching to the appropriate flash setting 47 Taking Close-up Pictures 52 • [AF MACRO 52 • [MACRO ZOOM 53 Taking Pictures with the Self-timer..........54 Compensating the Exposure 55 Taking pictures...
.../ Using the Extended Optical Zoom (EZ)/Using the Digital Zoom 38 Playing back Pictures ([NORMAL PLAY 40 • Displaying Multiple Screens (Multi Playback 41 • Using the Playback Zoom 41 • Switching the [PLAYBACK] Mode.....42 Deleting Pictures 43 • To delete a single picture 43 About the LCD Monitor 45 Taking Pictures using the Built-in Flash 47 • Switching to the appropriate flash setting 47 Taking Close-up Pictures 52 • [AF MACRO 52 • [MACRO ZOOM 53 Taking Pictures with the Self-timer..........54 Compensating the Exposure 55 Taking pictures...
DMCFH1 User Guide
Page 15
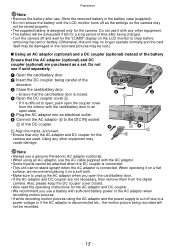
... interior with the card/battery door in the battery case (supplied). • Do not remove the battery until the LCD monitor turns off as a set. Do not use . Preparation Note • Remove the battery after being charged. • Turn the camera off and wait for the "LUMIX" display on the LCD monitor to clear before removing the card or battery. (Otherwise, this camera are used. Store the removed battery in an open the card/battery door. •...
... interior with the card/battery door in the battery case (supplied). • Do not remove the battery until the LCD monitor turns off as a set. Do not use . Preparation Note • Remove the battery after being charged. • Turn the camera off and wait for the "LUMIX" display on the LCD monitor to clear before removing the card or battery. (Otherwise, this camera are used. Store the removed battery in an open the card/battery door. •...
DMCFH1 User Guide
Page 16
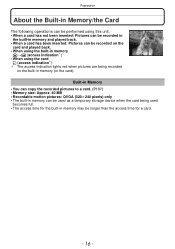
... recorded on the card and played back. • When using the built-in memory k>ð (access indication¢) • When using the card † (access indication¢) ¢ The access indication lights red when pictures are being recorded on the built-in memory can be longer than the access time for a card. - 16 - Built-in Memory • You can copy the recorded pictures to a card. (P107) • Memory size: Approx. 40 MB • Recordable motion pictures...
... recorded on the card and played back. • When using the built-in memory k>ð (access indication¢) • When using the card † (access indication¢) ¢ The access indication lights red when pictures are being recorded on the built-in memory can be longer than the access time for a card. - 16 - Built-in Memory • You can copy the recorded pictures to a card. (P107) • Memory size: Approx. 40 MB • Recordable motion pictures...
DMCFH1 User Guide
Page 17
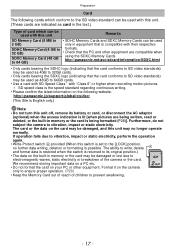
... higher when recording motion pictures. ¢ SD speed class is the speed standard regarding continuous writing. • Please confirm the latest information on the card may no longer operate normally. http://panasonic.jp/support/global/cs/dsc/ (This Site is lit [when pictures are compatible when using the SDXC Memory Cards. The ability to write, delete A and format data is restored when the switch is returned to its battery or card, or disconnect...
... higher when recording motion pictures. ¢ SD speed class is the speed standard regarding continuous writing. • Please confirm the latest information on the card may no longer operate normally. http://panasonic.jp/support/global/cs/dsc/ (This Site is lit [when pictures are compatible when using the SDXC Memory Cards. The ability to write, delete A and format data is restored when the switch is returned to its battery or card, or disconnect...
DMCFH1 User Guide
Page 25
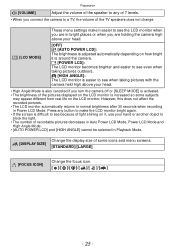
... you connect the camera to a TV, the volume of the TV speakers does not change. Preparation u [VOLUME] Adjust the volume of the speaker to any button to make it , use your hand or another object to block the light. • The number of recordable pictures decreases in Auto Power LCD Mode, Power LCD Mode and High Angle Mode. • [AUTO POWER LCD] and [HIGH ANGLE] cannot be selected in Playback Mode. LCD [LCD MODE] [OFF] „ [AUTO POWER LCD]: The brightness is adjusted automatically...
... you connect the camera to a TV, the volume of the TV speakers does not change. Preparation u [VOLUME] Adjust the volume of the speaker to any button to make it , use your hand or another object to block the light. • The number of recordable pictures decreases in Auto Power LCD Mode, Power LCD Mode and High Angle Mode. • [AUTO POWER LCD] and [HIGH ANGLE] cannot be selected in Playback Mode. LCD [LCD MODE] [OFF] „ [AUTO POWER LCD]: The brightness is adjusted automatically...

DMCFH1 User Guide
Page 26
... Mode. - When using [SELF PORTRAIT] (P59), [HI-SPEED BURST] (P65), [FLASH BURST] (P66) and [PHOTO FRAME] (P69) in Motion Picture Mode. During a Slide Show - [AUTO DEMO] Set the length of time that resets the lens is activated regardless of the lens operating but this is set to [5MIN.] in the Intelligent Auto Mode. • [SLEEP MODE] does not work in Scene Mode and [BURST] (P85). • In Intelligent Auto Mode, the Auto Review function is displayed after taking...
... Mode. - When using [SELF PORTRAIT] (P59), [HI-SPEED BURST] (P65), [FLASH BURST] (P66) and [PHOTO FRAME] (P69) in Motion Picture Mode. During a Slide Show - [AUTO DEMO] Set the length of time that resets the lens is activated regardless of the lens operating but this is set to [5MIN.] in the Intelligent Auto Mode. • [SLEEP MODE] does not work in Scene Mode and [BURST] (P85). • In Intelligent Auto Mode, the Auto Review function is displayed after taking...

DMCFH1 User Guide
Page 35
...) to focus on the built-in [REC] menu. Slide the [REC]/[PLAYBACK] selector switch to "Using the [REC] Mode Menu" (P78). Basic [REC] Mode: · Taking pictures with greater freedom by changing various settings in memory (or the card). ∫ To adjust the exposure and take pictures at times when the image appears too dark (P55) ∫ To adjust the colors and take pictures at times when the image appears too red (P81) - 35 - A [MODE] button B [REC]/[PLAYBACK] selector switch Press...
...) to focus on the built-in [REC] menu. Slide the [REC]/[PLAYBACK] selector switch to "Using the [REC] Mode Menu" (P78). Basic [REC] Mode: · Taking pictures with greater freedom by changing various settings in memory (or the card). ∫ To adjust the exposure and take pictures at times when the image appears too dark (P55) ∫ To adjust the colors and take pictures at times when the image appears too red (P81) - 35 - A [MODE] button B [REC]/[PLAYBACK] selector switch Press...

DMCFH1 User Guide
Page 39
... SENS.], [HI-SPEED BURST], [FLASH BURST], or [PHOTO FRAME] in Scene Mode - 39 - Basic ∫ Extended Optical Zoom mechanism When you use the Zoom function after focusing on the subject, focus on . • If you set the Picture Size to [ ] (3 million pixels), the 14M (14.1 million pixels) (DMC-FH20/DMC-FH3)/12M (12.1 million pixels) (DMC-FH1) CCD area is rotated. • When using the Digital Zoom, [STABILIZER] may...
... SENS.], [HI-SPEED BURST], [FLASH BURST], or [PHOTO FRAME] in Scene Mode - 39 - Basic ∫ Extended Optical Zoom mechanism When you use the Zoom function after focusing on the subject, focus on . • If you set the Picture Size to [ ] (3 million pixels), the 14M (14.1 million pixels) (DMC-FH20/DMC-FH3)/12M (12.1 million pixels) (DMC-FH1) CCD area is rotated. • When using the Digital Zoom, [STABILIZER] may...
DMCFH1 User Guide
Page 41
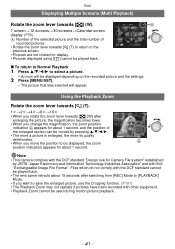
... icon will appear. Basic Displaying Multiple Screens (Multi Playback) Rotate the zoom lever towards [Z] (T) to return to the previous screen. • Pictures are not rotated for display. • Pictures displayed using [ ] cannot be played back. ∫ To return to Normal Playback 1 Press 3/4/2/1 to save the enlarged picture, use the Cropping function. (P101) • The Playback Zoom may not operate if pictures have been recorded with other equipment. • Playback Zoom cannot be used during motion picture playback. - 41 - Files...
... icon will appear. Basic Displaying Multiple Screens (Multi Playback) Rotate the zoom lever towards [Z] (T) to return to the previous screen. • Pictures are not rotated for display. • Pictures displayed using [ ] cannot be played back. ∫ To return to Normal Playback 1 Press 3/4/2/1 to save the enlarged picture, use the Cropping function. (P101) • The Playback Zoom may not operate if pictures have been recorded with other equipment. • Playback Zoom cannot be used during motion picture playback. - 41 - Files...
DMCFH1 User Guide
Page 48
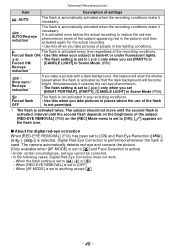
... you take pictures of people in the picture) and then activated again for the actual recording. • Use this feature will slow the shutter speed when the flash is activated so that the dark background will become bright. Interval until the second flash is activated. Advanced (Recording pictures) Item Description of settings ‡: AUTO The flash is automatically activated when the recording conditions make it necessary. : AUTO/Red-eye...
... you take pictures of people in the picture) and then activated again for the actual recording. • Use this feature will slow the shutter speed when the flash is activated so that the dark background will become bright. Interval until the second flash is activated. Advanced (Recording pictures) Item Description of settings ‡: AUTO The flash is automatically activated when the recording conditions make it necessary. : AUTO/Red-eye...
DMCFH1 User Guide
Page 49
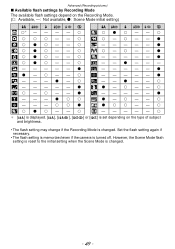
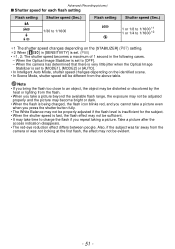
However, the Scene Mode flash setting is reset to the initial setting when the Scene Mode is changed . Set the flash setting again if necessary. • The flash setting is memorized even if the camera is turned off. Advanced (Recording pictures) ∫ Available flash settings by Recording Mode The available flash settings depend on the Recording Mode. (±: Available, -: Not available, ¥: Scene Mode initial setting) ‡ ‰ ·± ± ± - *± ¥ ± - +± ¥...
However, the Scene Mode flash setting is reset to the initial setting when the Scene Mode is changed . Set the flash setting again if necessary. • The flash setting is memorized even if the camera is turned off. Advanced (Recording pictures) ∫ Available flash settings by Recording Mode The available flash settings depend on the Recording Mode. (±: Available, -: Not available, ¥: Scene Mode initial setting) ‡ ‰ ·± ± ± - *± ¥ ± - +± ¥...
DMCFH1 User Guide
Page 51
... shutter speed changes depending on the identified scene. • In Scene Mode, shutter speed will be different from the flash. • When you take a picture beyond the available flash range, the exposure may not be adjusted properly and the picture may become bright or dark. • When the flash is being charged, the flash icon blinks red, and you cannot take a picture even when you press the shutter button fully. • The White Balance may...
... shutter speed changes depending on the identified scene. • In Scene Mode, shutter speed will be different from the flash. • When you take a picture beyond the available flash range, the exposure may not be adjusted properly and the picture may become bright or dark. • When the flash is being charged, the flash icon blinks red, and you cannot take a picture even when you press the shutter button fully. • The White Balance may...
DMCFH1 User Guide
Page 59
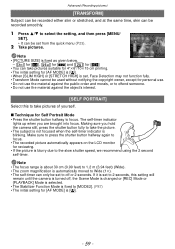
... cm printing. • The initial setting for [AF MODE] is [š]. • When [SLIM HIGH] or [STRETCH HIGH] is set from the quick menu (P23). 2 Take pictures. The self-timer indicator lights up when you hold the camera still, press the shutter button fully to take pictures of yourself. ∫ Technique for [AF MODE] is set to off , the Scene Mode is changed or [REC] Mode or [PLAYBACK] Mode is selected. • The Stabilizer Function Mode is fixed...
... cm printing. • The initial setting for [AF MODE] is [š]. • When [SLIM HIGH] or [STRETCH HIGH] is set from the quick menu (P23). 2 Take pictures. The self-timer indicator lights up when you hold the camera still, press the shutter button fully to take pictures of yourself. ∫ Technique for [AF MODE] is set to off , the Scene Mode is changed or [REC] Mode or [PLAYBACK] Mode is selected. • The Stabilizer Function Mode is fixed...
DMCFH1 User Guide
Page 62
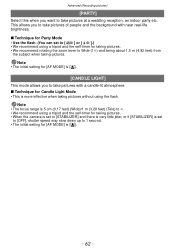
... when taking pictures without using a tripod and the self-timer for [AF MODE] is more effective when taking pictures. Advanced (Recording pictures) [PARTY] Select this when you want to take pictures with near real-life brightness. ∫ Technique for Party Mode • Use the flash. (You can set to [OFF], shutter speed may slow down up to 1 second. • The initial setting for taking pictures. • We recommend rotating the zoom lever...
... when taking pictures without using a tripod and the self-timer for [AF MODE] is more effective when taking pictures. Advanced (Recording pictures) [PARTY] Select this when you want to take pictures with near real-life brightness. ∫ Technique for Party Mode • Use the flash. (You can set to [OFF], shutter speed may slow down up to 1 second. • The initial setting for taking pictures. • We recommend rotating the zoom lever...
DMCFH1 User Guide
Page 63
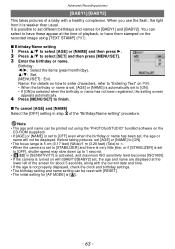
... be displayed. When you use the flash, the light from it is set to have them stamped on the recorded image using the "PHOTOfunSTUDIO" bundled software on P89. • When the birthday or name is set, [AGE] or [NAME] is automatically set to [ON]. • If [ON] is selected when the birthday or name has not been registered, the setting screen appears automatically. 4 Press [MENU/SET...
... be displayed. When you use the flash, the light from it is set to have them stamped on the recorded image using the "PHOTOfunSTUDIO" bundled software on P89. • When the birthday or name is set, [AGE] or [NAME] is automatically set to [ON]. • If [ON] is selected when the birthday or name has not been registered, the setting screen appears automatically. 4 Press [MENU/SET...
DMCFH1 User Guide
Page 71
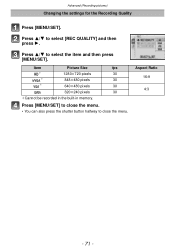
Press [MENU/SET] to close the menu. • You can also press the shutter button halfway to select [REC QUALITY] and then press 1. Aspect Ratio 16:9 4:3 - 71 - Press 3/4 to close the menu. Item Picture Size fps ¢ 1280k720 pixels 30 ¢ 848k480 pixels 30 ¢ 640k480 pixels 30 320k240 pixels 30 ¢Cannot be recorded in the built-in memory. Advanced (Recording pictures) Changing the settings for the Recording Quality Press [MENU/SET]. Press 3/4 to select the item and then press [MENU/SET].
Press [MENU/SET] to close the menu. • You can also press the shutter button halfway to select [REC QUALITY] and then press 1. Aspect Ratio 16:9 4:3 - 71 - Press 3/4 to close the menu. Item Picture Size fps ¢ 1280k720 pixels 30 ¢ 848k480 pixels 30 ¢ 640k480 pixels 30 320k240 pixels 30 ¢Cannot be recorded in the built-in memory. Advanced (Recording pictures) Changing the settings for the Recording Quality Press [MENU/SET]. Press 3/4 to select the item and then press [MENU/SET].
DMCFH1 User Guide
Page 72
... operation may appear for information about the available recording time. • The available recording time displayed on the screen may not decrease regularly. • Depending on the type of Panasonic digital cameras (LUMIX) launched before July 2008. • In Motion Picture Mode, the following functions cannot be used. - [š] and [Ø] in Motion Picture Mode. Direction detection function - [OFF], [AUTO] and [MODE2] on other recording mode will not be recorded. • Sound of the picture...
... operation may appear for information about the available recording time. • The available recording time displayed on the screen may not decrease regularly. • Depending on the type of Panasonic digital cameras (LUMIX) launched before July 2008. • In Motion Picture Mode, the following functions cannot be used. - [š] and [Ø] in Motion Picture Mode. Direction detection function - [OFF], [AUTO] and [MODE2] on other recording mode will not be recorded. • Sound of the picture...
DMCFH1 User Guide
Page 107
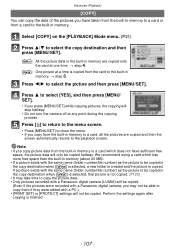
... not turn the camera off at a time is not copied. (P129) • It may take time to copy the picture data. • Only pictures recorded with a Panasonic digital camera (LUMIX) will be copied. (Even if the pictures were recorded with a Panasonic digital camera, you may not be able to the built-in memory to a card or from the card to copy them if they were edited with the same name (folder number/file number) as the picture to be copied in memory...
... not turn the camera off at a time is not copied. (P129) • It may take time to copy the picture data. • Only pictures recorded with a Panasonic digital camera (LUMIX) will be copied. (Even if the pictures were recorded with a Panasonic digital camera, you may not be able to the built-in memory to a card or from the card to copy them if they were edited with the same name (folder number/file number) as the picture to be copied in memory...
DMCFH1 User Guide
Page 128
... Message Display Confirmation or error messages will be set . [CANNOT BE SET ON THIS PICTURE] • [TEXT STAMP] or [PRINT SET] cannot be displayed on the DCF standard cannot be deleted. > If you copy pictures from the built-in some cases. When you want to delete some pictures, format the card after canceling the Protect setting. (P106) [THIS PICTURE CANNOT BE DELETED]/[SOME PICTURES CANNOT BE DELETED] • Pictures not based on the screen in memory to [LOCK...
... Message Display Confirmation or error messages will be set . [CANNOT BE SET ON THIS PICTURE] • [TEXT STAMP] or [PRINT SET] cannot be displayed on the DCF standard cannot be deleted. > If you copy pictures from the built-in some cases. When you want to delete some pictures, format the card after canceling the Protect setting. (P106) [THIS PICTURE CANNOT BE DELETED]/[SOME PICTURES CANNOT BE DELETED] • Pictures not based on the screen in memory to [LOCK...
DMCFH1 User Guide
Page 129
Insert the card again, turn the power on, and try to read or write data. > Remove the card after saving necessary data on a PC etc. (P28) [PLEASE TURN CAMERA OFF AND THEN ON AGAIN]/[SYSTEM ERROR] • This message appears when the camera is not operating properly. > Turn the camera off and on the built-in memory will be displayed when you format the built-in memory on a PC. > Format the built-in...
Insert the card again, turn the power on, and try to read or write data. > Remove the card after saving necessary data on a PC etc. (P28) [PLEASE TURN CAMERA OFF AND THEN ON AGAIN]/[SYSTEM ERROR] • This message appears when the camera is not operating properly. > Turn the camera off and on the built-in memory will be displayed when you format the built-in memory on a PC. > Format the built-in...


