
User Manual
Page 2
... Flash ....69 • Switching to the appropriate flash setting 69 Taking Close-up Pictures 74 Taking Pictures with Manual Focus.........75 Taking Pictures with the Self-Timer.........77 Compensating the Exposure 78 Taking Pictures using Auto Bracket ........79 Setting the Light Sensitivity 80 Taking Pictures using Burst Mode...........82 Taking pictures by specifying the aperture/shutter speed 85 • Aperture-Priority AE 85 • Shutter-Priority AE 85 Taking picture by setting the exposure manually 86 Aperture Value and Shutter Speed .........87 Taking pictures while adjusting...
... Flash ....69 • Switching to the appropriate flash setting 69 Taking Close-up Pictures 74 Taking Pictures with Manual Focus.........75 Taking Pictures with the Self-Timer.........77 Compensating the Exposure 78 Taking Pictures using Auto Bracket ........79 Setting the Light Sensitivity 80 Taking Pictures using Burst Mode...........82 Taking pictures by specifying the aperture/shutter speed 85 • Aperture-Priority AE 85 • Shutter-Priority AE 85 Taking picture by setting the exposure manually 86 Aperture Value and Shutter Speed .........87 Taking pictures while adjusting...

User Manual
Page 3
...; [TITLE EDIT 166 • [VIDEO DIVIDE 167 • [TEXT STAMP 168 • [RESIZE] Reducing the picture size (number of the Vacation .......127 • Recording Dates/Times at Overseas Travel Destinations (World Time) ......130 Using the [REC] Mode menu 132 • [FILM MODE 132 • [ASPECT RATIO 132 • [PICTURE SIZE 133 • [QUALITY 134 • [SENSITIVITY 135 • [ISO LIMIT SET 135 • [WHITE BALANCE 136 • [FACE RECOG...
...; [TITLE EDIT 166 • [VIDEO DIVIDE 167 • [TEXT STAMP 168 • [RESIZE] Reducing the picture size (number of the Vacation .......127 • Recording Dates/Times at Overseas Travel Destinations (World Time) ......130 Using the [REC] Mode menu 132 • [FILM MODE 132 • [ASPECT RATIO 132 • [PICTURE SIZE 133 • [QUALITY 134 • [SENSITIVITY 135 • [ISO LIMIT SET 135 • [WHITE BALANCE 136 • [FACE RECOG...

User Manual
Page 23
...-in Memory/the Card The following operations can be performed using the card † (access indication¢) ¢ The access indication lights red when pictures are being recorded on the card and played back. • When using the built-in memory k>ð (access indication¢) • When using this unit. • When a card has not been inserted: Pictures can be recorded in the built-in memory and played back. • When a card has...
...-in Memory/the Card The following operations can be performed using the card † (access indication¢) ¢ The access indication lights red when pictures are being recorded on the card and played back. • When using the built-in memory k>ð (access indication¢) • When using this unit. • When a card has not been inserted: Pictures can be recorded in the built-in memory and played back. • When a card has...

User Manual
Page 24
... access indication is lit [when pictures are being written, read or deleted, or the built-in memory or the card is being formatted (P39)]. Also, use a card with SD Speed Class with "Class 4" or higher when recording motion pictures in [AVCHD]. http://panasonic.jp/support/global/cs/dsc/ (This Site is English only.) Note • Do not turn this unit off, remove its original position.) • The data...
... access indication is lit [when pictures are being written, read or deleted, or the built-in memory or the card is being formatted (P39)]. Also, use a card with SD Speed Class with "Class 4" or higher when recording motion pictures in [AVCHD]. http://panasonic.jp/support/global/cs/dsc/ (This Site is English only.) Note • Do not turn this unit off, remove its original position.) • The data...

User Manual
Page 36
...) is set to [ON], white saturated areas appear blinking in black and white when the Auto Review function is updated and the file number starts from 0001. (P195) • A folder number between 100 and 999 can be assigned. The [TRAVEL DATE] (P127) setting. (Departure date, return date, destination) - SET MEM.] (P116) setting. - Preparation [PLAY ON LCD] If you selected the Viewfinder in a Recording Mode, the display will automatically switch to the LCD monitor when playing back the pictures. [OFF...
...) is set to [ON], white saturated areas appear blinking in black and white when the Auto Review function is updated and the file number starts from 0001. (P195) • A folder number between 100 and 999 can be assigned. The [TRAVEL DATE] (P127) setting. (Departure date, return date, destination) - SET MEM.] (P116) setting. - Preparation [PLAY ON LCD] If you selected the Viewfinder in a Recording Mode, the display will automatically switch to the LCD monitor when playing back the pictures. [OFF...

User Manual
Page 38
... progressive and high definition images. • If the images are possible) Button operation of the main unit will be controlled by the remote control of the VIERA by automatically coupling this unit with the VIERA Link compatible equipment using the HDMI mini cable (optional). [HDMI MODE] [AUTO]: The output resolution is automatically set based on the information from the connected TV. [1080i]: The interlace...
... progressive and high definition images. • If the images are possible) Button operation of the main unit will be controlled by the remote control of the VIERA by automatically coupling this unit with the VIERA Link compatible equipment using the HDMI mini cable (optional). [HDMI MODE] [AUTO]: The output resolution is automatically set based on the information from the connected TV. [1080i]: The interlace...

User Manual
Page 53
...] Mode: ³ Taking pictures with greater freedom by changing various settings in memory (or the card). ∫ To adjust the exposure and take pictures at times when the image appears too dark (P78) ∫ To adjust the colours and take pictures with your favourite settings (Programme AE Mode) The camera automatically sets the shutter speed and the aperture value according to "Taking Close-up Pictures" (P74). CUST M Set the mode dial to [ ]. A Mode dial • Set the focus selector switch...
...] Mode: ³ Taking pictures with greater freedom by changing various settings in memory (or the card). ∫ To adjust the exposure and take pictures at times when the image appears too dark (P78) ∫ To adjust the colours and take pictures with your favourite settings (Programme AE Mode) The camera automatically sets the shutter speed and the aperture value according to "Taking Close-up Pictures" (P74). CUST M Set the mode dial to [ ]. A Mode dial • Set the focus selector switch...

User Manual
Page 70
... every time regardless of the recording conditions. : • Use this when your photos. It is activated once before the actual recording to [š] and Face Detection is active) • Under certain circumstances, red-eye cannot be corrected. • In the following cases, Digital Red-Eye Correction does not work. - Advanced (Recording pictures) Item Description of settings ‡: AUTO The flash is automatically activated when the recording conditions make...
... every time regardless of the recording conditions. : • Use this when your photos. It is activated once before the actual recording to [š] and Face Detection is active) • Under certain circumstances, red-eye cannot be corrected. • In the following cases, Digital Red-Eye Correction does not work. - Advanced (Recording pictures) Item Description of settings ‡: AUTO The flash is automatically activated when the recording conditions make...

User Manual
Page 73
.... • Flash is fixed to charge the flash if you press the shutter button fully. • The White Balance may not be properly adjusted if the flash level is insufficient for details about the Aperture-Priority AE, Shutter-Priority AE, and Manual Exposure. • In Intelligent Auto Mode, shutter speed changes depending on the [MIN. Advanced (Recording pictures) ∫ Shutter speed for each flash setting Flash setting ‡ Shutter speed (Sec.) Flash setting 1/60¢1 to 1/2000th ‰ Œ Shutter speed (Sec.) 1¢...
.... • Flash is fixed to charge the flash if you press the shutter button fully. • The White Balance may not be properly adjusted if the flash level is insufficient for details about the Aperture-Priority AE, Shutter-Priority AE, and Manual Exposure. • In Intelligent Auto Mode, shutter speed changes depending on the [MIN. Advanced (Recording pictures) ∫ Shutter speed for each flash setting Flash setting ‡ Shutter speed (Sec.) Flash setting 1/60¢1 to 1/2000th ‰ Œ Shutter speed (Sec.) 1¢...

User Manual
Page 99
... screen for [AF MODE] is weaker than usual. When you use the flash, the light from it is [š]. - 99 - Advanced (Recording pictures) [BABY1]/ [BABY2] This takes pictures of playback, or have them stamped on the recorded image using the "PHOTOfunSTUDIO 5.2 HD Edition" bundled software on the CD-ROM (supplied). • If [AGE] or [NAME] is turned on P152. • When the birthday or name is set...
... screen for [AF MODE] is weaker than usual. When you use the flash, the light from it is [š]. - 99 - Advanced (Recording pictures) [BABY1]/ [BABY2] This takes pictures of playback, or have them stamped on the recorded image using the "PHOTOfunSTUDIO 5.2 HD Edition" bundled software on the CD-ROM (supplied). • If [AGE] or [NAME] is turned on P152. • When the birthday or name is set...

User Manual
Page 103
... flash setting is fixed to [Œ]. • The Optical Image Stabilizer Function is fixed to [OFF]. • ISO sensitivity is fixed to focus on a subject, such as the set shutter speed for signal processing. • Press [MENU/SET] to use a tripod. Do not move the camera after this screen is displayed. Be sure to stop taking pictures with the Self-Timer. • We recommend using the quick menu. (P30) 2 Take pictures. • Press the shutter button fully to display the...
... flash setting is fixed to [Œ]. • The Optical Image Stabilizer Function is fixed to [OFF]. • ISO sensitivity is fixed to focus on a subject, such as the set shutter speed for signal processing. • Press [MENU/SET] to use a tripod. Do not move the camera after this screen is displayed. Be sure to stop taking pictures with the Self-Timer. • We recommend using the quick menu. (P30) 2 Take pictures. • Press the shutter button fully to display the...

User Manual
Page 113
... will delete all data recorded on the card, save important data beforehand on this model have been changed to improve audio quality. Cards on AVCHD compatible devices, refer to update the firmware of the following website. Because formatting will not display while playback. • The sound recording specifications on the computer. • You may not be played back with Panasonic digital cameras (LUMIX)¢2. (Motion pictures recorded with poor picture or sound quality or playback may not be played back...
... will delete all data recorded on the card, save important data beforehand on this model have been changed to improve audio quality. Cards on AVCHD compatible devices, refer to update the firmware of the following website. Because formatting will not display while playback. • The sound recording specifications on the computer. • You may not be played back with Panasonic digital cameras (LUMIX)¢2. (Motion pictures recorded with poor picture or sound quality or playback may not be played back...

User Manual
Page 114
...¢ Exposure Compensation¢ S (Shutter-Priority AE Mode) M (Manual Exposure Mode) Shutter speed¢ Shutter speed¢ Exposure Compensation¢ Aperture¢ ¢You can be set Manual Focus using the rear dial. Press 3/4 to manually change the settings. [EXPOSURE MODE] Items that can change the settings even during motion picture recording. Start recording by pressing the motion picture button. - 114 - Advanced (Recording pictures) [REC] Mode: Recording Motion Picture with Manual Settings (Creative Motion Picture Mode) It is switched to [ ]. Set the mode dial...
...¢ Exposure Compensation¢ S (Shutter-Priority AE Mode) M (Manual Exposure Mode) Shutter speed¢ Shutter speed¢ Exposure Compensation¢ Aperture¢ ¢You can be set Manual Focus using the rear dial. Press 3/4 to manually change the settings. [EXPOSURE MODE] Items that can change the settings even during motion picture recording. Start recording by pressing the motion picture button. - 114 - Advanced (Recording pictures) [REC] Mode: Recording Motion Picture with Manual Settings (Creative Motion Picture Mode) It is switched to [ ]. Set the mode dial...
User Manual
Page 115
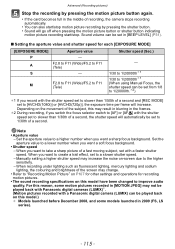
... Panasonic digital cameras (LUMIX)¢. (Motion pictures recorded with a faster shutter speed. F2.8 to F11 (Wide)/F5.2 to a higher number when you want a sharp focus background. Set the aperture value to F11 (Tele) - Sound volume can also start /stop. Advanced (Recording pictures) Stop the recording by pressing the shutter button. • Sound will go off when pressing the motion picture button or shutter button indicating motion picture recording start /stop motion picture recording by pressing the motion picture button again. • If the card...
... Panasonic digital cameras (LUMIX)¢. (Motion pictures recorded with a faster shutter speed. F2.8 to F11 (Wide)/F5.2 to a higher number when you want a sharp focus background. Set the aperture value to F11 (Tele) - Sound volume can also start /stop. Advanced (Recording pictures) Stop the recording by pressing the shutter button. • Sound will go off when pressing the motion picture button or shutter button indicating motion picture recording start /stop motion picture recording by pressing the motion picture button again. • If the card...

User Manual
Page 116
... desired menu settings in Scene Mode • Data registered with [FACE RECOG.] • [CLOCK SET] • [TRAVEL DATE] • [VOLUME] • [ECONOMY] • [RESET] • [VIDEO OUT] • [HDMI MODE] • [SCENE MENU] • [LANGUAGE] • [WORLD TIME] • [BEEP] • [LCD MODE] • [AUTO REVIEW] • [NO.RESET] • [USB MODE] • [TV ASPECT] • [VIERA Link] • [VERSION DISP.] • [DEMO MODE] - 116 - Advanced (Recording pictures) [REC] Mode: Registering Personal Menu Settings (Registering custom settings...
... desired menu settings in Scene Mode • Data registered with [FACE RECOG.] • [CLOCK SET] • [TRAVEL DATE] • [VOLUME] • [ECONOMY] • [RESET] • [VIDEO OUT] • [HDMI MODE] • [SCENE MENU] • [LANGUAGE] • [WORLD TIME] • [BEEP] • [LCD MODE] • [AUTO REVIEW] • [NO.RESET] • [USB MODE] • [TV ASPECT] • [VIERA Link] • [VERSION DISP.] • [DEMO MODE] - 116 - Advanced (Recording pictures) [REC] Mode: Registering Personal Menu Settings (Registering custom settings...

User Manual
Page 118
... wish to achieve. The contrast is used. The saved setting is increased. Enhanced beauty of time. The shutter speed may do something equivalent to pull processing or push processing to create a picture with the setting every time the shutter button is lowered for film cameras. Select different settings in Film Mode to match the photo look you press [DISPLAY] on the screen shown right, explanations about each...
... wish to achieve. The contrast is used. The saved setting is increased. Enhanced beauty of time. The shutter speed may do something equivalent to pull processing or push processing to create a picture with the setting every time the shutter button is lowered for film cameras. Select different settings in Film Mode to match the photo look you press [DISPLAY] on the screen shown right, explanations about each...

User Manual
Page 134
....], [FLASH BURST] and [PHOTO FRAME] in Scene Mode so the picture size for [ ] is not displayed. • You cannot set [PICTURE SIZE] when [QUALITY] is set to a picture taken by [ ]. - 134 - Advanced (Recording pictures) Note • "EZ" is an abbreviation of "Extra Optical Zoom". • A digital picture is made of paper or displayed on [REC] mode menu settings, refer to P28. The higher the numbers of recordable pictures. • You can be displayed on...
....], [FLASH BURST] and [PHOTO FRAME] in Scene Mode so the picture size for [ ] is not displayed. • You cannot set [PICTURE SIZE] when [QUALITY] is set to a picture taken by [ ]. - 134 - Advanced (Recording pictures) Note • "EZ" is an abbreviation of "Extra Optical Zoom". • A digital picture is made of paper or displayed on [REC] mode menu settings, refer to P28. The higher the numbers of recordable pictures. • You can be displayed on...

User Manual
Page 190
... display of the screen by pressing the [DISPLAY] on the camera while copying. (P66) • See the instruction manual for distributing copies. Image will vary depending on the file format. (JPEG, RAW, AVCHD, or Motion JPEG). AV OUT/DIGITAL AV OUT/DIGITAL Connecting to other equipment Saving the recorded still pictures and motion pictures Methods to export still pictures and motion pictures to the audio input socket A AV cable (supplied) MIC REMOTE 1 Connect...
... display of the screen by pressing the [DISPLAY] on the camera while copying. (P66) • See the instruction manual for distributing copies. Image will vary depending on the file format. (JPEG, RAW, AVCHD, or Motion JPEG). AV OUT/DIGITAL AV OUT/DIGITAL Connecting to other equipment Saving the recorded still pictures and motion pictures Methods to export still pictures and motion pictures to the audio input socket A AV cable (supplied) MIC REMOTE 1 Connect...

User Manual
Page 217
... a recorded picture and then play it . (P24) [NO VALID PICTURE TO PLAY] > Record a picture or insert a card with the same name as examples. [THIS MEMORY CARD IS WRITE-PROTECTED] > The Write-Protect switch on a PC etc. (P39) [NO ADDITIONAL SELECTIONS CAN BE MADE] • The number of pictures, which can be set at one time when [MULTI] has been selected for [DELETE MULTI] (P65), [FAVORITE] (P176), [TITLE EDIT] (P166), [TEXT STAMP...
... a recorded picture and then play it . (P24) [NO VALID PICTURE TO PLAY] > Record a picture or insert a card with the same name as examples. [THIS MEMORY CARD IS WRITE-PROTECTED] > The Write-Protect switch on a PC etc. (P39) [NO ADDITIONAL SELECTIONS CAN BE MADE] • The number of pictures, which can be set at one time when [MULTI] has been selected for [DELETE MULTI] (P65), [FAVORITE] (P176), [TITLE EDIT] (P166), [TEXT STAMP...

User Manual
Page 219
... picture recording may stop in the [SETUP] menu after formatting, the folder number is reset to 100. (P36) [PICTURE IS DISPLAYED FOR 16:9 TV]/[PICTURE IS DISPLAYED FOR 4:3 TV] • The AV cable is connected to the camera. > Press [MENU/SET] if you want to delete this message is displayed even when a genuine Panasonic battery is used . (P195) > Format the card after saving necessary data on before use. (P208) - 219 - from the terminal. [PLEASE MAKE SURE TO TURN ON THE POWER...
... picture recording may stop in the [SETUP] menu after formatting, the folder number is reset to 100. (P36) [PICTURE IS DISPLAYED FOR 16:9 TV]/[PICTURE IS DISPLAYED FOR 4:3 TV] • The AV cable is connected to the camera. > Press [MENU/SET] if you want to delete this message is displayed even when a genuine Panasonic battery is used . (P195) > Format the card after saving necessary data on before use. (P208) - 219 - from the terminal. [PLEASE MAKE SURE TO TURN ON THE POWER...


