

DMCZS10 User Guide
Page 1
DMC-ZS10 Before connecting, operating or adjusting this product, please read the instructions completely. VQT3G90 Owner's Manual for advanced features Digital Camera Model No.
DMC-ZS10 Before connecting, operating or adjusting this product, please read the instructions completely. VQT3G90 Owner's Manual for advanced features Digital Camera Model No.

DMCZS10 User Guide
Page 8
...;Keep small parts in Canada should contact Panasonic's parts department at 1-800-833-9626 and customers in a safe place out of the reach of all the accessories are supplied before using a card. (→14) • If any accessories are not using the camera. ●The accessories and their shape ...will differ depending on the country or area where the camera was purchased. You can record or play back pictures on the accessories, refer to Basic Owner's Manual. ●Battery Pack is indicated as battery pack or battery in the text. ●Battery ...
...;Keep small parts in Canada should contact Panasonic's parts department at 1-800-833-9626 and customers in a safe place out of the reach of all the accessories are supplied before using a card. (→14) • If any accessories are not using the camera. ●The accessories and their shape ...will differ depending on the country or area where the camera was purchased. You can record or play back pictures on the accessories, refer to Basic Owner's Manual. ●Battery Pack is indicated as battery pack or battery in the text. ●Battery ...

DMCZS10 User Guide
Page 9
... door (→12) Release lever (→12) DC coupler cover (→13) ●The illustrations and screens in this manual may differ from the actual product. ●How to avoid dropping the camera. Names of parts Mode dial Flash (→52) Self-timer indicator (→56)/AF Assist Lamp (→93) Lens... (→21) LCD monitor (→43, 130) REC/PLAY switch (→20) [EXPOSURE] button (→58) Cursor button [DISP.] button Zoom lever Motion picture button Camera ON/OFF switch Shutter button We recommend using the supplied hand strap to operate the...
... door (→12) Release lever (→12) DC coupler cover (→13) ●The illustrations and screens in this manual may differ from the actual product. ●How to avoid dropping the camera. Names of parts Mode dial Flash (→52) Self-timer indicator (→56)/AF Assist Lamp (→93) Lens... (→21) LCD monitor (→43, 130) REC/PLAY switch (→20) [EXPOSURE] button (→58) Cursor button [DISP.] button Zoom lever Motion picture button Camera ON/OFF switch Shutter button We recommend using the supplied hand strap to operate the...

DMCZS10 User Guide
Page 16
...Record motion pictures. In the playback mode: Pictures are deleted. During menu operations: The previous screen is displayed. How to operate the camera Mode dial Use this when zooming in the mode) Cursor button Use these for menu operations and for calling up the recording functions listed... below. ▲: Exposure Compensation, Auto Bracket etc. ▼: Macro Mode etc. ◄: Self-timer ►: Flash • In this manual, the button that is used is indicated by [MENU/SET] Use this to display the menus, enter the settings, etc. [Q.MENU]/[ / ] button ...
...Record motion pictures. In the playback mode: Pictures are deleted. During menu operations: The previous screen is displayed. How to operate the camera Mode dial Use this when zooming in the mode) Cursor button Use these for menu operations and for calling up the recording functions listed... below. ▲: Exposure Compensation, Auto Bracket etc. ▼: Macro Mode etc. ◄: Self-timer ►: Flash • In this manual, the button that is used is indicated by [MENU/SET] Use this to display the menus, enter the settings, etc. [Q.MENU]/[ / ] button ...
DMCZS10 User Guide
Page 19
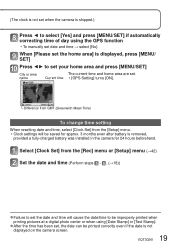
... settings will cause the date/time to be improperly printed when printing pictures at a digital photo center or when using the GPS function • To manually set date and time → select [No]. When [Please set the home area] is shipped.) Press ◄ to select [Yes] and press [MENU/SET] if... [Text Stamp]. ●After the time has been set, the date can be saved for approx. 3 months even after battery is not displayed on the camera screen. 19 VQT3G90 Difference from GMT (Greenwich Mean Time) To change time setting When resetting date and time, select [Clock Set] from the [Rec] menu...
... settings will cause the date/time to be improperly printed when printing pictures at a digital photo center or when using the GPS function • To manually set date and time → select [No]. When [Please set the home area] is shipped.) Press ◄ to select [Yes] and press [MENU/SET] if... [Text Stamp]. ●After the time has been set, the date can be saved for approx. 3 months even after battery is not displayed on the camera screen. 19 VQT3G90 Difference from GMT (Greenwich Mean Time) To change time setting When resetting date and time, select [Clock Set] from the [Rec] menu...
DMCZS10 User Guide
Page 26
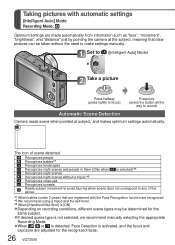
...a picture Press halfway (press lightly to focus) Press fully (press the button all the way to record) Automatic Scene Detection Camera reads scene when pointed at the subject, meaning that are registered with automatic settings [Intelligent Auto] Mode Recording Mode: Optimum settings ...tripod.∗3 Recognizes close-ups Recognizes sunsets Reads subject movement to avoid blurring when scene does not correspond to make settings manually. The icon of scene detected Recognizes people Recognizes babies∗1 Recognizes landscapes Recognizes night scenes and people in them (Only ...
...a picture Press halfway (press lightly to focus) Press fully (press the button all the way to record) Automatic Scene Detection Camera reads scene when pointed at the subject, meaning that are registered with automatic settings [Intelligent Auto] Mode Recording Mode: Optimum settings ...tripod.∗3 Recognizes close-ups Recognizes sunsets Reads subject movement to avoid blurring when scene does not correspond to make settings manually. The icon of scene detected Recognizes people Recognizes babies∗1 Recognizes landscapes Recognizes night scenes and people in them (Only ...

DMCZS10 User Guide
Page 31
...settings will be cleared, and the recordable area will be selected for nightscapes and other dark scenes. • If the camera does not select your desired Scene Mode, choosing an appropriate mode manually is recommended. • The following menu options in the [Motion Picture] menu can be set: • [Rec...you unplug the AC adaptor or a power outage occurs, power to format the SD card. To restore the original capacity, use the camera to the camera is cut, and the motion picture in progress will change when starting to record motion pictures with optimal settings. Also, if the Aspect ...
...settings will be cleared, and the recordable area will be selected for nightscapes and other dark scenes. • If the camera does not select your desired Scene Mode, choosing an appropriate mode manually is recommended. • The following menu options in the [Motion Picture] menu can be set: • [Rec...you unplug the AC adaptor or a power outage occurs, power to format the SD card. To restore the original capacity, use the camera to the camera is cut, and the motion picture in progress will change when starting to record motion pictures with optimal settings. Also, if the Aspect ...
DMCZS10 User Guide
Page 88
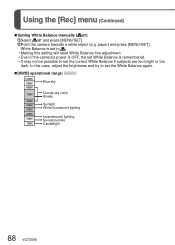
In this setting will reset White Balance fine adjustment. • Even if the camera's power is OFF, the set White Balance is set to . • Making this case, adjust the brightness and try to set the White Balance again. &#... Balance is remembered. • It may not be possible to set the correct White Balance if subjects are too bright or too dark. Point the camera towards a white object (e.g. paper) and press [MENU/SET]. Using the [Rec] menu (Continued) ■ Setting White Balance...
In this setting will reset White Balance fine adjustment. • Even if the camera's power is OFF, the set White Balance is set to . • Making this case, adjust the brightness and try to set the White Balance again. &#... Balance is remembered. • It may not be possible to set the correct White Balance if subjects are too bright or too dark. Point the camera towards a white object (e.g. paper) and press [MENU/SET]. Using the [Rec] menu (Continued) ■ Setting White Balance...

DMCZS10 User Guide
Page 116
... Cards, be sure to play motion pictures on other AV cables except the supplied one. ●Pictures rotated to portrait may be played back on Panasonic televisions (VIERA) displaying the AVCHD logo. To play each type of card in . (Damage to socket shape can lead to faulty operation.) AV cable (always... to Check socket direction and insert straight in equipment compatible with the AV cable (supplied) or HDMI mini cable (optional). ●Also consult TV operating manual. Connect camera to TV Turn on camera Set REC/PLAY switch to auxiliary input.
... Cards, be sure to play motion pictures on other AV cables except the supplied one. ●Pictures rotated to portrait may be played back on Panasonic televisions (VIERA) displaying the AVCHD logo. To play each type of card in . (Damage to socket shape can lead to faulty operation.) AV cable (always... to Check socket direction and insert straight in equipment compatible with the AV cable (supplied) or HDMI mini cable (optional). ●Also consult TV operating manual. Connect camera to TV Turn on camera Set REC/PLAY switch to auxiliary input.

DMCZS10 User Guide
Page 118
... VIERA remote control. (Some operations are connecting to has been set up to enable VIERA Link (HDMI) (consult your product manual to the industry- compatible devices by connecting HDMI mini cables (optional) for enabling easy operation with VIERA Link, read the operating... is [ON], operations via the camera buttons will be limited. ●Ensure that automatically links this camera to VIERA Link- standard HDMI control functions known as HDMI CEC (Consumer Electronics Control). This is the latest Panasonic standard that also supports previous Panasonic VIERA Link devices. (As of ...
... VIERA remote control. (Some operations are connecting to has been set up to enable VIERA Link (HDMI) (consult your product manual to the industry- compatible devices by connecting HDMI mini cables (optional) for enabling easy operation with VIERA Link, read the operating... is [ON], operations via the camera buttons will be limited. ●Ensure that automatically links this camera to VIERA Link- standard HDMI control functions known as HDMI CEC (Consumer Electronics Control). This is the latest Panasonic standard that also supports previous Panasonic VIERA Link devices. (As of ...

DMCZS10 User Guide
Page 120
... and [Cropping] in the [Playback] menu ∗ These functions are available when a picture is displayed in 2D. ●On the LCD monitor of this camera, 3D still pictures will be played back in 2D (conventional pictures). ●If you switch between 3D still pictures and normal still pictures while playing...back pictures, a black screen will be displayed for a few seconds. ●If you select a thumbnail of the TV, read the manual for the TV.) 120 VQT3G90 Connect the camera to a 3D-capable TV by use of an HDMI mini cable (optional) to display the playback screen (→117) Display still ...
... and [Cropping] in the [Playback] menu ∗ These functions are available when a picture is displayed in 2D. ●On the LCD monitor of this camera, 3D still pictures will be played back in 2D (conventional pictures). ●If you switch between 3D still pictures and normal still pictures while playing...back pictures, a black screen will be displayed for a few seconds. ●If you select a thumbnail of the TV, read the manual for the TV.) 120 VQT3G90 Connect the camera to a 3D-capable TV by use of an HDMI mini cable (optional) to display the playback screen (→117) Display still ...

DMCZS10 User Guide
Page 121
Connect camera to media such as a DVD disc, hard disk or video tape using a TV with high definition (AVCHD) images. http://panasonic.jp/support/global/cs/dsc/ (This Site is useful as a DVD recorder or video recorder. This method is English only.) • See the instruction manual for ... recorder's input socket ●Do not use cable supplied) Start recording on recorder • To stop recording (dubbing), stop the recording on camera AV cable (always use any other devices vary according to the file format (JPEG, MPO, AVCHD, Motion JPEG). Check the latest information about...
Connect camera to media such as a DVD disc, hard disk or video tape using a TV with high definition (AVCHD) images. http://panasonic.jp/support/global/cs/dsc/ (This Site is useful as a DVD recorder or video recorder. This method is English only.) • See the instruction manual for ... recorder's input socket ●Do not use cable supplied) Start recording on recorder • To stop recording (dubbing), stop the recording on camera AV cable (always use any other devices vary according to the file format (JPEG, MPO, AVCHD, Motion JPEG). Check the latest information about...
DMCZS10 User Guide
Page 122
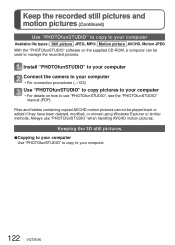
... the "PHOTOfunSTUDIO" manual (PDF). Files and folders containing copied AVCHD motion pictures cannot be used to manage the recorded pictures. Keeping the 3D still pictures ■Copying to your computer Use "PHOTOfunSTUDIO" to copy to use "PHOTOfunSTUDIO" when handling AVCHD motion pictures. Install "PHOTOfunSTUDIO" to your computer Connect the camera to your...
... the "PHOTOfunSTUDIO" manual (PDF). Files and folders containing copied AVCHD motion pictures cannot be used to manage the recorded pictures. Keeping the 3D still pictures ■Copying to your computer Use "PHOTOfunSTUDIO" to copy to use "PHOTOfunSTUDIO" when handling AVCHD motion pictures. Install "PHOTOfunSTUDIO" to your computer Connect the camera to your...

DMCZS10 User Guide
Page 123
... use "PHOTOfunSTUDIO"? Correct playback and operation depends on your PC Still/motion pictures can read directly from the camera to my computer via USB connection cable? http://panasonic.net/avc/sdcard/information/SDXC.html ■Computer specifications Windows Macintosh 98/98SE Me/2000 XP/Vista/7 OS ...from my camera to your computer does not support SDXC Memory Cards a message will erase recorded pictures.) If the card is not recognized, refer to my computer? Can I use "PHOTOfunSTUDIO" when copying AVCHD motion pictures. 123 VQT3G90 For details, see the manual for your ...
... use "PHOTOfunSTUDIO"? Correct playback and operation depends on your PC Still/motion pictures can read directly from the camera to my computer via USB connection cable? http://panasonic.net/avc/sdcard/information/SDXC.html ■Computer specifications Windows Macintosh 98/98SE Me/2000 XP/Vista/7 OS ...from my camera to your computer does not support SDXC Memory Cards a message will erase recorded pictures.) If the card is not recognized, refer to my computer? Can I use "PHOTOfunSTUDIO" when copying AVCHD motion pictures. 123 VQT3G90 For details, see the manual for your ...
DMCZS10 User Guide
Page 125
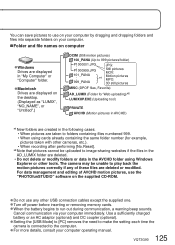
... inserting or removing memory cards. ●When the battery begins to the computer. ●For more details, consult your computer immediately. The camera may be uploaded to image-sharing websites if the files in the AVCHD folder using cards already containing the same folder number (for example, ...unable to play back the motion pictures correctly if any of AVCHD motion pictures, use any other tools. Cancel communication via your computer operating manual. 125 VQT3G90 For data management and editing of these files are deleted. • Do not delete or modify folders or data in the...
... inserting or removing memory cards. ●When the battery begins to the computer. ●For more details, consult your computer immediately. The camera may be uploaded to image-sharing websites if the files in the AVCHD folder using cards already containing the same folder number (for example, ...unable to play back the motion pictures correctly if any of AVCHD motion pictures, use any other tools. Cancel communication via your computer operating manual. 125 VQT3G90 For data management and editing of these files are deleted. • Do not delete or modify folders or data in the...
DMCZS10 User Guide
Page 126
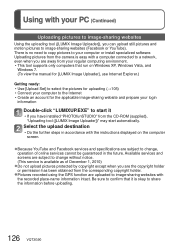
... your regular computing environment. • This tool supports only computers that it • If you have installed "PHOTOfunSTUDIO" from the camera is no need to copy pictures to your PC (Continued) Uploading pictures to image-sharing websites Using the uploading tool ([LUMIX Image Uploader...easy with the recorded place-name information intact. Using with the instructions displayed on Windows XP, Windows Vista, and Windows 7. (To view the manual for [LUMIX Image Uploader], use Internet Explorer.) Getting ready: • Use [Upload Set] to select the pictures for uploading (→105) ...
... your regular computing environment. • This tool supports only computers that it • If you have installed "PHOTOfunSTUDIO" from the camera is no need to copy pictures to your PC (Continued) Uploading pictures to image-sharing websites Using the uploading tool ([LUMIX Image Uploader...easy with the recorded place-name information intact. Using with the instructions displayed on Windows XP, Windows Vista, and Windows 7. (To view the manual for [LUMIX Image Uploader], use Internet Explorer.) Getting ready: • Use [Upload Set] to select the pictures for uploading (→105) ...

DMCZS10 User Guide
Page 129
... the still picture to 2 or 4. ●To print to paper sizes/layouts not supported by this camera, set to and make settings on the printer. (Consult your printer's operating manual.) ●[Print with Date] and [Num.of prints] are not shown when you have selected [Print Set] settings. ●... ●To arrange "2 pictures" or "4 pictures" in the same still picture, set the number of prints for your printer. Making print settings on the camera (Make settings before selecting [Print start]) Use cursor button to select the item and press [MENU/ SET] Item [Print with Date] [Num.of prints] ...
... the still picture to 2 or 4. ●To print to paper sizes/layouts not supported by this camera, set to and make settings on the printer. (Consult your printer's operating manual.) ●[Print with Date] and [Num.of prints] are not shown when you have selected [Print Set] settings. ●... ●To arrange "2 pictures" or "4 pictures" in the same still picture, set the number of prints for your printer. Making print settings on the camera (Make settings before selecting [Print start]) Use cursor button to select the item and press [MENU/ SET] Item [Print with Date] [Num.of prints] ...

DMCZS10 User Guide
Page 139
... for details). → Check the VIERA Link (HDMI) settings on the device you are cut off the camera's power before printing. (Consult printer operating manual.) ● The pictures were recorded in aspect ratio. → If printing in place. Cannot print when ...connecting to printer. ● Printer not compatible with certain television HDMI sockets. http://panasonic.net/avc/sdcard/information/SDXC....
... for details). → Check the VIERA Link (HDMI) settings on the device you are cut off the camera's power before printing. (Consult printer operating manual.) ● The pictures were recorded in aspect ratio. → If printing in place. Cannot print when ...connecting to printer. ● Printer not compatible with certain television HDMI sockets. http://panasonic.net/avc/sdcard/information/SDXC....


