
DMCZS19 User Guide
Page 2
... the battery 14 Charging the battery 15 Remaining battery 16 Guidelines for number of recordable pictures and operating time 17 Inserting and removing the card (optional 19 Picture save destination (cards and built-in memory 20 Displaying the picture recording capacity....21 Recording capacity guidelines (pictures/recording time 22 Setting the clock 23 To change time setting 24 Basics Sequence of operations 25 Taking pictures with your own settings [Program AE] Mode 27 How to adjust focus 28 Touching the screen and recording (Touch Shutter function...
... the battery 14 Charging the battery 15 Remaining battery 16 Guidelines for number of recordable pictures and operating time 17 Inserting and removing the card (optional 19 Picture save destination (cards and built-in memory 20 Displaying the picture recording capacity....21 Recording capacity guidelines (pictures/recording time 22 Setting the clock 23 To change time setting 24 Basics Sequence of operations 25 Taking pictures with your own settings [Program AE] Mode 27 How to adjust focus 28 Touching the screen and recording (Touch Shutter function...

DMCZS19 User Guide
Page 3
... [Setup] menu 54 [Clock Set 54 [Auto Clock Set] DMC-ZS20 54 [World Time 54 [Travel Date 54 [Beep 54 [Volume 55 [Cust.Set Mem 55 [LCD Display 55 [LCD Mode 55 [Guide Line 56 [Histogram 56 [Video Rec Area 56 [Zoom Resume 56 [Economy 57 [Auto Review 57 [No.Reset 58 [Reset 58 [USB Mode 58 [Output 59 [VIERA Link 59 [3D Playback 59 [Rotate Disp 60 [Version Disp 60 [Format 60 [Language 61 [Demo Mode 61 Contents Application (Record) Changing recording...
... [Setup] menu 54 [Clock Set 54 [Auto Clock Set] DMC-ZS20 54 [World Time 54 [Travel Date 54 [Beep 54 [Volume 55 [Cust.Set Mem 55 [LCD Display 55 [LCD Mode 55 [Guide Line 56 [Histogram 56 [Video Rec Area 56 [Zoom Resume 56 [Economy 57 [Auto Review 57 [No.Reset 58 [Reset 58 [USB Mode 58 [Output 59 [VIERA Link 59 [3D Playback 59 [Rotate Disp 60 [Version Disp 60 [Format 60 [Language 61 [Demo Mode 61 Contents Application (Record) Changing recording...

DMCZS19 User Guide
Page 4
... [Digital Zoom 102 [Burst 103 [Color Mode 103 [AF Assist Lamp 103 [Red-Eye Removal 104 [Stabilizer 104 [Date Stamp 105 [Clock Set 105 Using the [Motion Picture] menu ..... 106 [Rec Mode 106 [Rec Quality 107 [Continuous AF 108 [Wind Cut 108 Contents Application (View) Playing back still pictures recorded using the burst function 109 Different playback methods [Playback Mode 111 [2D/3D Settings 111 [Slide Show 112 [Filtering Play 114 [Calendar 114 Retouching pictures 115 [Auto Retouch...
... [Digital Zoom 102 [Burst 103 [Color Mode 103 [AF Assist Lamp 103 [Red-Eye Removal 104 [Stabilizer 104 [Date Stamp 105 [Clock Set 105 Using the [Motion Picture] menu ..... 106 [Rec Mode 106 [Rec Quality 107 [Continuous AF 108 [Wind Cut 108 Contents Application (View) Playing back still pictures recorded using the burst function 109 Different playback methods [Playback Mode 111 [2D/3D Settings 111 [Slide Show 112 [Filtering Play 114 [Calendar 114 Retouching pictures 115 [Auto Retouch...
DMCZS19 User Guide
Page 5
... displayed 134 Disabling the positioning function when the camera is turned off 135 Changing the place name information to be recorded 136 Changing the recorded GPS information 137 [Edit Location 137 [Edit Place Name 139 Adjusting the time using GPS .......... 140 Reducing the time required for positioning 141 About the "GPS Assist Tool 141 Using the "GPS Assist Tool 142 Updating the GPS assist data 144 Checking...
... displayed 134 Disabling the positioning function when the camera is turned off 135 Changing the place name information to be recorded 136 Changing the recorded GPS information 137 [Edit Location 137 [Edit Place Name 139 Adjusting the time using GPS .......... 140 Reducing the time required for positioning 141 About the "GPS Assist Tool 141 Using the "GPS Assist Tool 142 Updating the GPS assist data 144 Checking...

DMCZS19 User Guide
Page 11
... recording mode: Operate this when setting the shutter speed or aperture value. (Only in this manual may differ from the actual product. - 11 - LCD monitor (→55, 62, 172) Names and Functions of Main Parts REC/PLAY switch (→25) Use this to change display. Charging lamp (→16) [HDMI] socket (→156, 158) [Q.MENU] / [ / ] button In the recording mode: Quick menu is displayed. (→53) In the playback mode: Pictures are deleted. (→49) During menu operations: The previous screen...
... recording mode: Operate this when setting the shutter speed or aperture value. (Only in this manual may differ from the actual product. - 11 - LCD monitor (→55, 62, 172) Names and Functions of Main Parts REC/PLAY switch (→25) Use this to change display. Charging lamp (→16) [HDMI] socket (→156, 158) [Q.MENU] / [ / ] button In the recording mode: Quick menu is displayed. (→53) In the playback mode: Pictures are deleted. (→49) During menu operations: The previous screen...

DMCZS19 User Guide
Page 21
... remove the battery, card, or AC adaptor (supplied). If operation fails due to vibrations, impact, or static electricity. The card or the data on the card may be damaged, and this unit may no card is inserted (pictures will be saved to built-in memory) While the camera is accessing the card or built-in memory) Displaying the picture recording capacity Estimated remaining pictures or recording time capacity (press [DISP.] button to switch display) Displayed...
... remove the battery, card, or AC adaptor (supplied). If operation fails due to vibrations, impact, or static electricity. The card or the data on the card may be damaged, and this unit may no card is inserted (pictures will be saved to built-in memory) While the camera is accessing the card or built-in memory) Displaying the picture recording capacity Estimated remaining pictures or recording time capacity (press [DISP.] button to switch display) Displayed...
DMCZS19 User Guide
Page 27
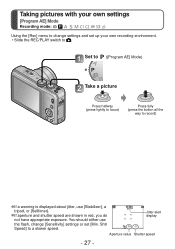
Shtr Speed] to record) ●If a warning is displayed about jitter, use the flash, change settings and set [Min. Jitter alert display Aperture value Shutter speed - 27 - Taking pictures with your own settings [Program AE] Mode Recording mode: Using the [Rec] menu to change [Sensitivity] settings or set up your own recording environment. • Slide the REC/PLAY switch to . You should either use [Stabilizer], a tripod, or [Selftimer]. ●If aperture and shutter speed are shown in red, you do not...
Shtr Speed] to record) ●If a warning is displayed about jitter, use the flash, change settings and set [Min. Jitter alert display Aperture value Shutter speed - 27 - Taking pictures with your own settings [Program AE] Mode Recording mode: Using the [Rec] menu to change [Sensitivity] settings or set up your own recording environment. • Slide the REC/PLAY switch to . You should either use [Stabilizer], a tripod, or [Selftimer]. ●If aperture and shutter speed are shown in red, you do not...

DMCZS19 User Guide
Page 34
... settings [Intelligent Auto] Mode [iHDR] HDR is activated automatically and the camera corrects the exposure by increasing the brightness of several photos at taken different exposure levels. The resulting image shows more detail in both bright and dark areas. ■ Settings Press [MENU/SET] Use cursor button to select [Rec] menu and press [MENU/SET] Use cursor button to select [iHDR] and press [MENU/SET] Use cursor button to select [ON] and press [MENU/SET...
... settings [Intelligent Auto] Mode [iHDR] HDR is activated automatically and the camera corrects the exposure by increasing the brightness of several photos at taken different exposure levels. The resulting image shows more detail in both bright and dark areas. ■ Settings Press [MENU/SET] Use cursor button to select [Rec] menu and press [MENU/SET] Use cursor button to select [iHDR] and press [MENU/SET] Use cursor button to select [ON] and press [MENU/SET...
DMCZS19 User Guide
Page 36
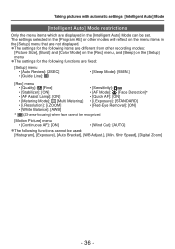
...]: [i.ZOOM] • [Red-Eye Removal]: [ON] • [White Balance]: [AWB] ∗ (23-area-focusing) when face cannot be recognized [Motion Picture] menu • [Continuous AF]: [ON] • [Wind Cut]: [AUTO] ●The following functions are displayed in the [Intelligent Auto] Mode can be used: [Histogram], [Exposure], [Auto Bracket], [WB Adjust.], [Min. The settings selected in the [Program AE] or other modes will reflect on the menu items in the [Setup] menu that...
...]: [i.ZOOM] • [Red-Eye Removal]: [ON] • [White Balance]: [AWB] ∗ (23-area-focusing) when face cannot be recognized [Motion Picture] menu • [Continuous AF]: [ON] • [Wind Cut]: [AUTO] ●The following functions are displayed in the [Intelligent Auto] Mode can be used: [Histogram], [Exposure], [Auto Bracket], [WB Adjust.], [Min. The settings selected in the [Program AE] or other modes will reflect on the menu items in the [Setup] menu that...

DMCZS19 User Guide
Page 41
... camera operation is disturbing, use the touch shutter. • When still pictures are recorded during zooming, the zooming may stop. ■Burst function When the burst function has been set in the following cases: • When [Rec Quality] is set to [VGA] • When recording [High Speed Video] • [Creative Control] Mode ([Soft Focus]) ●The flash is set to , or , still pictures are automatically recorded using the touch shutter function. Still pictures can also be created after motion picture recording...
... camera operation is disturbing, use the touch shutter. • When still pictures are recorded during zooming, the zooming may stop. ■Burst function When the burst function has been set in the following cases: • When [Rec Quality] is set to [VGA] • When recording [High Speed Video] • [Creative Control] Mode ([Soft Focus]) ●The flash is set to , or , still pictures are automatically recorded using the touch shutter function. Still pictures can also be created after motion picture recording...

DMCZS19 User Guide
Page 45
....) Volume adjustment - 45 - Motion picture recording time When playback starts, the elapsed playback time is no operation for about 2 seconds, the control panel disappears. Control Panel : Pause/Play : Stop : Capturing still pictures from motion pictures (→47) : Fast rewind (2 steps) : Single-frame rewind (while paused) : Fast forward (2 steps) : Single-frame forward (while paused) Volume level Playback bar (The playback position can also press to play motion pictures using the AVCHD, MP4 and QuickTime Motion JPEG formats. • Slide the REC/PLAY switch to . Viewing...
....) Volume adjustment - 45 - Motion picture recording time When playback starts, the elapsed playback time is no operation for about 2 seconds, the control panel disappears. Control Panel : Pause/Play : Stop : Capturing still pictures from motion pictures (→47) : Fast rewind (2 steps) : Single-frame rewind (while paused) : Fast forward (2 steps) : Single-frame forward (while paused) Volume level Playback bar (The playback position can also press to play motion pictures using the AVCHD, MP4 and QuickTime Motion JPEG formats. • Slide the REC/PLAY switch to . Viewing...

DMCZS19 User Guide
Page 54
Using the [Setup] menu [Clock Set], [Economy] and [Auto Review] are important for clock setting and battery life. Please check these before use. • For details about the setting procedure in the [Setup] menu (→51) Item Settings, notes [Clock Set] Set time, date, and display format. (→23) DMC-ZS20 [Auto Clock Set] [ON] / [OFF] Setting the clock automatically using GPS. (→140) [World Time] Set the local time at travel destination. (→93) [Destination]: Set the local time at travel...
Using the [Setup] menu [Clock Set], [Economy] and [Auto Review] are important for clock setting and battery life. Please check these before use. • For details about the setting procedure in the [Setup] menu (→51) Item Settings, notes [Clock Set] Set time, date, and display format. (→23) DMC-ZS20 [Auto Clock Set] [ON] / [OFF] Setting the clock automatically using GPS. (→140) [World Time] Set the local time at travel destination. (→93) [Destination]: Set the local time at travel...

DMCZS19 User Guide
Page 60
... a sufficiently charged battery. Settings, notes : Rotate and display pictures displayed on a TV screen in portrait orientation. [OFF] [Version Disp.] Check the camera firmware version or display software information. [Format] Use when [Built-In Memory Error] or [Memory Card Error] appears, or when formatting the built-in Exifcompatible (→42) environment (OS, software). When a card/built-in memory, remove the cards. (Only inserted card will be deleted. DMC-ZS19 • Do not turn off power or perform other picture data will be formatted if...
... a sufficiently charged battery. Settings, notes : Rotate and display pictures displayed on a TV screen in portrait orientation. [OFF] [Version Disp.] Check the camera firmware version or display software information. [Format] Use when [Built-In Memory Error] or [Memory Card Error] appears, or when formatting the built-in Exifcompatible (→42) environment (OS, software). When a card/built-in memory, remove the cards. (Only inserted card will be deleted. DMC-ZS19 • Do not turn off power or perform other picture data will be formatted if...
DMCZS19 User Guide
Page 83
...; Using flash in Motion JPEG with a picture size of QVGA (320x240 pixels). (Up to finish recording • Motion picture recording can be made recognizable by pressing the shutter button. (The touch shutter function will be recorded while high-speed motion pictures are being recorded. • The settings for the focus, zoom, exposure and White Balance are fixed to the settings specified when recording was started or finished by playing back the motion pictures using slow motion. Press the motion picture button to start recording Press the motion picture button...
...; Using flash in Motion JPEG with a picture size of QVGA (320x240 pixels). (Up to finish recording • Motion picture recording can be made recognizable by pressing the shutter button. (The touch shutter function will be recorded while high-speed motion pictures are being recorded. • The settings for the focus, zoom, exposure and White Balance are fixed to the settings specified when recording was started or finished by playing back the motion pictures using slow motion. Press the motion picture button to start recording Press the motion picture button...
DMCZS19 User Guide
Page 96
...;The [Sensitivity] is automatically set in [High Sens.] Scene Mode. ●When [3D Photo Mode] is set to lighting) manually. Using the [Rec] menu [Quality] • For [Rec] menu setting procedures (→51) Set quality of picture. ■ Recording mode: ■ Settings: ([Fine]) High quality, priority to picture quality ([Standard]) Standard quality, priority to the number of pictures ●The setting is fixed to , in the following cases: • When recording motion pictures • When [Burst...
...;The [Sensitivity] is automatically set in [High Sens.] Scene Mode. ●When [3D Photo Mode] is set to lighting) manually. Using the [Rec] menu [Quality] • For [Rec] menu setting procedures (→51) Set quality of picture. ■ Recording mode: ■ Settings: ([Fine]) High quality, priority to picture quality ([Standard]) Standard quality, priority to the number of pictures ●The setting is fixed to , in the following cases: • When recording motion pictures • When [Burst...

DMCZS19 User Guide
Page 127
... Panasonic digital cameras (LUMIX) may take several minutes. Identically-named files will be created when copying from card to card ( ). Do not turn off power or perform other operations during copying. ●If identical names (folder/file numbers) are not copied. Using the [Playback] menu [Copy] • For [Playback] menu display and operation methods (→51). Use cursor button to select the copy method (direction) and press [MENU/SET] : Copy all pictures from built-in memory to card (go to step ). : Copy 1 picture at a time...
... Panasonic digital cameras (LUMIX) may take several minutes. Identically-named files will be created when copying from card to card ( ). Do not turn off power or perform other operations during copying. ●If identical names (folder/file numbers) are not copied. Using the [Playback] menu [Copy] • For [Playback] menu display and operation methods (→51). Use cursor button to select the copy method (direction) and press [MENU/SET] : Copy all pictures from built-in memory to card (go to step ). : Copy 1 picture at a time...

DMCZS19 User Guide
Page 152
... the camera by connecting the camera to a computer using the supplied USB connection cable. • Select the connected camera in step (→151). • For details on making the connection with the instructions displayed on the computer screen. ●Since the map data size is large, be sure to check the free space on the memory card by deleting map data that is deleted or moved to another location using the file operation of recordable pictures and recording time...
... the camera by connecting the camera to a computer using the supplied USB connection cable. • Select the connected camera in step (→151). • For details on making the connection with the instructions displayed on the computer screen. ●Since the map data size is large, be sure to check the free space on the memory card by deleting map data that is deleted or moved to another location using the file operation of recordable pictures and recording time...

DMCZS19 User Guide
Page 165
..., Windows Vista, Windows 7, or Mac OS X The camera can be connected to your PC Copying still pictures and motion pictures recorded in [MP4] and [High Speed Video] Scene Mode (except AVCHD motion pictures) Preparation: • Charge the battery sufficiently. • When importing pictures from the built-in the wrong direction, the socket could become deformed and cause faulty operation) [Access] (sending data) • Do not disconnect the USB connection cable while [Access] is inserted in memory, remove any memory cards. • Turn...
..., Windows Vista, Windows 7, or Mac OS X The camera can be connected to your PC Copying still pictures and motion pictures recorded in [MP4] and [High Speed Video] Scene Mode (except AVCHD motion pictures) Preparation: • Charge the battery sufficiently. • When importing pictures from the built-in the wrong direction, the socket could become deformed and cause faulty operation) [Access] (sending data) • Do not disconnect the USB connection cable while [Access] is inserted in memory, remove any memory cards. • Turn...

DMCZS19 User Guide
Page 175
...) DMC-ZS20 Destination settings∗1 (→92) Travel elapsed days∗1 (→92) Title∗1 (→118) 11 Recording Mode (→25) Flash (→66) White Balance (→97) Exposure Compensation (→71) ISO Sensitivity (→96) Aperture value/Shutter speed (→27, 73) Elapsed playback time∗2 (→45) 12 [Auto Retouch] (→115) [Creative Retouch] (→116) 13 LCD Mode (→55) LCD power save...
...) DMC-ZS20 Destination settings∗1 (→92) Travel elapsed days∗1 (→92) Title∗1 (→118) 11 Recording Mode (→25) Flash (→66) White Balance (→97) Exposure Compensation (→71) ISO Sensitivity (→96) Aperture value/Shutter speed (→27, 73) Elapsed playback time∗2 (→45) 12 [Auto Retouch] (→115) [Creative Retouch] (→116) 13 LCD Mode (→55) LCD power save...
DMCZS19 User Guide
Page 176
... memory via computer, etc. → Reformat directly using camera. Data will be set on this camera. This card cannot be used with this camera. → Save needed data on a computer or other device, and then use [Format] on the camera. (→60) [No additional selections can be made for non-DCF pictures (→42). [Please turn camera off and then on again] [System Error] ● The lens is not working correctly. → Turn on power...
... memory via computer, etc. → Reformat directly using camera. Data will be set on this camera. This card cannot be used with this camera. → Save needed data on a computer or other device, and then use [Format] on the camera. (→60) [No additional selections can be made for non-DCF pictures (→42). [Please turn camera off and then on again] [System Error] ● The lens is not working correctly. → Turn on power...


