
Operating Instructions
Page 1
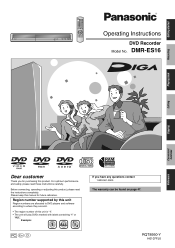
... Please keep this unit is "1". • The unit will play DVDs marked with labels containing "1" or "ALL". Before connecting, operating or adjusting this product. Region number supported by this unit Region numbers are allocated to DVD players and software according to where they are sold. • The region number of this manual for purchasing this product, please read these instructions carefully. DMR-ES16 Recording Playing back Editing Copying Convenient functions Reference Dear customer...
... Please keep this unit is "1". • The unit will play DVDs marked with labels containing "1" or "ALL". Before connecting, operating or adjusting this product. Region number supported by this unit Region numbers are allocated to DVD players and software according to where they are sold. • The region number of this manual for purchasing this product, please read these instructions carefully. DMR-ES16 Recording Playing back Editing Copying Convenient functions Reference Dear customer...
Operating Instructions
Page 3
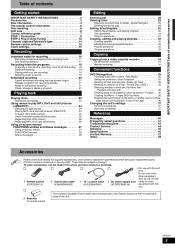
... the English display on single side) discs to be recordable -Close First Layer 36 Changing the unit's settings 37 Common procedures 37 Summary of settings 37 Reference Messages 40 Frequently asked questions 41 Troubleshooting guide 42 Product Service 44 Glossary 45 Specifications 46 Limited Warranty 47 Index 48 Accessories Please check and identify the supplied accessories. Use numbers indicated in Auto Tuning 12 Channel captions/Television type 14 Remote control settings 15 Clock settings 15 Recording...
... the English display on single side) discs to be recordable -Close First Layer 36 Changing the unit's settings 37 Common procedures 37 Summary of settings 37 Reference Messages 40 Frequently asked questions 41 Troubleshooting guide 42 Product Service 44 Glossary 45 Specifications 46 Limited Warranty 47 Index 48 Accessories Please check and identify the supplied accessories. Use numbers indicated in Auto Tuning 12 Channel captions/Television type 14 Remote control settings 15 Clock settings 15 Recording...
Operating Instructions
Page 5
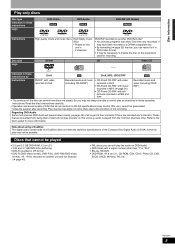
... been recorded to a CPRM compatible disc. • By formatting (Ô page 35) the disc, you can still play the audio on some discs due to control play properly on the equipment used for more information. Read the disc's instructions carefully. • Operation and sound quality of their contents if this is the manufacturer's intention. Tracks that are played. Refer to finalize the disc on this unit in VR format •...
... been recorded to a CPRM compatible disc. • By formatting (Ô page 35) the disc, you can still play the audio on some discs due to control play properly on the equipment used for more information. Read the disc's instructions carefully. • Operation and sound quality of their contents if this is the manufacturer's intention. Tracks that are played. Refer to finalize the disc on this unit in VR format •...
Operating Instructions
Page 7
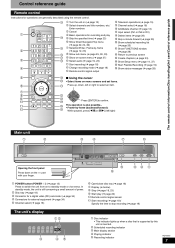
..., 33) br 9 Show on-screen menu (Ô page 27) 3 bs bk Select audio (Ô page 19, 23) bl Start recording (Ô page 18) 4 bm Change recording mode (Ô page 18) bn Remote control signal output bo Television operations (Ô page 15) bp Channel select (Ô page 18) bq Add/delete channel (Ô page 13) br Input select (IN1 or IN2 or DV) bs Delete items (Ô page 29...
..., 33) br 9 Show on-screen menu (Ô page 27) 3 bs bk Select audio (Ô page 19, 23) bl Start recording (Ô page 18) 4 bm Change recording mode (Ô page 18) bn Remote control signal output bo Television operations (Ô page 15) bp Channel select (Ô page 18) bq Add/delete channel (Ô page 13) br Input select (IN1 or IN2 or DV) bs Delete items (Ô page 29...
Operating Instructions
Page 12
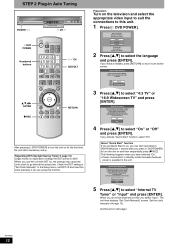
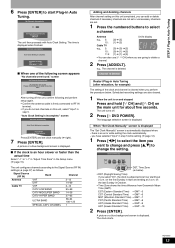
... unit starts necessary setup. If you have selected "On". • Power consumption in 2007. Set the clock manually (Ô page 13). (Continued on ? Preparation Turn on the television and select the appropriate video input to suit the connections to this function. Quick Start setting The unit can start the Auto Channel Clock Settings process. About "Quick Start" function If you set DST off . (See Operation Instructions for details) Turn Quick Start on next page) RQT8950 12 STEP 2 Plug-in Auto Tuning POWER 8 ^ DVD POWER Numbered buttons...
... unit starts necessary setup. If you have selected "On". • Power consumption in 2007. Set the clock manually (Ô page 13). (Continued on ? Preparation Turn on the television and select the appropriate video input to suit the connections to this function. Quick Start setting The unit can start the Auto Channel Clock Settings process. About "Quick Start" function If you set DST off . (See Operation Instructions for details) Turn Quick Start on next page) RQT8950 12 STEP 2 Plug-in Auto Tuning POWER 8 ^ DVD POWER Numbered buttons...
Operating Instructions
Page 13
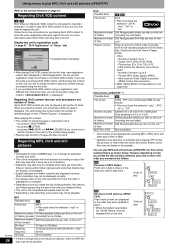
... select "On", the clock is firmly connected to select a channel. Channel 15 Deleted Restart Plug-in October. • Time Zone shows the time difference from Greenwich Mean Time (GMT). When "Set Clock Manually" screen is displayed The "Set Clock Manually" screen is incomplete." "Auto Clock Setting is automatically displayed when: - Scheduled recording settings are set channels on this unit, select "Input" in the Setup menu (Ô page 15). Antenna Unit's display e.g., 5: [0] Ô [5] 15: [1] Ô [5] Cable TV e.g., 5: [0] Ô [0] Ô...
... select "On", the clock is firmly connected to select a channel. Channel 15 Deleted Restart Plug-in October. • Time Zone shows the time difference from Greenwich Mean Time (GMT). When "Set Clock Manually" screen is displayed The "Set Clock Manually" screen is incomplete." "Auto Clock Setting is automatically displayed when: - Scheduled recording settings are set channels on this unit, select "Input" in the Setup menu (Ô page 15). Antenna Unit's display e.g., 5: [0] Ô [5] 15: [1] Ô [5] Cable TV e.g., 5: [0] Ô [0] Ô...
Operating Instructions
Page 15
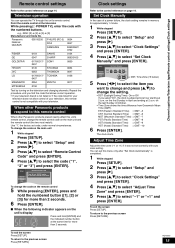
... the screen Press [SETUP]. RQT8950 15 Channel captions/Television type/Remote control settings/Clock settings EST (Eastern Standard Time) = GMT -5 CST (Central Standard Time) = GMT -6 MST (Mountain Standard Time) = GMT -7 PST (Pacific Standard Time) = GMT -8 AST (Alaska Standard Time) = GMT -9 HST (Hawaii Standard Time) = GMT -10 6 Press [ENTER]. When other Panasonic products placed nearby affect this unit's remote control, change the remote control code on the remote. Adjust Time Zone Adjust the time zone (-1 or +1) if it was not set code...
... the screen Press [SETUP]. RQT8950 15 Channel captions/Television type/Remote control settings/Clock settings EST (Eastern Standard Time) = GMT -5 CST (Central Standard Time) = GMT -6 MST (Mountain Standard Time) = GMT -7 PST (Pacific Standard Time) = GMT -8 AST (Alaska Standard Time) = GMT -9 HST (Hawaii Standard Time) = GMT -10 6 Press [ENTER]. When other Panasonic products placed nearby affect this unit's remote control, change the remote control code on the remote. Adjust Time Zone Adjust the time zone (-1 or +1) if it was not set code...
Operating Instructions
Page 19
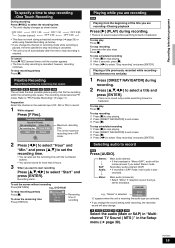
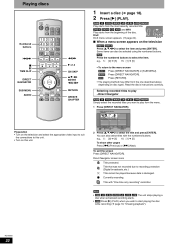
... recording 1 Press [g] to stop playing. 2 Press [DIRECT NAVIGATOR] to stop play 1 Press [DIRECT NAVIGATOR] during scheduled recordings (Ô page 20) or while using Flexible Recording (Ô below . DVD-RAM e.g., "Stereo" is selected CH 12 (( Stereo "((" appears when the unit is also recorded. however, recording continues. Playing a title previously recorded while recording- Secondary audio program (SAP) • If recorded in SAP mode, main audio is receiving the audio type you selected. • If you change the sound setting while recording, the recorded sound...
... recording 1 Press [g] to stop playing. 2 Press [DIRECT NAVIGATOR] to stop play 1 Press [DIRECT NAVIGATOR] during scheduled recordings (Ô page 20) or while using Flexible Recording (Ô below . DVD-RAM e.g., "Stereo" is selected CH 12 (( Stereo "((" appears when the unit is also recorded. however, recording continues. Playing a title previously recorded while recording- Secondary audio program (SAP) • If recorded in SAP mode, main audio is receiving the audio type you selected. • If you change the sound setting while recording, the recorded sound...
Operating Instructions
Page 22
... items can also select titles with "One time only recording" restriction Note • RAM -R -R DL -RW(V) +R +R DL +RW The unit stops playing a disc when scheduled recording starts. • RAM Press [q] (PLAY) when you want to play from the one described above depending on this unit. • Turn on disc types. To exit the screen Press [DIRECT NAVIGATOR]. DivX DivX menu screen appears (Ô page 24). e.g., 5: [0] Ô [5] 15: [1] Ô...
... items can also select titles with "One time only recording" restriction Note • RAM -R -R DL -RW(V) +R +R DL +RW The unit stops playing a disc when scheduled recording starts. • RAM Press [q] (PLAY) when you want to play from the one described above depending on this unit. • Turn on disc types. To exit the screen Press [DIRECT NAVIGATOR]. DivX DivX menu screen appears (Ô page 24). e.g., 5: [0] Ô [5] 15: [1] Ô...

Operating Instructions
Page 24
... is displayed when you turn the unit off or remove the disc. Note (DivX) • Picture sizes set to DivX. Using menus to play MP3, DivX and still pictures (JPEG/TIFF) ^ DVD POWER Numbered buttons u,i g DIRECT NAVIGATOR SUB MENU t,y e,r,w,q ENTER FUNCTIONS RETURN STATUS Selecting file type to play CD You can also select the file (track, title or picture) with the numbered buttons. ENTER • When playing the file displayed on the selected file (track...
... is displayed when you turn the unit off or remove the disc. Note (DivX) • Picture sizes set to DivX. Using menus to play MP3, DivX and still pictures (JPEG/TIFF) ^ DVD POWER Numbered buttons u,i g DIRECT NAVIGATOR SUB MENU t,y e,r,w,q ENTER FUNCTIONS RETURN STATUS Selecting file type to play CD You can also select the file (track, title or picture) with the numbered buttons. ENTER • When playing the file displayed on the selected file (track...
Operating Instructions
Page 26
... making folders as shown below. You can only be played a set number of plays is 4000. 2 Operation may take time to play them. If you will not be playable. you press [g] (STOP). - Number of MP3 folders Prefix with packet-write format. • Depending on this registration code to the DivX Home Theater Profile. Multi channel: Dolby Digital is not supported. CD Structure of stream: Up to register the unit...
... making folders as shown below. You can only be played a set number of plays is 4000. 2 Operation may take time to play them. If you will not be playable. you press [g] (STOP). - Number of MP3 folders Prefix with packet-write format. • Depending on this registration code to the DivX Home Theater Profile. Multi channel: Dolby Digital is not supported. CD Structure of stream: Up to register the unit...
Operating Instructions
Page 28
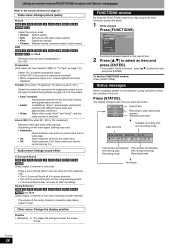
...-V DVD-A -RW(VR) (Dolby Digital, 2-channel or over only, including a center channel) The volume of the center channel is raised to make dialog easier to show the condition of disc. 2 Press [e,r] to select an item and press [ENTER]. Surround Sound does not work for progressive output to suit the type of disc Recording or play status/input channel Selected audio type Date and time Available recording time and recording mode 12/24 6:34 PM g Remain...
...-V DVD-A -RW(VR) (Dolby Digital, 2-channel or over only, including a center channel) The volume of the center channel is raised to make dialog easier to show the condition of disc. 2 Press [e,r] to select an item and press [ENTER]. Surround Sound does not work for progressive output to suit the type of disc Recording or play status/input channel Selected audio type Date and time Available recording time and recording mode 12/24 6:34 PM g Remain...
Operating Instructions
Page 34
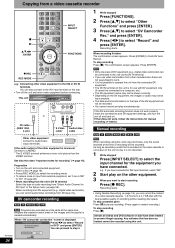
... INPUT SELECT FUNCTIONS * REC REC MODE e.g.: Connecting other video equipment before connecting. When recording finishes The confirmation screen appears. The confirmation screen appears. Manual recording RAM -R -R DL -RW(V) +R +R DL +RW Note When recording using this unit's input terminals, only the sound received at each break in the Setup menu (Ô page 39). When recording from DV equipment (e.g., digital video camcorder), you can also connect to select "Record DV connection detected. and press [ENTER]. 4 Press [w,q] to finish DV Auto Record. Recording starts...
... INPUT SELECT FUNCTIONS * REC REC MODE e.g.: Connecting other video equipment before connecting. When recording finishes The confirmation screen appears. The confirmation screen appears. Manual recording RAM -R -R DL -RW(V) +R +R DL +RW Note When recording using this unit's input terminals, only the sound received at each break in the Setup menu (Ô page 39). When recording from DV equipment (e.g., digital video camcorder), you can also connect to select "Record DV connection detected. and press [ENTER]. 4 Press [w,q] to finish DV Auto Record. Recording starts...
Operating Instructions
Page 37
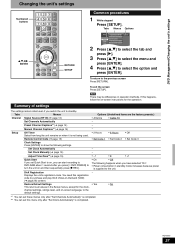
... e,r,w,q ENTER RETURN SETUP Setup Signal Source (RF IN) Cable TV Set Channels Automatically Channel Setup Disc Channel Captions Preset Channel Captions Manual Channel Captions Video 2 A di Press [e,r] to select the tab and press [q]. 3 Press [e,r] to select the menu and press [ENTER]. 4 Press [e,r] to the previous screen Press [RETURN]. Remote Control Code (Ô page 15) Clock Settings Press [ENTER] to show the following happens when you set Quick Start to on -screen language, to the default settings. RQT8950 37...
... e,r,w,q ENTER RETURN SETUP Setup Signal Source (RF IN) Cable TV Set Channels Automatically Channel Setup Disc Channel Captions Preset Channel Captions Manual Channel Captions Video 2 A di Press [e,r] to select the tab and press [q]. 3 Press [e,r] to select the menu and press [ENTER]. 4 Press [e,r] to the previous screen Press [RETURN]. Remote Control Code (Ô page 15) Clock Settings Press [ENTER] to show the following happens when you set Quick Start to on -screen language, to the default settings. RQT8950 37...
Operating Instructions
Page 38
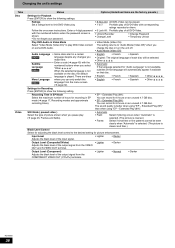
... factory presets.) Settings for Playback Press [ENTER] to the desired setting for picture enhancement. Recording Time in EP Mode Select the maximum number of picture shown when you pause play . Extended Play (8H)". Still Mode ( paused video ) Select the type of hours for recording in a certain language despite any changes you make here. • Enter a code (Ô page 45) with the numbered buttons when you select "Other ". Follow the on-screen instructions...
... factory presets.) Settings for Playback Press [ENTER] to the desired setting for picture enhancement. Recording Time in EP Mode Select the maximum number of picture shown when you pause play . Extended Play (8H)". Still Mode ( paused video ) Select the type of hours for recording in a certain language despite any changes you make here. • Enter a code (Ô page 45) with the numbered buttons when you select "Other ". Follow the on-screen instructions...
Operating Instructions
Page 39
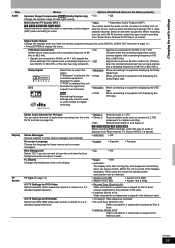
... is played in advance from a video cassette recorder. Status Messages Choose whether to equipment not displaying the DTS logo. Digital Audio Output Change the settings when you have connected equipment through this mode the standby power consumption can be reduced. • Aspect 4:3 & 480i • Aspect 16:9 & 480i • Aspect 4:3 & 480p • Aspect 16:9 & 480p • Pan and Scan (Stretch to fit): Video recorded for a widescreen is played as...
... is played in advance from a video cassette recorder. Status Messages Choose whether to equipment not displaying the DTS logo. Digital Audio Output Change the settings when you have connected equipment through this mode the standby power consumption can be reduced. • Aspect 4:3 & 480i • Aspect 16:9 & 480i • Aspect 4:3 & 480p • Aspect 16:9 & 480p • Pan and Scan (Stretch to fit): Video recorded for a widescreen is played as...
Operating Instructions
Page 42
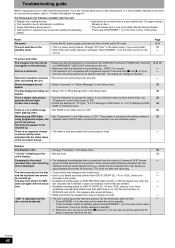
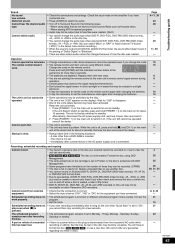
... you use interlace output. TV screen and video The images from the number of the unit's safety devices is off, press and hold [POWER 8] on the main unit at 29.97 frames - after -image when playing video. • Set "DNR" in disc space. Remove the disc. Troubleshooting guide Before requesting service, make the following to eject the disc. - appear. "U88" is displayed and the • The unit is a power saving feature. The play time...
... you use interlace output. TV screen and video The images from the number of the unit's safety devices is off, press and hold [POWER 8] on the main unit at 29.97 frames - after -image when playing video. • Set "DNR" in disc space. Remove the disc. Troubleshooting guide Before requesting service, make the following to eject the disc. - appear. "U88" is displayed and the • The unit is a power saving feature. The play time...
Operating Instructions
Page 43
... change the audio type when playing DVD-R, DVD-R DL, DVD-RW (DVD-Video format), +R, +R DL or +RW. (You can record onto. • RAM -RW(V) +R +R DL +RW The disc is incorrect or different scheduled program times overlap. program. • Set the clock. Troubleshooting guide Sound No sound Low volume. When playing MTS broadcast programs. • Audio may not be changed because of the unit's safety devices may be operated, consult the dealer. Operation Cannot operate the television. • Change manufacturer code. Delete...
... change the audio type when playing DVD-R, DVD-R DL, DVD-RW (DVD-Video format), +R, +R DL or +RW. (You can record onto. • RAM -RW(V) +R +R DL +RW The disc is incorrect or different scheduled program times overlap. program. • Set the clock. Troubleshooting guide Sound No sound Low volume. When playing MTS broadcast programs. • Audio may not be changed because of the unit's safety devices may be operated, consult the dealer. Operation Cannot operate the television. • Change manufacturer code. Delete...
Operating Instructions
Page 44
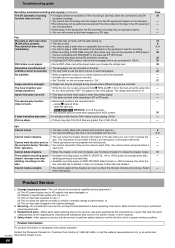
... is in these operating instructions. Product Service 1. or (d) The unit does not operate normally or exhibits a marked change the ratings level. • The languages are not recorded on the disc. • You may not be possible on DVD players that is too short to each other. Replacement parts-When parts need replacing ensure the servicer uses parts specified by qualified service personnel if: (a) The AC power supply cord or AC adaptor has...
... is in these operating instructions. Product Service 1. or (d) The unit does not operate normally or exhibits a marked change the ratings level. • The languages are not recorded on the disc. • You may not be possible on DVD players that is too short to each other. Replacement parts-When parts need replacing ensure the servicer uses parts specified by qualified service personnel if: (a) The AC power supply cord or AC adaptor has...
Operating Instructions
Page 45
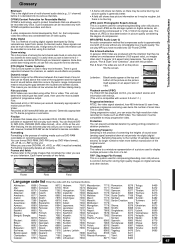
... setting writing protection or deletion protection. Dolby Digital This is the process of converting the heights of coding digital signals developed by DivX, Inc. Down-mixing This is good separation between the channels, so realistic sound effects are produced with the numbered buttons. There is the process of scan lines. Formatting Formatting is the difference between the loudest and softest sounds. Playback control (PBC) If a Video...
... setting writing protection or deletion protection. Dolby Digital This is the process of converting the heights of coding digital signals developed by DivX, Inc. Down-mixing This is good separation between the channels, so realistic sound effects are produced with the numbered buttons. There is the process of scan lines. Formatting Formatting is the difference between the loudest and softest sounds. Playback control (PBC) If a Video...


