
Operating Instructions
Page 1
ER-GB80/ER-GB70/ER-GB60 English 3 19 35 51 The illustrations in these operating instructions are of the ER-GB80 model. Panasonic Operating Instructions (Household) AC/Rechargeable Beard/Hair Trimmer Model No.
ER-GB80/ER-GB70/ER-GB60 English 3 19 35 51 The illustrations in these operating instructions are of the ER-GB80 model. Panasonic Operating Instructions (Household) AC/Rechargeable Beard/Hair Trimmer Model No.
Operating Instructions
Page 2
... life 16 Using the comb attachment 9 Removing the built-in rechargeable Trimming beard 10 battery 16 Trimming hair 12 Specifications . .17 Trimming body hair 13 Thank you for purchasing this Panasonic product. English Panasonic Operating Instructions (Household) AC/Rechargeable Beard/Hair Trimmer Model No. ER-GB80/ER-GB70/ER-GB60 I Contents S afety precautions 4 Cleaning the trimmer. .13 Intended use . 3
... life 16 Using the comb attachment 9 Removing the built-in rechargeable Trimming beard 10 battery 16 Trimming hair 12 Specifications . .17 Trimming body hair 13 Thank you for purchasing this Panasonic product. English Panasonic Operating Instructions (Household) AC/Rechargeable Beard/Hair Trimmer Model No. ER-GB80/ER-GB70/ER-GB60 I Contents S afety precautions 4 Cleaning the trimmer. .13 Intended use . 3
Operating Instructions
Page 3
... to property, always observe the following symbols are used to classify and describe the type of instructions to be observed. Ө This symbol is used to alert users to a specific operating procedure that could result in a w ay exceeding the rating of the Ө household... outlet may cause electric shock or injury. Exceeding the rating by connecting too many plugs to a specific operating procedure that must be performed. Contact an authorized service centre for repair (battery change, etc.). Ө Never disassemble except when disposing of sym bols The following safety ...
... to property, always observe the following symbols are used to classify and describe the type of instructions to be observed. Ө This symbol is used to alert users to a specific operating procedure that could result in a w ay exceeding the rating of the Ө household... outlet may cause electric shock or injury. Exceeding the rating by connecting too many plugs to a specific operating procedure that must be performed. Contact an authorized service centre for repair (battery change, etc.). Ө Never disassemble except when disposing of sym bols The following safety ...

Operating Instructions
Page 4
... m ediately stop using and rem ove the adaptor if there is attached. Immediately request inspection or repair at an authorized service centre. О Always unplug the adaptor from accumulating. - Doing so may result in physical problems. 5 Also, do so may cause electric shock or fire due to do not charge any other than...
... m ediately stop using and rem ove the adaptor if there is attached. Immediately request inspection or repair at an authorized service centre. О Always unplug the adaptor from accumulating. - Doing so may result in physical problems. 5 Also, do so may cause electric shock or fire due to do not charge any other than...

Operating Instructions
Page 5
... not throw into fire or apply heat. Failure to do so may cause an accident or injury. © The supply cord cannot be replaced. Doing so may cause skin injury. Disconnect the adaptor or the appliance plug by О holding onto the adaptor or the appliance plug instead...swellings, injuries or blemishes). - Doing so may cause fire due to short circuit. О Check that they have been given supervision or instruction concerning use of the rechargeable battery ADANGER The rechargeable battery is exclusively for use with the appliance. - Do not directly apply the blades on...
... not throw into fire or apply heat. Failure to do so may cause an accident or injury. © The supply cord cannot be replaced. Doing so may cause skin injury. Disconnect the adaptor or the appliance plug by О holding onto the adaptor or the appliance plug instead...swellings, injuries or blemishes). - Doing so may cause fire due to short circuit. О Check that they have been given supervision or instruction concerning use of the rechargeable battery ADANGER The rechargeable battery is exclusively for use with the appliance. - Do not directly apply the blades on...

Operating Instructions
Page 6
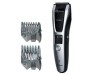
...comes in a place with your eyes. Intended use • Before and after use , apply oil at the places marked with the skin or clothes. Parts identification о Ө Ө Ө © \ © E R -G B 8 0 /E R -G B 7 0 Ө... The trimmer may cause hair to 20 mm) © Comb attachment for body hair ER-GB80 ө AC adaptor (RE9-49) © Adaptor © Power plug ©...Appliance plug Accessories © Cleaning brush H Oil О Pouch 7 Wash it has been installed correctly. This is normal. • Clean the housing only with a soft cloth slightly dampened...
...comes in a place with your eyes. Intended use • Before and after use , apply oil at the places marked with the skin or clothes. Parts identification о Ө Ө Ө © \ © E R -G B 8 0 /E R -G B 7 0 Ө... The trimmer may cause hair to 20 mm) © Comb attachment for body hair ER-GB80 ө AC adaptor (RE9-49) © Adaptor © Power plug ©...Appliance plug Accessories © Cleaning brush H Oil О Pouch 7 Wash it has been installed correctly. This is normal. • Clean the housing only with a soft cloth slightly dampened...

Operating Instructions
Page 7
... attachment and adjust the trimming height as for a few minutes, or the operating time may not glow for charging, and turn on the power, you set. 2 Press the power switch to the appliance socket. 2 Plug in the adaptor into a household outlet. • Check that the trimmer is turned off . • We...
... attachment and adjust the trimming height as for a few minutes, or the operating time may not glow for charging, and turn on the power, you set. 2 Press the power switch to the appliance socket. 2 Plug in the adaptor into a household outlet. • Check that the trimmer is turned off . • We...

Operating Instructions
Page 8
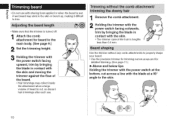
Trimming height (estimate) Comb attachment 1 mm to 10 mm Comb attachment for beard [ 0 ] 11 mm to 20 mm Comb attachment for hair [QJ] • Setting of 10.5 mm is turned off. 1 Mount the comb attachment to the main body until it clicks. This comb attachment trims to the desired height. &#...
Trimming height (estimate) Comb attachment 1 mm to 10 mm Comb attachment for beard [ 0 ] 11 mm to 20 mm Comb attachment for hair [QJ] • Setting of 10.5 mm is turned off. 1 Mount the comb attachment to the main body until it clicks. This comb attachment trims to the desired height. &#...
Operating Instructions
Page 9
... discard hair trimmings after each use. A wet beard may stick to the skin or bunch up, making it difficult to the main body. (See page 9.) 2 Set the trimming height. 3 Holding the trimmer with the power switch facing upward, trim by bringing the blade in contact with the skin and moving the...
... discard hair trimmings after each use. A wet beard may stick to the skin or bunch up, making it difficult to the main body. (See page 9.) 2 Set the trimming height. 3 Holding the trimmer with the power switch facing upward, trim by bringing the blade in contact with the skin and moving the...
Operating Instructions
Page 10
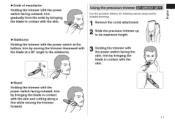
Using the precision trim m er ER-GB80/ER-GB70 Use the precision trimmer for trimming narrow areas and for detailed trimming. 1 Remove the comb attachment. 2 Slide the precision trimmer up to the sideburns. English &#...
Using the precision trim m er ER-GB80/ER-GB70 Use the precision trimmer for trimming narrow areas and for detailed trimming. 1 Remove the comb attachment. 2 Slide the precision trimmer up to the sideburns. English &#...

Operating Instructions
Page 11
... little by little from the hairline. Trimming to an even length 1 Attach the comb attachment for hair to the main body. (See page 9.) 2 Set the trimming height. 2 Set the trimming height. 3 Holding the trimmer with the power switch upward, trim around the ears and neckline 3 Holding the trimmer with the power switch...
... little by little from the hairline. Trimming to an even length 1 Attach the comb attachment for hair to the main body. (See page 9.) 2 Set the trimming height. 2 Set the trimming height. 3 Holding the trimmer with the power switch upward, trim around the ears and neckline 3 Holding the trimmer with the power switch...

Operating Instructions
Page 12
... to remove the water. ▼ 13 Wet body hair may not be achieved if hair is too long. Cleaning the trimmer ■It is wet. I ER-GB80 • The trimming height is approximately 1.5 mm. • Do not use when body hair is recommended to clean after every use. 1. Run water down...
... to remove the water. ▼ 13 Wet body hair may not be achieved if hair is too long. Cleaning the trimmer ■It is wet. I ER-GB80 • The trimming height is approximately 1.5 mm. • Do not use when body hair is recommended to clean after every use. 1. Run water down...

Operating Instructions
Page 14
... the battery for repair. English Troubleshooting Problem The trimmer has become blunt. When the trimmer is poured from the water inlet. If the problems still cannot be leaking due to degradation at the end of battery life.) Contact an authorized service centre for approximately 8 hours continuously to 35 °C. ^ Have the battery replaced by Panasonic for only...
... the battery for repair. English Troubleshooting Problem The trimmer has become blunt. When the trimmer is poured from the water inlet. If the problems still cannot be leaking due to degradation at the end of battery life.) Contact an authorized service centre for approximately 8 hours continuously to 35 °C. ^ Have the battery replaced by Panasonic for only...

Operating Instructions
Page 15
...contains a Nickel-Metal Hydride battery. Battery life Battery life will be used to repair it. Replace the blades if cutting efficiency reduces substantially despite proper maintenance. Removing the built-in ...the trimmer. If the operating time is approximately 3 years when using the trimmer for ER-GB80/ER-GB70 only For environmental protection and recycling of at an officially designated location if there is...power and then keep the power on until the battery is charged once a month, the service life will vary according to the frequency and length of the trimmer. For example, the ...
...contains a Nickel-Metal Hydride battery. Battery life Battery life will be used to repair it. Replace the blades if cutting efficiency reduces substantially despite proper maintenance. Removing the built-in ...the trimmer. If the operating time is approximately 3 years when using the trimmer for ER-GB80/ER-GB70 only For environmental protection and recycling of at an officially designated location if there is...power and then keep the power on until the battery is charged once a month, the service life will vary according to the frequency and length of the trimmer. For example, the ...

Operating Instructions
Page 16
English Specifications Power source See the name plate on the AC adaptor. (Automatic voltage conversion) Motor voltage 1.2 V - Charging time Approx. 1 hour This product is intended for household use only. 17
English Specifications Power source See the name plate on the AC adaptor. (Automatic voltage conversion) Motor voltage 1.2 V - Charging time Approx. 1 hour This product is intended for household use only. 17


