
ET-D75LE90 Spec File
Page 1
...approximate. Specifications F value: Focal length (f): Lens shift: Dimensions (W × H × D): Weight: Applicable projector: NOTE: The lens cannot be mounted onto the specified Panasonic DLP™ projector. 2.5 7.5 mm Capable (Adjustment range is limited. Lens shift is possible with Panasonic's applicable projectors. ...DLP is a trademark of February 2017 SFD14A15-5 1/11 right: 6% PT-DZ16K/DZ16K2 up: 13% down: 0% left: 12%; As of Texas Instruments. Specifications subject to scale. Fixed-Focus Lens ET-D75LE90 This fixed-focus lens is designed for use with models...
...approximate. Specifications F value: Focal length (f): Lens shift: Dimensions (W × H × D): Weight: Applicable projector: NOTE: The lens cannot be mounted onto the specified Panasonic DLP™ projector. 2.5 7.5 mm Capable (Adjustment range is limited. Lens shift is possible with Panasonic's applicable projectors. ...DLP is a trademark of February 2017 SFD14A15-5 1/11 right: 6% PT-DZ16K/DZ16K2 up: 13% down: 0% left: 12%; As of Texas Instruments. Specifications subject to scale. Fixed-Focus Lens ET-D75LE90 This fixed-focus lens is designed for use with models...
ET-D75LE90 Spec File
Page 2
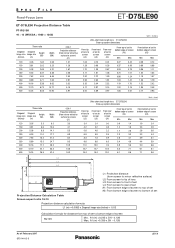
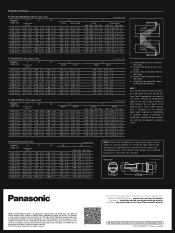
...SH - 0.128 As of screen RQ13K Min. A1 (m) =0.245 x SH - 0.128 Max. Fixed-Focus Lens ET-D75LE90 ET-D75LE90 Projection Distance Table PT-RQ13K 16 : 10 (WUXGA ; 1920 × 1200) Throw ratio Diagonal Diagonal image size image size (Inches) (m) Height (SH...24.7 28.3 35.3 42.4 0.36:1 Projection distance (From mirror reflective surface to screen) (L1) 3.3 4.1 5.5 6.8 8.2 9.5 10.9 13.6 16.3 Ultra-short focal length lens ET-D75LE90 Close-up system dimensions From tip of lens to screen (L2) From front of set to screen (L3) From rear of set to screen (L4) 3.4 2.4 0.0 4.2 3.2 0.8...
...SH - 0.128 As of screen RQ13K Min. A1 (m) =0.245 x SH - 0.128 Max. Fixed-Focus Lens ET-D75LE90 ET-D75LE90 Projection Distance Table PT-RQ13K 16 : 10 (WUXGA ; 1920 × 1200) Throw ratio Diagonal Diagonal image size image size (Inches) (m) Height (SH...24.7 28.3 35.3 42.4 0.36:1 Projection distance (From mirror reflective surface to screen) (L1) 3.3 4.1 5.5 6.8 8.2 9.5 10.9 13.6 16.3 Ultra-short focal length lens ET-D75LE90 Close-up system dimensions From tip of lens to screen (L2) From front of set to screen (L3) From rear of set to screen (L4) 3.4 2.4 0.0 4.2 3.2 0.8...
ET-D75LE90 Spec File
Page 3
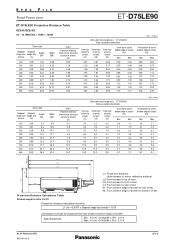
... x SH - 0.114 As of screen DZ21K/DZ21K2 Min. Fixed-Focus Lens ET-D75LE90 ET-D75LE90 Projection Distance Table DZ21K/DZ21K2 16 : 10 (WUXGA ; 1920 × 1200) Throw ratio Diagonal Diagonal image size image size (Inches) (m) Height (SH) 120... 21.2 24.7 28.3 35.3 42.4 0.36:1 Projection distance (From mirror reflective surface to screen) (L1) 3.1 3.9 5.1 6.4 7.6 8.9 10.2 12.7 15.2 Ultra-short focal length lens ET-D75LE90 Close-up system dimensions From tip of lens to screen (L2) From front of set to screen (L3) From rear of set to screen (L4) 3.2 2.2 -0.2 4.0 2.9 0.6 5.2 ...
... x SH - 0.114 As of screen DZ21K/DZ21K2 Min. Fixed-Focus Lens ET-D75LE90 ET-D75LE90 Projection Distance Table DZ21K/DZ21K2 16 : 10 (WUXGA ; 1920 × 1200) Throw ratio Diagonal Diagonal image size image size (Inches) (m) Height (SH) 120... 21.2 24.7 28.3 35.3 42.4 0.36:1 Projection distance (From mirror reflective surface to screen) (L1) 3.1 3.9 5.1 6.4 7.6 8.9 10.2 12.7 15.2 Ultra-short focal length lens ET-D75LE90 Close-up system dimensions From tip of lens to screen (L2) From front of set to screen (L3) From rear of set to screen (L4) 3.2 2.2 -0.2 4.0 2.9 0.6 5.2 ...
ET-D75LE90 Spec File
Page 4
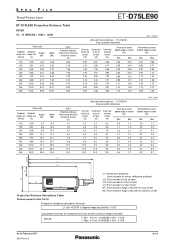
...A1 (m) =0.000283 x SH - 0.128 As of screen RZ12K Min. Fixed-Focus Lens ET-D75LE90 ET-D75LE90 Projection Distance Table RZ12K 16 : 10 (WUXGA ; 1920 × 1200) Throw ratio Diagonal Diagonal image size image size (Inches) (m) Height (SH) 120 3.05 1.... 24.7 28.3 35.3 42.4 0.36:1 Projection distance (From mirror reflective surface to screen) (L1) 3.1 3.9 5.1 6.4 7.6 8.9 10.2 12.7 15.2 Ultra-short focal length lens ET-D75LE90 Close-up system dimensions From tip of lens to screen (L2) From front of set to screen (L3) From rear of set to screen (L4) 3.2 2.2 -0.2 3.9 2.9 0.6...
...A1 (m) =0.000283 x SH - 0.128 As of screen RZ12K Min. Fixed-Focus Lens ET-D75LE90 ET-D75LE90 Projection Distance Table RZ12K 16 : 10 (WUXGA ; 1920 × 1200) Throw ratio Diagonal Diagonal image size image size (Inches) (m) Height (SH) 120 3.05 1.... 24.7 28.3 35.3 42.4 0.36:1 Projection distance (From mirror reflective surface to screen) (L1) 3.1 3.9 5.1 6.4 7.6 8.9 10.2 12.7 15.2 Ultra-short focal length lens ET-D75LE90 Close-up system dimensions From tip of lens to screen (L2) From front of set to screen (L3) From rear of set to screen (L4) 3.2 2.2 -0.2 3.9 2.9 0.6...

ET-D75LE90 Spec File
Page 7
...of screen DW17K/DW17K2 Min. Fixed-Focus Lens ET-D75LE90 ET-D75LE90 Projection Distance Table DW17K/DW17K2 16 : 9 (WXGA ; 1366 × 768) Throw ratio Diagonal Diagonal image size image size (Inches...Projection distance (from screen to mirror reflective surface) L2: From screen to tip of lens L3: From screen to front of set L4: From screen to rear of set A1: From bottom edge of screen to top of set A2: From bottom edge of screen to bottom of set Projection Distance Calculation Table Screen aspect ratio 16:9 Projection distance calculation formula L1 (m) =0.008783 x Diagonal image size...
...of screen DW17K/DW17K2 Min. Fixed-Focus Lens ET-D75LE90 ET-D75LE90 Projection Distance Table DW17K/DW17K2 16 : 9 (WXGA ; 1366 × 768) Throw ratio Diagonal Diagonal image size image size (Inches...Projection distance (from screen to mirror reflective surface) L2: From screen to tip of lens L3: From screen to front of set L4: From screen to rear of set A1: From bottom edge of screen to top of set A2: From bottom edge of screen to bottom of set Projection Distance Calculation Table Screen aspect ratio 16:9 Projection distance calculation formula L1 (m) =0.008783 x Diagonal image size...
Catalog
Page 2
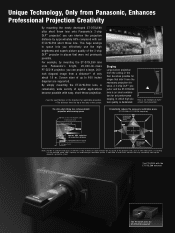
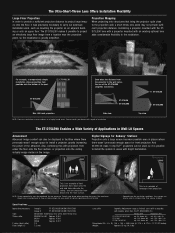
... the ET-D75LE90 mounted The PT-DZ13K with easy, short-throw projection. * See the specifications in this brochure for applicable projectors. ** The distance from the tip of the lens to 600 inches diagonal are supported. Screen sizes of multiscreen front projection. If installing it in space lets you can shorten the projection distance by approximately 60% compared with our ET-D75LE50 short throw lens. By simply mounting the ET-D75LE90 lens, a remarkably...
... the ET-D75LE90 mounted The PT-DZ13K with easy, short-throw projection. * See the specifications in this brochure for applicable projectors. ** The distance from the tip of the lens to 600 inches diagonal are supported. Screen sizes of multiscreen front projection. If installing it in space lets you can shorten the projection distance by approximately 60% compared with our ET-D75LE50 short throw lens. By simply mounting the ET-D75LE90 lens, a remarkably...
Catalog
Page 3
... ET-D75LE90 makes it possible to the wall varies, the use outdoors or in the image. Please consult your dealer with projection from under the floor onto the floor surface, or projection onto the ceiling virtually wraps visitors in highly humid areas. Ask your dealer when selecting the screen. down: 0% up : 18%; And 20,000-lm-class 3-chip DLP™ projectors can...
... ET-D75LE90 makes it possible to the wall varies, the use outdoors or in the image. Please consult your dealer with projection from under the floor onto the floor surface, or projection onto the ceiling virtually wraps visitors in highly humid areas. Ask your dealer when selecting the screen. down: 0% up : 18%; And 20,000-lm-class 3-chip DLP™ projectors can...
Catalog
Page 4
... detailed information, please consult the dealer from the projector's rear panel to export control regulations. Projection images simulated. © 2013 Panasonic Corporation. ET-D75LE90G1 Printed in an enclosed space, add a separate air conditioning or ventilation system. Specifications and appearance are trademarks or registered trademarks of their respective trademark owners. www.youtube.com/user/PanasonicProjector All information included here is insufficient, exhaust...
... detailed information, please consult the dealer from the projector's rear panel to export control regulations. Projection images simulated. © 2013 Panasonic Corporation. ET-D75LE90G1 Printed in an enclosed space, add a separate air conditioning or ventilation system. Specifications and appearance are trademarks or registered trademarks of their respective trademark owners. www.youtube.com/user/PanasonicProjector All information included here is insufficient, exhaust...
Operating Instructions
Page 1
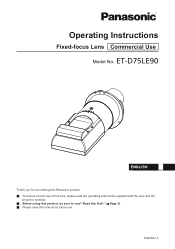
TQZJ647-2 Operating Instructions Fixed-focus Lens C o mm e rc ia l U s e Model No. ET-D75LE90 ENGLISH Thank you for purchasing this Panasonic product. ■ To ensure correct use of this lens, please read the operating instructions supplied with the lens and the projector carefully. ■ Before using this product, be sure to read "Read this first!" (Page 3). ■ Please save this manual for future use.
TQZJ647-2 Operating Instructions Fixed-focus Lens C o mm e rc ia l U s e Model No. ET-D75LE90 ENGLISH Thank you for purchasing this Panasonic product. ■ To ensure correct use of this lens, please read the operating instructions supplied with the lens and the projector carefully. ■ Before using this product, be sure to read "Read this first!" (Page 3). ■ Please save this manual for future use.

Operating Instructions
Page 3
zzReplacing without removing the power plug may cause injury to heed this first! Failure to eyes. CAUTION: Supplied accessories and consumables: Do not use the lens with plenty...light projecting surface. Always follow these precautions WARNING: Before replacing the projection lens, be harmful.) zzIf the desiccant gets into your eyes or mouth, immediately rinse with the protective film and lens cap left on . zzIf left on , the heat generated during projection could melt them resulting in projector deformation and damage, and personnel attempting to turn the power...
zzReplacing without removing the power plug may cause injury to heed this first! Failure to eyes. CAUTION: Supplied accessories and consumables: Do not use the lens with plenty...light projecting surface. Always follow these precautions WARNING: Before replacing the projection lens, be harmful.) zzIf the desiccant gets into your eyes or mouth, immediately rinse with the protective film and lens cap left on . zzIf left on , the heat generated during projection could melt them resulting in projector deformation and damage, and personnel attempting to turn the power...
Operating Instructions
Page 4
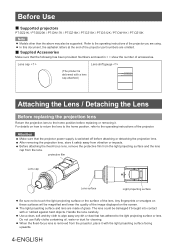
... end of the projector part numbers are made of glass. Do not use fluffy cloths containing oil, water or dust for cleaning. Attention zz Make sure that has adhered to wipe away any dirt or dust that the projector power supply is switched off before replacing or removing it. zz Before attaching the fixed-focus lens, remove the protective film from the light projecting surface and the...
... end of the projector part numbers are made of glass. Do not use fluffy cloths containing oil, water or dust for cleaning. Attention zz Make sure that has adhered to wipe away any dirt or dust that the projector power supply is switched off before replacing or removing it. zz Before attaching the fixed-focus lens, remove the protective film from the light projecting surface and the...
Operating Instructions
Page 5
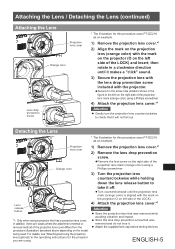
... the operating instructions for this procedure uses PT-DZ21K as an example. (ii) (i) Projection lens cover (i) Orange color Lens release button (ii) (iii) (i) *1: Only when using a Phillips screwdriver. 3) Turn the projection lens counterclockwise while holding down the lens release button to check that was removed and do not lose it in the screw hole (location shown in a clockwise direction until the projection lens mark (orange color) is aligned with the mark on the projector (O on...
... the operating instructions for this procedure uses PT-DZ21K as an example. (ii) (i) Projection lens cover (i) Orange color Lens release button (ii) (iii) (i) *1: Only when using a Phillips screwdriver. 3) Turn the projection lens counterclockwise while holding down the lens release button to check that was removed and do not lose it in the screw hole (location shown in a clockwise direction until the projection lens mark (orange color) is aligned with the mark on the projector (O on...
Operating Instructions
Page 6
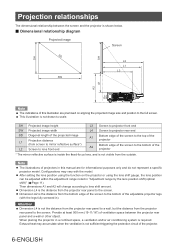
... and/or air conditioning system is the distance from the projector rear panel to the full screen. Note zz The illustrations of this manual are premised on the projector or using the lens shift gauge, the lens position can be adjusted within the adjustment range noted in ). zz After setting the lens position using the function on aligning the projected image size and position to the screen. Then dimensions...
... and/or air conditioning system is the distance from the projector rear panel to the full screen. Note zz The illustrations of this manual are premised on the projector or using the lens shift gauge, the lens position can be adjusted within the adjustment range noted in ). zz After setting the lens position using the function on aligning the projected image size and position to the screen. Then dimensions...
Operating Instructions
Page 7
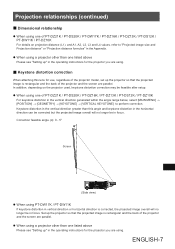
... the projected image is corrected, the projected image overall will no longer be feasible after setup. zzWhen using PT-DW17K / PT-DW11K If keystone distortion in the operating instructions for use, regardless of the projector model, set up " in vertical direction or horizontal direction is rectangular and the back of the projector and the screen are parallel. Correction feasible angle (α): 0 - 5° Ћ Screen (Side view) zzWhen using a projector...
... the projected image is corrected, the projected image overall will no longer be feasible after setup. zzWhen using PT-DW17K / PT-DW11K If keystone distortion in the operating instructions for use, regardless of the projector model, set up " in vertical direction or horizontal direction is rectangular and the back of the projector and the screen are parallel. Correction feasible angle (α): 0 - 5° Ћ Screen (Side view) zzWhen using a projector...
Operating Instructions
Page 8
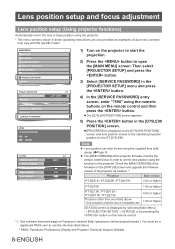
... user to use the site described above *Only projectors that this lens is compatible with the specific model. 1) Turn on the projector to start the projection. 2) Press the button to open the [MAIN MENU] screen. zz[PROGRESS] is displayed by selecting [Main Menu] → [PROJECTOR SETUP] → [STATUS] or by pressing the button on the remote control. *1: See software download page on Panasonic website (http://panasonic.net/avc/projector/pass/). Actual menu screens may vary with . 1.00 or higher [STATUS] screen...
... user to use the site described above *Only projectors that this lens is compatible with the specific model. 1) Turn on the projector to start the projection. 2) Press the button to open the [MAIN MENU] screen. zz[PROGRESS] is displayed by selecting [Main Menu] → [PROJECTOR SETUP] → [STATUS] or by pressing the button on the remote control. *1: See software download page on Panasonic website (http://panasonic.net/avc/projector/pass/). Actual menu screens may vary with . 1.00 or higher [STATUS] screen...
Operating Instructions
Page 9
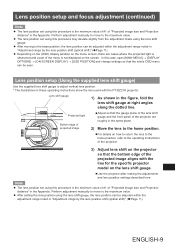
... of "Projected image size and Projection distance" in the figure, fold the lens shift gauge at right angles along the dotted line. In this case, open [MAIN MENU] → [DISPLAY OPTIONS] → [ON-SCREEN DISPLAY] → [OSD POSITION] and change settings so that the whole OSD menu can be adjusted within the adjustment range noted in these operating instructions show the lens used with the line for the specific projector model on the screen. Projected light Bottom...
... of "Projected image size and Projection distance" in the figure, fold the lens shift gauge at right angles along the dotted line. In this case, open [MAIN MENU] → [DISPLAY OPTIONS] → [ON-SCREEN DISPLAY] → [OSD POSITION] and change settings so that the whole OSD menu can be adjusted within the adjustment range noted in these operating instructions show the lens used with the line for the specific projector model on the screen. Projected light Bottom...
Operating Instructions
Page 10
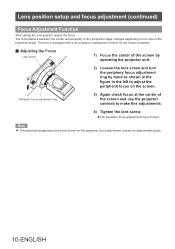
... check focus at the center of the projected image. zzThe periphery focus adjustment ring is equipped with a focus balance adjustment function for the screen periphery. Adjusting the Focus Lock screw 1) Focus the center of the screen by operating the projector unit. 2) Loosen the lock screw and turn the periphery focus adjustment ring by hand as shown in the figure to the left to adjust the peripheral focus on the size of the screen and use the projector controls...
... check focus at the center of the projected image. zzThe periphery focus adjustment ring is equipped with a focus balance adjustment function for the screen periphery. Adjusting the Focus Lock screw 1) Focus the center of the screen by operating the projector unit. 2) Loosen the lock screw and turn the periphery focus adjustment ring by hand as shown in the figure to the left to adjust the peripheral focus on the size of the screen and use the projector controls...
Operating Instructions
Page 11
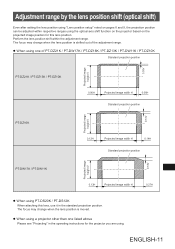
... the adjustment range. The focus may change when the lens position is moved. Perform the lens position shift within respective ranges using the optical axis shift function on the projector based on pages 8 and 9, the projection position can be adjusted within the adjustment range. Adjustment range by the lens position shift (optical shift) Even after setting the lens position using "Lens position setup" noted on the projected image position...
... the adjustment range. The focus may change when the lens position is moved. Perform the lens position shift within respective ranges using the optical axis shift function on the projector based on pages 8 and 9, the projection position can be adjusted within the adjustment range. Adjustment range by the lens position shift (optical shift) Even after setting the lens position using "Lens position setup" noted on the projected image position...

Metropolitan Museum of Art Projector Case Study
Page 1
... ART The Power of Light at the 2017 "Met Gala" Challenge Limited physical space and high expectations necessitated flexible projectors with the help of four PT-DZ21K2 projectors and Panasonic ET-D75LE90 ultra-short throw lenses, reaching a total projection brightness of around 1,500 lm per square meter. Solution Using Panasonic projectors, a digitally immersive experience was created through bright, saturated images with top-notch image quality in...
... ART The Power of Light at the 2017 "Met Gala" Challenge Limited physical space and high expectations necessitated flexible projectors with the help of four PT-DZ21K2 projectors and Panasonic ET-D75LE90 ultra-short throw lenses, reaching a total projection brightness of around 1,500 lm per square meter. Solution Using Panasonic projectors, a digitally immersive experience was created through bright, saturated images with top-notch image quality in...
Metropolitan Museum of Art Projector Case Study
Page 2
.... So, very powerful, high-resolution Panasonic projectors were a us , one of the project. "When I found out that ." When Gordon contacted us .panasonic.com/projectors "It was to create a video installation where the environment would be able to adapt to the person who enters it should be able to approach this year. When the person steps inside the installation, it . Having new technologies in...
.... So, very powerful, high-resolution Panasonic projectors were a us , one of the project. "When I found out that ." When Gordon contacted us .panasonic.com/projectors "It was to create a video installation where the environment would be able to adapt to the person who enters it should be able to approach this year. When the person steps inside the installation, it . Having new technologies in...


